background image


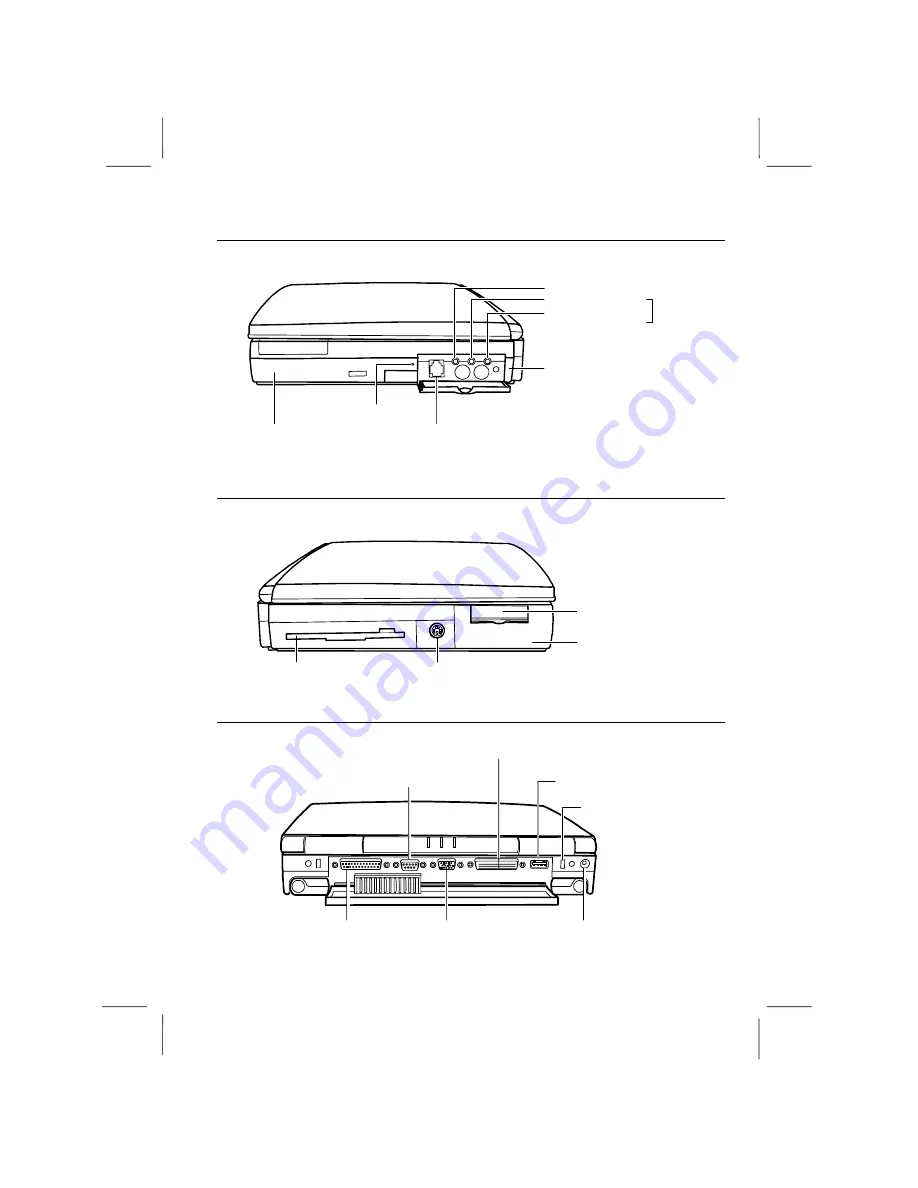
Right 


IR Port


5-1

Audio Output Jack
Audio Input Jack

External Microphone Jack 


4-7

Modem Jack 


5-4

(US & Canada only)

CD Tray Eject Hole 


T-3

CD-ROM Drive 


2-13


4-6


Left 


Keyboard/mouse Port 


4-4

Floppy Disk Drive 


2-10

Hard Disk Drive

PC Card Slots 


6-1


Rear 

USB Port 


4-8

Expansion Connector

RS-232C Serial Port 


4-5

Security Slot 


7-3

AC Adapter Jack


1-2

External Monitor Port


4-2

Parallel Port


4-3


xix


Содержание PC-9800T

Страница 1: ...ommunications However there is no guarantee that interference will not occur in a particular installation If this equipment does cause harmful interference to radio or television reception which can be determined by turning the equipment off and on the user is encouraged to try to correct the interference by one or more of the following measures Reorient or relocate the receiving antenna Increase ...

Страница 2: ...to the telephone line Excessive RENs on the telephone line may result in the devices not ringing in response to an incoming call In most but not all areas the sum of the RENs should not exceed five 5 0 To be certain of the number of devices that may be connected to the line as determined by the total RENs contact the telephone company to determine the maximum REN for the calling areas If the termi...

Страница 3: ... the telephone network the telephone company may request you remove the equipment from the network until the problem is resolved The equipment cannot be used on public coin service provided by the telephone company Connection to Party Line Service is subject to state tariffs Contact the state public utility commission public service commission or corporation commission for information iii ...

Страница 4: ...smission charges To program this information refer to the manual of the communication software CAUTION about CD ROM Drive Use of controls or adjustments or performance of procedures other than those specified herein may result in hazardous radiation exposure CAUTION about Battery Danger of explosion if battery is incorrectly replaced Replace only with the same or equivalent type recommended by the...

Страница 5: ...Mahwah NJ 07430 v ...

Страница 6: ...nector assembly telephone extension cord The customer should be aware that compliance with the above conditions may not prevent degradation of service in some situations Repairs to certified equipment should be made by an authorized Canadian maintenance facility designated by the supplier Any repairs or alterations made by the user to this equipment or equipment malfunctions may give the telecommu...

Страница 7: ...g the termination on a loop may consist of any combination of devise subject only to the requirement that the total of the Load Numbers of all the devices does not exceed 100 Product Information and Customer Assistance For Product Information and Customer Assistance Call 1 905 890 2100 Sharp Electronics of Canada Ltd 335 Britannia Road East Mississauga Ontario L4Z 1W9 Canada vii ...

Страница 8: ... incorrectly replaced Replace only with the same or equivalent type recommended by the manufacturer Do not dispose of large quantities of used Lithium batteries at the same time Copyright Copyright may exist in material you wish to record Copying or broadcasting such material without permission of the relevant licensees or owners of the copyright is prohibited by law SHARP is not in a position to ...

Страница 9: ...ed with the letter L or coloured red This apparatus must be protected by a 3A fuse in the mains plug or di ib i b d This apparatus is approved under approval number NS G 1234 J 100003 for indirect connection to the public telecommunication system in the United Kingdom Service Inquiries For customer and service support please refer to the documentation included with your notebook Copyright Recordin...

Страница 10: ...zigd door 93 68 EEG Dette udstyr overholder kravene i direktiv nr 89 336 EEC og 73 23 EEC med tillæg nr 93 68 EEC Quest apparecchio è conforme ai requisiti delle direttive 89 336 EEC e 73 23 EEC come emendata dalla direttiva 93 68 EEC Η εγκατασταση αυτη ανταποκρινεται στιζ απαιτησειζ των οδηγιων τηζ Ευρωπαïκηζ Ενωσηζ 89 336 EOK κατ 73 23 EOK óπωζ οι κανονισµοι αυτοι συµπληρωθηκαν απó την οδηγια 93...

Страница 11: ...EEC och 73 23 EEC så som komplette ras av 93 68 EEC Dette produktet oppfyller betingelsene i direktivene 89 336 EEC og 73 23 EEC i endringen 93 68 EEC Tämä laite täyttää direktiivien 89 336 EEC ja 73 23 EEC vaatimukset joita on muutettu direktiivillä 93 68 EEC xi ...

Страница 12: ...TERY VORSICHT UM DIE STROMZUFUHR VOLLSTÄNDIG ZU UNTERBRECHEN DEN NETZSTECKER HERAUSZIEHEN UND DIE BATTERIE ÈNTFERNEN ATTENTION POUR UN ARRET TOTAL DU SYSTEME DECONNECTEZ LA PRISE DE COURANT SECTEUR VARNING FÖR TOTAL ELEKTRISK URKOPPLING KOPPLA UR KONTAKTEN OCH TA UR BATTERIET PRECAUCION PARA UNA COMPLETA DESCONEXION ELECTRICA DESENCHUFE LA CLAVIJA DE LA RED Y LA BATERIA xii ...

Страница 13: ...nments Keep the notebook away from any magnetic devices and TVs Keep the notebook away from excessive humidity or fluids such as rain snow water spray juice coffee steam etc Do not move the notebook from a cold place to a warm place A temperature difference of more than 10 C 18 F will cause condensation inside the unit which may damage the data Do not block or cover slots or openings on the cabine...

Страница 14: ...pack in a fire as it could explode and cause injury Do not attempt to open or alter the battery pack Do not place the battery where it might get hotter than 60 C 140 F Do not allow metal objects such as jewelry to short across the battery terminals as it could heat up and explode The battery includes a circuit breaker to help protect against short circuiting However covering or pressing this break...

Страница 15: ...ent type recommended by the equipment manufacturer Discard used batteries according to manufacturer s instructions Attention Il y a danger d explosion s il y a remplacement incorrect de la batterie Remplacer uniquement avec une batterie du même type ou d un type équivalent recommandé par le constructeur Mettre au rebut les batteries usagées conformément aux instructions du fabricant Vorsicht Explo...

Страница 16: ...or terminals unless the telephone line has been disconnected at the network interface Use caution when installing or modifying telephone lines Avoid using the telephone function during a lightning storm There may be a remote risk of electric shock from lightning Do not use the telephone function to report a gas leak in the vicinity of the leak xvi ...

Страница 17: ...sons resulting from the use of this product and any of its functions such as stolen credit card numbers the loss of or alteration of stored data etc Edition 1st Edition May 1997 Copyright 1997 SHARP Corporation This document contains or refers to proprietary information which is protected by copyright All rights are reserved Copying or other reproduction of this document is prohibited without the ...

Страница 18: ...provided below Model Number Serial Number BIOS Version Number Date of purchase Dealer s Name Place of purchase Password The serial number is printed on a sticker located on the bottom of the notebook You will see the BIOS Version number on the middle line of the LCD screen when you turn on the notebook xviii ...

Страница 19: ...than one key are pressed simultaneously the key labels are separated by a plus sign Restart your notebook by pressing Ctrl Alt Delete When necessary important key combinations are shown in graphics Sample Entries are shown in upper cases of different typeface In the following case press the Enter key after you type the command C FORMAT A Enter Words Texts on Screen such as window titles or possibl...

Страница 20: ...Refer to Infrared Communication section in Chapter 5 xx ...

Страница 21: ...Switch 1 4 PC Card Slot Slide Door PC Card Slot Cover Latch PC Card Slot Cover Stereo Speakers GlidePoint 2 3 Keyboard 2 5 Microphone Status Indicators 2 1 LCD Screen 1 3 4 1 6 1 Indicator Panel CD ROM Hard Disk Floppy Disk Num Lock Caps Lock Scroll Lock Drive Drive Drive AC Power Battery Power Battery Charge xviii ...

Страница 22: ... 4 US Canada only CD Tray Eject Hole T 3 CD ROM Drive 2 13 4 6 Left Keyboard mouse Port 4 4 Floppy Disk Drive 2 10 Hard Disk Drive PC Card Slots 6 1 Rear USB Port 4 8 Expansion Connector RS 232C Serial Port 4 5 Security Slot 7 3 AC Adapter Jack 1 2 External Monitor Port 4 2 Parallel Port 4 3 xix ...

Страница 23: ...Bottom Right side bay lock latch 2 7 Ventilation Openings Do not cover Left side bay lock latch 2 8 Legs You can tilt the notebook by rotating its legs xx ...

Страница 24: ...ance of the Notebook xviii Chapter 1 Quick Setup Unpacking the Notebook 1 1 Connecting to AC Power 1 2 Opening the Notebook 1 3 Turning Power On 1 4 Setting up Windows 95 1 5 Setting Original Wallpaper 1 6 Shutting Down the System 1 7 Chapter 2 Basic Operations Choosing Power Source 2 1 Resetting the System 2 2 Operating GlidePoint 2 3 Using Keyboard 2 5 Installing Units into Bays 2 7 Using Floppy...

Страница 25: ...cation 5 1 Modem US and Canada only 5 4 Chapter 6 Hardware Expansion PC Cards 6 1 Memory Module 6 6 Chapter 7 Using the Passwords Passwords 7 1 Security Slot 7 3 Chapter 8 Setup Utility Running the Setup Utility 8 1 Appendixes Maintenance and Care A 1 Power On Self Test A 2 System Mapping A 3 Pin Assignment A 5 Specifications A 8 Troubleshooting Index xvii ...

Страница 26: ...Switch 1 4 PC Card Slot Slide Door PC Card Slot Cover Latch PC Card Slot Cover Stereo Speakers GlidePoint 2 3 Keyboard 2 5 Microphone Status Indicators 2 1 LCD Screen 1 3 4 1 6 1 Indicator Panel CD ROM Hard Disk Floppy Disk Num Lock Caps Lock Scroll Lock Drive Drive Drive AC Power Battery Power Battery Charge xviii ...

Страница 27: ... 4 US Canada only CD Tray Eject Hole T 3 CD ROM Drive 2 13 4 6 Left Keyboard mouse Port 4 4 Floppy Disk Drive 2 10 Hard Disk Drive PC Card Slots 6 1 Rear USB Port 4 8 Expansion Connector RS 232C Serial Port 4 5 Security Slot 7 3 AC Adapter Jack 1 2 External Monitor Port 4 2 Parallel Port 4 3 xix ...

Страница 28: ...Bottom Right side bay lock latch 2 7 Ventilation Openings Do not cover Left side bay lock latch 2 8 Legs You can tilt the notebook by rotating its legs xx ...

Страница 29: ...APTER 1 Quick Setup Your notebook is designed and pre configured for easy setup and use This chapter describes the steps to get your notebook up and running as quickly as possible Read this chapter first ...

Страница 30: ......

Страница 31: ...OM Setup Boot Disk USB Supplement Disk Introducing Microsoft Windows 95 Reinstallation Instructions TranXit Quick Reference Guide SuperVoice User s Guide only in US and Canada Sharp Import Export User s Guide not available in Germany Profilink Windows only in Germany Notice to Users Carefully inspect each component to make sure nothing is missing or damaged If any of these items is missing or dama...

Страница 32: ...e the notebook is turned off 2 Connect the notebook and the AC adapter with the adapter cable 3 Plug the AC cord into the AC adapter Always use the AC adapter included with the notebook Using other AC adapters may damage the notebook Always hold the AC cord by its plug when pulling off from the wall outlet 4 Plug the AC cord into a wall outlet To Wall Outlet Figure 1 1 Connecting to AC Power 1 2 Q...

Страница 33: ...o open your notebook 1 Slide the display lock latch until the screen cover releases and raise the cover 2 Tilt the cover to a comfortable viewing position Display Lock Latch Figure 1 2 Opening the Screen Cover Quick Setup 1 3 ...

Страница 34: ...h when the battery does not have enough power 2 Press the power switch Power Switch Figure 1 3 Turning Power On When you turn on the notebook the power indicator lights green the notebook goes through a self test to detect any problems and Windows 95 starts When using the notebook for the first time a dialog box called the Windows 95 Setup wizard appears to guide you through the Windows 95 setup F...

Страница 35: ...e as follows Gathering information Configuring your computer Restarting your computer To set up Windows 95 follow the instructions on the screen See also the manual of Windows 95 It takes approximately 20 minutes to complete the entire setup process Quick Setup 1 5 ...

Страница 36: ...the SHARP original wallpaper in the following procedure 1 Double click the Click me to set up SHARP Wallpaper icon at the upper right corner of the screen 2 When the message appears click OK The SHARP original wallpaper is displayed on the screen 1 6 Quick Setup ...

Страница 37: ...e it or not Do not turn off or reset the notebook while the hard disk or floppy disk drive indicator is lit Doing so may damage or even wipe out the data To protect the screen always close the screen cover while the notebook is off Before turning it back on wait at least 10 seconds after turning off the notebook Turning the power off and on in rapid succession can damage the notebook s electrical ...

Страница 38: ...CHAPTER 2 Basic Operations This chapter describes the basic operations you can perform on the notebook ...

Страница 39: ......

Страница 40: ...ing charged Blinking red Almost completely discharged The warning beep sounds For more information on Suspend to RAM see Chapter 3 Using the AC Adapter When connected to a wall outlet the AC adapter provides power for operation or charges the battery The AC input voltage can range from 100 to 250 volts so that you could use the notebook with the appropriate plug adapter The AC power cord included ...

Страница 41: ...m is locked up because of a software problem you can reset or reboot the system by pressing the Ctrl Alt Del keys simultaneously Press the Ctrl Alt Del keys again to restart the notebook Resetting may cause data loss Use the software reset only if the normal Windows 95 Shut Down does not work because of software malfunction Although resetting will not damage the system you may lose the data you ar...

Страница 42: ...ePoint Take a moment to become familiar with how the GlidePoint works Figure 2 1 The Integrated GlidePoint Place Your Fingertip Place your left or right hand next to the GlidePoint resting your wrist naturally in a relaxed manner Place your thumb or finger on the GlidePoint Move Your Fingertip The rectangular pad of the GlidePoint acts like a miniature duplicate of the display As you slide your fi...

Страница 43: ...On the second tap keep your finger in contact with the pad 4 Holding down the button move the pointer The object moves together with the pointer 5 Release the button when the object comes to the appropriate place Changing the Configuration You can change the configuration of the GlidePoint such as swapping left and right buttons changing the pointer size etc To adjust the configuration 1 From the ...

Страница 44: ...ort cut menu equivalent to the right clicking System Function Keys Your notebook provides system function keys When pressed in conjunction with the Fn key these keys set specific system parameters and are sometimes referred to as hot keys Decreases the sound volume Increases the sound volume Do not use the above system function keys while recording sound Switches the display output between the LCD...

Страница 45: ...st only for DSTN models Increases the LCD screen contrast only for DSTN models Turns on and off the battery low warning beep Turns on and off the screen backlighting Puts the notebook in suspend mode to RAM or to Disk according to the setup selection 2 6 Basic Operations ...

Страница 46: ...in the right side bay Right side Bay The right side bay is installed with the CD ROM drive when the notebook is shipped You can install the following units into the right side bay Battery pack Floppy disk drive To uninstall the unit in the right side bay 1 Turn off the notebook 2 Disconnect the AC adapter and all the peripheral devices 3 Turn the notebook upside down on a flat place 4 Slide the ba...

Страница 47: ... 2 Disconnect the AC adapter and all the peripheral devices 3 Turn the notebook upside down on a flat place 4 Slide the bay lock latch to the releasing position and gently draw the unit out The bay lock latch 2 1 Figure 2 3 Uninstalling the unit in the left side bay To install the unit in the left side bay 1 Make sure the notebook is turned off and upside down 2 Insert the unit into the bay with t...

Страница 48: ... 6 Double click System and select the Device Manager tab 7 Double click Floppy disk controllers 8 See whether an X mark is attached to Standard Floppy Disk Controller If the mark is not attached the settings are finished If the mark is attached go on to the next step 9 Double click Standard Floppy Disk Controller 10 Uncheck Disable in this hardware profile 11 Click OK then Yes After uninstalling t...

Страница 49: ...ppy disks on the built in speakers the magnets inside the speakers may destroy the data in the disks Never subject a disk to sudden shocks or extreme vibration Do not drop or bend it Do not place heavy objects on the disk Do not spill liquid onto the disk Inserting and Removing a Floppy Disk Inserting Hold the floppy disk with the arrow facing up and towards the drive Slide the disk into the drive...

Страница 50: ... the disk slightly Remove it and store it away properly Figure 2 5 Removing a Floppy Disk Formatting a Floppy Disk 1 Make sure the floppy disk is not write protected and insert it into the floppy disk drive 2 Double click My Computer on the desktop 3 Click 3 Floppy A From the File menu select Format 4 From the capacity drop down list select 1 44MB or 720KB 5 Click Start to start formatting When yo...

Страница 51: ...rograms Accessories System Tools Backup to start the backup operation For more information see the Windows 95 Help Backup method may differ depending on software in use Installing and Uninstalling Floppy Disk Drive The floppy disk drive is originally installed into the left side bay however you can install it into the right side bay See the previous section for the details 2 12 Basic Operations ...

Страница 52: ...e edges Fingerprints dirt or water on the CDs can cause noise or mistracking If a CD is dirty or does not play properly clean it with a soft dry cloth wiping straight out from the center along the radius Inserting a CD You can operate the CD ROM drive only when the notebook is on 1 Make sure the CD ROM drive indicator does not light on it is supposed to blink periodically 2 Press the eject button ...

Страница 53: ...formance of procedures other than those specified herein may result in hazardous radiation exposure Removing a CD 1 Make sure the CD ROM drive indicator does not light on 2 Press the eject button to open the CD tray slightly 3 Gently pull out the tray 4 Remove the CD from the tray 5 Gently push the CD tray back into the notebook When opening the CD tray if the CD is still spinning wait until it ha...

Страница 54: ...CHAPTER 3 Battery and Power Management This chapter explains how to manage the notebook s power effectively and use optional battery packs ...

Страница 55: ......

Страница 56: ...right or left side bay of your notebook as in the same way with other units See Chapter 2 Before installing or uninstalling the battery pack turn off your notebook If not the system may malfunction or the data may be lost Incorrect installation of the battery is dangerous Replace the battery only with Sharp s optional battery packs Discard used batteries according to the dealer s instructions The ...

Страница 57: ...s a pre caution under long hours of operation the battery charge indicator may light off and the notebook may stop charging the battery automatically when it gets too hot When the temperature is low again the system resumes charging the battery Checking the Battery Level 1 From the Start menu select Settings Control Panel 2 Double click Power and read the battery level Double clicking the battery ...

Страница 58: ...lso the section about the power management Maintaining the Battery Pack To keep the battery life long Sometimes initialize the battery pack especially when the difference between battery power remaining and the actual operating time is too large Turn off your notebook when not using Disposing of Battery Packs The capacity of a battery pack gradually decreases when used repeatedly though the deteri...

Страница 59: ...ny data through the keyboard or GlidePoint your system enters a power management mode depending on the duration of no operation You can set the period when the system switches to the next mode except entering the idle mode in the Setup Utility Full Power Mode ordinary operation About ten seconds later Idle Mode Standby Mode Suspend to RAM Mode Suspend to disk Mode If you have set each time to Disa...

Страница 60: ...standby mode press any key or touch the GlidePoint Suspend to RAM Mode In the Suspend to RAM the system stores the current status in the RAM and stops power supply to all but a few essential components The Suspend to RAM is helpful when you have to pause your computing but plan to resume working after a short interval Your notebook enters the Suspend to RAM if The specified time has passed without...

Страница 61: ... state as it was when entering the suspend mode If sufficient battery power does not remain your notebook will not resume from a suspend mode To resume it from a suspend mode connect the notebook to the wall outlet The RAM contents are preserved using the AC power supply or the battery If all power sources are disconnected while the system is in the Suspend to RAM the RAM contents will be lost Whe...

Страница 62: ...battery power however you have to connect the notebook to AC power first Suspend to Disk is useful when you want to turn off the notebook and reopen the same windows after turning it on 67MB of your hard disk space has been reserved as the suspend to disk partition when your notebook shipped from the factory This means you can safely suspend to disk if the notebook has 64MB of installed memory Whe...

Страница 63: ... period of Standby After below is shorter than that of Hard Disk Power Down After the value of the latter is not effective because the standby mode includes stopping the power supply to the hard disk Idle Mode Enables disables the idle mode Standby After Specifies the period after which the system enters the standby mode Auto Suspend to RAM After Specifies the period after which the system enters ...

Страница 64: ...t If you select Disabled the power management works even if the screen is slightly changed such as updating of the clock Resume on Time Defines whether the system resumes from the Suspend to RAM at the time defined in Resume Time Resume Time Specifies the time when the system resumes from the Suspend to RAM The fields in this item correspond to hours minutes and seconds respectively Resume On Mode...

Страница 65: ...selectively powers down system components that are not in use To adjust the Windows power management 1 From the Start menu select Settings Control Panel 2 Double click Power 3 In the Power Properties dialog box set each item 4 Click OK to close the dialog box When using communication software or if sound or voice pauses or skips while played back set the Windows power management to Off 3 10 Batter...

Страница 66: ...erals This chapter describes how to use peripheral devices of your notebook You can connect a printer external monitor external keyboard mouse or any other device to the parallel RS 232C serial or keyboard mouse ports ...

Страница 67: ......

Страница 68: ...the colors in the Color palette and select the resolution in Desktop area Refer to the table below 5 Click OK twice Resolutions and Colors you can choose Number of Colors Resolution LCD CRT Simultaneous display LCD CRT 640 x 480 256 65 536 16 770 000 256 65 536 16 770 000 256 65 536 16 770 000 800 x 600 256 65 536 16 770 000 256 65 536 16 770 000 256 65 536 1024 x 768 256 65 536 256 65 536 256 65 ...

Страница 69: ...uctions below to use a CRT monitor with the notebook 1 Turn off the notebook and the CRT monitor 2 Open the connector compartment cover on the rear side of the notebook 3 With a 15 pin monitor cable connect the CRT monitor to the external monitor port of your notebook If the connector has screws tighten them 4 Turn on the CRT monitor and the notebook 5 Switch the display with Fn F5 External Monito...

Страница 70: ...o use a printer you have to install the printer driver 1 Turn on the notebook and the printer 2 From the Start menu select Settings Printers 3 Double click Add Printer Add Printer Wizard appears 4 Click Next 5 Select the manufacturer and the printer and click Next If you cannot see the model name of your printer you have to install the printer driver attached to the printer See the printer manual ...

Страница 71: ...ect the cable from your mouse or keyboard to the keyboard mouse port on the left side Keyboard mouse Port Figure 4 3 Connecting an External Keyboard or PS 2 Mouse 3 Turn on the notebook Never connect or disconnect the devices to the keyboard mouse port when the notebook is powered on This may cause the notebook to operate improperly When connecting a mouse you cannot use the GlidePoint 4 4 Periphe...

Страница 72: ... When the message Press F2 to enter SETUP appears press F2 7 In the Advanced menu of the Setup Utility set the GlidePoint PS 2 Mouse to Disabled 8 Press Esc then Enter twice 9 From the Start menu select Settings Control Panel 10 Double click Mouse 11 Click the General Tab then Change 12 Select the manufacturer and model name and click OK then Close 13 Click Yes and the notebook restarts When the s...

Страница 73: ... the audio equipment Audio Equipment LINE IN R LINE IN L Red White Audio Output Jack Notebook Black To input audio signal from the audio equipment to the notebook Audio Equipment LINE OUT R LINE OUT L Red White Audio Input Jack Notebook Black Figure 4 5 Connecting Audio Equipment 3 Turn on the notebook When using the audio output jack you cannot use the built in speakers 4 6 Peripherals ...

Страница 74: ...e notebook 2 Connect the external microphone to the external microphone jack on the right side Figure 4 6 Connecting an External Microphone 3 Turn on the notebook When using an external microphone you cannot use the built in microphone Peripherals 4 7 ...

Страница 75: ...porting USB Connecting a USB supporting peripheral device 1 Turn on or restart the notebook 2 When the message Press F2 to enter SETUP appears press F2 3 In the Advanced menu enable USB Device 4 Press Esc then Enter twice 5 After the system starts open the connector compartment cover at the rear of the notebook 6 Connect the USB cable from the peripheral to the USB port USB Port Figure 4 7 Connect...

Страница 76: ...CHAPTER 5 Communication Functions This chapter explains how to use infrared communications and the built in modem ...

Страница 77: ......

Страница 78: ...the IR ports to less than 30 inches 80 cm When using a Sharp electronic organizer make sure the two IR ports are within 4 inches 10 cm apart Setting for Infrared Communication You have to set the following items in the Setup Utility 1 Turn on or restart your notebook 2 When the message Press F2 to enter SETUP appears press F2 3 In the Advanced menu set COM1 COM2 to MODEM IR RS 232 IR or Disabled I...

Страница 79: ...port for the application except TranXit is automatically set The physical port for TranXit is set when you install it Logical Port To use TranXit Zrlink or Import Export disable the logical port 1 From the Start menu select Settings Control Panel 2 Double click Infrared 3 Select Options 4 Uncheck Enabled infrared communication on 5 Click OK To use Zrlink or Import Export also set the port to COM4 ...

Страница 80: ...e Programs 3 Select Infrared Support for Window 95 Version X X 4 Click Add Remove then No 5 Select SHARP IR for Window 95 Version X X 6 Click Add Remove then OK then Yes to restart the notebook 7 The SHARP 4M Infra Red Port is detected Follow the instructions on the screen 8 Re install Infrared Support for Window 95 Version X X and SHARP IR for Window 95 Version X X Refer to Re installation Instru...

Страница 81: ...le to the telephone line 4 Turn on the notebook Modem Jack Figure 5 1 Connecting to telephone Line Connect the modem to the telephone line directly Do not use a distributor or allotter Setting the Modem in the Setup Utility To use communication software 1 Turn on your notebook 2 Press the F2 key when the message Press F2 to enter SETUP appears 3 On the Advanced menu of the Setup Utility set COM1 C...

Страница 82: ...wer management see Chapter 3 Using communications software Do not enter suspend mode while using communications software You have to set parameters such as modem speed baud rate and line type pulse dialing or tone dialing within the communications software you are using For details see the documentation or online help of the software Communication Functions 5 5 ...

Страница 83: ...CHAPTER 6 Hardware Expansion This chapter describes how to handle PC cards and increase memory of the notebook ...

Страница 84: ......

Страница 85: ...down the PC Card slot cover latch on the front side of your notebook open the PC card slot cover on the left side 2 Insert the card into the appropriate slot with the label face up until it locks into place You do not have to power off the notebook to handle PC cards when using Windows 95 The PC card eject button pops up Notch The labeled face up PC Card Slot Cover PC Card Slot Cover Latch Figure ...

Страница 86: ...eject 4 Click Stop 5 When the message prompting you to eject the card click OK 6 Release the latch and open the PC card slot cover 7 Raise up the eject button and push it in The PC card will be pushed out slightly 8 Remove the card and close the slot cover Installing the PC Card Driver When you insert a PC card into the notebook the driver for the PC card will usually be installed automatically If...

Страница 87: ...ws emm386 exe NOEMS X D000 D7FF If you do not find the above line just add DOS HIGH 5 From the File menu select Save 6 Close Notepad 7 Restart the system 8 Insert the Backup CD ROM in the CD ROM drive 9 From the Start menu select Run 10 In the field of Open type R PCCARD95 SETUP EXE and press Enter The message appears 11 Follow the instructions of the installation program 12 To the question on rea...

Страница 88: ...MM386 EXE rem SystemSoft CardWorks TM PCMCIA drivers device C CARDWORK CARDXTND SYS device C CARDWORK SSCBCI SYS NUMADA 1 ADA1SKTS 2 device C CARDWORK CS SYS POLL 1 device C CARDWORK CSALLOC EXE device C CARDWORK CARDID SYS 5 From the File menu select Save 6 Close Notepad 7 From the Start menu select Settings TaskBar 8 Select the Start Menu Programs tab 9 Click Remove 10 Select CardWorks then Remo...

Страница 89: ...k Next 4 In the next window make sure No is selected and click Next again 5 Click Finish 6 Click Yes The system automatically shuts down 7 Turn on the notebook again 8 From the Start menu select Settings Control Panel 9 Double click the System icon 10 Select the Device Manager tab 11 Double click PCMCIA socket and make sure two Cirrus Logic PD6832 CardBus Controllers are displayed without X marks ...

Страница 90: ...ching an unpainted metal area Avoid touching the integrated circuits on a memory module Handle all components by the edges Keep the memory module in the anti static wrapping until you are ready to install it Follow the steps below to install a memory module 1 Turn off the notebook and disconnect the AC adapter and peripheral devices 2 Turn over the notebook and place it on a flat surface 3 Slide t...

Страница 91: ...ompartment Cover 7 Raise the tape attached on the memory module board until it snaps up and gently draw out the module board Tape Figure 6 4 Removing the Memory Board 8 Inclining the memory module match its notched part with the board and push down the memory module on both ends Notched part Figure 6 5 Attaching the Memory Module on the Memory Board Hardware Expansion 6 7 ...

Страница 92: ...ector Figure 6 6 Inserting the Memory Module Two lines Connector part Figure 6 7 Connector Part and Two Lines 10 Insert the connector of the memory board into the female connector of the notebook 11 Replace the cover and refit the screw you have removed in the step 4 12 Insert the right side bay unit 6 8 Hardware Expansion ...

Страница 93: ...CHAPTER 7 Using Passwords This chapter describes how to set up security to limit access to the notebook ...

Страница 94: ......

Страница 95: ...write it down and protect it in a secure place Otherwise you will have to contact your dealer for assistance If you input the wrong password three consecutive times the message SYSTEM DISABLED appears Turn off the notebook turn on again and input the correct password Setting the Supervisor Password You can set the password in the Security menu of the Setup Utility 1 Turn on the notebook 2 When Pre...

Страница 96: ...ser password and press Enter The password can be up to seven characters 4 Type the same password for confirmation and press Enter 5 Press Enter again The user password is enabled Deleting a Password 1 Open the Security menu of the Setup Utility as in the above 2 Select Set Supervisor Password or Set User Password then press Enter 3 Do not enter password but press Enter three times The password is ...

Страница 97: ...7 Security Slot You can prevent theft by using a security cable and the security slot on the rear side of your notebook Figure 7 2 Security Slot Using Passwords 7 3 ...

Страница 98: ...CHAPTER 8 Setup Utility This chapter describes how to run the Setup Utility to change settings on your notebook ...

Страница 99: ......

Страница 100: ... Basic system configuration time date disk drive and memory settings Advanced Device interface configuration I O ports sound settings Security Password settings Power Power management battery saving settings Exit Exit the Setup Utility Entering and Exiting the Setup Utility 1 Turn on the notebook 2 When Press F2 to enter SETUP appears press F2 to display the Setup Utility screen 3 Change the desir...

Страница 101: ... or changes to the next value of an item Decreases the numeric value or changes to the previous value of an item If you use the German keyboard use the Fn P keys instead Enters the Exit menu Replaces the settings on the current menu with their default values date and time are not changed Restores all the values you previously saved date and time are not changed Displays online help for the Setup U...

Страница 102: ...ress Enter to move the cursor You can also change the system time in the Windows Control Panel System Date Defines the system date using the format month day year Press Enter to move the cursor You can also change the system date from the Windows Control Panel Diskette A Specifies the floppy disk type It should usually be 1 44MB 3 IDE Adapter 0 1 Master Slave Specifies the hard disk type built in ...

Страница 103: ...r is not connected to the notebook the LCD screen works when the system starts Whichever mode you have selected here you can change the display with the Fn F5 keys after the system starts Large Disk Access Mode Normally has to be as default DOS If installing other operating system such as UNIX you may have to change the value to Other System Memory Defines the size of conventional memory for start...

Страница 104: ...Specifies the mode of the printer port among Output Only Bi Directional EPP and ECP If you set ECP as LPT Extended Mode you cannot use IrDA1 1 in the IR Mode SaveToDisk Warning Message Defines whether the warning message appears after the system restarts if there is no suspend to disk partition in the hard disk Plug Play O S Defines whether the operating system has plug play function Since Windows...

Страница 105: ...d when you connect an external keyboard GlidePoint PS 2 Mouse Defines whether you can use GlidePoint and a PS 2 mouse While you connect a PS 2 mouse the GlidePoint is automatically disabled To use a serial mouse set this item to Disabled Hot Key Beep Turns on off the sound when you press a hot key USB Device Enables disable the USB port 8 6 Setup Utility ...

Страница 106: ...red If Password on boot is enabled and if this item is enabled you have to input the user password when the system boots Set Supervisor Password Defines the supervisor password Set User Password Defines the user password In some settings of the password you cannot select some items You cannot set the user password unless setting the supervisor password If you lose your password you will be unable ...

Страница 107: ...tting the supervisor password always enable this item Otherwise you cannot operate the system as supervisor Diskette access Specifies who can access the floppy disk drive If the value of this item is Supervisor only the supervisor can access the floppy disk drive if it is User anyone can access the FDD BootSector Virus Protection Limits the writing into the boot sector of the hard disk to protect ...

Страница 108: ...um Battery Life the values which limit the battery consumption most are automatically selected Hard Disk Power Down After Defines a period of non access to the hard disk after which the power supply for the hard disk stops automatically Idle Mode Enables or disables the idle mode Your notebook enters the idle mode if you do not use the keyboard GlidePoint the mouse the hard disk or the serial port...

Страница 109: ...end the system enters the suspend mode Battery Low Warning Beep Defines whether to make a warning sound if the battery power is low VGA Activity Defines whether the power management works when the screen image has not been changed for the specified time If you set this item to Enabled the power management does not work when the screen gets even a small change such as the clock proceeding If you se...

Страница 110: ...its the Setup Utility Discard Changes Exit Exits the Setup Utility without saving the settings you have changed Get Default Values Returns the values of all items to the default To exit select one of the above items Load Previous Values Returns the values of all items to the value you have saved last time Save Changes Saves the settings you have changed Setup Utility 8 11 ...

Страница 111: ...Troubleshooting This chapter describes how to troubleshoot notebook problems ...

Страница 112: ......

Страница 113: ... messages If you encounter a software error try to determine if the error message is from your operating system or from an application program and refer to the appropriate manual for possible remedies You can also refer to the Windows 95 manual or Windows Help program to solve the problem To access the Help program select Help from the Start menu It also gives you Troubleshooting tips and an Index...

Страница 114: ...T 2 Troubleshooting Troubleshooting ...

Страница 115: ...mmercially to check the notebook If you need to re initialize your hard disk refer to the Re installation Instructions It is strongly recommended to backup your data before you proceed the re installation Question Why is the screen blank Press the Spacebar to see if any power management feature has blanked the screen to save power See the AC power indicator to check whether the notebook is powered...

Страница 116: ... do the software reset turn the notebook off wait more than ten seconds and turn the notebook back on Question Why is the battery discharged so quickly Initialize the battery pack T 4 Troubleshooting Troubleshooting ...

Страница 117: ...protect tab covers the detection hole If you cannot write to a floppy disk the disk may be full Use another disk Check whether the item of Diskette A in the Main menu of the Setup Utility is set to 1 44MB 3 1 2 Check whether the item of Diskette access in the Security Menu is not set to Supervisor Question Why can I not read data from a compact disc Confirm the CD is inserted correctly Confirm the...

Страница 118: ...Question Why is the date and or time incorrect Correct the date and time using the Windows Control Panel or the Setup Utility If the date and time are still incorrect when you reboot contact your dealer to change the CMOS backup battery on the system board Question Why do expansion or peripheral devices not function Confirm they are correctly connected to your notebook T 6 Troubleshooting Troubles...

Страница 119: ...ses COM4 disable the COM2 port Question Why can I not record sound Check the Volume in the Multimedia Properties dialog box Confirm the Preferred device for Playback and Recording are identified in the Multimedia Properties dialog box Question Why can I not produce sound Troubleshooting T 7 Troubleshooting Confirm the sound driver is installed From the Windows Control Panel click System Device Man...

Страница 120: ...ur notebook Confirm the application program is compliant with the RS 232C standard interface Confirm COM1 or COM2 is set to RS 232 in the Advanced menu of the Setup Utility Question Why does the GlidePoint not function correctly Confirm the surface of the GlidePoint is not wet Confirm the item of the GlidePoint in the Advanced menu of the Setup Utility is Enabled T 8 Troubleshooting Troubleshootin...

Страница 121: ...power management both in the Windows and the Setup Utility Select the IrDA mode in the IR Type Question Why can I not communicate through the built in modem U S and Canada only Confirm the telephone line is properly connected to the modem jack Confirm the COM1 is set to Modem in the Advanced menu of the Setup Utility Turn off the power management both in the Windows and the Setup Utility Question ...

Страница 122: ...the Autotyping message appear when I start the notebook You may have installed or uninstalled the floppy disk drive without changing the settings To change the setteings see page 2 9 T 10 Troubleshooting Troubleshooting ...

Страница 123: ...s of the display 4 1 communications software 5 3 5 5 CRT monitor 4 2 T 5 D date T 4 display 4 1 lock latch 1 3 E expansion connector xix external microphone 4 7 jack xix external monitor port xix 4 2 A 6 F floppy disk 2 9 2 10 T 3 floppy disk drive xix indicator xviii installing 2 9 uninstalling 2 9 G GlidePoint xviii 2 3 T 2 T 6 changing the configuration 2 4 H hard disk T 3 hard disk drive xix i...

Страница 124: ...S 232C serial port xix 4 5 A 6 T 5 S screen T 2 backlighting 2 6 cover 1 3 scroll lock indicator xviii security menu of setup utility 8 7 security slot xix 7 3 serial mouse 4 5 setup utility 8 1 advanced menu 8 5 exit menu 8 11 main menu 8 3 power menu 8 9 security menu 8 7 short cut menu 2 5 shutting down the system 1 7 simultaneous display 4 1 sound T 5 volume 2 5 specifications A 8 standby mode...

Страница 125: ...V ventilation openings xx W warm boot 2 2 Windows T 2 logo keys 2 5 power management 3 10 setting up 1 5 Start menu 2 5 Z ZV port compliant card 6 3 Index 3 ...

Отзывы: