background image


29

Watching TV

You can select one of the following settings.

Search

 (See this page.)

Fine

 (See this page.)

Colour sys.

 (See this page.)

Sound sys.

 (See page 30.)

Label

 (See page 30.)

Skip

 (See page 30.)

Lock

 (See page 30.)

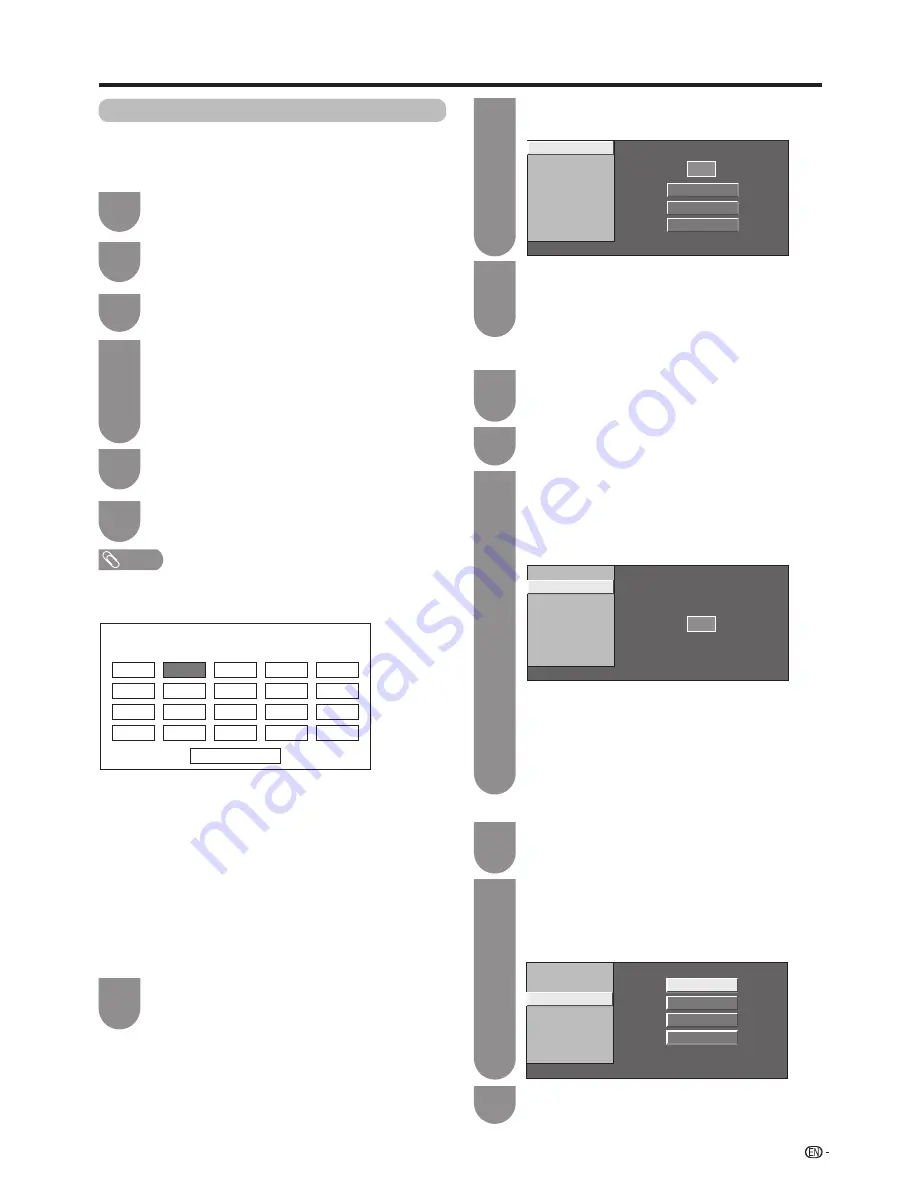
Manual setting for each channel (Analogue)

You can set some channel items manually. They are 

Search, Fine (TV frequency), Colour sys., Sound sys., 

Label, Skip and Lock (Child Lock).

Press 

MENU 

and the MENU screen displays.

The “Programme setup” screen displays, and 

then press 

ENTER

. If you have already set the 

password, enter it here.

•  See page 35 for setting a password.

The “Analogue setting” screen displays, and 

then press 

ENTER

.

Press 

c

/

d

 to select “Yes”, and then press 

ENTER

.

Press 

a

/

b

 to select “Manual Adjust”, and 

then press 

ENTER

.

Programme Setup “Manual Adjust” menu

Next

01

06

11

16

07

12

17

08

13

18

02

03

09

14

19

04

10

15

20

05

1

4

5

6

Press 

b

/

c

/

d

 to select “View setting”

.

Press 

a

/

b

 to select “Channel settings” and 

then press 

ENTER

.

2

3

Search tuning

Press 

a

/

b

/

c

/

d

 to select the channel you 

want to edit, and then press 

ENTER

.

•  The selected channel information displays.

Press 

a

/

b

 to select “Search”, and then press 

ENTER

.

1

2

Fine 

Colour sys.

Next

48.25 MHz

Store

Cancel

Sound sys.

Label 

Skip 

Lock 

Search 

[48.25]

[PAL]

[ I ]

[Off] 

[ ]

[Off] 

Press 

a

/

b

 to select item and press 

ENTER

.

• 

Next

: Search the next channel.

• 

Store

: Memorise the current display channel.

• 

Cancel

: Return to the previous screen. (The search result 

will not be stored.)

3

Fine tuning

Press 

a

/

b

/

c

/

d

 to select the channel you 

want to edit, and then press 

ENTER

.

•  The selected channel information displays.

1

Press 

a

/

b

 to select “Fine”, and then press 

ENTER

.

2

Use 

0

 - 

9

 to directly enter the frequency 

number of the channel, and then press 

RETURN

 or 

MENU

.

•  Adjust while checking the background picture as a 

reference.

3

Fine 

Colour sys.

48.25 MHz

Sound sys.

Label 

Skip 

Lock 

Search 

[48.25]

[PAL]

[ I ]

[Off] 

[ ]

[Off] 

•  When setting a frequency on the “Fine” screen, the last 

figure of the frequency needs to be “0” or “5”.

a

•  179.25 MHz: Press 

1


s


7


s


9


s


2


s


5


s


ENTER

.

•  49.25 MHz: Press 

4


s


9


s


2


s


5


ENTER

.

Press 

a

/

b

 to select the optimum colour 

system, and then press 

ENTER

.

3

Fine 

Colour sys.

SECAM

PAL

Auto

NTSC3.58

Sound sys.

Label 

Skip 

Lock 

Search 

[48.25]

[Auto]

[ I ]

[Off] 

[ ]

[Off] 

Colour system

Press 

a

/

b

/

c

/

d

 to select the channel you 

want to edit, and then press 

ENTER

.

•  The selected channel information displays.

1

Press 

a

/

b

 to select “Colour sys.” and then 

press 

ENTER

.

•  Receivable colour systems are listed.

2

Colour system menu

NOTE

•  “Analogue setting” is available only in the A-TV mode.

Содержание LC60LX849H

Страница 1: ...18 Before turning on the power 19 Connecting external devices 20 Connecting an AV amplifier 21 Connecting a USB hard disk drive HDD 21 Using digital audio output 21 Connecting to the Network 21 Inserting the batteries 22 Using the remote control unit 22 Cautions regarding the remote control unit 22 Turning the TV on off 23 Turning on off the power 23 Standby mode 23 Initial auto installation 23 Su...

Страница 2: ...e size manually 39 Selecting a preset AV mode 40 Manual picture settings 41 Picture adjustment 41 Advanced picture settings 41 Other picture settings 43 Adjusting the image position 43 Game play time 43 Wallpaper setting 44 Boot picture 44 Indicating time on the screen 45 Audio adjustment 46 Automatic volume adjustment 46 Clear voice 46 Wall mount audio setup 47 Digital audio output 47 Headphone A...

Страница 3: ...5 Connecting an AQUOS BD player via the AQUOS LINK compatible audio system 65 Connecting an AQUOS BD player only 65 Regarding Select recording device 65 AQUOS LINK setup 65 AQUOS LINK control 65 AQUOS LINK auto power on 65 Selecting recorder 66 Selecting channel key 66 Audio return channel ARC 66 Operating an AQUOS LINK device 67 Recorder power on off 67 Playback of titles using AQUOS LINK 67 Setu...

Страница 4: ...88 Video mode 88 DivX setup 90 List of file formats compatible with USB mode 90 Connecting a home network server 91 Playing back files on a home network server 92 Photo mode 92 Music mode 93 Video mode 93 List of file formats compatible with home network mode 93 Selecting the picture size for video mode in USB and home network mode 93 Playing back files from a portable device or PC 94 Easy share s...

Страница 5: ...omes into contact with some substances Therefore keep it away from volatile substances such as insecticide In addition do not let it come into contact with objects made of rubber resin etc for a long time Maintenance of the LCD panel Before cleaning the LCD panel be sure to turn off the TV set and unplug the power cord from the outlet When cleaning the LCD panel use a dry and soft cloth made of co...

Страница 6: ...nerating products including amplifiers To prevent fire never place any type of candle or naked flames on the top or near the TV set To prevent fire or shock hazard do not place the AC power cord under the TV set or other heavy items Do not place heavy objects on this product or stand on it Doing so could cause injury if the product overturns Take special care near children and pets The LCD panel i...

Страница 7: ... the 3D glasses The 3D glasses vision should be limited Security advisory establishes a maximum of 3 hours visualization and in any case no more than one show length break included Use only the 3D glasses recommended for this TV Use the 3D glasses only for the specified purpose Do not move around while wearing the 3D glasses The surrounding area appears dark which may result in falling or other ac...

Страница 8: ... tools to convert your files into DivX videos ABOUT DIVX VIDEO ON DEMAND This DivX Certified device must be registered in order to play purchased DivX Video on Demand VOD movies To obtain your registration code locate the DivX VOD section in your device setup menu Go to vod divx com for more information on how to complete your registration Manufactured under license from DTS BVI Limited and its af...

Страница 9: ...ided ALL THIRD PARTY CONTENT OR SERVICES ACCESSIBLE VIA THIS DEVICE IS PROVIDED TO YOU ON AN AS IS AND AS AVAILABLE BASIS AND SHARP AND ITS AFFILIATES MAKE NO WARRANTY OR REPRESENTATION OF ANY KIND TO YOU EITHER EXPRESS OR IMPLIED INCLUDING WITHOUT LIMITATION ANY WARRANTIES OF MERCHANTABILITY NON INFRINGEMENT FITNESS FOR A PARTICULAR PURPOSE OR ANY WARRANTIES OF SUITABILITY AVAILABILITY ACCURACY C...

Страница 10: ...wing accessories are provided with the product Remote control unit AAA size alkaline battery g2 3D glasses accessories g2 Used with batteries inserted Page 18 Page 22 Stand unit Page 12 Page 13 Safety restraint Wireless LAN USB adapter Page 14 Page 76 Operation manual 3D Glasses 2 Button Battery CR2025 2 Already installed in 3D glasses Page 55 LC 60LX650H LC 60LX650H ...

Страница 11: ...onal optional accessories may be available in the near future When purchasing please read the newest catalogue for compatibility and check the availability Part name Part number Note 3D glasses AN 3DG30 Rechargeable NOTE The optional glasses are different from the supplied ones Please refer to the operation manual of the option for the operation details ...

Страница 12: ...nd tighten the screws with the other hand TOP L TOP R FRONT 1 FRONT TOP L Insert the base into the slot on the bottom of the TV while holding the base to avoid it falling over Insert the four screws into the four holes on the back of the TV and tighten them Step 1 below is only applicable to LC 52LX650H 1 Insert the supporting post into the foam block TOP L as shown in the figure below 2 As illust...

Страница 13: ...apped between the TV bottom and the floor Insert the base into the slot on the bottom of the TV while holding the base to avoid it falling over Insert the four screws into the four holes on the back of the TV and tighten them 1 Insert the supporting post into the foam blocks TOP MIDDLE as shown in the figure below 2 As illustrated in the following figure attach the supporting post onto the stand 3...

Страница 14: ...ilable screws in the holes of the restraining bracket and tighten the screws to secure the TV to the table Use commercially available screws of the proper size to firmly secure the TV 2 3 Anchoring the TV to the wall or a pillar Fixing the TV to the table CAUTION As this product is heavy use a table that is wide enough to support the product and capable of withstanding the product s weight The tab...

Страница 15: ...equires special skills that should only be performed by qualified service personnel Customers should not attempt to do the work themselves SHARP bears no responsibility for improper mounting or mounting that results in accident or injury Using a SHARP recommended bracket to mount the TV You can ask a qualified service professional about using a SHARP recommended bracket to mount the TV to the wall...

Страница 16: ...e illustrations used throughout this operation manual are based on LC 46LX650H TV Front Side 6 7 8 9 0 1 POWER On Off button 2 MENU button 3 TV VIDEO button 4 CH r s Channel up down buttons 5 VOL k l Volume up down buttons 6 Remote control sensor 7 OPC sensor 8 POWER indicator 9 REC indicator 0 Infrared emitter OPC Optical Picture Control See page 41 for details 1 2 3 4 5 ...

Страница 17: ...isplay when headphones are plugged in 30 Headphone AUDIO R L terminal HDMI 3 terminal DIGITAL AUDIO OUTPUT terminal HDMI 1 terminal ARC 1 HDMI 4 MHL terminal 2 HDMI 2 PC AUDIO INPUT R L terminal 3 PC terminal USB 1 terminal USB 2 terminal 1 Audio Return Channel ARC See page 66 2 Mobile High Definition Link MHL can also be used See page 69 3 The HDMI 2 PC AUDIO INPUT L R terminal share the same aud...

Страница 18: ...ages 39 71 and 93 15 CONTROL Display a panel to operate some functions on the screen See pages 82 89 and 93 16 MPX Select the sound multiplex mode See page 34 17 TV VIDEO INPUT SOURCE Select an input source A TV D TV HDMI1 HDMI2 HDMI3 HDMI4 INPUT5 INPUT6 INPUT7 PC USB media Home network See pages 20 61 to 62 and 85 18 HOME Display the HOME screen for enjoying Internet connection and Home network f...

Страница 19: ...nding 4 Plug the AC cord in to the AC outlet Place the TV close to the AC outlet and keep the power plug within reach Disconnect the AC cord from the AC outlet if the TV will not be used for a long period of time TV rear view Connecting the antenna cable To enjoy a clearer picture use an outdoor antenna The following is a brief explanation of the types of connections that are used for coaxial cabl...

Страница 20: ...ke a VCR game console camcorder DVD player Digital TV Set Top Box STB and PC To view external source images select the input source from TV VIDEO on the remote control unit or TV VIDEO on the TV When using component cable commercially available When using composite cable commercially available Audio R Red Audio L White Video Yellow L AUDIO R Y PB CB PR CR INPUT 5 INPUT 6 INPUT 7 PR Red PB Blue Y G...

Страница 21: ... STB HDMI certified cable commercially available NOTE If the image is not in sync with the audio check the settings of the connected surround system Letting the TV output the audio to an AV amplifier When you connect ARC compatible equipment use the HDMI1 terminal If the equipment to be connected is not compatible with the ARC connect an optical fibre cable When using RGB cable commercially availa...

Страница 22: ... to the e and f indications in the battery compartment 2 Insert the two supplied AAA size alkaline batteries 3 Close the battery cover Use the remote control unit by pointing it towards the remote sensor window Objects between the remote control unit and sensor window may prevent proper operation Cautions regarding the remote control unit Do not subject the remote control unit to shock In addition...

Страница 23: ...elect the desired language and then press ENTER 2 Press c d to select HOME or STORE and then press ENTER 3 HOME STANDARD will be the default value for the AV mode setting STORE DYNAMIC Fixed will be the default value for the AV mode setting If the AV mode is changed the TV will automatically switch back to DYNAMIC Fixed when there is no further change to TV setting for 10 minutes When selecting ST...

Страница 24: ...PG INFO TEXT MENU Preparation Press MENU and the MENU screen displays 1 Checking signal strength and channel strength If you install a D TV antenna for the first time or relocate it you should adjust the alignment of the antenna to receive a good reception while checking the antenna setup screen Press a b to select Antenna setup DIGITAL and then press ENTER 4 w Checking signal strength Press a b t...

Страница 25: ...or the settings is called Menu The Menu can be operated with the remote control unit Press MENU and the MENU screen displays 1 About guide display The operations differ depending on the functions and menu items Refer to the guide display for the key buttons Press a b c d to select the desired menu item Press ENTER to proceed if necessary 2 Press EXIT or MENU to exit the MENU Press RETURN as necess...

Страница 26: ...Analogue Search and then press ENTER You do not need to do anything during the auto search Press c d to select Yes and then press ENTER 5 Watching TV Setting channels automatically You can run auto installation again even after setting up the preset channels Press b c d to select View setting 2 Setup CH list Menu View setting Back Enter Select Network setup Auto installation Channel settings HOME ...

Страница 27: ... e g channel 12 Press 1 followed by 2 To select a 3 digit channel e g channel 123 Press 1 followed by 2 and 3 Watching TV HOME MPX MENU RETURN EPG INFO TEXT HOME MPX MENU RETURN EPG INFO TEXT 30 Changing the volume You can change the volume on the TV or on the remote control unit To increase the volume press VOL e To decrease the volume press VOL f NOTE TV A TV D TV HDMI1 ARC HDMI2 HDMI3 HDMI4 INP...

Страница 28: ...various settings for each service using the Colour R G Y buttons Press MENU and the MENU screen displays Press c d to select Yes and then press ENTER 1 6 Press a b to select the desired menu item and then press ENTER 5 Buttons for Manual Adjust operation Menu items Remote control buttons Description Lock R When the service is locked you must enter your password whenever you tune to the service CH ...

Страница 29: ...48 25 MHz Store Cancel Sound sys Label Skip Lock Search 48 25 PAL I Off Off Press a b to select item and press ENTER Next Search the next channel Store Memorise the current display channel Cancel Return to the previous screen The search result will not be stored 3 Fine tuning Press a b c d to select the channel you want to edit and then press ENTER The selected channel information displays 1 Press...

Страница 30: ...rmation will be displayed 1 Press a b to select Skip and then press ENTER Skip menu displays 2 NOTE Check the sound system if the sound output were not correct NOTE The name can be 5 characters or less Select Done to set the channel name w Using Software keyboard The software keyboard appears when you need to input text Char Set Cursor Left Cursor Right Caps Char Set 123 abc Caps a b c d e f g h i...

Страница 31: ...ER 3 Press b c d to select View setting 2 Press a b to select Channel settings and then press ENTER 3 The Programme setup screen displays and then press ENTER If you have already set the password enter it here See page 35 for setting a password The Analogue setting screen displays and then press ENTER The Programme setup screen displays and then press ENTER If you have already set the password ent...

Страница 32: ...ed channel Press A to toggle between the currently selected input source and the previously selected one Outputting only audio When listening to music from a music programme you can set the display off and enjoy audio only Press MENU and the MENU screen displays 1 Press a b to select Audio only and then press ENTER 3 Press a b to select On and then press ENTER 4 NOTE When you make operations that ...

Страница 33: ...or hearing impaired 1st language 2nd language Off Set For hearing impaired to No 1st language 2nd language For hearing impaired Off w Selecting the Language Switching subtitle languages Each time you press Subtitle on the remote control the subtitle switches when the broadcast contains subtitle information Press MENU and the MENU screen displays 5 Press a b to select Subtitle and then press ENTER ...

Страница 34: ...ode switches between STEREO and MONO When receiving a monaural signal When you press MPX MONO displays When receiving a bilingual signal Each time you press MPX the mode switches among CH A CH B and CH AB Stereo mode Bilingual mode Monaural mode Stereo mode Bilingual mode Monaural mode Switching the digital audio format If multi sound modes are received each time you press MPX the mode switches as...

Страница 35: ... Setting Password You can change or clear Password Enter your new password Use 4 digits Enter the password again to confirm Enter the 4 digit number as a password using 0 9 7 NOTE As a precautionary measure make a note of your password on page 102 cut it out and keep it in a safe place that children cannot reach This function is only available for TV input mode To relock a channel which has been t...

Страница 36: ...ton control lock at the same time w Cancelling the lock To cancel RC control lock follow the below steps using the TV control panel buttons on the TV Selected item Description None Cancel the blocking Age 4 18 years Select desired age to block Example If age 14 is selected programmes rated for ages of 15 or more are blocked NOTE The Programme title display function is only available for the D TV m...

Страница 37: ... Remain 2 hr 00 min NOTE When the time has been set countdown automatically starts Five minutes before the preset of time expires the remaining time displays each minute Select Off by pressing SLEEP to cancel the sleep timer Press SLEEP Remaining time displays when sleep timer has been set Each time you press SLEEP the remaining time switches as shown below 0 hr 30 min 1 hr 00 min 1 hr 30 min 2 hr...

Страница 38: ...Auto wide 3 Press c d to select On or Off 4 NOTE Auto wide is only available in D TV mode The channel switching speed may be slower when Auto wide is turned on Try to set WIDE mode if an image does not switch to the correct screen format When the broadcast signal contains no aspect ratio information the function will not work even if enabled This function is available for 3D images converted from ...

Страница 39: ...displays on the screen As you toggle down the options each mode is immediately reflected on the TV 2 4 3 Mode set to Full 4 3 Mode set to Normal Auto Selection If you set Auto wide and 4 3 Mode in the Setup menu on page 38 the optimum WIDE mode is automatically chosen for every broadcast containing the aspect ratio information Auto wide menu To enable Auto Selection set Auto wide in the Setup menu...

Страница 40: ...VIE 3D AV MODE STANDARD 3D AV MODE STANDARD AV MODE AUTO AV MODE MOVIE AV MODE DYNAMIC Fixed AV MODE DYNAMIC AV MODE USER TV AV MODE GAME Standard Selected item Description AUTO The TV automatically sets the appropriate selection from the AV mode menu depending on the lighting conditions and the type of programme watched STANDARD For a highly defined image in a normally bright room MOVIE For a mov...

Страница 41: ...screen brightness is automatically adjusted according to the lighting condition in the room OPC setting See this page Backlight The screen dims The screen brightens Contrast For less contrast For more contrast Brightness For less brightness For more brightness Colour For less colour intensity For more colour intensity Tint Skin tones become purplish Skin tones become greenish Sharpness For less sh...

Страница 42: ...an be set to a maximum of 2 and a minimum of 2 by pressing c or d w Film mode Automatically detects a film based source originally encoded at 24 25 frames second depending on the vertical frequency analyses it then recreates each still film frame for high definition picture quality Selected item Selected item Advanced Adjust effect to reduce judder from film contents Select a desired level of judd...

Страница 43: ...s to the factory preset values press a b to select Reset and then press ENTER Adjustments are stored separately according to input source Images may not be displayed properly depending on the settings and or signals This function is available for 3D images converted from 2D images or normal 2D images Selected item Description H Pos Centres the image by moving it to the left or right V Pos Centres ...

Страница 44: ...Setting Quick start to On consumes more power No buttons except for POWER work even while the still images are being displayed If the ready for use USB device is not inserted the still images pre installed in the TV will be displayed in a slideshow even when Data source is set to USB The still images will be displayed until the set time has elapsed If you do not want to use the wallpaper as descri...

Страница 45: ...s ENTER 4 5 Press b c d to select View setting 2 Press a b to select Individual setting and then press ENTER 3 NOTE You cannot set the Clock type in either the USB media mode or the Home network mode Even if you selected Analogue a Digital clock is still displayed in these two modes NOTE When On is set you can press DISPLAY on the remote control to show or hide the time information w Clock type Yo...

Страница 46: ... a concert hall 3D Movie Reproduces a movie theater experience with realistic live surround sound based on reverberant sounds measured in a movie theater 3D Standard Creates three dimensional surround sound with detailed control of the signal phase Normal Provides limited surround sound Off Outputs normal sound Press b c d to select Audio Press MENU and the MENU screen displays 1 2 Press a b to se...

Страница 47: ...used for outputting audio Press MENU and the MENU screen displays 1 Press a b to select Headphone Audio out select and then press ENTER 3 Headphone Audio out select Press a b to select Terminal setting and then press ENTER 2 Press a b to select the desired item and then press ENTER 4 Selected item Description Headphone Output audio through headphones Audio out Output audio through an A V receiver ...

Страница 48: ...se perform the auto installation A TV Analogue TV You can run the auto installation to set channels automatically To watch the analogue TV select Auto installation from Setup menu See page 26 1 D TV Digital TV You can run the auto installation to set channels automatically After setting the channels you can select a channel using CHr s or 0 9 on the remote control unit See page 27 2 To watch D TV ...

Страница 49: ... information pressing c d allows you to go to the next page or return to the previous page You can cancel this info by pressing INFO again Using Info on the menu screen Press a b to select Option for view and then press ENTER Press MENU and the MENU screen displays 1 3 Press a b to select Programme info and then press ENTER 4 Press b c d to select Option 2 HProgramme info HInput Info Video 576i 00...

Страница 50: ...ring of data for all available channels while the TV set is in standby mode If EPG is set to No only EPG data for the current channel will be updated Selecting EPG to Yes will result in higher power consumption Selecting EPG to No will save power consumption Approximately 21W for 15 30 minutes depending on number of channels tuned after power off from remote control NOTE EPG data will not update i...

Страница 51: ...nue to press a b to display next or previous screen w Close the EPG screen Press EPG again Selecting a programme 3 Check programme information Press a b c d to select the programme you want to check 1 Press R 2 Press ENTER to tune to the selected programme 3 Watching TV NOTE You can also display the EPG screen from Menu s EPG s EPG The time displayed on the EPG is information sent by the TV statio...

Страница 52: ...me by date time Press Y 1 Press a b c d to select the desired time span and then press ENTER 2 Press a b to select the desired programme and then press ENTER 3 NOTE When you select a programme outside of the current time span the timer setting screen displays See page 53 Watching TV NOTE The genre information depends on the broadcasts You can also display the EPG screen from Menu s EPG s Search by...

Страница 53: ...ou select No the TV returns to the EPG screen 3 Cancelling the timer setting Switching subtitle languages Text Press a b c d to select the programme on timer setup and then press ENTER 2 Press c d to select Cancel and then press ENTER 3 w Cancelling using B button on the remote control Press EPG 1 Press B to display the timer list screen 2 Press a b to select a programme you want to change and the...

Страница 54: ... disparity 3D system of this TV with incompatible 3D broadcasts or software can make images appear with a cross talk blur or create overlapping images When viewing 3D images continuously be sure to take a break periodically to prevent eye strain If you are nearsighted or farsighted or have astigmatism or a different level of eyesight between the left and right eyes you should take the necessary st...

Страница 55: ...ng so may block signals from the TV and prevent the 3D glasses from working properly Interference from other infrared communications equipment may prevent you from viewing 3D images correctly Before using the 3D Glasses for the first time remove the insulating sheet attached to them Infrared receiver The illustration above is for reference They may be slightly different from the actual accessories...

Страница 56: ...r object to press in on the lock 2 While pressing in on the lock place your fingertip in the groove and pull out the battery holder Pull the battery holder all the way out 3 Replace the battery Remove the battery according to the arrow direction Insert a new battery Insert the battery with the negative side facing up 4 Align the battery holder with the battery slot on the 3D Glasses and slide it b...

Страница 57: ...viewing 3D images on the same TV with some people wanting to watch in 3D and some people wanting to watch in 2D The 3D glasses will shift between 2D and 3D mode every time you press the power button When the TV is in 3D mode you can choose to watch 2D or 3D image via the 3D glasses In 3D mode LED indicator is in green and blinks every 3 seconds In 2D mode LED indicator is in red and blinks every 3...

Страница 58: ...es and then press ENTER to switch to 2D mode 2 Take off the 3D glasses and turn off the power of the 3D glasses 3 NOTE If the input signal switches to 2D 2D images are displayed automatically 3D mode is canceled automatically when the setting is changed input source is changed the input signal resolution is changed or the power is turned off Receiving a 3D image signal that cannot be detected auto...

Страница 59: ... in 3D shown above Y button 3D surround See page 46 The surround mode changes each time you press Y B button 3D setup See page 60 NOTE The keys are available only before the 3D menu disappears HOME MPX MENU RETURN EPG INFO TEXT HOME MPX MENU RETURN EPG INFO TEXT HOME MPX MENU RETURN EPG INFO TEXT HOME MPX MENU RETURN EPG INFO TEXT Configuring the TV settings to enhance 3D image viewing You can mak...

Страница 60: ...erience discomfort while viewing 3D images immediately stop viewing Auto is not available when converting 2D images to 3D images w 2D s 3D convert effect You can adjust the 3D effect when converting images from 2D mode to 3D mode Select a desired level of convert effect from e1 to e16 NOTE This function is only available when converting 2D images to 3D images When you use this function image conve...

Страница 61: ...nd then press ENTER 6 NOTE Refer to your external equipment operation manual for the above settings When connecting a DVI HDMI conversion adaptor cable to the HDMI terminal the image may not come in clearly Connecting an HDMI output device Settings when using external devices HDMI terminals can carry audio and visual signals to the TV with an HDMI certified cable When you want to output the audio ...

Страница 62: ...d HDMI device Video noise may occur depending on the type of HDMI cable used Make sure to use a certified HDMI cable These operations affect the HDMI device selected as the current input source If the device does not operate turn on the device and select the appropriate input source using TV VIDEO When you insert remove HDMI cables or change connections turn on all connected HDMI devices before tu...

Страница 63: ...l system of your equipment and then press ENTER 4 Auto PAL SECAM NTSC3 58 NTSC4 43 PAL 60 You can change the colour system to one that is compatible with the image on the screen NOTE Factory preset value is Auto If Auto is selected colour system for input signal is automatically set If an image does not display clearly select another colour system e g PAL NTSC 4 43 You can choose from Auto PAL SEC...

Страница 64: ...INK 4 Controlling the AQUOS LINK compatible audio system You can adjust the volume and select the sound mode of the AQUOS LINK compatible audio system 4 Multiple control of HDMI devices You can select which HDMI device to operate using the Link operation menu NOTE Point the remote control toward the TV not to the connected HDMI device Video noise may occur depending on the type of HDMI certified c...

Страница 65: ...tible audio system AQUOS BD player AQUOS LINK setup Press MENU and the MENU screen displays 1 Press a b to select AQUOS LINK setup and then press ENTER 3 AQUOS LINK auto power on If this is activated the One Touch Play function is enabled While the TV is in standby mode it automatically turns on and plays back the image from the HDMI source Regarding Select recording device Select the device for r...

Страница 66: ...nnected HDMI device using the TV s remote control Audio return channel ARC Press MENU and the MENU screen displays 1 Press a b to select AQUOS LINK setup and then press ENTER 3 Press a b to select Selecting channel key and then press ENTER 4 Connection for using Audio return channel You need to use ARC compatible cables devices and connect to the HDMI 1 ARC terminal to activate this function The c...

Страница 67: ...he CEC compatible recorder on off Press MENU and the MENU screen displays 1 Operating an AQUOS LINK device AQUOS LINK allows you to operate the HDMI connected device with one remote control Use the following procedures to start playback Press I to start playback of a title See this page section Playback of titles using AQUOS LINK if you want to start playback using the list of the titles of the AQ...

Страница 68: ... control here 3 Press MENU and the MENU screen displays 1 Press c d to select Link operation 2 Press MENU and the MENU screen displays 1 Press c d to select Link operation 2 Select the programme to record You can use a b c d RETURN EXIT and the coloured buttons 4 Recording via the CEC compatible recorder s EPG only for recorders You can call the CEC compatible recorder s EPG and preset timer recor...

Страница 69: ...ion w Auto Power On When a MHL compatible device is connected to the TV the TV turns on automatically This function operates when AQUOS LINK control is set to On See page 65 w Auto Input Selection When a MHL compatible device is connected while the TV is on the input mode is selected automatically This function operates when AQUOS LINK control is set to On See page 65 w Operation Using the Remote ...

Страница 70: ...ompatibility chart VGA SVGA XGA WXGA SXGA SXGA and UXGA are registered trademarks of International Business Machines Corporation Resolution Horizontal Frequency Vertical Frequency Analogue D Sub Digital HDMI VESA Standard VGA 640 g 480 31 5 kHz 60 Hz 4 4 4 SVGA 800 g 600 37 9 kHz 60 Hz 4 4 4 XGA 1024 g 768 48 4 kHz 60 Hz 4 4 4 WXGA 1360 g 768 47 7 kHz 60 Hz 4 4 4 SXGA 1280 g 1024 64 0 kHz 60 Hz 4 ...

Страница 71: ...PC may not be displayed properly under HDMI connection The analogue audio input is available only for HDMI 2 PC Selecting the picture size Press WIDE The Wide mode menu displays 1 Press WIDE or a b to select a desired item on the menu 2 Example You can select the picture size as illustrated below Connecting a PC or Displaying a PC image on the screen Using Wide mode on the menu screen Press b c d ...

Страница 72: ...bottom of the image is slightly cropped Keeps the original aspect ratio in a full screen display Full Dot by Dot An image fully fills the screen Detects the resolution of the signal and displays an image with the same number of pixels on the screen Input Signal Full An image fully fills the screen Detects the resolution of the signal and displays an image with the same number of pixels on the scre...

Страница 73: ...es the image by moving it up or down Clock Adjusts when the image flickers with vertical stripes Phase Adjusts when characters have low contrast or when the image flickers Adjusting the PC image automatically Adjusting the PC image manually Connecting a PC Press c d to select Yes and then press ENTER Auto Sync starts 6 NOTE Auto Sync is likely to succeed when an input PC image has wide vertical st...

Страница 74: ...s according to the received command and sends a response message to the PC Do not send multiple commands at the same time Wait until the PC receives the OK response before sending the next command Command format Parameter Input the parameter values aligning left and fill with space s for the remainder Be sure that four values are input for the parameter When the input parameter is not correct ERR ...

Страница 75: ...E _ PHASE 20 20 WIDE MODE W I D E 0 _ _ _ TOGGLE AV W I D E 1 _ _ _ NORMAL AV W I D E 2 _ _ _ ZOOM 14 9 AV W I D E 3 _ _ _ PANORAMA AV W I D E 4 _ _ _ FULL AV W I D E 5 _ _ _ CINEMA 16 9 AV W I D E 6 _ _ _ CINEMA 14 9 AV W I D E 7 _ _ _ NORMAL PC CONTROL ITEM COMMAND PARAMETER CONTROL CONTENTS WIDE MODE W I D E 8 _ _ _ CINEMA PC W I D E 9 _ _ _ FULL PC W I D E 1 0 _ _ DOT BY DOT AV PC W I D E 1 1 ...

Страница 76: ...SB adapter Wi Fi CERTIFIED certification program from the Wi Fi Alliance Wi Fi Protected Setup certification program from the Wi Fi Alliance A wireless LAN connection and performance cannot be guaranteed for all residential environments In the following cases the wireless LAN signal may be poor or drop or the connection speed may become slower When used in buildings made with concrete reinforced s...

Страница 77: ...ing s Network setup s LAN setting s Manual setup s Yes Connection type s Wireless s OK Press a b to select Easy setup and then select Yes press ENTER Select Wired or Wireless and then press ENTER 1 1 2 3 Go to Menu s Setup s View setting s Network setup s LAN setting Go to Menu s Setup s View setting s Network setup s LAN setting 2 Press a b to select Manual setup and then select Yes press ENTER G...

Страница 78: ... the internet service For the selection items in HOME screen please see page 79 80 HOME MPX MENU RETURN EPG INFO TEXT HOME MPX MENU RETURN EPG INFO TEXT HOME MENU w Display the HOME screen Press HOME and the HOME screen displays You can also display the HOME screen from Menu s Set up s Option s Option for view s Home UI Network AQUOS NET USB media SkypeTM Home network ENTER HOME END LAN Storage st...

Страница 79: ...n Picture Each time you press WIDE when a browser screen is shown the display pattern toggles between a website only screen and a TV Web screen Selected item Description Go back to the previous page Go to the next page Refresh the page Interrupt a page while it is loading Switches between virtual mouse and spatial navigation modes Switching modes also switches the display Depending on the page dis...

Страница 80: ...f there is important information take notes before executing About links Web pages on the Internet often include links that allow you to jump to other web pages or sites Links can take various forms including words or images but they always work in the same way letting you jump to the link destination when you select them You can jump from a link to the corresponding link destination CAUTION If th...

Страница 81: ... HDD At least USB HDDs with memory between 100GB and 2TB and under are required for USB recording to register Refer to Disconnect the USB HDD when removing the USB HDD do not remove the USB HDD during USB recording operation USB recording may take a while to start after the TV is turned on This function may not work properly for some USB HDDs Do not connect and disconnect a USB HDD from the TV rep...

Страница 82: ...evious chapter point L Jump forward to the next chapter point Playback will resume after jumping backward by the time interval you set in Jump time setting Page 84 Playback will resume after jumping forward by the time interval you set in Jump time setting Page 84 Chapter points are fixed at 10 minute increments NOTE Refer to Regarding Select recording device Page 65 when the buttons for USB recor...

Страница 83: ...e with the on screen instructions It is not possible to newly schedule a recording that overlaps with a timer setting that is currently running recording When urgent setting of a schedule is desired stop recording before scheduling A combined total of 16 timer settings Watch and Record can be set Timer list A list of programmes scheduled for recording can be displayed 1 Press EPG 2 Press B to disp...

Страница 84: ...V Menu s Setup s View setting s USB REC setting s Jump time setting A time interval from 10 sec to 99 min 50 sec can be selected NOTE You can use the time interval you set using the or buttons w Device registration You need to register the USB HDD for the USB recording Go to TV Menu s Setup s View setting s USB REC setting s Device registration Refer to USB HDD registration Page 81 NOTE Only one U...

Страница 85: ...rectory in Folder display setting Example USB 1 USB 2 If the TV is turned off and then on again the number assigned to the USB drive may change w Home network Press a b to select the Home network server where you want to find your files and then press ENTER Press Y to search for servers Example Server1 Server2 2 Press c d to select Photo mode Music mode or Video mode and then press ENTER Example P...

Страница 86: ...pixel size of the selected photo in the lower left corner of the screen shooting date is only available in the EXIF file format w Viewing individual photos The photo selected on the thumbnail selection screen is displayed Buttons for individual display operation Buttons Description c d Cursor Go to the previous next photo in the same directory RETURN Return to the thumbnail selection screen 3D Swi...

Страница 87: ...t Reset all slide show image Set or reset the images to be displayed Press B to display the USB media menu screen 1 Press a b to select Set all slide show image or Reset all slide show image and then press ENTER When you select Set all slide show image checkmarks are added to all the images When you select Reset all slide show image remove all the checkmarks from all the images 2 Example Press Y t...

Страница 88: ...d the music is not played back automatically See page 87 for details on the USB device removal function Video mode Example Buttons for file selecting operations Buttons Description ENTER When selecting a folder icon Enter this directory When selecting a video file Play the video a b c d Cursor Select a desired item RETURN Return to the previous operation R button Select deselect items 4 mark appea...

Страница 89: ...ter viewing the file for 15 minutes jumps to the 20 minute playback point NOTE The key guide is shown when playback is resumed Reverse fast forward continues from one file to another during continuous playback in the USB media mode Jump forward back may not be available depending on the files in the home network mode w USB media menu E Set Reset all auto play Set or reset the video to be played ba...

Страница 90: ...e on this menu You need to deregister the TV at http www divx com to release the registration List of file formats compatible with USB mode USB device USB Memory USB card reader Mass Storage class USB hard disk drive File system FAT FAT32 NTFS USB hard disk drive only Photo file format JPEG jpg DCF2 0 compliant Multi Picture Format mpo CIPA DC 007 Compliant Music file format MP3 mp3 Bitrate 32 k 4...

Страница 91: ...ution higher than 1280x720 may not be played back correctly Some file formats in the above list may not be played back correctly including images sounds subtitles etc Depending on the bit rate some files may not be played back The TV supports DTS encoded video files instead of DTS surround sound formats Some subtitles may not be displayed correctly and this may affect the TV operation mp4 files ov...

Страница 92: ...operation Buttons Description a b c d Go to the previous next photo in the same directory RETURN Return to the thumbnail selection screen 3D Switches between 2D and 3D modes R Rotate the photo by 90 degrees to the left G Rotate the photo by 90 degrees to the right NOTE Rotating photos only applies to the temporarily selected item and this setting is not saved In 3D mode you cannot rotate the photo...

Страница 93: ... network contents Music mode Example Root Music Folders Music Folder1 Folder2 Folder3 Buttons for music mode Buttons Description a b c d Select a desired item ENTER When selecting a folder icon Enter this directory When selecting a music file Play music RETURN When music is stopped Return to the previous operation When music is being played Stop music G Move to the parent folder Y Play music NOTE ...

Страница 94: ...ive contents On Receiving and playing contents from portable device or PC are allowed Off Receiving contents from portable device or PC is not allowed w Timeout Setup This sets the time until the TV returns automatically to TV mode after remote playback ends 10 sec 60 sec When the set time has elapsed after remote playback ends the TV returns automatically to TV mode No Select this to manually swi...

Страница 95: ...ean Check the ECO setting See pages 37 and 38 Is the sleep timer no signal off or no operation off set See page 38 No picture Is the connection to external equipment correct See pages 20 and 21 Is the correct input selected See page 62 Is the picture adjustment correct See pages 41 to 43 Is the antenna connected properly See page 19 Is On selected in Audio only See page 32 Refer to Picture Audio t...

Страница 96: ...glasses to malfunction The 3D glasses cannot operate fully at extreme high or low temperatures Use them within the specified usage temperature range If the 3D glasses are used in a room with fluorescent lighting 50 60 Hz the light within the room may appear to flicker In this case either darken or turn off the fluorescent lights when using the 3D glasses Wear the 3D glasses correctly 3D images wil...

Страница 97: ...in standby mode No Does not search for update information Now Checks if there is new software immediately Downloading the software You can select the method of update Selected item Description Yes Starts downloading immediately Typically it takes approximately 30 minutes for download You cannot carry out other operations while downloading Cancels the download by pressing ENTER on the remote contro...

Страница 98: ...ted USB device This function allows you to transform to the latest software via a USB device Go to Menu s Setup s Information s Software licence You can read the software licences in this menu CAUTION Be sure to insert the USB device correctly into the terminal CAUTION If the software is not compatible with the system an error message appears on the screen Repeat step 2 after pressing ENTER When a...

Страница 99: ...50Hz 720P 60Hz 1080I 50Hz 1080I 60Hz 1080P 50Hz 1080P 60Hz 1080P 24Hz HDMI 4 MHL HDMI HDMI input 480I 576I 480P 576P 720P 50Hz 720P 60Hz 1080I 50Hz 1080I 60Hz 1080P 50Hz 1080P 60Hz 1080P 24Hz MHL is not applicable Rear INPUT5 AUDIO in COMPONENT in 480I 576I 480P 576P 720P 50Hz 720P 60Hz 1080I 50Hz 1080I 60Hz INPUT6 INPUT7 VIDEO in AUDIO in RS 232C 9 pin D Sub male connector PC 15 pin mini D sub AU...

Страница 100: ...Dimensional drawings 100 Unit mm Appendix LC 46LX650H LC 52LX650H 1 Active area 2 Thinnest part ...

Страница 101: ...Appendix 101 LC 60LX650H 1 Active area 2 Thinnest part Including tip prevention brackets when stored Including tip prevention brackets when attached Excluding tip prevention brackets ...

Страница 102: ...imultaneously until the message appears on the screen Press MENU and the MENU screen displays 1 Press c d to select Setup 2 Press a b to select Individual setting and then press ENTER 4 Press a b to select Password and then press ENTER 5 Press b c d to select View setting 3 NOTE To set the password again refer to Password setting for the child lock on page 35 and follow the instructions HOME MPX M...

Отзывы: