


Section 08
ELECTRICAL
Sub-Section 08
(STARTING SYSTEM)
08-08-13
SERVICING
Electrolyte Level
Since a battery has been activated (see above),
add distilled water to top up electrolyte.
TIPS FOR CHARGING A USED
BATTERY
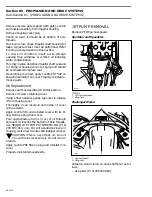
WARNING : Prior to charging the battery,
always remove it from jet boat to prevent
electrolyte spillage and to prevent the possibil-
ity of a spark in engine compartment.
For best results, battery should be charged when
the electrolyte and the plates are at room temper-
ature. A battery that is cold may not accept cur-
rent for several hours after charging begun.
Do not charge a frozen battery. If the battery
charge is very low, the battery may freeze. If it is
suspected to be frozen, keep it in a heated area
for about 2 hours before charging.
WARNING : Do not place battery near
open flame.
The time required to charge a battery will vary de-
pending on some factors such as
:
– Battery temperature
:
The charging time is in-
creased as the temperature goes down. The
current accepted by a cold battery will remain
low. As the battery warms up, it will accept a
higher rate of charge.
– State of charge
:
Because the electrolyte is
nearly pure water in a completely discharged
battery, it cannot accept current as well as elec-
trolyte. This is the reason the battery will not
accept current when the charging cycle first be-
gins. As the battery remains on the charger, the
current from the charger causes the electrolytic
acid content to rise which makes the electro-
lyte a better conductor and then, the battery
will accept a higher charging rate.
– Type of charger
:
Battery chargers vary in the
amount of voltage and current that they can
supply. Therefore, the time required for the bat-
tery to begin accepting measurable current will
also vary.
Charging a Very Flat or Completely
Discharged Battery
Unless this procedure is properly followed, a good
battery may be needlessly replaced.
– Measure the voltage at the battery posts with
an accurate voltmeter. If it is below 10 volts, the
battery will accept current at very low rate, in
term of milliamperes, because electrolyte is
nearly pure water as explained above. It could
be some time before the charging rate increas-
es. Such low current flow may not be detect-
able on some charger ammeters and the
battery will seem not to accept any charge.
– Exceptionally for this particular case, set the
charger to a high rate.
NOTE :
Some chargers have a polarity pro-
tection feature which prevents charging un-
less the charger leads are connected to the
correct battery terminals. A completely dis-
charged battery may not have enough voltage to
activate this circuitry, even though the leads are
connected properly. This will make it appear that
the battery will not accept a charge. Follow the
charger manufacturer’s instruction on how to by-
pass or override this circuitry so that the charger
will turn on and charge a low-voltage battery.
– Since the battery chargers vary in the amount
of voltage and current they provide, the time
required for the battery to accept measurable
charger current might be up to approximately
10 hours or more.
– If the charging current is not up to a measurable
amount at the end of about 10 hours, the bat-
tery should be replaced.
– If the charging current is measurable before the
end or at the end of about 10 hours, the battery
is good and charging should be completed in
the normal manner as specified in Activation of
a new battery.
– It is recommended that any battery recharged
by this procedure be load tested prior to return-
ing it to service.
BATTERY CHARGING
EQUIPMENT
The battery charger should have an adjustable
charging rate. Variable adjustment is preferred,
but a unit which can be adjusted in small incre-
ments is acceptable.
The battery charger must be equipped with an
ammeter capable of accurately measuring current
of less than one ampere.
;
;
'
Содержание Challenger 5896
Страница 1: ......
Страница 2: ......
Страница 3: ...219 100 044 0 0 0 1996 Shop Manual 0 R ...
Страница 143: ...Section 08 ELECTRICAL Sub Section 01 OVERVIEW 08 01 3 1 Battery 2 Fuse block 3 Accessories F04H0YA 3 1 2 ...
Страница 152: ...Section 08 ELECTRICAL Sub Section 03 IGNITION SYSTEM 08 03 2 ELECTRICAL BOX Sportster F04H11S ...
Страница 154: ...Section 08 ELECTRICAL Sub Section 03 IGNITION SYSTEM 08 03 4 ELECTRICAL BOX Speedster F04H26S ...
Страница 251: ...Section 11 HULL DECK Sub Section 01 COMPONENTS 11 01 5 F04L3IS Loctite 242 ...
Страница 274: ......