


www.safehome.dk
www.safehome.dk
6
7
2. Installing the Smart Panel WS200X
2.1 Locating the Smart Panel and tamperproof switch
•
The panel must have 220V power, so it must be located near a power outlet.
•
The panel must be easily accessible for battery replacement and operation.
•
Away from doors and windows where intruders have easy access to it.
•
The panel should not be placed close to very hot devices (ovens, stoves, etc.) or near
devices that may interfere with the wireless signal.
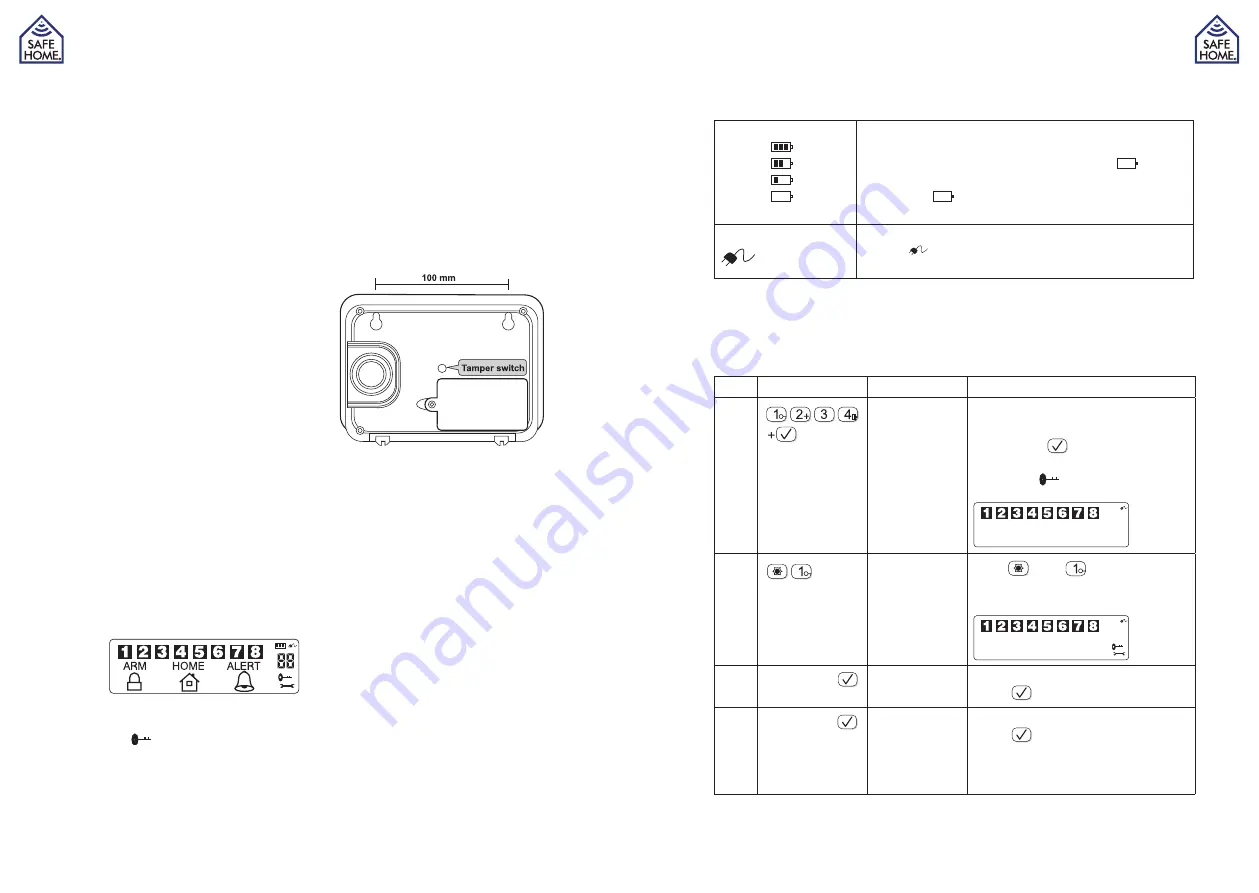
2.2 Wall mounting the Smart Panel and tamperproof
switch
•
First cut out the mounting template for the
Smart Panel.
•
Tape the template onto the wall, in the posi-
tion you wish to install the Smart Panel.
•
Mark on the wall the points of drilling holes
for the wall plugs and mounting screws.
•
Drill the holes, insert wall plugs and locate the
mounting screws for the Smart Panel.
•
Mount the Smart Panel onto the wall.
•
Once the Smart Panel has been installed the
system can be powered up. The tamperproof
system is enabled once the Smart Panel is switched to HOME, ALERT or ARM mode.
2.3 Powering up the Control Panel
Unscrew the battery compartment and remove the cover, and insert a new back-up 9 V
battery noting the polarity. Plug in the AC adaptor to the Smart Panel and connect it to a
wall socket. Replace the cover and the screw.
When inserting 9 V Alkaline backup battery, you will hear one beep and the backlight will
blink within 1 second (Yellow>Red>Green>Yellow).
The Smart Panel will display the below image:
The Smart Panel will enter “STANDBY” mode after the automatic self-checking is com-
plete. Then
will appear on the LCD screen.
The main power supply (AC adaptor) must be plugged in all times, with the 9 V battery
functioning as back-up power supply only.
2.4 Understanding the Battery and AC Adaptor icon
Battery icon
Full
High
Middle
Low
The battery icon shows when the AC power supply is un-
plugged or interrupted.
9 V battery functions as BACK UP only and the
symbol
means LOW BATTERY, the LCD Backlight flashes yellow for
30 sec. and
will blink until the battery is replaced or the
AC power supply is plugged in.
AC adaptor icon
When the AC adaptor is connected to a wall socket, the AC
symbol
will appear.
The backlight will be ‘ON’ for 10 secs.
3. Using the Smart Panel
3.1 Programming your new 4-Digit PIN
The Smart Panel is supplied with a default PIN of “1234”, which is recommended
changed. PIN can be changed as follow:
Step
Keys
Description
Note
1
You must be in
READY mode
before
programming
your new 4-digit
PIN
To make sure you are in READY mode:
From STANDBY mode enter the default
4-digit PIN +
:
The symbol
disappears from the
screen.
2
Enter program-
ming mode
Press
then
The Smart Panel will display the below
image :
3
4-digit PIN +
Enter your new
4-digit PIN
Enter the new 4-digit PIN.
Press
to confirm.
4
4-digit PIN +
Re-enter new
PIN for final
confirmation
Re-enter the new 4-digit PIN.
Press
for final confirmation.
One beep indicates that you entered
a valid PIN, two beeps indicate that an
invalid operation was performed.
Содержание WS200X
Страница 1: ...DK Brugsanvisning Alarm Start Kit 01 med HD Overv gnings kamera...
Страница 22: ...www safehome dk 42...
Страница 23: ...UK User Guide Alarm Starter Kit 01 with HD Surveillance Camera...
Страница 44: ...SE Anv ndarhandbok Larmstartpaket 01 med HD vervakningskamera...
Страница 65: ...NO Bruksanvisning Startsett for Alarm 01 med HD overv kingskamera...
Страница 86: ...FI K ytt opas H lytin 01 HD valvontakameralla...