background image

Spiral

®

 SST and STT Prewire Installation Manual

Spiral

®

 SST and STT Prewire Installation Manual  

  1072124-0  

  Rev 03  

  01/22

9


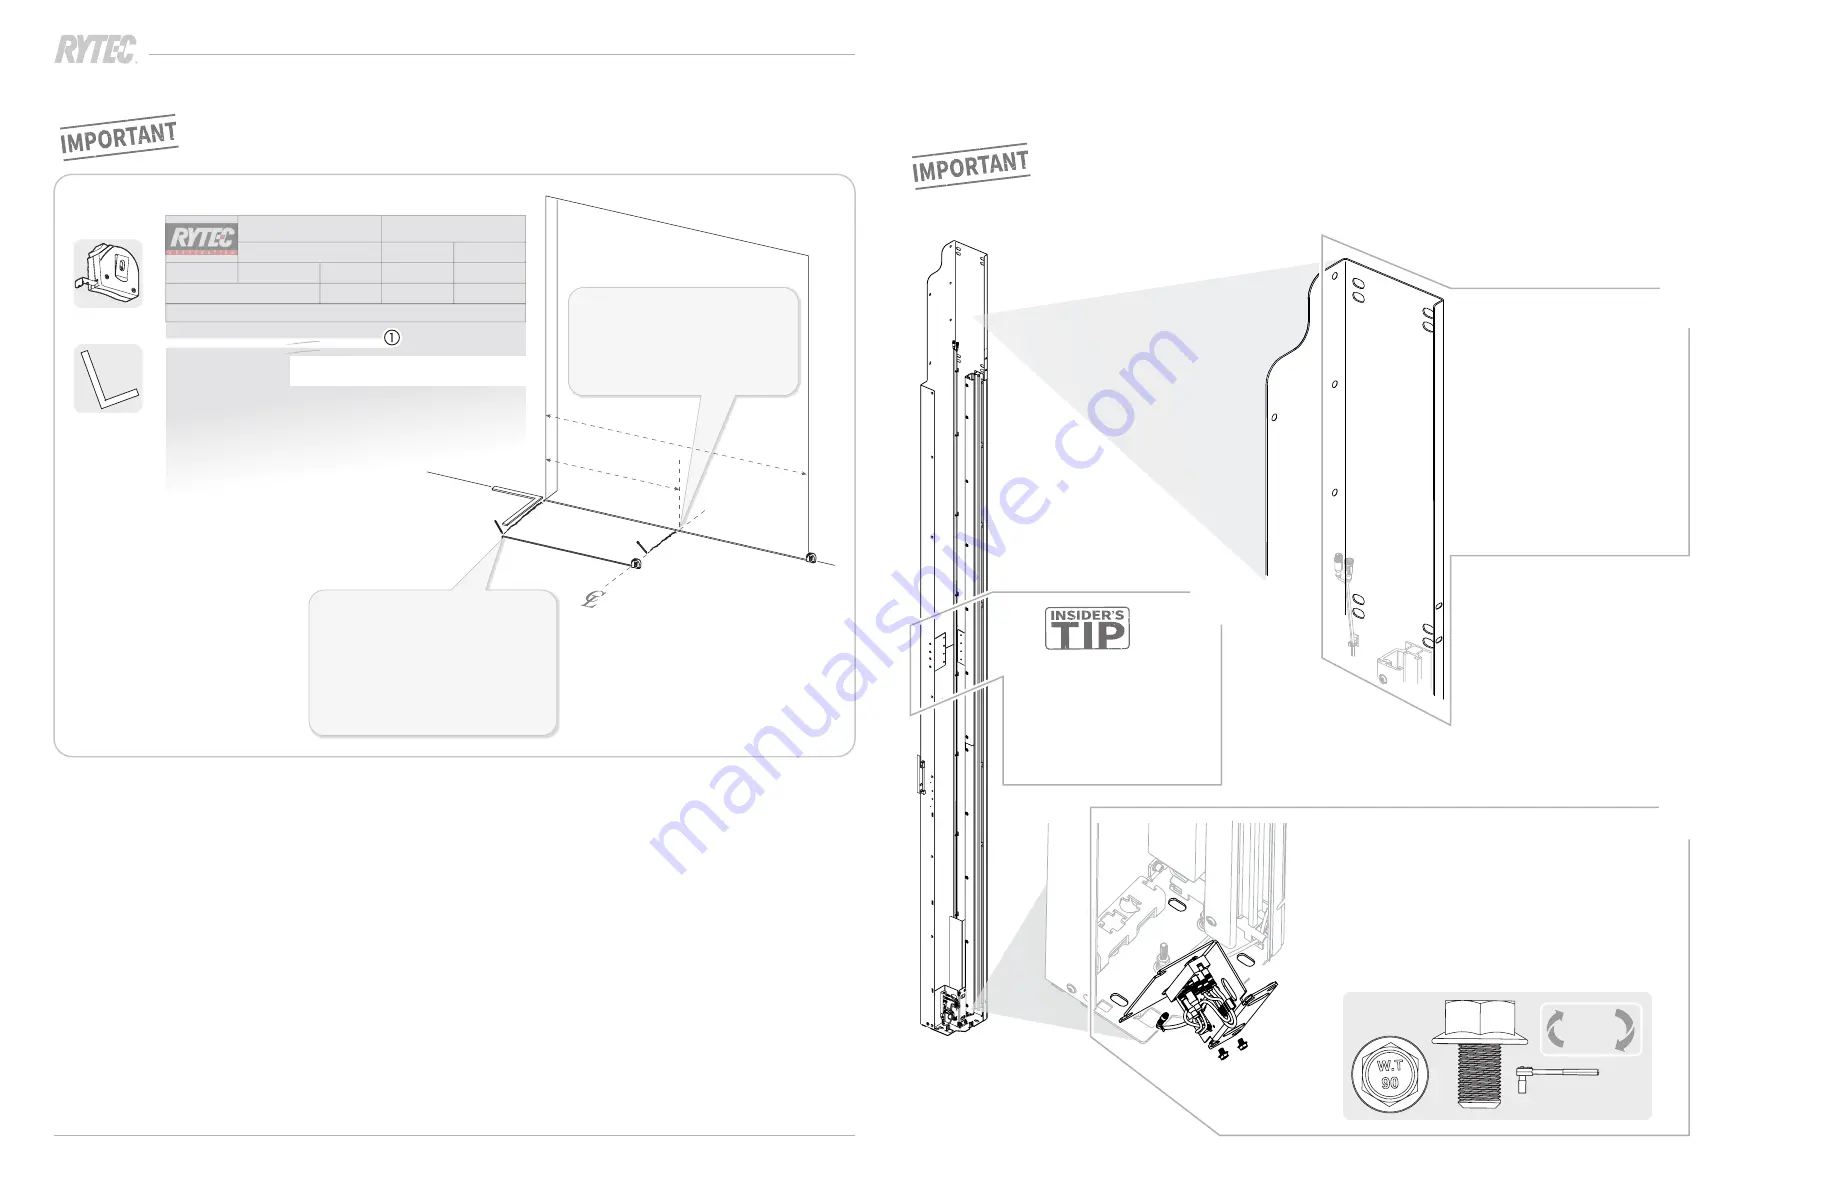
How to center the door in the door opening

Rytec doors are engineered to be centered in the door opening, so follow these 
steps even if the width of the opening and the production width match exactly. 


Measuring


tape

Carpenter’s


square

1: Measure

 the width of the 

door opening (

w)

 and find 

the halfway point (

½w)

 Mark 

the centerline there. 

2: Use 

the width to center

from the object list (

1/2 

a

).

  Starting at the centerline,

measure and mark


the reference line for

the first column.

Serial number

 D0091893-010

Configuration

DOOR MODEL NAME

Spiral Full Vision "L"

Production Width in mm 3,660

Production Height in mm 3,260

Door head sizeB

Line Voltage 460V

motor mount side

Right Hand Motor

Motor Duty

Standard Duty Motor

Horsepower

2.0

Number of solid slats

0

Number of vent slats

0

Brake Release Location Release lever on side column

Hood style

No spiral hood type

Number of Springs 4

Spring Tension (in)

4.724

LH Inner Spring Pack Qty

0

LH Outer Spring Pack Qty

2

RH Outer Spring Pack Qty

2

0

Order type

ZP02

RYTEC MTO Order

Order number

20000597

MRP controller

500

B5 ZMAT

Creation Date

05/31/2019

Production scheduler

T7

Tier 7

Order quantity

1 EA

Finish

06/05/2019

Start

06/03/2019

Material number

724

Material description

SPIRAL STT-L

Reservation number

0002425475

Status

REL MSPT PRT PRC SETC

Object list

Original

Plant

2000

Rytec Corporation -

Door Width (Inches)

144.094

Door Height (Inches)

128.346

Refer

ence line

Centerline

½


w

w

1/2 

a

90 º

Width to center = 1/2 

a

144 1/16

123 3/8

®

Plumb, level, square: how to position the door correctly as you install 

the side columns

Call Rytec technical support at 800-628-1909 immediately and stop the installation


if you are not able to correctly position the door.

Before you begin: where to find the anchor points on the Spiral side columns

How to anchor the door:


Use

 1/2" diameter through bolts, 

1/2" diameter threaded rods or 

equivalent to anchor the side columns. 


Anchoring hardware and materials 

must be provided by the door owner 

or installer.


Make sure 

the anchors do not 

interfere with the moving parts 

of the door.

a

b

There are four sets of anchor 

holes (

a

,

b

,

c

,

d

) at the top of 

each side column.


Use at least one anchor in 

each set of anchor holes:

a

b

c

 and 

d

Anchor both 

holes unless conditions at the 

installation site prevent this.


Position anchors at the 

horizontal center

 of the 

anchor holes.

1

c

d

There are three anchor holes  (

a

,

b

,

c

in the baseplate of each side column.

You must use at least two baseplate anchors.
To access all three anchor holes:


Remove

 the bolts and 

move

 the bracket and CAN 

terminal out of the way. 

Make sure

 you do not 

disconnect any cables when moving the bracket.

c

a

b

For doors over 12' (twelve feet) 

in height, 

drill an extra 

anchor hole

 near the halfway 

point of the side column for 

added stability when the 

column is installed.

3

2

KEEP

REUSE

5550300

2

13mm

Содержание Spiral SST

Страница 1: ... personnel and equipment to safely perform all lifts Make sure you have been informed of any hazardous conditions that exist within the installation site Make sure the installation site is kept clear of obstructions and debris and that the floor is dry Make sure you are aware of the location of all power lines piping and HVAC systems within the installation site Make sure all accessories installed...

Страница 2: ...user terminal Primary drive pulley Drive shaft Wire chase Secondary drive pulley Primary drive belt Secondary drive belt Spring straps Spring clamp and bracket CAN bus repeater box Motor Brake release Encoder inside motor Wireless antenna and antenna arm Corner bracket Inside the drive side console Table of Contents Rytec installation safety information 1 Requirements Staffing 1 Electrician s resp...

Страница 3: ...embly 201 L SAI Slot2 CAN signal path CAN signal path NEW in 2022 Spirals Smartsurround light curtains and CAN bus cabling Two new features have been added to Spirals in 2022 both of which change the installation process CAN bus cabling The CAN bus system simplifies cabling and minimizes internal field wiring during installation the system works this way CAN bus cabling is a single chain series of...

Страница 4: ... number D0091893 01 0 Configuration DOOR MODEL NAME Spiral Full Vision L Door Width Inches 144 094 Door Height Inches 128 346 Production Width in mm 3 660 Production Height in mm 3 260 Door head sizeB Line Voltage 460V motor mount side Right Hand Motor Motor Duty Standard Duty Motor Horsepower 2 0 Number of solid slats 0 Number of vent slats 0 Brake Release Location Release lever on side column Ho...

Страница 5: ...d height match the numbers on the object list 3 Calculate the width to center divide the Door Width a by 2 Write this number on the object list Use it when you center the door 4 Find the total width of the door measure the width of the head assembly c in the crate Write this number on the object list 5 Calculate the total height of the door Start with the Door Height b Measure the height of the he...

Страница 6: ...ver If the door has a preinstalled flat top hood cover a remove this end panels first If the door has a preinstalled front hood cover b remove this end panels next The end spacer bracket c is removed with the console cover Do this on both sides of the head assembly 2 L and L R doors remove the side console covers NOTE this is called the belt guard cover on the drive side Do this on both sides of t...

Страница 7: ...ed nuts Front screws connect to riveted nuts STT S Full vision doors have a spacer at the rear of the head assembly Line up bracket with spacer Solid panel doors have no spacer SST S R If the door has a slanted top hood cover do not reinstall the outer screws and washers until the cover is installed 13mm Cutting pliers Protect your cables Make sure all cables preinstalled in the head assembly are ...

Страница 8: ...cables labeled 01 Make sure the cables are disconnected when you remove the cover You will reconnect them later KEEP REUSE number of screws varies based on height of door number of screws varies based on height of door T40 Remove tags from cables 3 Make sure the vertical guide tracks for the door panels are in the fully lowered position 4 Loosen the holders on the vertical guide track If necessary...

Страница 9: ...r 0002425475 Status REL MSPT PRT PRC SETC Object list Original Plant 2000 Rytec Corporation Door Width Inches 144 094 Door Height Inches 128 346 Reference line Centerline w w 1 2 a 90º Width to center 1 2 a 144 1 16 123 3 8 Plumb level square how to position the door correctly as you install the side columns Call Rytec technical support at 800 628 1909 immediately and stop the installation if you ...

Страница 10: ...h sides of door opening 26 26 26 If measurements are the same the floor is level 27 If measurements are not the same shim the side with the larger number Use the difference for the height of the shim Measurements should match when you measure with the shims in place 3 If the floor is level install the drive side column first If the floor is not level install the side column that is not shimmed fir...

Страница 11: ...r on side column Hood style No spiral hood type Number of Springs 4 Spring Tension in 4 724 LH Inner Spring Pack Qty 0 LH Outer Spring Pack Qty 2 RH Outer Spring Pack Qty 2 0 Order type ZP02 RYTEC MTO Order Order number 20000597 MRP controller 500 B5 ZMAT Creation Date 05 31 2019 Production scheduler T7 Tier 7 Order quantity 1 EA Finish 06 05 2019 Start 06 03 2019 Material number 724 Material desc...

Страница 12: ... seal 1 Install bolts on both sides of the seal and hand tighten 2 Make sure the back of the seal is flush with the back of the side column and that there is direct contact with the wall If necessary shim the seal where it meets both side columns and at the anchor point so that both conditions are met 3 Make sure the rear seal is level Anchor rear seal to wall at all anchor points 4 10mm Tighten t...

Страница 13: ...ure the distances are the same Measure distance from bottom corner of drive side to top corner of non drive side then from bottom corner of non drive side to top corner of drive side b Make sure the distances are the same 3 Tighten all anchors Laser level Use the screws on the track holders as your reference Measuring tape a a b b Anchoring hardware How to install the head assembly 1 Line up the h...

Страница 14: ... and nut are not installed Use at least one anchor on each side of the bracket Rear screw connects to flanged nut Front screw connects to riveted nut 2 2 KEEP REUSE T40 b a How to raise the vertical guide tracks into place 1 Make sure that all of the vertical guide track holders are loose enough to allow the track to move freely DO NOT remove any of the holders 2 Make sure the pins at the top of t...

Страница 15: ...ction scheduler T7 Tier 7 Order quantity 1 EA Finish 06 05 2019 Start 06 03 2019 Material number 724 Material description SPIRAL STT L Reservation number 0002425475 Status REL MSPT PRT PRC SETC Object list Original Plant 2000 Rytec Corporation DOOR MODEL NAME Spiral Full Vision L Door Width Inches 144 094 Door Height Inches 128 346 Production Width in mm 3 660 Production Height in mm 3 260 Door he...

Страница 16: ...the cable tie on the outer spring strap and let it drop 8 Loosen the clamp on the spring strap 9 Position the spring bracket so that the bumpers and locking tab face the side wall 10 Loop the spring strap around the bolt in the spring bracket Thread the strap between two plates of the clamp Hand tighten the clamp nuts DO NOT trim the strap 11 Set the spring tension This is the distance the springs...

Страница 17: ... retaining slot c How to install a second assembly in the side column 1 Install the guide tubes into the second bracket Install the second bracket above the first bracket 2 Follow steps 4 15 for installing the springs Make sure the spring bracket bumpers face out toward the first spring assembly 13mm 2 c a b 01260110 01901506 2 SMALL PARTS 10mm How to install the locking collars at the top and bot...

Страница 18: ...d to keep the belt tight Cut the two cable ties to release the belt 4 Remove the top nut on the front baseplate mounting post Keep the nut Loosen the top nut on the rear mounting post DO NOT loosen the bottom nuts b a d c Cutting pliers KEEP REUSE 17mm 5 Set the height of the top nut on the rear baseplate mounting post a 1 Slide the rear flange of the baseplate pulley assembly b under the top nut ...

Страница 19: ...ttom hood spreader in the small parts box Locate the bottom hood spreader SMALL PARTS 01900820 2 SMALL PARTS 01900820 2 Drive side Corner bracket Corner bracket Wireless antenna arm Non drive side SMALL PARTS 01901508 L and L R doors bottom hood spreader S and S R doors bottom hood spreader 01900820 L and L R doors 4 screws and nuts S and S R doors 8 screws and nuts Spreader brackets Spreader brac...

Страница 20: ...rive side console connect the M12 CAN connectors The male M12 for the cable from the CAN port in the side column to the female M12 connector for the cable that crosses the spreader Line up the embossed arrows on the connectors to align the guide notch and contacts correctly The connectors will only fully connect if they are aligned correctly 2 Find the schematics for the door in the red document e...

Страница 21: ...10877 2 5 16 Distance between wall mounted SmartSurround and door track should match distance between cover mounted SmartSurround and door track 2 Connect the two cables that connect the wall mounted SmartSurround light curtain to the CAN port Line up the embossed arrows on the connectors to align the guide notch and contacts correctly The connectors will only fully connect if they are aligned cor...

Страница 22: ...10765 0 BTA4 unit 1 b 1210766 0 BTA4 frame 1 c 5550351 0A01 Mounting hardware 5 5550057 0Z01 side column d 1210756 0 Mounting hardware 5 5550353 0 wall SMALL PARTS 1210800 2 5 Line up the two bottom tabs on the BTA4 unit with the bottom tabs in the frame a Then snap the two top tabs into place b 6 In the head assembly on the drive side remove the jumper from port 1 on the CAN repeater a and plug i...

Страница 23: ... down but it should not require excessive force to reach the fully released position If you feel too much resistance loosen the tension on the cable DO NOT trim the cable until the brake release has been fully tested Make sure the clamp is tight enough to hold when pressure is applied 1 Locate the brake release cable in the console Loosen the retaining nut and slide it down the length of the brake...

Страница 24: ... console A B C A B N GND A B C GND GND A B C WARNING WARNING The activation whip and activator box are used to wire optional additional activators for the door If the junction box is not needed tuck it back into the console The high voltage power whip and junction box are required to bring power to the door When the non drive side cover is reinstalled whips may be run through the rear of the cover...

Страница 25: ... 3 Install the spacer bracket from the small parts box onto the side console Do this on both sides of the head assembly SMALL PARTS 01900820 Number of screws varies based on height of door Number of screws varies based on height of door Spacer brackets Splice bracket L L R S S R Bottom hood cover panels T40 KEEP REUSE number of torx screws varies based on size of door number of torx screws varies ...

Страница 26: ...and L R doors install the end splice bracket Do this on both sides of the head assembly Splice bracket End splice bracket Flashing L L R S S R Top hood cover panels SMALL PARTS 2 01900820 T40 3 L and L R doors install the rest of the splice brackets 4 S and S R doors install the end splice bracket Do this on both sides of the head assembly 5 S and S R doors finish anchoring the wall mount bracket ...

Страница 27: ...overlaps the panel to the left T40 T40 SMALL PARTS 4 4 01901508 01900820 13mm 13mm T40 SMALL PARTS 01900820 4 8 Align side flashing with top of hood cover place flashing tight against the cover and anchor in place Do this on both sides of the head assembly 9 Align top flashing with end of side flashing place flashing tight against the cover and anchor in place The two sections of top flashing over...

Страница 28: ...right side of display press arrows to change paramter value Parameter name The Controller Display The Controller Controls Parameter number All three digits are hexadecimal Parameter value value being changed change saved RESET Button Press to toggle the flashing cursor between parameters and values Press and hold to save changes to a value UP Arrow Press to increase a value or parameter number Pre...

Страница 29: ...L SAI Slot2 PDN UI 000060 201 0948 9147 L SAI Slot2 until the setting is saved 401 L SAI Slot4 PDN UI 000052 1x to show the first set of light curtains 401 0932 9156 L SAI Slot4 Drive side Non drive side Do This Result 8 If the current selection does NOT light the LEDs Re check the light curtains 9 If the current selection DOES light the LEDs 10 The controller moves to parameter L 501 11 Do This R...

Страница 30: ...un mode The door may not open or close completely during automatic calibration This is normal When calibration is complete the door will open and close correctly You can manually adjust the close limit after calibration is complete by changing parameter P 275 See page 34 _0 Press Reset Syncron until the Syncron screen displays _0 Hold Reset To Open Pos RY FT 000091 1x to start sequence _0 Hold Res...

Страница 31: ...mity sensor 5 Is the door operating correctly Test listen for grinding whining or excessive motor noise Watch for changes in speed or excessive movement of the motor or drum Yes no action is needed No contact Rytec technical support at 800 628 1909 _0 Hold Reset To Open Pos RY FT 000092 fully open and close door five times Laser level Use the hinge screws as the vertical reference How to reverse t...

Страница 32: ... Laser level Always adjust the belt to lower the side of the door panel that is higher 17mm 13mm 3 In the head assembly jump the secondary drive belt one notch in the pulley Adjust the belt one tooth at a time then recheck level 4 Level the door panel again If the door panel is not level repeat these steps and retest If the door panel is level reset the tension on the belt 5 To reset the tension o...

Страница 33: ...elease lever DO NOT remove the cable The play in the spring allows it to turn with the release lever until it is free of the motor F211 E Stop Ext1 Emergency Stop Door is Stopped F211 E Stop Ext1 Emergency Stop Lever down brake released Lever up brake reset Controller No action is needed Reset the sensor 10mm 2 Remove the four screws and the bottom cover of the motor 3 Check the distance between t...

Страница 34: ...rd 5 The Service level password is saved 6 You can now go to parameter 275 Next navigate to parameter P 275 parameter P 221 for doors with photo eyes and change the value Do This Result 1 The default value is 12 default at 2 You can now change the value The UP arrow increases the value and raises the close limit position for the door The Down arrow decreases the value and lowers the close limit fo...

Страница 35: ... press either arrow to start cycling 5 Sec Acl 1 Receiver Transmitter a c b d If the red LED is on run a laser level on the vertical guide track to make sure the light curtains are at the same height Adjust if necessary Laser level 4 Test the Advanced3 light curtains by placing your hand flat across any of the light curtains at the top a middle b and bottom c while the door panel closes Make sure ...

Страница 36: ...s S S R doors T40 If the door has a preinstalled front hood cover reinstall the front spacer brackets in front of the console covers 3 Notes S and S R doors have both top and bottom front spreaders 4 If necessary use the spray paint to correct blemishes in the door finish 5 Caulk between the door opening and the door 6 Full vision SST doors remove the protective plastic film from both sides of eac...

Отзывы: