23
ELEKTROANSCHL†SSE
GemŠ§ Norm EN 60 335-1 biegsame Kabel ver-
wenden:
¥ falls unter PVC-Mantel mindestens den Typ
H05 VV-F verwenden;
¥ falls unter Gummimantel mindestens den Typ
H05 RR-F verwenden.
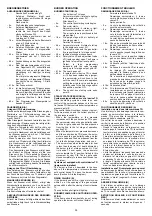
Alle an die Stecker 7)(A) anzuschlie§enden
Kabel sind durch die beigepackten Kabeldurch-
gŠnge zu fŸhren, die nach Abdrehen der
Schrauben 8), …ffnen der Plattenteile 9) und 10)
und Abnahme der Verschlu§blende in die Boh-
rungen der rechten oder linken Platte einge-
steckt werden. Die KabeldurchgŠnge und die
Vorbohrungen kšnnen auf verschiedene Art ver-
wendet werden; hier folgend ein Beispiel :
1- Pg 11
Einphasenspeisung
2- Pg 11
Gasventile
(wenn die Dichtheitskontrollein-
richtung RG1/CT oder LDU 11
nicht eingebaut ist)
3- Pg 9
TL-Regelung
4- Pg 9
TR-Regelung
5- Pg 11
GasdruckwŠchter oder Dichtheits-
kontrolle der Gasventile
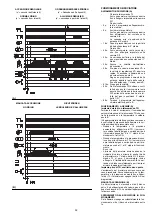
SCHEMA (B)
Elektroanschlu§ der Brenner RS 30 - 40 BLU
ohne Dichtheitskontrolle der Gasventile.
SCHEMA (C)
Elektroanschlu§ der Brenner RS 30 - 40 BLU
mit Dichtheitskontrolle VPS der Gasventile.
Die Dichtheitskontrolle der Gasventile erfolgt
umgehend vor jedem Brennerstart.
SCHEMA (D)
Elektroanschlu§ der Brenner RS 30 - 40 BLU
mit Dichtheitskontrolle der Gasventile RG1/
CT RIELLO oder LDU 11 LANDIS.
Die Dichtheitskontrolle der Gasventile erfolgt
umgehend vor jedem Brennerstart.
ZEICHENERKL€RUNG SCHEMEN (B - C - D)
h1 - StundenzŠhler der 1 Stufe
h2 - StundenzŠhler der 2 Stufe
IN - Schalter fŸr das manuelle Ausschalten des
Brenners
XP - Stecker fŸr die Dichtheitskontrolleinrichtung
X4 - Stecker mit 4 Polen
X6 - Stecker mit 6 Polen
X7 - Stecker mit 7 Polen
PC - GasdruckwŠchter fŸr Dichtheitskontrolle
PG - Gas-MindestdruckwŠchter
S
- Stšrabschaltung-Fernmeldung
S1 - Stšrabschaltung-Fernmeldung Dichtheits-
kontrolle
TR - Einstell-Fernsteuerung:
steuert 1. und 2. Betriebsstufe. Wird ein
Einstufebetrieb des Brenners gewŸnscht,
so ist TR zu ŸberbrŸcken.
TL - Begrenzungsfernsteuerung:
schaltet den Brenner aus, wenn die Tem-
peratur oder der Kesseldruck den festge-
legten Hšchstwert erreichen.
TS - Sicherheitsfernsteuerung:
tritt bei Defekt an TL in Aktion.
VR - Regelventil
VS - Sicherheitsventil
VERMERKE
¥
Die Brenner RS 30 - 40 BLU sind fŸr intermit-
tierenden Betrieb typgeprŸft. Das bedeutet, da§
sie - laut Vorschrift - wenigstens einmal pro 24
Stunden ausgeschaltet werden mŸssen, damit
die SteuergerŠte eine PrŸfung ihrer Funktions-
tŸchtigkeit bei Anfahren durchfŸhren kšnnen.
Das Ausschalten erfolgt gewšhnlich Ÿber die
Fernsteuerung des Kessel.
Sollte dies nicht der Fall sein, mu§ an IN ein
Zeitschalter reihengeschaltet werden, der ein
Brennerausschalten einmal alle 24 Stunden
gewŠhrleistet.
¥
Die Brenner RS 30 - 40 BLU werden werksei-
tig auf den Zweistufen-Betrieb voreingestellt
und sind daher an die Fernsteuerung TR ange-
schlossen werden. Wird dagegen ein Einstufen-
Betrieb erwŸnscht, so ist anstelle der Fern-
steuerung TR eine BrŸckenschaltung zwischen
Klemmen T6 und T8 des Steckers X4 zu legen.
ACHTUNG: Den Nulleiter nicht mit dem Pha-
senleiter in der Leitung der Stromversor-
gung vertauschen. Die Folge einer solchen
Vertauschung wŠre eine Stšrabschaltung
wegen nicht erfolgter ZŸndung.
ELECTRICAL CONNECTIONS
Use ßexible cables according to EN 60 335-1
Regulations:
¥ if in PVC sheath, use at least H05 VV-F;
¥ if in rubber sheath, use at least H05 RR-F.
All the wires to connect to the burner plugs 7)(A)
must enter through the supplied fairleads, which
must be Þtted into the relevant holes in the left
hand or right hand plate. To do this, Þrst
unscrews screws 8), then split the plate into its
two parts 9) and 10) and remove the membrane
press-outs from the holes.
The fairleads and hole press-outs can be used
in various ways; the following lists show one
possible solution:
1- Pg 11
Single-phase power supply
2- Pg 11
Gas valves
(when RG1/CT or LDU 11 leak
detection control device is not Þtted)
3- Pg 9
Remote control device TL
4- Pg 9
Remote control device TR
5- Pg 11
Gas pressure switch or gas valve
leak detection control device
LAYOUT (B)
The RS 30 - 40 BLU Models electrical connec-
tion without leak detection control device.
LAYOUT (C)
The RS 30 - 40 BLU Models electrical connec-
tion with VPS leak detection control device.
Gas valve leak detection control takes place
immediately before every burner start-up.
LAYOUT (D)
The RS 30 - 40 BLU Models electrical con-
nection with RG1/CT RIELLO or LDU 11
LANDIS leak detection control device.
Gas valve leak detection control takes place
immediately before every burner start-up.
KEY TO LAYOUTS (B - C - D)
h1 - 1st stage hourcounter
h2 - 2nd stage hourcounter
IN - Burner manual stop switch
XP - Plug for leak detection control device
X4 - 4 pole plug
X6 - 6 pole plug
X7 - 7 pole plug
PC - Gas pressure switch for leak detection
control device
PG - Min. gas pressure switch
S
- Remote lock-out signal
S1 - Remote lock-out signal of leak detection
control device
TR - High-low mode load remote control system:
controls operating stages 1 and 2. If the
burner is to be set up for single stage
operation, replace of remote control device
TR with a jumper.
TL - Load limit remote control system:
shuts down the burner when the boiler
temperature or pressure reaches the pre-
set value.
TS - Safety load control system:
operates when TL is faulty.
VR - Adjustment valve
VS - Safety valve
NOTA
¥
The RS 30 - 40 BLU burners have been type-
approved for intermittent operation. This means
they should compulsorily be stopped at least
once every 24 hours to enable the control box to
checks its own efÞciency at start-up.
Burner halts are normally provided for automati-
cally by the boiler load control system.
If this is not the case, a time switch should be Þt-
ted in series to IN to provide for burner shut-
down at least once every 24 hours.
¥
The RS 30 - 40 BLU burners are factory set for
two-stage operation and must therefore be con-
nected to control device TR.
Alternatively, if single stage operation is
required, instead of control device TR install a
jumper lead between terminals T6 and T8 of
connector X4.
WARNING: Do not invert the neutral with the
phase wire in the electricity supply line.
Inverting the wires will make the burner go
into lock-out because of Þring failure.
BRANCHEMENTS ELECTRIQUES
Utiliser des c‰bles ßexibles selon la norme EN
60 335-1:
¥ si en gaine PVC, au moins type H05 VV-F;
¥ si en gaine caoutchouc, au moins type H05
RR-F.
Tous les c‰bles ˆ raccorder aux Þches 7)(A) du
br“uleur doivent passer par les passe-c‰bles de
sŽrie ˆ insŽrer dans les oriÞces pratiquŽs dans
la plaque, de gauche ou de droite, apr•s avoir
desserrŽ les vis 8), ouvert la plaque (parties 9 et
10) et retirŽ le Þn diaphragme recouvrant les
trous. L'utilisation des passe-c‰bles et des trous
prŽdŽcoupŽs peut se faire de plusieurs fa•ons;
ˆ titre d'exemple nous indiquons l'une de ces
possibilitŽs.
1- Pg 11
Alimentation monophasŽe
2- Pg 11
Vannes gaz
(lorsque le contr™le d'ŽtanchŽitŽ
RG1/CT ou LDU 11 n'est pas montŽ)
3- Pg 9
TŽlŽcommande TL
4- Pg 9
TŽlŽcommande TR
5- Pg 11
Pressostat gaz ou contr™le d'Žtan-
chŽitŽ vannes gaz
SCHEMA (B)
Branchement Žlectrique bržleurs RS 30 - 40
BLU sans dispositif de contr™le d'ŽtanchŽitŽ.
SCHEMA (C)
Branchement Žlectrique bržleurs RS 30 - 40 BLU
avec dispositif de contr™le d'ŽtanchŽitŽ VPS.
Le contr™le d'ŽtanchŽitŽ des vannes se fait juste
avant chaque mise en marche du bržleur.
SCHEMA (D)
Branchement Žlectrique bržleurs RS 30 - 40
BLU avec dispositif de contr™le d'ŽtanchŽitŽ
RG1/CT RIELLO ou LDU LANDIS.
Le contr™le d'ŽtanchŽitŽ des vannes se fait juste
avant chaque mise en marche du bržleur.
LEGENDE SCHEMAS (B - C - D)
h1 - Compteur dÕheures 1•re allure
h2 - Compteur dÕheures 2•me allure
IN - Interrupteur Žlectrique pour arr•t manuel
bržleur
XP - Fiche pour le contr™le d'ŽtanchŽitŽ
X4 - Fiche 4 p™les
X6 - Fiche 6 p™les
X7 - Fiche 7 p™les
PC - Pressostat gaz pour contr™le dÕŽtanchŽitŽ
PG - Pressostat gaz seuil minimum
S
- Signalisation blocage bržleur ˆ distance
S1 - Signalisation blocage contr™le d'Žtan-
chŽitŽ ˆ distance
TR - TŽlŽcommande de rŽglage:
commande 1•re et 2•me allure de fonc-
tionnement. Si l'on dŽsire un bržleur ˆ
fonctionnement ˆ une seule allure, rempla-
cer TR par un pontet.
TL - TŽlŽcommande de limite:
arr•te le bržleur quand la tempŽrature ou
la pression dans la chaudi•re a atteint la
valeur ÞxŽe.
TS - TŽlŽcommande de sŽcuritŽ:
intervient quand le TL tombe en panne.
VR - Vanne de rŽglage
VS - Vanne de sŽcuritŽ
NOTES
¥
Les mod•les RS 30 - 40 BLU ont ŽtŽ homolo-
guŽs pour fonctionner de fa•on intermittente.
Cela veut dire qu'ils doivent s'arr•ter selon les
normes au moins 1 fois toutes les 24 heures
pour permettre au bo”tier d'effectuer un contr™le
de son efÞcacitŽ au dŽmarrage. Normalement
l'arr•t du bržleur est assurŽ par le thermostat de
la chaudi•re. S'il n'en Žtait pas ainsi, il faudrait
appliquer en sŽrie au IN un interrupteur horaire
qui commanderait l'arr•t du bržleur au moins 1
fois toutes les 24 heures.
¥
Les mod•les RS 30 - 40 BLU quittent l'usine
dŽjˆ prŽvus pour le fonctionnement ˆ 2 allures,
et la tŽlŽcommande TR doit •tre reliŽe.
Par contre, si l'on dŽsire un fonctionnement ˆ 1
allure, remplacer la tŽlŽcommande TR par un
pontet entre les bornes T6 et T8 de la Þche X4.
ATTENTION:
Dans la ligne d'alimentation
Žlectrique, ne pas inverser le neutre avec la
phase. L'inversion Žventuelle provoquerait
un blocage dž ˆ l'absence d'allumage.


