background image

Original Hanger (D311) 

SM 3-31 

D093/D094 

Inst

allation 

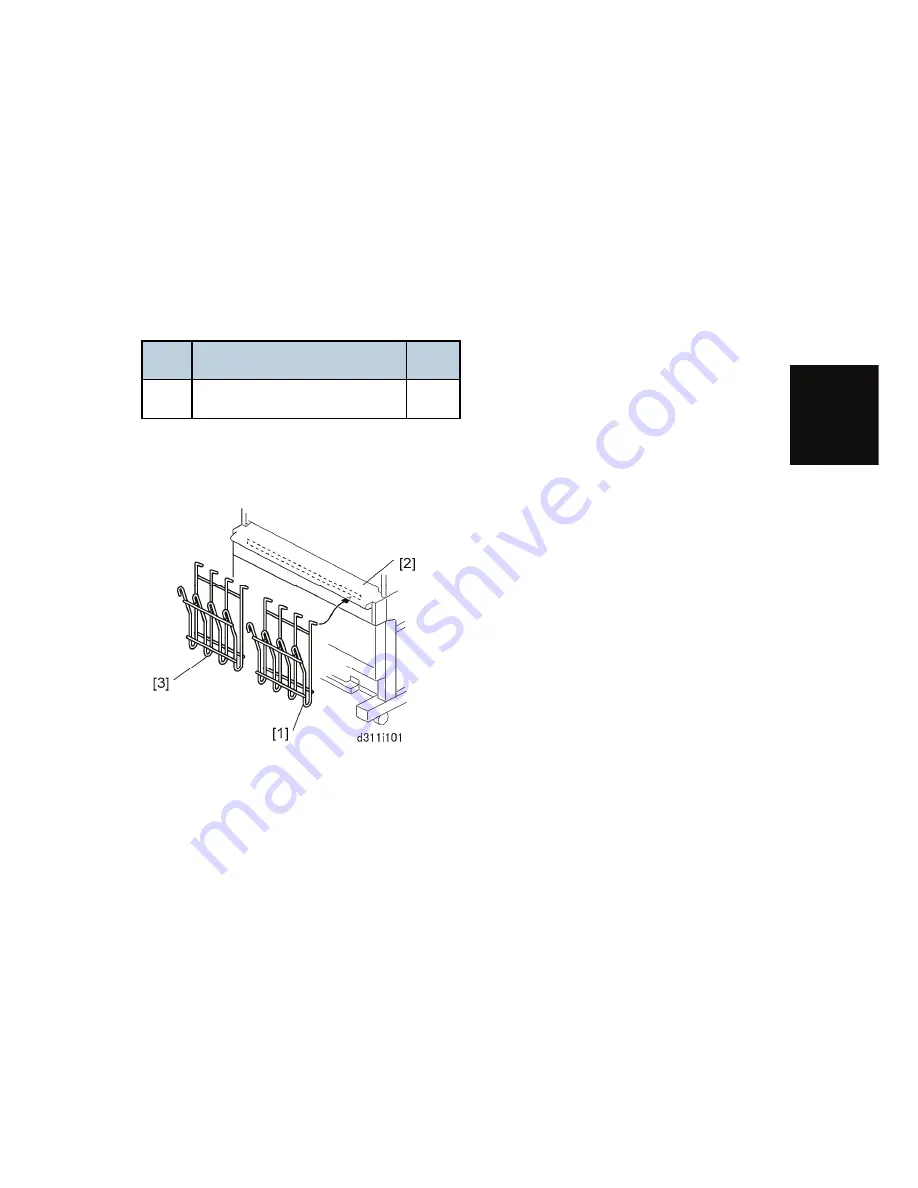
3.3  ORIGINAL HANGER (D311) 

The optional original hanger is attached to the bypass feed table on the front of the main 

machine. 

3.3.1 ACCESSORY CHECK 

Check the accessories and their quantities against the table below. 


No.


Description


Q’ty


1 Original 

Hangers 


3.3.2 INSTALLATION 


1.  Attach one original hanger [1] to the bypass feed table [2]. 

2.  Attach the other original hanger [3] to the bypass feed table. 

Содержание D093

Страница 1: ...D093 D094 SERVICE MANUAL 006365MIU...

Страница 2: ......

Страница 3: ...D093 D094 SERVICE MANUAL...

Страница 4: ......

Страница 5: ...D093 D094 SERVICE MANUAL 006365MIU...

Страница 6: ......

Страница 7: ...ION OF RICOH AMERICAS CORPORATION All product names domain names or product illustrations including desktop images used in this document are trademarks registered trademarks or the property of their r...

Страница 8: ......

Страница 9: ...tion Users of this manual should be either service trained or certified by successfully completing a Ricoh Technical Training Program Untrained and uncertified users utilizing information contained in...

Страница 10: ......

Страница 11: ...LEGEND PRODUCT CODE COMPANY GESTETNER LANIER RICOH SAVIN D093 NA NA Aficio MP W2401 NA D094 GWD3006 LW426 Aficio MP W3601 3406WD DOCUMENTATION HISTORY REV NO DATE COMMENTS 02 2011 Original Printing...

Страница 12: ......

Страница 13: ...1 6 1 1 7 OPTIONS 1 6 PRODUCT INFORMATION 2 PRODUCT INFORMATION 2 1 2 1 SPECIFICATIONS 2 1 2 2 MAIN MACHINE AND PERIPHERALS 2 2 2 3 GUIDANCE FOR THOSE WHO ARE FAMILIAR WITH PREDECESSOR PRODUCTS 2 4 2...

Страница 14: ...or Installation 3 5 3 2 MAIN MACHINE INSTALLATION D093 D094 3 8 3 2 1 ACCESSORY CHECK 3 8 3 2 2 MACHINE INSTALLATION PROCEDURE 3 9 Before You Begin 3 9 Removing the Shipping Material 3 10 Setting the...

Страница 15: ...Wide Mylars to the Back of the Roll Feeder 3 45 Securing the Power Cord 3 46 Installing the Paper Rolls 3 47 Attaching the Lower Output Tray Exit Guide Plates 3 47 Entering the Cut Length Adjustment 3...

Страница 16: ...he Use of SD Cards 3 73 Move Undo Restrictions 3 74 Application Move 3 74 Undo Exec 3 75 3 9 4 PRINTER OPTION TYPE W3601 D506 3 76 Accessories 3 76 Installation 3 76 3 9 5 SCANNER OPTION TYPE W3601 D5...

Страница 17: ...0 REPLACEMENT AND ADJUSTMENT 5 REPLACEMENT AND ADJUSTMENT 5 1 5 1 COMMON PROCEDURES 5 1 5 1 1 BEFORE WORKING ON THE MAIN MACHINE 5 1 5 1 2 SIDE COVERS 5 2 5 1 3 REAR COVER CONTROLLER COVER 5 3 5 1 4 P...

Страница 18: ...EANER SENSOR 5 33 5 3 4 LPH 5 34 5 3 5 TRANSFER CORONA SEPARATION CORONA WIRES 5 36 5 4 DEVELOPMENT 5 38 5 4 1 DEVELOPMENT UNIT 5 38 5 4 2 DEVELOPER 5 39 5 4 3 PAPER SET SENSOR REGISTRATION SENSOR 5 4...

Страница 19: ...5 72 5 7 11 PRESSURE ROLLER 5 73 5 7 12 HOT ROLLER THERMISTOR THERMOSTATS 5 74 5 8 MOTORS 5 75 5 8 1 SCANNER MOTOR 5 75 5 8 2 DRUM MOTOR 5 76 5 8 3 FUSING MOTOR MAIN MOTOR 5 77 5 8 4 USED TONER BOTTL...

Страница 20: ...110 5 12 3 LPH ADJUSTMENT WITH SP MODES 5 113 Doing SP Adjustment Settings for a Replacement LPH 5 113 To Print Pattern IPU Test Pattern 27 5 113 Main Scan Adjustment White Black Vertical Lines 5 114...

Страница 21: ...C100 7 15 7 3 2 SC200 7 17 7 3 3 SC300 7 17 7 3 4 SC400 7 19 7 3 5 SC500 7 21 7 3 6 SC600 7 27 7 3 7 SC700 7 31 7 3 8 SC800 7 32 7 3 9 SC900 7 44 7 4 JAM CODE TABLES COVER OPEN 7 51 7 4 1 OVERVIEW 7 5...

Страница 22: ...SIF 7 76 7 6 5 GW CONTROLLER BOARD 7 77 LEDs 7 77 DIP Switches 7 79 ENERGY SAVING 8 ENERGY SAVING 8 1 8 1 ENERGY SAVE 8 1 8 1 1 ENERGY SAVER MODES 8 1 Timer Settings 8 1 Return to Stand by Mode 8 2 Re...

Страница 23: ...IX SP MODE TABLES INSTALLATION APPENDIX UP MODE PREVENTIVE MAINTENANCE REPLACEMENT AND ADJUSTMENT SYSTEM MAINTENANCE REFERENCE TROUBLESHOOTING ENERGY SAVING TAB POSITION 2 TAB POSITION 1 TAB POSITION...

Страница 24: ......

Страница 25: ...components as the machine starts making copies as soon as the warm up period is completed 6 The inside and the metal parts of the fusing unit become extremely hot while the machine is operating Be ca...

Страница 26: ...ling them apart may lead to chemical reactions and heat build up The danger of explosion exists if a battery of this type is incorrectly replaced Replace only with the same or an equivalent type recom...

Страница 27: ...ans For more refer to Core Tech Manual Bushing C ring Connector E ring FFC Flat Film Connector Gear Harness clamp Hook or tab release Knob screw black Knob screw sliver Pivot screw Screw common screw...

Страница 28: ...EF describe the direction of paper feed The arrows indicate the direction of paper feed In this manual Horizontal means the Main Scan Direction and Vertical means the Sub Scan Direction relative to th...

Страница 29: ...prevent damage to the machine This information provides tips and advice about how to best service the machine Trademarks Microsoft Windows and MS DOS are registered trademarks of Microsoft Corporation...

Страница 30: ......

Страница 31: ...NEW FEATURES OF D093 D094 REVISION HISTORY Page Date Added Updated New None...

Страница 32: ......

Страница 33: ...1 MAIN MACHINE 1 1 1 MODEL NUMBERS NAMES Production No Model Name D093 21 Ricoh Aficio MP W2401 D093 27 Ricoh Aficio MP W2401 NRG MP W2401 D094 17 Ricoh Aficio MPW3601 Gestetner GWD 3006 Savin 3406WD...

Страница 34: ...or scanning 2 Operation panel The new operation panel provides better usability and many new features described below 3 Original table The original table is longer by 40 mm 1 8 The extra length provid...

Страница 35: ...machine The breaker switch A is at the same location However removal of the rear cover is no longer required for breaker switch testing A new anti condensation heater switch is provided The anti conde...

Страница 36: ...or use on he operation panel Thumbnail view Documents can be viewed as thumbnails in full color Zoom in out feature also provided Simplified display Allows selecting enlarged display with minimum numb...

Страница 37: ...machine whether the upper or lower path can be selected on the operation panel or whether output is restricted to the lower path The D093 D094 also has the lever but no sensor The paper exit selectio...

Страница 38: ...1 1 7 OPTIONS Red text in the diagram above denotes new options No Option Comments 01 Roll Feeder Type 3601A B D503 One roll 1 02 Roll Feeder Type 3601A B D504 Two rolls 1 03 Paper Cassette Type 240 B...

Страница 39: ...nts of the new Roll Feeder D503 D504 are nearly identical to the previous Roll Feeder B851 B852 2 A roller feeder must be installed with this printer option The TIFF GL filter application is provided...

Страница 40: ......

Страница 41: ...PRODUCT INFORMATION REVISION HISTORY Page Date Added Updated New None...

Страница 42: ......

Страница 43: ...Specifications SM 2 1 D093 D094 Product Information 2 PRODUCT INFORMATION 2 1 SPECIFICATIONS See Appendices for the following information Specifications...

Страница 44: ...ALS Main Peripherals No Item Machine Code 1 Main Machine D093 D094 2 Roll Feeder Type 3601A B D504 D504 D503 D504 3 Table Type 240 B854 4 Rear Stacker Option for copies D312 5 Original Hanger Option f...

Страница 45: ...ption Type W3601 D506 SD cards x2 Scanner Option Type W3601 D507 SD card IEEE802 11a g Interface Unit Type J D377 01 02 K D377 19 Board GigaBit Ethernet Type B D377 21 Board File Format Converter Type...

Страница 46: ...The D093 D094 is based on the engine of the B286 B289 The target reliability specifications are the same for both models 2 3 1 FEATURE COMPARISON Target Reliability D093 D094 vs B286 B289 Item D093 D0...

Страница 47: ...per Stack Capacity 50 sheets A1 D size LEF 50 sheets A1 D size SEF External controller P S 1 No Yes RATIO CTL Color scanning 2 Yes No SDK 3 Yes No PDF batch scanning Yes 4 Print and scan tools TBA No...

Страница 48: ...D506 4 On the B286 B289 batch scanning is possible only with a firmware update on the main machine 5 An additional 1GB memory unit is required for the Scanner Option Type W3601 D507 Memory is provide...

Страница 49: ...carded for D093 D094 Folder FD 6500A B889 Manual Feeder D333 VM Card Type E D338 VMware for this machine resides on the new printer SD card Printer Option TIFF GL Filter Printer Controller RW 3600 Int...

Страница 50: ...d Item B286 B289 D093 D094 Roll Feeder Type 3600 A B B852 B853 Type 3601 A B D503 D504 Printer Option Type 3600 D320 Type 3601 D506 Scanner Option Type 3600 D321 Type 3601 D507 Browser Unit Type C B82...

Страница 51: ...Overview SM 2 9 D093 D094 Product Information 2 4 OVERVIEW 2 4 1 MACHINE GENERAL LAYOUT...

Страница 52: ...aper size and paper type that the user input at the operation panel 5 OPC Drum The components around the OPC drum do the charging image writing development transfer separation cleaning and quenching 6...

Страница 53: ...Overview SM 2 11 D093 D094 Product Information 2 4 2 MECHANICAL COMPONENT LAYOUT...

Страница 54: ...put Stacker 21 Roll 1 Holder 7 Original Upper Exit Guides 22 Paper Cassette 8 Cleaning Unit 23 Paper Cassette Feed Roller 9 Upper Exit Rollers 24 Paper Cassette Grip Rollers 10 Original Exit Guides St...

Страница 55: ...Overview SM 2 13 D093 D094 Product Information 2 4 3 DRIVE LAYOUT 1 Scanner Motor 2 Drum Motor 3 Main Motor 4 Fusing Motor...

Страница 56: ...Bypass Path 2 Original Path Upper Upper output stacker installed 3 Original Path Straight Through Upper output stacker removed 4 Paper Path Upper Normal Default 5 Paper Path Rear Selectable See below...

Страница 57: ...r Lower under Copy Output Location on the display to select the exit Upper Copy feeds out to the top of the machine Lower Copy feeds out the rear If the upper output stackers 1 are removed The paper e...

Страница 58: ...selection switch 2 and keeps it closed This de activates the paper junction gate solenoid 3 The closed junction gate 4 guides paper to the top of the machine The lever 5 should be up For normal operat...

Страница 59: ...omes up and opens the switch This activates the 2 paper junction gate solenoid which opens the paper junction gate 3 The open junction gate guides paper out the back of the machine With both the upper...

Страница 60: ...ontains the AC drive board that supplies AC power to the fusing lamp MCU Main Control Unit This is the engine control board The MCU manages Base engine control scanning control image processing contro...

Страница 61: ...cated on the left side of the panel Also contains the LEDs for the left side keys Inverter Mounted under the LCDC provides the light for the LCD touch panel OP R Operation Panel Left Relays key presse...

Страница 62: ...netic Clutches MC1 Cassette Feed Clutch This transfers power from the cassette feed motor to the feed and grip rollers in the cassette MC2 Paper Registration Clutch This controls the registration roll...

Страница 63: ...Main Motor This controls the registration roller development unit and the agitator in the toner cartridge M7 PCB Cooling Fan Motor 1 Cools the SIPU MCU and controller board M8 PCB Cooling Fan Motor 2...

Страница 64: ...SU Power Supply Unit This supplies dc power for the machine heaters and dehumidifiers in the roll feeder PCB4 RFDB Roll Feed Drive Board This is attached to the optional roll feeder It controls the co...

Страница 65: ...ckground lighting of the LCD screen on the operation panel PCB13 OP R Relays the key presses from keys on the right side of the operation panel to the LCDC PCB14 OP L Relays the key presses from keys...

Страница 66: ...supply toner near end and toner end There is no toner density sensor in this machine S6 Original Exit Sensor This detects the original when it feeds out of the scanner S7 Original Registration Sensor...

Страница 67: ...B4 9 width paper S19 Paper Registration Sensor This detects paper at the registration rollers S20 Paper Set Sensor This detects when a cut sheet is placed on the manual feed table by pass S21 Relay S...

Страница 68: ...S26 Roll End Sensor 3 Detects the trailing edge of the roll after there is no more paper on Roll 1 This sensor is included because if the color of the roll core is not black Roll End Sensor 1 cannot a...

Страница 69: ...ff SW2 Exit Cover Switch This detects if the exit cover on the rear of the machine is closed SW3 Main Power Switch This switches the copier on and off SW4 Scanner Stop Switch This is on the operation...

Страница 70: ...after 3 consecutive jams occur in the fusing unit Note SC559 is not issued unless SP1159 is switched on Default 0 off The fusing unit cover must always be opened and closed after this SC occurs to re...

Страница 71: ...idifier 1 Front Right One of four dehumidifiers that keeps the roll feeder drawer free of moisture H2 Dehumidifier 2 Front Left H3 Dehumidifier 3 Rear Right H4 Dehumidifier 4 Rear Left H5 Anti Condens...

Страница 72: ...it fails TS2 Thermostat 2 End 200 C This safety device prevents overheating if the temperature control circuit fails CB1 Circuit Breaker Breaks the main power supply to the machine if there is an over...

Страница 73: ...CU System Scanner Control Unit Does overall system and scanner control ECU Engine Control Unit Does print engine and image processing control The MCU DIP switches must always be OFF default and they m...

Страница 74: ...on lamps VDB SIF VDB Video Drive Board The VDB controls the LPH and the algorithms to convert video data SIF Scanner Interface Board The SIF controls the CIS Contact Image Sensor and changes analog da...

Страница 75: ...ll sheet feeder RFDB Roll Feed Drive Board The RFDB on the bottom panel of the roll feeder controls the motors solenoids and clutches for the two paper rolls in the roll sheet feeder SFDB Sheet Feed D...

Страница 76: ...The controller board controls the memory and all peripheral devices The GW architecture control all applications i e copying printing and scanning The controller board has board slots and SD card slo...

Страница 77: ...INSTALLATION REVISION HISTORY Page Date Added Updated New None...

Страница 78: ......

Страница 79: ...se vertical black and white lines in scanned images If the machine is near a window turn it around so the back of the machine is not facing the window and install blinds to block sunlight 4 Ventilatio...

Страница 80: ...chine to ammonia in the air cannot be avoided and if poor reproduction in filled areas of the images is visible do SP2201 2 and enter a setting 50 steps lower than the current setting 8 Do not install...

Страница 81: ...l 120V 60 Hz 15A or more 220 240V 50 60 Hz 10A or more 2 Permissible Voltage Fluctuation 10 3 Do not set objects on the power cord Make sure the plug is firmly inserted in the outlet Do not connect th...

Страница 82: ...installation Installation Flow Diagram Machine Pre Installation Remove the machine from its box Remove all packing material and tape Put the machine on the roll feeder or the table Roll Feeder or Tab...

Страница 83: ...supplies toner 2923 1 Execute Cleaning Blade Replace Mode Applies a thin layer of toner to the drum This prevents scratches on the drum when the machine power comes on for the first time 3001 2 Initia...

Страница 84: ...st for D503 D504 1st Roll 1920 26 Cut Length Adjustment 1st Roll 1189 mm Plain Paper Adjust for D503 D504 1st Roll 1920 82 Cut Length Adjustment 2nd Roll 297 mm Plain Paper Adjust for D504 2nd Roll 19...

Страница 85: ...ding Edge Registration Cassette Adjust for Paper Cassette B853 1002 3 Side to Side Registration Cassette MFP Options Onboard Device Settings 5985 1 On Board NIC Both SP codes must be set to 1 to enabl...

Страница 86: ...nel wait for the power switch LED to stop flashing then switch off the main switch on the side of the machine 3 2 1 ACCESSORY CHECK Check the accessories and their quantities against the table below N...

Страница 87: ...for a long period in a cold location and moved to a warm room If time permits delay installation and allow the machine to set for at least 24 hours at room temperature after moving it from a cold envi...

Страница 88: ...r cord to the power source during these installation procedures until the procedure tells you to do this 1 Remove all the orange filament tape and packing materials from the main machine Use a clean c...

Страница 89: ...y or damage to the main machine always use these handles 3 to lift the main machine Two or more service technicians are necessary to lift the main machine and set it on the roll feeder or table 2 Lift...

Страница 90: ...rs and screws 1 Left upper cover x 2 2 Left screws x 2 3 Right upper cover x 2 4 Right screws x 2 6 Open the upper unit 7 Remove 1 Left cover x 3 2 Right cover x 3 3 Manual feed table x 2 Open the dra...

Страница 91: ...3 13 D093 D094 Installation 8 Remove the right transport lock plate 1 x 4 9 Remove the left transport lock plate 2 x 4 10 Install the studs 1 on the right side and the left side You must fasten each...

Страница 92: ...rovided as accessories with either the Roll Feeder D503 D504 or Table B854 12 Attach screws but do not tighten them 13 While you lift the main machine by its handle 3 set screw in the lower hole of th...

Страница 93: ...ther the Roll Feeder D503 D504 or Table B854 17 Attach the movable guide plates 1 x6 Each plate is the same It is not possible to install a plate in the incorrect position Attach each plate with the r...

Страница 94: ...eg Covers 1 Raise the original feed unit 1 2 Remove the protective sheet and tape 2 3 Remove the original table 3 x1 x1 Be sure to re attach the pivot screw and tapping screw at the correct positions...

Страница 95: ...level side to side within 0 15 m 8 Attach the left leg cover 2 and the right leg cover 3 9 Remove the lock screws 1 2 x 2 10 Lift the left hinge 3 and right hinge 4 off their support screws then lift...

Страница 96: ...nt with the level on the exposure glass go back to Step 5 and do the adjustment again with the level on the development unit Developer 1 Push up the buttons 1 to release the upper unit Then open the u...

Страница 97: ...toner hopper cover 2 7 Close the upper unit 3 8 Connect the power supply cord To ensure safe operation of the machine always make sure that the machine is grounded at the power source 9 Switch the mai...

Страница 98: ...tap the capped end of the cartridge 1 4 or 5 times 3 Tap the other end of the cartridge 4 or 5 times 4 Shake the cartridge from side to side 4 or 5 times so the toner moves freely inside the cartridg...

Страница 99: ...Never break the seal of a toner cartridge until it is to be installed The room temperature where toner cartridges are stored should be less than 40 C 104 F To prevent fire hazards and personal injury...

Страница 100: ...ner cartridge has been installed in the machine See previous section 2 Next do SP2801 1 to mix the developer and supply toner This takes about 5 minutes 3 Do SP2923 This applies a thin layer of toner...

Страница 101: ...lower the operation panel 1 to one set of the three sets of holes to set the panel at the desired angle to reduce glare on the operation panel 2 Push each anchor screw 2 into its hole x 3 It is not ne...

Страница 102: ...machine power is off Do not turn on the main machine The main machine must be off 2 At the back of the machine use the tip of a small screwdriver to depress the breaker test button A The breaker switc...

Страница 103: ...achine These blinders prevent light from entering the scanner unit Strong light or direct sunlight can interfere with the operation of the CIS unit and cause vertical white and black lines to appear i...

Страница 104: ...for Copy Output on the operation panel The guide lever should be up for Upper output The guide lever should be down for Lower output so the original can pass over it 7 Attach the upper output guide hi...

Страница 105: ...ler feeder or table x 3 The lines and numbers embossed on the back of the main machine see the upper left of the above diagrams show where to position the exit guide plates for different paper widths...

Страница 106: ...chine pulls the original stops for 1 second then starts to feed it 3 Do a sample copy from the roller feeder and paper cassette if these options are installed 4 If the copied image is not in the corre...

Страница 107: ...you switch on the anti condensation heater In order to comply with new International Energy Star Standards the anti condensation heater is switched off when the machine leaves the factory Before you...

Страница 108: ...the main machine you could twist and possibly damage the bottom of the main machine Never push on the main machine while it is installed on top of the roll feeder or table To prepare the main machine...

Страница 109: ...he bypass feed table on the front of the main machine 3 3 1 ACCESSORY CHECK Check the accessories and their quantities against the table below No Description Q ty 1 Original Hangers 2 3 3 2 INSTALLATI...

Страница 110: ...quantities against the table below No Description Q ty 1 Lower Output Trays 3 2 Leg Covers 2 3 Movable Guides 6 4 Shoes 4 5 Joint Brackets Left Right 2 6 Exit Guide Plates 2 7 Screws Cosmetic Silver...

Страница 111: ...Roll Feeder D503 D504 SM 3 33 D093 D094 Installation...

Страница 112: ...event injury or damage to the main machine always use these handles 3 to lift the main machine Two or more service technicians are needed to lift the main machine and set it on the roll feeder 2 Lift...

Страница 113: ...r Do not try to open the drawer of the roll feeder until after you set the main machine on top of the roll feeder 1 Open the drawer 1 of the roll feeder 2 Remove the spring lock plate 2 x 2 3 Remove t...

Страница 114: ...D093 D094 3 36 SM 6 Remove the covers and screws 1 Left upper cover x 2 2 Left screws x 2 3 Right upper cover x 2 4 Right screws x 2 7 Open the upper unit 8 Remove 1 Left cover x 3 2 Right cover x 3 3...

Страница 115: ...93 D094 Installation 9 Remove the right transport lock plate 1 x 4 10 Remove the left transport lock plate 2 x 4 11 Install the studs 1 on the right side and the left side You must fasten each stud in...

Страница 116: ...ws are provided as accessories with the roll feeder 13 Attach screws but do not tighten them 14 While you lift the main machine by its handle 3 set screw in the lower hole of the keyhole cutout and ti...

Страница 117: ...8 Attach the movable guide plates 1 x6 Each plate is the same It is not possible to install a plate in the incorrect position Attach each plate with the ribbed side down Move the hinges 2 a small dist...

Страница 118: ...ers 1 Raise the original feed unit 1 2 Remove the protective sheet and tape 2 3 Remove the original table x1 x1 Be sure to re attach the pivot screw and tapping screw at the correct positions 4 Open t...

Страница 119: ...side to side within 0 15 m 8 Attach the left leg cover 2 and the right leg cover 3 9 Remove the lock screws 1 2 x 2 10 Lift the left hinge 3 and right hinge 4 off their support screws then lift the un...

Страница 120: ...15 m Normally the adjustment with the level on the exposure glass is not required However if you have to do the adjustment with the level on the exposure glass go back to Step 5 and do the adjustment...

Страница 121: ...main machine and top of the roll feeder 7 Route the harness x 1 through bracket 4 then attach the bracket x 2 Use one screw from the accessories 8 Route the harness x 2 through bracket 5 and then atta...

Страница 122: ...e Main Machine 1 Use a clean cloth moistened with a small amount of alcohol to clean the area around the rib 2 Remove the tape from each end of one of the narrow mylars 3 Attach one end to the top edg...

Страница 123: ...move the tape from each end of one of the wide mylars 4 Align the end with the narrow tape with the top edge 4 of the rear plate Make sure that the right edge is parallel to the vertical lines on the...

Страница 124: ...Roll Feeder D503 D504 D093 D094 3 46 SM Securing the Power Cord 1 Clean the rear plate 1 with alcohol 2 Attach the harness clamp 2 3 Clamp the power cord 3 to the roll feeder x 1...

Страница 125: ...3 51 Paper Cassette B853 If you do not install the paper cassette first you must remove Roll 2 before you can install the optional paper cassette To install the paper rolls follow the instructions on...

Страница 126: ...how where to position the exit guide plates for different paper widths 2 Position the right exit guide plate 1 as shown then attach it with its magnet 3 Position the left exit guide plate 2 as shown t...

Страница 127: ...Plain Paper Roll 1 1920 26 Cut Length Adjustment 1st Roll 1189 mm Plain Paper Roll 2 1920 82 Cut Length Adjustment 2nd Roll 297 mm Plain Paper Roll 2 1920 86 Cut Length Adjustment 2nd Roll 1189 mm Pla...

Страница 128: ...ish is already attached Do this procedure only if you need to attach a decal for another language 1 Pull the roll feeder out of the machine 2 Remove the front cover of the roll feeder 1 x3 3 Select on...

Страница 129: ...TE B853 The Paper Cassette B853 is installed inside the Roll Feeder D503 D504 3 5 1 ACCESSORY CHECK Check the accessories and their quantities the table below No Description Q ty 1 Paper Cassette Unit...

Страница 130: ...oll feeder 2 Remove the front cover 1 of the roll feeder x 3 If you cannot see the screw on the left or right side of the front cover push the cutter 2 away from the top of the screw 3 Remove the knoc...

Страница 131: ...ble through the open clamps then close the clamps x6 12 Reattach the board cover front cover and rear plate of the roll feeder 13 Reinstall the paper rolls and close the drawer of the roll feeder 14 P...

Страница 132: ...heir quantities in the table below No Description Q ty 1 Lower Output Trays 3 2 Leg Covers 2 3 Shoes 4 4 Joint Brackets Left Right 2 5 Exit Guide Plates 2 6 Screws 9 7 Mylars Wide 2 8 Mylars Narrow 2...

Страница 133: ...side of the main machine To prevent injury or damage to the main machine always use these handles 1 to lift the main machine Two or more service technicians are necessary to lift the main machine and...

Страница 134: ...e level Attach the leg covers p 3 16 Leveling the Main Machine and Attaching Leg Covers Attaching the Guide Plate Keep the power cord disconnected while you do this procedure 1 Install the guide plate...

Страница 135: ...machine by its handle 3 set screw in the lower hole of the keyhole cutout and tighten it 4 Tighten screws 5 Do the above procedure again for the left joint bracket 4 When you attach the left bracket...

Страница 136: ...d 3 to the table x 1 Attach the Narrow Mylars to the Main Machine 1 If the rear cover is attached to the main machine remove it x 2 1 Use a clean cloth moistened with a small amount of alcohol to clea...

Страница 137: ...de of the rear plate 1 find the straight line 2 and patterns 3 2 Use a clean cloth moistened with a small amount of alcohol to clean this area and the bottom edge of the cover 3 Remove the tape from e...

Страница 138: ...t use inch paper sizes 1 Remove the stoppers 1 x 2 ea 2 Use a clean cloth soaked in alcohol to clean the surfaces 2 where the stopper brackets 3 will be attached 3 Remove the double sided tape 4 from...

Страница 139: ...e lines and numbers embossed on the back of the main machine see the upper left of the above diagram show where to position the exit guide plates for different paper widths 2 Position the right exit g...

Страница 140: ...Table B854 D093 D094 3 62 SM 4 Do a test print to confirm that the paper exits the main machine straightly and smoothly between the guide plates...

Страница 141: ...R D312 The rear stacker is an option installed on the back of the Roll Feeder D503 D504 3 7 1 ACCESSORIES Check the accessories and their quantities against the table below No Description Qty 1 Copy T...

Страница 142: ...Rear Stacker D312 D093 D094 3 64 SM 3 7 2 INSTALLATION 1 Attach 1 Copy tray holder x4 2 Rear copy tray x3 3 Guide mylar x1 to center of copy tray...

Страница 143: ...K Check the accessories and their quantities against the table below No Description Q ty 1 Screw M3x6 1 2 Screw M3x8 Wide Pitch 4 3 Screw M3x8 Narrow Pitch 2 4 Clamp 3 5 Plate Spring 1 6 USB Cable 1 7...

Страница 144: ...2 Select the device access decal 2 for the local language and attach it to the top of the unit 3 Select the close cover decal 3 for the local language and attach it to the top of the unit 4 Connect th...

Страница 145: ...D094 Installation 7 Fasten the bracket 1 to the side of the slot unit x4 8 Open the original feed unit 1 9 Remove the right upper cover 2 x 2 10 Remove the right cover 3 x 3 11 Remove the left upper c...

Страница 146: ...USB 2 0 SD Slot Type E D534 D093 D094 3 68 SM 13 Open the rear exit cover 1 14 Remove rear top cover 2 x 1 x1 x 2 15 Attach the unit 1 to the left rear corner of the machine x2...

Страница 147: ...so it is aligned with the edges of the slot covers above 19 Route the cable and close the clamps x3 20 Re set plate 1 Remove the plate x1 Rotate it clockwise 180 degrees Re attach the plate x1 21 Conn...

Страница 148: ...0 SD Slot Type E D534 D093 D094 3 70 SM SP1013 is a Scanner SP code To open the Scanner SP list enter the SP mode and select Scanner SP not System SP 26 Exit SP mode and test operation of the installe...

Страница 149: ...boards and SD cards are written on a decal on the controller box cover Always touch a grounded surface to discharge static electricity from your hands before you handle SD cards printed circuit boards...

Страница 150: ...ion these applications must be moved to the Printer Option SD card These three applications are then installed together p 3 76 Printer Option Type W3601 D506 3 The scanner option requires the File For...

Страница 151: ...ways touch a grounded surface to discharge static electricity from your hands before you handle SD cards When an application is moved from one SD card to another SD card the authentication data is mov...

Страница 152: ...TIFF GL Filter 2 No The Data Overwrite Security and HDD Encryption applications are on one the Security Encryption SD card that is inserted into SD card Slot 1 before the machine is shipped These appl...

Страница 153: ...3 2 restores an application to its original SD card The application is moved from Slot 2 to Slot 1 1 Turn off the main power switch 2 Remove the SD card slot cover x1 p 3 73 Removing the SD Card Slot...

Страница 154: ...installation of the printer application you must first move the Data Overwrite Security and HDD Encryption applications to the Printer SD card Make sure that the machine is switched off and disconnec...

Страница 155: ...77 D093 D094 Installation 10 Reattach the SD card slot cover 11 On the operation panel remove the dummy keytop 1 and replace it with the Printer keytop 2 12 Attach the PS3 decal 3 13 Attach the Enabl...

Страница 156: ...nd HDD Encryption applications on the Security Encryption SD card in Slot 1 Before installation of the printer application you must first move the Data Overwrite Security and HDD Encryption applicatio...

Страница 157: ...n of MFP Options SM 3 79 D093 D094 Installation 2 Remove the rear cover 1 of the main machine x2 3 Remove the cover of the controller unit 2 x1 4 Remove the shield cover 1 x 8 5 Remove controller boar...

Страница 158: ...operation panel remove the dummy keytop and replace it with the Scanner keytop 11 Reconnect the machine to its power source and turn the main power switch on 12 Enter the SP mode and make sure that SP...

Страница 159: ...gainst the table below Description Q ty 1 File Format Converter PCB 1 Installation of the File Format Converter is required for the scanner option Installation Before doing the procedure turn off the...

Страница 160: ...D093 D094 3 82 SM 3 9 7 IEEE802 11A G INTERFACE UNIT TYPE J D377 01 02 TYPE K D377 19 Accessories Check the accessories and their quantities against the table below Description Qt y 1 LAN board with a...

Страница 161: ...nd unplug the machine from its power source 1 Remove the cover 1 of Slot A x 2 2 Insert the LAN board 2 into Slot A x 2 3 Use a clean cloth moistened with alcohol to clean where clamp 1 will be attach...

Страница 162: ...t Antenna1 2 with the black ferrite core is high and that Antenna 2 3 with the white ferrite core is low as shown above Antenna 2 receives and Antenna 1 transmits as well as receives so it must always...

Страница 163: ...is installed the standard Ethernet board can no longer be used A cap is provided to cover the standard Ethernet connector This prevents accidental reconnection of the cable while the Gigabit Ethernet...

Страница 164: ...e the cover of the controller unit 2 x1 3 Remove the shield cover 1 x 8 4 Remove controller board unit 1 x7 5 Remove the cover of Slot C x1 6 Install the Gigabit Ethernet board x2 7 Insert the LAN con...

Страница 165: ...he cable 2 to be attached to the main machine Attach both cores 4 5 cm about 2 in from each end of the cord 10 Reconnect the machine to its power source and turn the main power switch on 11 Do SP5985...

Страница 166: ...panel 6 Login with the administrator user name and password 7 Touch Extended Feature Settings 8 Touch Extended Feature Settings again 9 Touch SD Card 10 Touch the Browser line 11 Under Install to tou...

Страница 167: ...Installation of MFP Options SM 3 89 D093 D094 Installation 19 On the operation panel remove the dummy keytop and replace it with the Others keytop...

Страница 168: ......

Страница 169: ...PREVENTIVE MAINTENANCE REVISION HISTORY Page Date Added Updated New None...

Страница 170: ......

Страница 171: ...M Interval PM Comments Metric Feet Scanner Original Feed Rollers 5 5 18 0 C Damp cloth Original Exit Rollers 5 5 18 0 C Platen White Plate 5 5 18 0 C Original Width Set Registration Exit Sensors 33 0...

Страница 172: ...11 0 36 0 C Inside Cleaning Unit 11 0 36 0 I Dry cloth or vacuum cleaner Used Toner Bottle 5 5 18 0 C Empty used toner Registration Registration Rollers 5 5 18 0 C Damp cloth Paper Registration Senso...

Страница 173: ...aper or clean cloth and alcohol p 4 9 After cleaning touch to discharge static Important Use no other chemical cleaners Fusing Unit Hot Roller 1 27 5 90 0 R Replace if necessary p 5 74 Fusing Cleaning...

Страница 174: ...nsor 5 5 18 0 C Blower brush Fusing Gears 5 5 18 0 L Lubricate with Barrierta S552R p 4 10 Mechanical Drive Section Drum Drive Gears 5 5 18 0 L Lubricate with Silicone Grease G501 p 4 10 Development D...

Страница 175: ...stimated service life 127 K cuts Feed Rollers 5 5 18 0 C Damp cloth Exit Rollers 5 5 18 0 C Exit Sensor 11 0 36 0 C Blower brush or dry cloth Roll End Sensors 3 4 EXP 11 0 36 0 C 4 1 3 PAPER CASSETTE...

Страница 176: ...NG POINTS 4 2 1 ENTRANCE SPURS 1 Open the upper unit 2 Retrieve the flat brush from 1 from its storage location 3 Use the flat brush to clean the 5 entrance spurs 2 Be sure to return the flat brush to...

Страница 177: ...eparation corona unit p 5 38 Transfer Corona Separation Corona Wires 2 Remove the paper guides 1 3 Use lens paper to clean the transfer separation wires 2 4 Use a dry or water damp cloth to clean the...

Страница 178: ...nit 2 Use lens paper to clean the grid wires 3 Remove the grid wires 1 4 Use lens paper to clean the charge corona wire 2 5 Remove the wire and clean the casing 3 with dry or water damp cloth If you u...

Страница 179: ...rounded surface to discharge static electricity from your hands If you use a cloth dampened with alcohol be sure there is no residue remaining around the cleaned area If you use a damp cloth use the d...

Страница 180: ...Remove the development unit p 5 40 Development Unit 2 Lubricate the development unit gears with Silicone Grease G501 Apply at the points shown by the numbers in the drawing 4 3 2 FUSING GEARS 1 Remove...

Страница 181: ...REPLACEMENT AND ADJUSTMENT REVISION HISTORY Page Date Added Updated New 22 02 21 2011 Updated Scanner CIS Reinstallation...

Страница 182: ......

Страница 183: ...procedure turn off the main power switch and unplug the machine from its power source 5 1 1 BEFORE WORKING ON THE MAIN MACHINE Always remove these items before you start work on the machine 1 Remove...

Страница 184: ...rst then the top 5 1 2 SIDE COVERS 1 Open the original feed unit A 2 Open the upper unit B 3 Remove the left upper cover C x 2 If necessary push in the release button D to remove the cover 4 Remove th...

Страница 185: ...Make sure the original feed unit and upper unit are open Always install the lower covers before the upper covers If necessary push in the upper unit release buttons D when you attach the upper covers...

Страница 186: ...Rear Cover Controller Cover 2 Disconnect the ground wire A and connector B on the left x 2 x 1 x 1 3 Disconnect the ground wire C on the right x 1 x 1 4 Open the paper exit unit A and cover 5 Raise th...

Страница 187: ...djustment 5 1 5 UNLOCKING OPENING THE ORIGINAL UNIT 1 Open the upper unit 2 Remove the lock screws A x 2 3 On the left and right sides lift the hinges B off the support screws and lift the unit to the...

Страница 188: ...wire x 1 4 On the right side disconnect the ground wires x 2 5 Disconnect the connectors B x 2 6 On the ends of the original unit shaft move the Teflon arms C and D out of the holes and lift them unt...

Страница 189: ...2 Loosen spring A and remove the scanner motor belt B 3 Tighten the screw again to make sure that the screw and spring do not fall off 4 Remove the original table C x2 5 Remove screws and raise the sc...

Страница 190: ...dures D093 D094 5 8 SM 5 1 8 TONER HOPPER COVER 1 Side covers p 5 2 Side Covers 2 Open the toner hopper cover A Reinstallation Make sure that the bent edge of the mylar B is attached around the edge o...

Страница 191: ...opper cover p 5 8 Toner Hopper Cover 4 Disconnect the connector and ground wire A x 1 x 1 5 Idle registration roller panel B x 2 Remove the two rear screws C first and let the panel come down Use a ve...

Страница 192: ...nlock and lift the original feed unit p 5 5 Unlocking Opening the Original Unit 2 Open the upper unit 3 Side covers p 5 2 Side Covers 4 Original feed table A x1 x1 5 Original feed sensor cover B x 2 R...

Страница 193: ...Common Procedures SM 5 11 D093 D094 Replacement and Adjustment 5 1 11 DRAWER FRONT COVER 1 Open the front drawer of the roll feeder A 2 Push the cutter B to the right 3 Front cover C x 3...

Страница 194: ...diations can seriously damage your eyes Blue Wavelength 452 463 nm and an output 6 9 mW Green Wavelength 520 531nm and an output 3 9 mW Red Wavelength 629 634 nm and an output 4 8 mW Do not actuate th...

Страница 195: ...WITCHES To ensure the safety of customers and customer engineers two switches inside the scanner section prevent the LED radiation from switching on accidentally When the original feed unit is open th...

Страница 196: ...T SENSOR SCANNER SWITCH 1 Original feed table original feed sensor cover p 5 10 Original Feed Table Original Feed Sensor Cover 2 Original width sensor bracket A x 3 x2 x3 3 Original width sensors B x...

Страница 197: ...Scanner SM 5 15 D093 D094 Replacement and Adjustment 5 2 3 ORIGINAL EXIT SENSOR 1 Raise and lock the scanner unit p 5 7 Raising and Locking the Scanner Unit 2 Remove original exit sensor A x1 x2 x1...

Страница 198: ...rollers x 1 x 2 E Original feed rollers x 2 Steel washer x 1 Rubber spacer x1 Plastic sleeve x1 x 2 The control timing of the scanner motor has modified to operate the new original feed and original...

Страница 199: ...The joints are labeled 1 to 5 in the diagram these joints are at the same locations as the joints between segments of the CIS If the lines are broken at a joint do SP4972 to adjust them Then go to th...

Страница 200: ...original feed unit p 5 6 Removing the Original Feed Unit 2 Side covers p 5 2 Side Covers 3 Left exposure glass plate A x 1 with washer 4 Right exposure glass plate B x 1 with washer 5 Exposure glass...

Страница 201: ...mylar and left corner and edge of the large mylar must both be on to of the exposure glass edge On the right B the top edge of the small mylar and left corner and edge of the large mylar must both be...

Страница 202: ...e paper or cloth that could leave lint or other particles on the glass To preserve the alignment of its components always disconnect and re connect the CIS unit at the SIF Never disconnect the signal...

Страница 203: ...Left x1 B Center x1 C Right x1 3 Disconnect the CIS from the SIF x5 1 Remove the original exit sensor A x1 x2 x1 2 Remove the CIS unit B x4 3 Remove the three brackets C x3 The three brackets must be...

Страница 204: ...ON again in Step 13 8 Press the Program key on the right side of the operation panel 9 On the operation panel press 0 1 Start 10 Press the Program key then touch Exit to return to standby mode 11 Pres...

Страница 205: ...7 VDB SIF CGB POWER PACK Preparation Side covers p 5 2 Side Covers Manual feed table original feed sensor cover p 5 10 Original Feed Table Original Feed Sensor Cover 1 Remove the LPH harness plate A...

Страница 206: ...Scanner D093 D094 5 24 SM 4 Remove CGB power pack A x 4 x2 x 2...

Страница 207: ...L BOARDS Preparation Remove p 5 1 Before Working On the Main Machine Upper output stackers x 2 Original output guides x 4 Upper output guide x 1 Original tray x1 Removing the Operation Panel 1 Open an...

Страница 208: ...5 26 SM LCDC Inverter LCD Display Window LCD Unit 1 Remove the operation panel p 5 25 2 Remove LCDC bracket with the LCDC attached x4 x12 3 Remove A LCDC x1 x1 x5 B Inverter x2 4 Lift the touch panel...

Страница 209: ...lacement and Adjustment 5 Remove the LCD from its frame x4 OP R Board 1 Remove the operation panel p 5 25 Removing the Operation Panel 2 Remove the LCDC p 5 26 LCDC Inverter LCD Display Window LCD Uni...

Страница 210: ...Calibration Always re calibrate the screen after replacing the LCDC Do not attempt to use other items on these menu Items other than Touch Screen Adjust are for design use only To avoid errors do not...

Страница 211: ...ears 5 Touch a few random spots on the touch screen to confirm that the marker appears exactly where the screen is touched 6 If the mark does not appear where the screen is touched push Re input and r...

Страница 212: ...Drum D093 D094 5 30 SM 5 3 AROUND THE DRUM 5 3 1 CHARGE CORONA UNIT Charge Corona Wire Grid Wire Wire Cleaner 1 Lift and lock the scanner unit p 5 7 Raising and Locking the Scanner Unit 2 Remove the...

Страница 213: ...e corona unit at A x2 4 Remove B Leaf spring x 1 C Leaf spring x 1 D End plate x 1 5 Disconnect the cleaning pad E and then move it to the left You must move the cleaning pad to the left so you can us...

Страница 214: ...dust and other foreign matter that may have collected on the wire at the factory where it was manufactured Reinstallation Put the left end into the hole on the left first viewed from the rear of the...

Страница 215: ...Around the Drum SM 5 33 D093 D094 Replacement and Adjustment 5 3 2 QUENCHING LAMP UNIT QUENCHING LAMPS 1 Remove OPC drum unit p 5 47 Drum Unit LPH p 5 36...

Страница 216: ...Wire Wire Cleaner 2 Quenching lamp unit A x 3 x 3 3 Quenching lamps x3 B x all x 3 The quenching lamps are attached to the plate with double sided tape 5 3 3 WIRE CLEANER MOTOR WIRE CLEANER SENSOR 1 R...

Страница 217: ...Around the Drum SM 5 35 D093 D094 Replacement and Adjustment 3 Remove the wire cleaner motor x2 4 Remove the wire cleaner sensor x3...

Страница 218: ...or image reproduction Clean the LPH lens cover with lens paper only Never use tissue paper or cloth that could leave lint or other particles on the glass Preparation Remove upper side covers on both s...

Страница 219: ...with the new LPH unit 2 After re installing the LPH do SP2943 input the values that are printed on the label attached to the replacement unit p 5 116 LPH Adjustment with SP Modes 3 Do SP2952 and input...

Страница 220: ...nit 2 Side covers p 5 2 Side Covers 3 Transfer unit A x 2 x 2 Reinstallation At each end of the unit make sure that the tabs B are fully engaged with the studs C When the tabs are engaged correctly th...

Страница 221: ...h guide Each guide must be installed at its original position 3 Paper guides C x4 4 Transfer wire D 5 Separation wires E Reinstallation Each paper guide pair must be installed at its original position...

Страница 222: ...el p 5 9 Idle Registration Roller Panel Toner cartridge 1 On the left side Disconnect the left end of the development unit A x2 x1 x1 Remove the screws B x1 x1 2 On the right side Disconnect the right...

Страница 223: ...the toner supply unit x 2 4 Remove the development filter B and bracket C 5 Hold the development unit above the paper with the gears up 6 Turn the paddle roller knob D clockwise until all developer i...

Страница 224: ...cover F 10 Close the upper unit G 11 Connect the power supply cord 12 Switch the main power switch on If the development motor starts wait 50 sec for it to stop Go to Step 16 or If the development mo...

Страница 225: ...3 Switch the main power switch on 24 Go into the SP mode enter the developer lot numbers then mix the developer and initialize the ID sensor First do SP2801 2 and 3 and use the soft keyboard on the di...

Страница 226: ...on Roller Panel 2 Sensor bracket A x 1 3 Paper set sensor B x 1 4 Registration sensor C x 1 5 4 4 TONER SUPPLY CLUTCH 1 Remove the development unit p 5 40 Development Unit 2 Plate A x 1 x 1 3 Cut the...

Страница 227: ...Development SM 5 45 D093 D094 Replacement and Adjustment 5 4 5 DEVELOPMENT FILTER 1 Remove the development unit p 5 40 Development Unit 2 Development unit casing A x 2 3 Filter rack B 4 Filter C...

Страница 228: ...NER COLLECTION BOTTLE TONER OVERFLOW SENSOR 1 Lift the original feed unit 2 Lift the upper unit 3 Right upper cover A x 2 4 Right cover B x 3 5 Loosen the leaf spring C and lift it 6 Toner overflow se...

Страница 229: ...event deterioration of the drum surface never expose the surface of the drum to strong light especially direct sunlight When the drum is removed during machine servicing place the drum inside the blac...

Страница 230: ...re on the drive belt and remove the belt 7 Use the long end of Allen key to loosen the two Allen screws 6 8 Remove drum gear 7 Handle the drum gear carefully to avoid dropping and losing the two Allen...

Страница 231: ...end B x1 Bearing x1 Turn knob counter clockwise and remove it At C remove spring and slide plate Reinstallation After you replace the drum 1 After re attaching the drum drive gear be sure to tighten b...

Страница 232: ...A x 2 x 2 Reinstallation After you replace the cleaning blade Do SP2923 Execute Cleaning Blade Replace Mode to apply toner to the drum and blade The coating of toner reduces friction between the drum...

Страница 233: ...B pressure release 5 Pick off pawl solenoid C x 2 x 1 Re installation After replacing or cleaning the ID sensor do SP3001 2 to initialize the new ID sensor If the ID sensor is damaged and cannot be re...

Страница 234: ...LLER 1 Side covers p 5 2 Side Covers 2 Registration clutch A x 1 x 1 3 Gear cover plate B x 7 cap x 1 x 1 4 Gear C x 1 x 1 5 Gear D x 1 6 Remove the used toner collection bottle p 5 46 Used Toner Coll...

Страница 235: ...ve cover plate A x 5 9 Switch pressure plate B At reinstallation make sure that the vertical brace C is locked in the cutouts in the ceramic clutch D 10 Front plate A x 6 11 Transport roller dust cove...

Страница 236: ...he roll feeder drawer 2 Remove the paper rolls 3 Roll 1 feed clutch cover A x 2 4 Roll 1 feed clutch B x 1 x 1 5 Roll 1 feed rollers C x 3 x 2 6 After you replace the roller or the clutch adjust the c...

Страница 237: ...the B642 only 1 Open the roll feeder drawer 2 Remove paper roll 2 at the rear 3 Roll 2 feed clutch cover A x 2 4 Roll 2 feed clutch B x 1 x 1 5 Roll 2 feed rollers C x 3 x 2 6 After you replace the r...

Страница 238: ...Paper Feed D093 D094 5 56 SM 5 6 4 RF EXIT SENSOR 1 Open the drawer of the roll feeder 2 Plate A x 2 3 RF exit sensor B x 1 x 1...

Страница 239: ...nd Adjustment 5 6 5 ROLL FEED MOTOR 1 Open the roll feeder drawer 2 Drawer front cover p 5 11 Drawer Front Cover 3 Below the front left corner of the roll feeder unit loosen belt tension bracket A 4 G...

Страница 240: ...en the roller feeder drawer 2 Drawer front cover p 5 11 Drawer Front Cover 3 Upper bracket A x 2 4 Lower bracket B x 1 x 1 x 1 5 Right cutter HP switch C x 1 x 1 6 Left cutter HP switch D x 1 x 1 7 Cu...

Страница 241: ...ent and Adjustment 5 6 7 ROLL PAPER END SENSORS 1 Open the roll feeder drawer 2 Roll feeder back plate A x 2 3 Roll end sensors B x 1 x 1 each The Roll Feeder B641 has one roll end sensor and the Roll...

Страница 242: ...ASSETTE FEED ROLLER 1 Paper cassette A 2 Cassette feed roller B 5 6 9 CASSETTE RELAY SENSOR CASSETTE END SENSOR 1 Open the roll feeder drawer and remove the paper cassette 2 Roll feeder rear plate x 2...

Страница 243: ...nd Adjustment 4 Paper cassette unit B x 6 x 2 x 4 Blue Pull the unit to the rear then remove it from the front 5 Relay sensor plate C x 1 Blue 6 Relay sensor D x 1 x 2 7 Cassette end sensor plate E x...

Страница 244: ...ASSETTE OPEN SENSOR 1 Open the roll feeder drawer and remove the paper cassette unit p 5 60 2 Relay sensor plate cassette end sensor plate A x 1 each 3 Cassette open sensor B x 1 x 2 4 Paper cassette...

Страница 245: ...Feed SM 5 63 D093 D094 Replacement and Adjustment 5 6 11 CASSETTE FEED CLUTCH 1 Cassette feed motor p 5 62 Cassette Feed Motor Cassette Open Sensor 2 Motor mount plate A x 2 3 Cassette feed clutch B x...

Страница 246: ...spring A and connect it to a different hole Center Standard tension standard pressure Left Less tension less pressure Set to this position to decrease wrinkling Right More tension more pressure Can g...

Страница 247: ...TRIPPERS 1 Open the paper exit cover and paper exit unit together A 2 Hot roller strippers B pressure release spring x 1 each 5 7 3 FUSING EXIT SENSOR 1 Remove Rear cover p 5 2 Side Covers Paper exit...

Страница 248: ...ver p 5 3 Rear Cover Controller Cover Paper exit unit p 5 4 Paper Exit Unit 2 Remove pressure roller thermistors A x 1 x 2 x1 The end roller thermistor is at The center roller thermistor is at You mus...

Страница 249: ...Rear cover x 2 p 5 3 Rear Cover Controller Cover Paper exit unit and exit cover x 4 x 1 p 5 4 Paper Exit Unit 2 Remove Pressure roller stripper unit A x 4 Stopper screw B x 1 ea Pressure roller strip...

Страница 250: ...CH 1 Remove the pressure roller stripper unit A p 5 67 Pressure Roller Strippers 2 Remove the exit unit switch B Use tips of two small flat head screwdrivers to release the tabs at the top and bottom...

Страница 251: ...sing unit become cool for 10 minutes or more before you remove it Preparation Rear cover controller cover p 5 3 Rear Cover Controller Cover Remove the left and right side covers p 5 2 Side Covers Remo...

Страница 252: ...ure roller thermistor x1 x1 Exit unit set switch x1 C Fusing exit sensor x1 D Pressure roller thermistor x1 3 Open clamps E x2 4 Release the arms of the fusing unit A on both sides The fusing unit is...

Страница 253: ...nstall the fusing unit Close the top cover and push down on the levers on both ends of the fusing unit when you set the fusing unit in the machine Be sure to match and connect the color coded fusing l...

Страница 254: ...D094 5 72 SM 5 7 8 FUSING CLEANING ROLLER 1 Fusing unit p 5 69 Fusing Unit 2 Springs A x 2 3 Felt plate B x 2 4 Fusing cleaning roller C x 2 x 2 The brown bushing is on the right the white bushing is...

Страница 255: ...ller 2 Right plate A x 1 3 Right support B x 1 4 Left plate C x 1 5 Left support D x 1 This is the support with the anti static brush 6 Fusing lamp E x 2 Metal harness clamps x 2 Reinstallation Make s...

Страница 256: ...Fusing D093 D094 5 74 SM 5 7 10 HOT ROLLER 1 Fusing lamp p 5 73 Fusing Lamp 2 Hot roller A Clip springs x 2 Sleeve bearings x 2 Gear x 1 3 Lubricate B with Barrierta S552R x 2...

Страница 257: ...SM 5 75 D093 D094 Replacement and Adjustment 5 7 11 PRESSURE ROLLER 1 Hot roller p 5 74 Hot Roller 2 Pressure roller plate A x 4 3 Thermistor Thermostat plate B x 4 4 Pressure roller C Sleeve bearing...

Страница 258: ...1 Fusing unit p 5 69 Fusing Unit 2 Hot roller thermistor A x1 x 1 3 Thermostat 2 199 C B M3x6 x 2 4 Thermostat 1 200 C C M3x6 x 2 Reinstallation The thermostats 199 C and 200 C must be installed at B...

Страница 259: ...Adjustment 5 8 MOTORS 5 8 1 SCANNER MOTOR 1 Original feed unit p 5 6 Removing the Original Feed Unit 2 Lift and lock the scanning unit p 5 7 Raising and Locking the Scanner Unit 3 Scanner motor assem...

Страница 260: ...Motors D093 D094 5 78 SM 5 8 2 DRUM MOTOR 1 Open the original feed unit 2 Drive belt plate A x4 3 Loosen belt tension plate B x 2 x 1 4 Remove drive belt x1 5 Drum motor unit C x 1 x 3...

Страница 261: ...ING MOTOR MAIN MOTOR 1 Open the upper unit 2 Side covers p 5 2 Side Covers 3 Registration clutch A x 1 x 1 4 Disconnect upper unit sensor harness B x 1 x 3 5 Gear cover plate C x 7 6 Timing belt and c...

Страница 262: ...bove If it is not easy to connect the connector at the rear of the motor when you install the motor mount plate Remove the rear cover At the left rear corner of the main machine open two or three harn...

Страница 263: ...for this procedure PSU p 5 87 Circuit Breaker PSU Toner collection bottle p 5 46 Used Toner Collection Bottle Toner Overflow Sensor T S power pack p 5 95 T S Power Pack Removal of the fusing unit is r...

Страница 264: ...om your hands before you handle printed circuit boards or memory boards 5 9 1 MCU SIPU MB 1 If you need to replace the MCU before disassembling the machine do SP5824 to upload the UP and SP mode data...

Страница 265: ...acement and Adjustment 4 Open all the clamps at A in front of the board tray x7 5 Disconnect both harnesses B x2 x2 6 Disconnect the board x13 7 Disconnect the board tray A and remove it x3 8 Set the...

Страница 266: ...Boards D093 D094 5 84 SM 9 Remove the controller box A x7 10 Remove the PCB cover x12 The boards must be removed in this order MCU SIPU Motherboard 11 Remove the MCU x4 x1 12 Remove the SIPU x5 x1...

Страница 267: ...8 001 Scanner Sub Scan Magnification 4010 001 Scanner Sub Scan Registration 4961 001 Original Adjustment Synchro cut 210mm 002 Original Adjustment Synchro cut 1000mm 4965 001 Scan Speed Switch Correct...

Страница 268: ...ON OFF ON 2 OFF OFF OFF 3 OFF OFF OFF 4 OFF OFF OFF 5 OFF OFF OFF 6 OFF OFF OFF 7 OFF OFF OFF When you re install the motherboard A check the right upper corner and make sure that the board lies flat...

Страница 269: ...cement and Adjustment 5 9 2 CIRCUIT BREAKER PSU 1 Remove the rear cover A x2 2 Remove the controller box cover B x1 3 Remove breaker switch A x2 x4 x1 4 Open the clamps to free harness B x2 5 Remove t...

Страница 270: ...A Anti condensation heater switch bracket x2 B Ground wire x1 C Left vertical ground plate x2 D Right vertical ground plate x1 x2 8 Close the paper exit guide unit 9 Remove PSU A x12 x1 10 Lay the PS...

Страница 271: ...the breaker switch installation of a voltage stabilizer constant voltage transformer is recommended for work sites where there is significant fluctuation in the AC power source Re installation Be sur...

Страница 272: ...Boards D093 D094 5 90 SM 5 9 3 CONTROLLER BOARD 1 Remove A Rear cover x2 B Controller cover x1 2 Remove the PCB shield cover 1 x8...

Страница 273: ...Boards SM 5 91 D093 D094 Replacement and Adjustment 3 Remove the slot covers of Slots A B D or installed boards x6 4 Remove the controller box A x7 5 Lay the controller box on a flat surface...

Страница 274: ...have been removed from Slots A B and D Boards or slot covers must be removed from Slots A B D before you can remove the controller board 7 Remove the controller board x7 8 Remove the NVRAM for the ol...

Страница 275: ...oard If you change the controller board put the old NVRAM on the new board NVRAM Upload Do this procedure to upload the NVRAM data from NVRAM to an SD card Do this procedure before replacing the NVRAM...

Страница 276: ...set to 0 User Tools Counter 3 Do SP5811 Machine Serial Number to set the serial number 4 Insert the SD card with the NVRAM data in SD card Slot 2 5 Switch the main power switch on 6 Go into SP mode an...

Страница 277: ...S POWER PACK Preparation Remove Fusing Unit Fusing Unit PSU p 5 87 Circuit Breaker PSU Removal of the fusing unit is not absolutely required but is recommended to make this procedure easier 1 Remove T...

Страница 278: ...Boards D093 D094 5 96 SM 5 9 6 RFDB ROLL FEEDER DRIVE BOARD 1 Open the roll feeder drawer 2 Remove the rear plate of the roll feeder x 2 blue A Shield plate x 2 B RFDB x 3 x 2...

Страница 279: ...OARD 1 Open the roll feeder drawer and remove the paper cassette 2 Remove Roll feeder rear plate x 2 Blue p 5 59 Roll Paper End Sensors A RFDB shield plate A x 2 B Paper cassette unit B x 4 x 2 x 4 Pu...

Страница 280: ...HDD D093 D094 5 98 SM 5 10 HDD 1 Remove the controller box p 5 90...

Страница 281: ...nd Adjustment Controller Board 2 Disconnect the HDD at A x2 3 Remove the HDD bracket A with HDD attached x4 4 Lay the HDD unit on a flat surface 5 Remove the screws from sides of the HDD bracket B x4...

Страница 282: ...o download the fixed stamp data from ROM to the hard disk A new hard disk should always be formatted with SP5832 1 even if it has already been formatted The fixed stamp data the files for fixed stamps...

Страница 283: ...5 11 COOLING FAN OZONE FILTER PAPER EXIT SELECTION SWITCH Preparation Side covers off p 5 2 Side Covers Trays guides on top of the machine off p 5 1 Before Working On the Main Machine 1 Remove rear to...

Страница 284: ...er Paper Exit Selection Switch D093 D094 5 102 SM 5 Turn over plate A 6 Remove the cooling fan B x1 x 1 x3 7 Disconnect the paper exit selection switch C x1 8 Press in the sides of the switch and push...

Страница 285: ...sure to turn the main machine s power off on after each SP adjustment to enable the new setting Step 1 Magnification for Paper Type Plain 1 Go into the SP mode 2 Do SP4417 select pattern 28 Grid Patt...

Страница 286: ...be 997 mm If the measured length is not 997 mm adjust this SP until the length is 997 mm Step 2 Scanning Magnification 1 Make a 1 1 copy of the A0 SEF Magnification Chart with plain roll paper You can...

Страница 287: ...are not in the standard range SP Standard Fine Magnification 2916 3 Less than 0 5 Translucent Mode 1 4 Main Scan 2916 4 Less than 0 5 Translucent Mode 1 4 Sub Scan Step 4 Magnification for Paper Type...

Страница 288: ...rase Margin DF TEdge 4012 7 0 Scanner Erase Margin DF Left 4012 8 0 Scanner Erase Margin DF Right Step 6 Erase Margins Set these SPs to 5 to make measurement easier SP Set To Comments 2101 1 5 Print E...

Страница 289: ...Feeder Roll 1 Roll Feeder Roll 2 Paper Cassette 2 Measure the gaps for the leading edge and side to side registration 3 Touch SP Mode and adjust these SPs if a measurement is not in the standard rang...

Страница 290: ...5 SP Set To Comments 4012 5 1 5 Scanner Erase Margin DF LEdge 4012 6 Scanner Erase Margin DF TEdge 4012 7 Scanner Erase Margin DF Left 4012 8 0 5 Scanner Erase Margin DF Right Step 9 Erase Margins Do...

Страница 291: ...Ps are necessary for this step SP Comments 1920 22 Cut Length Adjustment 1st Roll 297 mm 11 or 12 Plain Paper 1920 26 Cut Length Adjustment 1st Roll 1189 mm 44 or 48 Plain Paper 1920 82 Cut Length Adj...

Страница 292: ...ys Eng 44 2 Measure the cuts and check them against the standards of this table Cut Length mm Cut Tolerance mm Less than 297 3 420 to 1189 5 to 2000 6 3000 11 to 4000 14 3 If a measurement is not in t...

Страница 293: ...ure and cut 2 Go into the SP mode and do SP4961 1 3 Touch COPY Window and copy the 210 mm sheet that you prepared in Step 1 4 Touch SP Mode to go back to the SP mode 5 Do SP4961 3 to check the origina...

Страница 294: ...of the rolls for paper feed 7 Put the blank sheet of paper on the original feed tray and feed it into the original feed unit Pattern 28 grid pattern prints 8 Touch SP Mode to return to the SP mode 9...

Страница 295: ...Scan as described below B The lines at CIS 1 2 are broken If the output from CIS 1 is lower as shown above or higher adjust the sub scan offset at CIS 1 2 with SP4972 6 CIS Joint Adjustment CIS 1 2 S...

Страница 296: ...ts D093 D094 5 114 SM If the CIS 1 area is higher than the CIS 2 area set a larger value If the CIS 1 area is lower than the CIS 2 area set a smaller value In the example shown B you must decrease the...

Страница 297: ...fect 1 Main Scan Offset Interval 1 2 CIS 1 2 CIS 1 moves CIS 2 does not move 3 Main Scan Offset Interval 2 3 CIS 2 3 CIS 3 moves CIS 2 does not move 4 Main Scan Offset Interval 3 4 CIS 3 4 CIS 4 moves...

Страница 298: ...o SP4417 Pattern 27 Horizontal Grayscale to print IPU Test Pattern 10 to confirm that the LPH is functioning normally see the procedure below To Print Pattern IPU Test Pattern 27 1 Open the roll feede...

Страница 299: ...e joint Black lines occur if too many LEDs come on at the joint 3 Left line If the left line is white adjust SP2952 1 to a smaller value If the left line is black adjust SP2952 1 to a larger value 4 R...

Страница 300: ...d digit of the value for LPH 2 3 500 to 510 with SP2952 2 this moves the four LEDs by one position to the right If you change the 3rd digit of LPH 1 2 or LPH 2 3 510 to 512 for example this increases...

Страница 301: ...the rollers C is slightly larger than the circumference at the centers D This arrangement ensures that there is always sufficient pressure on the paper between the roller ends However this difference...

Страница 302: ...o show the main screen 6 On the operation panel select one of the rolls for paper feed You must select Tray 1 1st Roll or Tray 2 2nd Roll You cannot use Auto Paper Select If you select Auto Paper Sele...

Страница 303: ...2 Adjust the density for LPH 1 with SP2943 1 If the density is too dark set a smaller value If the density is too light set a larger value 3 Do SP2902 2 select Pattern 10 touch OK then print the patte...

Страница 304: ...stallation Store and handle SD cards carefully to protect them from heat humidity and sunlight Before you handle SD cards touch a grounded surface to discharge static electricity from your hands 5 13...

Страница 305: ...f the NEW number is higher than the ROM number the application needs to be updated If the numbers are the same the application does not need to be updated 7 Press the down arrow to see the next screen...

Страница 306: ...ot 2 Reattach the SD card slot cover Note More than one application can be selected for update but there are restrictions Controller applications and the operation panel update must be done separately...

Страница 307: ...SYSTEM MAINTENANCE REFERENCE REVISION HISTORY Page Date Added Updated New None...

Страница 308: ......

Страница 309: ...Service Program Mode SM 6 1 D093 D094 System Maintenance Reference 6 SYSTEM MAINTENANCE REFERENCE 6 1 SERVICE PROGRAM MODE See Appendices for Service Program Mode...

Страница 310: ...to 10 0 0 0 1 mm step 2 2nd Roll 3 Cassette 5 By pass Feed 1002 Side to Side Registration 1 1st Roll Adjusts the side to side registration for printing 10 0 to 10 0 0 0 1 mm step To move the start po...

Страница 311: ...t the registration rollers remain idle to reduce paper buckle Raise this setting to lengthen the amount of time that the paper pauses at the nip of the registration rollers if you notice a large amoun...

Страница 312: ...uccessive jams occur in the fusing unit 0 1 0 1 0 Disabled SC559 not issued after 3 successive jams in the fusing unit 1 Enabled SC559 issued after 3 successive jams in the fusing unit The operator ca...

Страница 313: ...ration rollers In order to prevent this jitter just before the paper leaves the registration roller the speed of the registration roller can be increased slightly to match the speed of the fusing roll...

Страница 314: ...mm 29 1st Roll 6000mm Plain Paper 30 1st Roll 15000mm Plain Paper 100 to 100 0 1 mm 42 1st Roll 297mm Translucent Paper 10 0 to 10 0 0 0 1 mm 43 1st Roll 420mm Translucent Paper 44 1st Roll 594mm Tran...

Страница 315: ...2nd Roll 2000mm Plain Paper 30 to 30 0 1 mm 88 2nd Roll 3600mm Plain Paper 89 2nd Roll 6000mm Plain Paper 90 2nd Roll 15000mm Plain Paper 100 to 100 0 1 mm 102 2nd Roll 297mm Translucent Paper 10 to 1...

Страница 316: ...100 0 1 mm 1923 Paper Interval Adjustment This SP slightly increases the gap between sheets in the paper path When the machine shifts to the CPM down mode the paper is fed by whichever interval betwe...

Страница 317: ...aper Thickness Default Selection in this section 1 Plain Mode1 120 to 220 195 5o C 2 Plain Mode2 3 Plain Mode3 4 Plain Mode4 120 to 220 185 5o C 5 Plain Mode5 120 to 220 175 5o C 6 Trans Mode1 120 to...

Страница 318: ...and thickness settings selected in User Tools see Paper Thickness Default Selection in this section After adjusting these SP s you must turn the machine power off on 1 Plain Mode1 60 to 180 100 5o C...

Страница 319: ...t Modes 1 to 5 below refer to the paper and thickness settings selected in User Tools see Paper Thickness Default Selection in this section 1 Plain Mode1 0 to 50 20 5 2 Plain Mode2 0 to 50 15 5 3 Plai...

Страница 320: ...mperature is 195oC 100 is SP1932 195 is SP1931 If the pressure roller temperature 120oC 100 20 this is SP1932 SP1935 the target hot roller temperature is 175oC 195 20 this is SP1931 SP1934 If the sett...

Страница 321: ...rature is below the temperature set for the pressure roller paper feed will stop during a long job to perform inching to allow enough time for the pressure roller temperature to rise to the level of t...

Страница 322: ...Main SP Modes D093 D094 6 14 SM 13 Film Mode3 14 Film Mode4 15 Film Mode5...

Страница 323: ...adjusts the charge corona outputs 2 Grid Voltage Image Area Adjusts the charge grid output 160 to 1080 800 1 A step 2101 Print Erase Margin Adjusts the quantity of erase for copy mode quantity of whi...

Страница 324: ...SP2201 4 can be used to switch between High Duty Mode 400 m day and Low Duty Mode 400 m day The default setting is Low Duty Mode 1 Image Area This SP sets the bias voltage applied to the image area i...

Страница 325: ...is stabilized near 0 4 V for subsequent printouts 2208 Toner Supply Setting 1 Gain This SP setting determines the supply GAIN for toner supply based on the readings of the ID sensor Vsp Vsg This value...

Страница 326: ...etect Mode uses ID sensor 1 Fixed Mode 3 Coverage fixed at 3 medium 2 Fixed Mode 6 Coverage fixed at 6 darker If the ID sensor is damaged and cannot be replaced immediately set either SP to 1 The oper...

Страница 327: ...e set accordingly The values set for this SP are reflected in the printed images after Long Print Graphic has been selected 1 to 40 6 1 7 Long Print Mode Setting The machine switches to the Long Print...

Страница 328: ...he leading edge of the paper across the image area and at the trailing edge of the paper Notes The coefficient adjustment should be done before the power output The amount of voltage applied to each a...

Страница 329: ...nsfer can be adjusted at each area depending on what type of paper is used Note that the default voltages are slightly higher for Roll Film and Cut Sheet Film SP2301 sets the voltage levels The timing...

Страница 330: ...coefficient for the image at the center leading edge and trailing edge on translucent roll paper 1 to 2 1 0 1 11 Roll Paper Film Before Leading Edge 0 to 230 80 1 A 12 Roll Paper Film Leading Edge 0...

Страница 331: ...ing edge on plain cut sheet paper 1 to 2 1 0 1 26 Cut Paper Translucent Before Leading Edge 0 to 230 60 1 A 27 Cut Paper Translucent Leading Edge 0 to 230 60 1 A 28 Cut Paper Translucent Image Area 0...

Страница 332: ...lm Image Area 0 to 230 80 1 A 34 Cut Paper Film Trailing Edge 0 to 230 80 1 A 35 Cut Paper Film Coefficient DFU Adjusts the transfer output coefficient for the image at the center leading edge and tra...

Страница 333: ...kg of developer be loaded in the development unit and that the toner cartridge be set If the lot numbers are not entered then the developer cannot be initialized complete failure with no operation Th...

Страница 334: ...2902 Test Pattern Use these SP s to select and print test patterns Select one of 25 available test patterns 1 25 0 to 25 0 1 0 None default 0 None 13 1 dot Vertical Line 1 1 dot Grid Pattern 14 2 dot...

Страница 335: ...iginal is scanned Adjust the setting for a paper type if you consistently notice distortion in magnified images for a particular type 10 to 10 0 0 1 Notes SP2916 1 SP2916 2 should be adjusted at insta...

Страница 336: ...or returns from the auto off mode or sleep mode 0 to 3 1 1 0 Off 1 On 50 sec Development motor rotates 50 sec after the machine is switched on when fusing temperature is less than 50 C 122 F 2 On 30...

Страница 337: ...is full the used toner bottle motor does not operate 2 Used Tnr M TE Recovery Sets the length of time that the used toner bottle motor operates after TE toner end 0 to 80 30 5 sec 3 Used Toner Bottle...

Страница 338: ...surface of the drum Vsg Vsg Vref If Vsp Vsg Vref the value of this SP setting recovery is completed and the machine goes back to normal operation 2943 LED Duty Adjustment Adjusts the on timing the wid...

Страница 339: ...in scan between LPH2 and LPH3 0 to 999 500 1 11 LPH1 2 Sub Scan Adjusts sub scanning at LPH 1 2 for paper more than 420 mm wide 300 to 500 412 1 12 LPH2 3 Sub Scan Adjusts sub scanning at LPH 2 3 for...

Страница 340: ...kness processing for vertical lines wider than 2 dots This SP is provided to adjust the settings if the desired image quality cannot be obtained with the default settings However with the content of s...

Страница 341: ...or the settings SP2954 10 0 to 3 on a 2 dot vertical line The settings have no effect on the horizontal line When line thickness more than 2 dots the value selected for SP2954 10 affects only the oute...

Страница 342: ...Sets the level of the PWM Pulse Width Modulation of the ID sensor LED 0 to 100 20 0 1 2 Initialize ID Sensor Execute Automatically adjusts the ID sensor with a sensor reading of the bare drum The ini...

Страница 343: ...sensor pattern 20 to 1000 100 100 cm 2 During Job ON OFF This setting is for ID sensor pattern reading during print jobs 0 to 1 1 1 If 0 OFF is selected the ID sensor pattern will not be read until t...

Страница 344: ...setting shifts the image up in the same direction as the sub scan direction 2 Trailing Edge This SP shifts the trailing edge of the scanned image relative to the sub scan direction 10 to 10 0 0 0 1 mm...

Страница 345: ...start the scanner free run operation for testing 1 Start This SP uses the most recent settings for the original length and interval between sheets to print virtual pages for a scanner free run ON Sta...

Страница 346: ...Vertical Line SCN 3 1 dot Horizontal Line SCN 4 2 dot Horizontal Line SCN 5 1 dot Alternating Dot Pattern SCN 6 1 dot Grid Pattern SCN 7 Vertical Stripes SCN 8 Horizontal Grayscale 16 Lvl SCN 9 Verti...

Страница 347: ...ern 128 dot Width 4903 Image Quality Adjustment Use this if density is not equal in shaded areas of the copy The change from high to low density areas in shaded areas must be smooth Do these SP adjust...

Страница 348: ...ngest 11 Line Width Corr Text Mode Select Sets the strength of line correction effect for Text Mode 0 to 8 3 1 0 Weakest 3 Default 4 Medium 8 Strongest 12 Line Width Corr Text Main Scan Sets the stren...

Страница 349: ...rrection in the main scan direction for Generation Mode 0 to 2 1 1 0 No line width correction 1 Line width and shaded area correction 2 Line width correction 16 Line Width Corr Generation Sub Scan Set...

Страница 350: ...er tries to adjust for slippage of the feed rollers to allow the machine measure the length of the original accurately The diameter of the feed roller 32 0 05 differs slightly from the diameter of the...

Страница 351: ...ints occurs When to Use This SP Adjust this SP if you see image distortion after replacing the original feed roller or exit roller You may also need to adjust this SP if you see image distortion after...

Страница 352: ...on This SP turns on image adjustment feature that corrects slight misalignment of the image at the joints of the CIS elements 0 to 2 2 1 0 No adjustment 1 Simple adjustment at joints 2 Gradation adjus...

Страница 353: ...units for counting 1 Counter Method Selects the counting method 0 to 1 0 1 0 Development counter black prints 1 Paper counter Shows the total page counts 2 Counter Unit 0 to 8 0 1 0 Models 21 27 2 Mod...

Страница 354: ...itches the counter list for the system administrator on off 0 to 1 1 1 0 On 1 Off 5071 Set Bypass Paper Size Display CTL This SP determines whether long paper can be fed from the bypass tray Note Even...

Страница 355: ...2 3 Expansion Device 3 5114 Optional Counter I F CTL This SP code enables the interface for an optional counting device 0 to 8 0 1 Important Note Only settings that can be enabled for machines outside...

Страница 356: ...5121 Counter Up Timing CTL Determines whether the optional key counter counts up at paper feed in or at paper exit 0 to 1 1 1 0 Feed count 1 No feed count 5127 APS Off Mode CTL This SP can be used to...

Страница 357: ...tings of UserTools 0 to 1 0 1 0 Disable 1 Enable 0 CE login mode disabled 1 CE login mode enabled 5180 Charge Counter Method Japan Only CTL This SP codes sets the charge counter method 0 to 1 0 1 0 Co...

Страница 358: ...Tokyo KO 540 Korea NA 300 NY TW 480 Taipei 5404 User Code Count Clear CTL Clears the counts for the user codes assigned by the key operator to restrict the use of the machine Press Execute to clear 5...

Страница 359: ...nal Count Alarm 0 to 1 0 1 0 No alarm sounds 1 Alarm sounds after the number of originals passing through the ARDF 10 000 5504 Jam Alarm CTL Sets the alarm to sound for the specified jam level documen...

Страница 360: ...the control call on off for the toner end 0 to 1 0 1 0 Off 1 On If you select 1 the alarm will sound when the main machine detects toner end 80 Toner Call Timing This SP switches the toner supply cal...

Страница 361: ...tting is enabled only when SP5508 4 is enabled set to 1 13 Door Open Time Length Sets the length of time the remains opens to determine when to initiate a call 3 to 30 10 1 This setting is enabled onl...

Страница 362: ...settings Before executing any of these SP s print an SMC Report 1 All Clear Initializes items 2 to 22 below 2 Engine Initializes all registration settings for the engine and copy process settings 3 S...

Страница 363: ...zes the Job login ID Netfiles Jobs to be printed from the document server using a PC and the Desk Top Binder software 11 NCS Initializes the system defaults and intersection settings IP addresses also...

Страница 364: ...izes the ECS settings 22 Folder Initializes the folder settings 5802 Printer Free Run Does a free run in the mode specified on the operation panel Push On or Off to switch on or off 5803 Input Check D...

Страница 365: ...gistration Sensor 17 Paper Exit Sensor 18 Total Counter Set 19 Toner Overflow Sensor 20 Charge Corona Cleaner Motor Rotation Sensor 21 Clam Shell Open Sensor Right 24V 22 Clam Shell Open Senor Left 5V...

Страница 366: ...03 Original Width Sensor A2 204 Original Width Sensor A3 205 Original Width Sensor B1 206 Original Width Sensor B2 207 Original Width Sensor B3 208 Original Width Sensor B4 209 Original Width Sensor 9...

Страница 367: ...19 Cutter Motor 21 Cassette Feed Motor 25 Cassette Feed Clutch 32 Main Motor 33 Fusing Motor 34 Drum Motor 35 Registration Clutch 36 Paper Junction Gate Solenoid 37 Used Toner Motor 41 Charge Corona 4...

Страница 368: ...xit Fan 201 Scanner Motor Off On 211 CIS LED R 212 CIS LED G 213 CIS LED B 5810 SC Reset Touch EXECUTE to release the machine for servicing When the machine issues a Level A SC code this indicates a s...

Страница 369: ...r and press Press the key to input a pause Press the Clear modes key to delete the telephone number 1 Service Service representative telephone number 2 Facsimile Fax number of service representative 3...

Страница 370: ...th of time seconds for the time out when the RCG Remote Communication Gate connects during a call via the Remote network 1 to 90 30 1 sec 9 RCG Write to Timeout Sets the length of time seconds for the...

Страница 371: ...thod 0 Internet connection 1 Dial up connection 61 Cert Expire Timing DFU Proximity of the expiration of the certification 62 Use Proxy This SP setting determines if the proxy server is used when the...

Страница 372: ...certification update used for Embedded RC Gate If Embedded RC Gate has not been set up These SP settings are done automatically as soon as Embedded RC Gate is set up 0 The certification used by Embed...

Страница 373: ...CTL URL the CTL URL was notified of the results of the update after it was completed but a certification error has been received and the rescue certification is being recorded 18 The rescue certifica...

Страница 374: ...the size of the firmware data files during the firmware update execution 87 CERT Macro Version Displays the macro version of the Remote certification 88 CERT PAC Version Displays the PAC version of th...

Страница 375: ...ce the number country is selected the following settings are checked Access point telephone number Dial up user name Modem parameters set for the country 0 to 10 1 0 Japan 1 USA 3 UK 0 Japan 1 USA 2 C...

Страница 376: ...8 Other error 9 Line type identification still in progress Please wait 153 Selection Dial Push DFU Used only for Embedded RC Gate M to set the telephone number of the dial up access point of the line...

Страница 377: ...e used to communicate with the Call Center 162 Connection Timing Adjustment Incoming DFU When the Call Center calls out to the access point where Embedded RC Gate M is used the ID tone 1 is sent repea...

Страница 378: ...h SP5816 164 for users who are using a line shared with a facsimile unit 0 to 1 0 1 0 Disabled Embedded RC Gate M continues to operate if a fax transmission starts on the same line 1 Enabled Fax trans...

Страница 379: ...nit cannot answer a polling request 3 The Remote device is being set In this status the Embedded RC Gate device cannot be set 4 The Remote module has not started 202 Letter Number Allows entry of the...

Страница 380: ...splayed only when the result is registered at the CTL URL 206 Register Execute Executes Embedded RC Gate Registration 207 Register Result Displays a number that indicates the registration result 0 Suc...

Страница 381: ...uiring device status 12003 Attempted registration without execution of an inquiry and no previous registration 12004 Attempted setting with illegal entries for certification and ID2 Error Caused by Re...

Страница 382: ...UP and SP mode data except for counters and the serial number from NVRAM on the control board to an SD card inserted in Slot 2 Remove the SD card slot cover on the back of the machine Insert a blank...

Страница 383: ...d 65 Job Spool Switches job spooling on and off 0 to 1 0 1 0 No spooling 1 Spooling enabled 66 Job Spool Clear Start Time This SP determines whether the job interrupted at power off is resumed at the...

Страница 384: ...ess Prefix Length The IPv6 address consists of a total 128 bits configured in 8 blocks of 16 bits each These notations can be abbreviated See Note IPV6 Addresses below this table 147 Active IPv6 State...

Страница 385: ...enced on the Ethernet or wireless LAN 802 11b The IPv6 address consists of a total 128 bits configured in 8 blocks of 16 bits each These notations can be abbreviated See Note IPV6 Addresses below this...

Страница 386: ...bandwidth setting varies for different countries 1 to 14 14 1 7 Channel MIN Sets the minimum range of the bandwidth for operation of the wireless LAN This bandwidth setting varies for different countr...

Страница 387: ...Fragment Thresh Adjusts the fragment threshold for the IEEE802 11 card 256 to 2346 2346 1 This SP is displayed only when the IEEE802 11 card is installed 43 11g CTS to Self Determines whether the CTS...

Страница 388: ...Sets the vendor ID Initial Setting 0x05A Ricoh Company 0x0000 to 0xFFFF 1 3 Product ID DFU Sets the product ID 0x0000 to 0xFFFF 1 4 Device Release Number DFU Sets the device release number of the BCD...

Страница 389: ...the same as the serial number in use At initialization the serial number generated from the model name is used not the setting of this SP code At times other than initialization the value set for thi...

Страница 390: ...Machine ID Clear Delivery Server Clears the unique ID of the device used as the name in the file transfer directory Execute this SP if the connection of the device to the delivery server is unstable A...

Страница 391: ...ength of the time out for the search of the LDAP server 1 to 255 60 1 20 WSD Maximum Entries WSD Web Services on Devices is the Microsoft standard for connectivity to web service enabled devices 50 to...

Страница 392: ...the machine on 5 Do SP5846 40 6 Turn the machine off 7 Remove the SD card from SD card Slot C3 8 Turn the machine on Notes Executing this SP overwrites any address book data already on the HDD with t...

Страница 393: ...ower on grants full address book access to all users Procedure 1 Turn the machine off 2 Install the new HDD 3 Turn the machine on 4 The address book and its initial data are created on the HDD automat...

Страница 394: ...es in the directory information managed by UCS However the accounts and passwords of the system administrators are not deleted 51 Backup All Addr Book Uploads all directory information to the SD card...

Страница 395: ...4 Not Used 5 Not Used 6 Not Used 7 Not Used 62 Complexity Option 1 Use this SP to set the conditions for password entry to access the local address book Specifically this SP limits the password entry...

Страница 396: ...ccess the local address book Specifically this SP limits the password entry to numbers and defines the length of the password 0 to 32 0 1 Note This SP does not normally require adjustment This SP is e...

Страница 397: ...ress book on the LDAP server 5849 Installation Date CTL Displays or prints the installation date of the machine 1 Display Displays the installation date The installation date is set automatically afte...

Страница 398: ...xecuting this SP 5856 Remote ROM Update CTL When set to 1 allows reception of firmware data via the local port IEEE 1284 during a remote ROM update This setting is reset to zero after the machine is c...

Страница 399: ...d 3 Initialize 5873 SD Card Appli Move CTL Moves an application from one SD card to another 1 Move Exec Executes the move from one SD card to another 2 Undo Exec This is an undo function It cancels th...

Страница 400: ...ard Slot 1 option slot The SD card must reside in Slot 1 after execution 2 HDD Encryption This SP enables the HDD Encryption option Note Before execution the SD card must be in SD Card Slot 1 option s...

Страница 401: ...n the document box list 5 to 20 10 1 100 Set Signature This SP determines whether a signature is attached to scanned documents queued for sending with Web Image Monitor 0 to 2 0 1 0 Set individually O...

Страница 402: ...in 5887 SD Get Counter CTL After you touch EXECUTE this SP sends a text file to an SD card inserted in SD card Slot 2 The file is stored in a folder created in the root directory of the SD card called...

Страница 403: ...fessional is installed 0 to 1 0 1 step 0 Light version supplied with this machine 1 Full version optional 5985 Device Setting CTL The NIC and USB support features are built into the CTL controller Use...

Страница 404: ...s D093 D094 6 96 SM 4 Logging Data touch panel 5 Diagnostic Report 6 Non Default 7 NIB Summary 8 Capture Log 21 Copier User Program 22 Scanner SP 23 Scanner User Program 24 SDK J Summary 25 SDK J Appl...

Страница 405: ...anner Motor Shows the total operation time of the scanner motor that drivers the scanner unit rollers that feed originals 7401 Total SC Counter CTL Shows the total SC count as a 4 digit number 7403 SC...

Страница 406: ...selection menu displayed you will see detailed information about the recently logged SC991 errors including the software file name line number and so on 1 Latest Display the occurrences of SC991 in o...

Страница 407: ...when the paper remains at the sensor for longer than the prescribed time Display range 0000 to 9999 Main Machine D093 D094 1 At Power On 3 Tray 1 No Feed 4 Tray 2 No Feed 5 Tray 3 No Feed 8 RF Exit S...

Страница 408: ...fails to activate the sensor at the precise time A Check Out failure occurs when the paper remains at the sensor for longer than the prescribed time and causes a jam The 3rd column in the table below...

Страница 409: ...ms by paper size Note In the paper size notations below T means SEF Short Edge Feed 97 A0T A1 98 A1T A2 99 A2T A3 100 A3T A4 101 A4T 106 B1T B2 107 B2T B3 108 B3T B4 109 B4T 225 36x48T 24x36 226 24x36...

Страница 410: ...isplay contents are as follows CODE SP7 504 number SIZE Paper size code in hex See the table below TOTAL Total jam error count SP7003 DATE Previous jam occurred 1 Latest Sample Display CODE 007 SIZE 0...

Страница 411: ...ecent 10 jams Display contents are as follows CODE SP7505 number SIZE Paper size code in hex See table below TOTAL Total jam error count SP7003 DATE Date the previous jam occurred 1 Latest Sample Disp...

Страница 412: ...s FF 7801 ROM No Firmware Version CTL Displays the ROM number firmware version numbers and other important information about the machine Press or to see more information 7803 PM Counter Display CTL Di...

Страница 413: ...to 0 Japan Only 7832 Self Diagnosis Result Display CTL Opens the Self Diagnose Result Display to view details about errors Use the keys on in the display to scroll through all the information If no e...

Страница 414: ...abled the MFP I O timeout setting will have no effect I O timeouts never occur bit 4 SD Card Save Mode Disabled Enabled If enabled print jobs will be output to the SD card slot not to paper bit 5 DFU...

Страница 415: ...SDK applications will not be able to alter print data This is achieved by preventing SDK applications from accessing a module called the GPS Filter Note The main purpose of this bit switch is for tro...

Страница 416: ...s not necessarily mean that the job cannot be printed This bit switch tells the device whether to execute a time out immediately default upon failure or to wait 10 sec bit 1 Forced Printing If enabled...

Страница 417: ...Summary Prints the service summary sheet a summary of all the controller settings 1005 Display Version Displays the version of the printer application 1006 Sample Locked Print Enables and disables the...

Страница 418: ...R 3 MMR 1005 Erase Margin Remote Scan Creates an erase margin for all edges of the scanned image If the machine has scanned the edge of the original create a margin 0 to 5 0 1 mm 1009 Remote Scan Disa...

Страница 419: ...ounted on the left rear corner of the machine Operators can scan documents to either an SD card or a USB memory device inserted into this unit This SP must be enabled set to 1 in order for the device...

Страница 420: ......

Страница 421: ...TROUBLESHOOTING REVISION HISTORY Page Date Added Updated New None...

Страница 422: ......

Страница 423: ...ooting SM 7 1 D093 D094 Trouble Shooting 7 TROUBLESHOOTING 7 1 IMAGE PROBLEM TROUBLESHOOTING 7 1 1 FLOW CHART Follow this flow chart to determine the cause of an image problem Use SP2902 to print the...

Страница 424: ...l Line 4 4 dot Grid Pattern 17 Checkered Flag 5 5 dot Grid Pattern 18 1 dot Alternating Dot Pattern 6 6 dot Grid Pattern 19 2 dot Alternating Dot Pattern 7 1 dot Argyle Pattern 20 4 dot Alternating Do...

Страница 425: ...ine SCN 22 Density Patch 256 Lvl PRN 5 1 dot Alternating Dot Pattern SCN 23 Density Patch 64 Lvl PRN 6 1 dot Grid Pattern SCN 24 Cross Pattern PRN 7 Vertical Stripes SCN 25 Grid Pattern 96 dot Width 8...

Страница 426: ...ses Connection problem between CIS and SIPU CIS defective 2 No image solid black copy print or no image with only vertical white lines on the output Possible causes Connection problem between CIS and...

Страница 427: ...xposure glass CIS defective 5 Vertical white lines Possible causes Dirty exposure glass Dirt or scratches on the white plate above the CIS CIS defective 6 Black or white bands with no image width 1 5...

Страница 428: ...fective Case 8 Dark image density at CIS1 CIS3 and CIS5 Possible cause The machine is near a window and sunlight is hitting the CIS unit The blinders have been removed from the machine 1 Make sure tha...

Страница 429: ...blinds or moving the machine is not possible or if the blinders have been removed or damaged cover the top of the machine with one wide sheet of paper B at least 840 mm wide to block the sunlight Cas...

Страница 430: ...SM 7 1 3 IMAGE WRITING 1 No Image blank copy print Possible causes VDB board defective SIPU board defective LPH LED head defective 2 Band with no image width 1 3 of image Possible causes Connection pr...

Страница 431: ...white and black line at 150 mm from center Possible causes LPH Joints adjustment error 4 Horizontal line broken at 150 mm from center Possible causes LPH subscan timing error at joint position 5 Band...

Страница 432: ...supply 2 Black Spots at Regular Intervals Pitch Possible causes Scratched OPC drum 250 mm pitch Scratched hot roller 157 mm pitch Scratched pressure roller 173 mm pitch 3 Random Black Spots Possible...

Страница 433: ...t cleaning blade Line caused by dirty corona wire Band caused by dirty OPC drum Line caused by scratched OPC drum 5 Horizontal Black Lines or Bands Possible causes Line caused by scratched OPC drum Li...

Страница 434: ...st to the core tends to have excessive curl There is no way to correct this Operators should be instructed to use cut sheets if possible 2 Shrinkage of areas in incomplete images Possible causes Some...

Страница 435: ...e features that use the defective item The user does not see these SC codes in usual conditions But they are shown on the operation panel when the defective feature is used Cycle the machine off on wi...

Страница 436: ...the PCB If the problem is a motor lock check the mechanical load before you replace a motor or sensor When a Level A or Level B SC occurs while the machine is in the SP mode the SC number will not be...

Страница 437: ...ment of the CIS failed at power on Standard white strips dirty or not platen white plate installed improperly CIS LED defective and not lighting CIS to PSU harness connector loose disconnected or defe...

Страница 438: ...er on or when the machine returned from energy save mode an SIPU error occurred during Ri2500 access Ri2500 did not respond within 5 ms SIPU defective 161 3 D SIPU Error 3 Ri2001A Chip Failure At powe...

Страница 439: ...broken defective SIF SIPU harnesses loose broken defective SIF defective CIS defective SIPU defective 7 3 2 SC200 There are no Group 2 SC codes for this machine 7 3 3 SC300 Group 3 SC codes are relate...

Страница 440: ...leaner unit blocked or damaged Until replacement parts become available set SP2804 to 0 to disable the charge corona cleaning function so the machine can operate 392 D Development Bias Error The devel...

Страница 441: ...sensor dirty ID sensor harness connector loose disconnected damaged defective ID sensor defective MCU defective Development unit defective CGB power pack defective 401 D ID Sensor Vsg Error The Vsg l...

Страница 442: ...ive Development unit defective CGB power pack defective 406 D ID Sensor Pattern Edge Detection Error The ID sensor pattern check could not detect the correct voltage on the ID sensor pattern below 2 5...

Страница 443: ...he left and right cutter HP sensors remained on or off more than 2 sec HP sensors on the left and right side loose disconnected defective Cutter motor harness damaged defective Cutter motor defective...

Страница 444: ...or defective 522 D Fusing Unit Drive Motor Error After the motor started the fusing motor lock signal remained HIGH for 5 sec Physical obstruction blocking motor Motor harness damaged defective Motor...

Страница 445: ...or The hot roller did not reach 100 C within 130 sec after power on Fusing lamp connections loose broken defective Fusing lamp defective Thermistor not touching the hot roller Thermistor defective MCU...

Страница 446: ...defective Fusing unit defective 545 A Fusing Lamp Overheated Error 2 After the hot roller reached the ready temperature the fusing lamp stayed on at full power for 50 sec while the hot roller was not...

Страница 447: ...ence or while the hot roller and pressure roller were rotating the pressure roller center thermistor measured a value higher than 3 3V 10 consecutive times at 600 ms intervals Pressure roller center t...

Страница 448: ...ror 1 During the hot roller temperature control sequence or while the hot roller and pressure roller were rotating the center thermistor on the pressure roller returned a digital reading of more than...

Страница 449: ...r device error 2 CTL During communication with the device the MCU received a break Low signal Serial line from the device to the main machine is unstable disconnected or defective 634 B Key card count...

Страница 450: ...correct file of the expanded authentication module SC641 D Engine Controller Communication Error No Response CTL There was no response to a frame sent from the controller board to the engine Cycle th...

Страница 451: ...n required because this SC does not interfere with operation of the machine 652 D Remote Service ID2 Mismatch Error 1 CTL ID2 for the device did not match the ID2 stored in NVRAM This error can occur...

Страница 452: ...authentication then try again 670 D Engine startup error CTL The MCU failed to respond within the prescribed time when the machine was turned on Connections between MCU and controller board are loose...

Страница 453: ...correctly Controller board defective Operation panel harness disconnected or defective 687 D PER command error The main machine received no PER command module from the GW controller Poor communication...

Страница 454: ...de Reboot the machine Replace the controller board SC816 5 SCS Machine attempted to enter STR mode before engine was OFF SC816 39 Sub System Error occurred during system start up SC816 50 Hardware Pri...

Страница 455: ...occurred in the compression decompression module of ASIC Veena in HAIC P2 If EFI Fiery Controller is connected refer to the EFI manual If EFI is not connected HDD defective System memory defective 0x6...

Страница 456: ...itration for CPU access for option bus and SDRAM access for SDRAM refresh and for management of the internal bus gate Controller board defective Note For more details about this SC code error execute...

Страница 457: ...Check and correct the driver settings Network PHY LINK module defective PCI interface defective IEEE1394 I F board defective Controller board defective 853 B Wireless LAN Error 1 CTL During machine st...

Страница 458: ...B loose 857 B USB I F Error CTL The USB driver is not stable and caused an error Poor USB card connection Replace the controller board 858 A Data Encryption Error 1 CTL These are errors of the HDD Dat...

Страница 459: ...ncryption Error 2 CTL These are errors of the HDD Data Encryption Option D377 8 HDD Check Error Data conversion was attempted with no HDD unit present Confirm that HDD unit installed correctly Initial...

Страница 460: ...as awakened from the energy save mode it did not return to the ready status within 30 sec Harness between HDD and controller board disconnected defective HDD power connector disconnected HDD defective...

Страница 461: ...rmation error CTL The machine detected an electronic license error in the application on the SD card in the controller slot immediately after the machine was turned on Program missing from the SD card...

Страница 462: ...ter 3 sec reset the user information with SP5832 6 HDD Formatting User Information 3 Turn the main power switch off on 872 B HDD mail receive data error CTL An HDD error was detected immediately after...

Страница 463: ...te Security Unit B735 running from the DOS SD card Turn the main switch off on do the operation again Install the Data Overwrite Security Unit again HDD defective 875 D Delete All error 2 Data area CT...

Страница 464: ...Install the HDD encryption unit 876 3 Log data error 3 Invalid log encryption key due to defective NVRAM data Initialize the HDD with SP5832 4 Request customer s system administrator to disable HDD e...

Страница 465: ...n removed or was not installed correctly switch the machine off insert the SD card then switch on the machine again If the SD card has been damaged procure a new SD card replace the NVRAM then do the...

Страница 466: ...e mechanical counter is not connected Mechanical counter connection loose broken defective Mechanical counter defective 920 B Printer error 1 CTL An internal application error was detected and operati...

Страница 467: ...and other network functions cannot be used HDD status codes are displayed below the SC code Refer to the four procedures below Recovery from SC 925 Here is a list of HDD status codes Display Meaning...

Страница 468: ...ased DeskTopBinder Print Job Manager Desk Top Editor job history will be erased Documents on the document server and scanned documents will not be erased The first time that the network gets access to...

Страница 469: ...the software all firmware modules SIPU defective 965 D Print Start Error During print processing another command to start printing was received Printer firmware defective Update printer firmware 967...

Страница 470: ...are performs an unexpected function However unlike SC990 recovery processing allows the program to continue Software defective re boot 1 1 For more information about SC990 and SC991 1 Execute SP7403 o...

Страница 471: ...ble and inform your supervisor of the results 994 C Operation Panel Management Records Exceeded CTL An error occurred because the number of records exceeded the limit for images managed in the service...

Страница 472: ...processing does not operate for an application within 60 s after the machine power is turned on No applications start correctly and all end abnormally Software bug A RAM or DIMM option needed for the...

Страница 473: ...on the LCD shows the location of the jam with instructions about how to correct the problem The Code numbers in the table are also shown Use SP7507 Plotter Jam History and SP7508 Original Jam History...

Страница 474: ...ation at the prescribed time LE Leading edge of original or paper TE Trailing edge of original or paper Scanner Standby Jams Code Location Display Comment 001 Initial jam Original Set Sensor P Sensor...

Страница 475: ...sensor detected the leading edge of the next original before the IPU received the scan end signal 006 Original Stop P Scanner Stop button was pushed to remove the original Scanner Late Jams Code Locat...

Страница 476: ...aper Set Sensor B Initial Jam Fusing Exit Sensor C Plotter Late Jams Code Location Display Comment 003 Roll 1 Non Feed Jam A2 004 Roll 2 Non Feed Jam A2 005 Paper cassette Non Feed Jam A1 008 Roll Fee...

Страница 477: ...ed to feed 054 Roll 2 Feed Lag A2 Roll paper failed to feed 055 Paper Cassette Lag A1 Cut sheets failed to feed 058 Roll Feeder Exit Jam A2 RF exit sensor failed to go OFF 063 Registration Jam B Paper...

Страница 478: ...V dc line fusing lamp power relay ac line Exit Cover Switch Exit Unit Switch Scanner Switch Scanner motor 24 dc line Toner Hopper Cover Switch Toner supply clutch paper registration clutch drum motor...

Страница 479: ...ects B1 24 width paper 3 Original Width Sensor B2 18 Detects B2 18 width paper 4 Original Width Sensor B3 12 Detects B3 12 width paper 5 Paper Exit Selection Switch The upper output stacker depresses...

Страница 480: ...ide of original feed unit to stop original feed if there is a problem during scanning 9 CIS 1 5 Contact Image Sensors Transfer the image signals from the CIS LEDs to the SIF 10 LPH1 3 LED Print Heads...

Страница 481: ...t Sensor A4 8 5 SEF Detects the leading edge of the original This starts the scanner motor This sensor also detects A4 or 8 5 width paper 19 Original Width Sensor B4 9 Detects B4 or 9 width paper 20 V...

Страница 482: ...C This safety device prevents overheating if the temperature control circuit fails 5 Fusing Exit Sensor Detects the leading edge and trailing edge of the paper as it leaves the fusing unit 6 Pressure...

Страница 483: ...paper at the registration rollers 15 Paper Set Sensor This detects when a cut sheet is placed on the manual feed table by pass 16 ID Sensor The machine uses this sensor to control toner supply toner n...

Страница 484: ...r Board Controls the memory and all peripheral devices The GW architecture allows the board to control all applications copying printing and scanning 5 SIPU Scanner Image Processing Unit This processe...

Страница 485: ...idifiers in the roll feeder 8 Anti condensation Heater Switch Switches the anti condensation heaters on off in the main machine There are two 13W heaters one located at either end of the OPC drum Thes...

Страница 486: ...r there is no more paper on Roll 1 3 Roll End Sensor 2 This reflective photosensor above Roll 2 detects the core of the roll which is black after there is no more paper on Roll 2 4 Dehumidifier Switch...

Страница 487: ...it Sensor 1 Detects the leading edge of the paper from the rolls 2 Detects the trailing edge of cut sheets from the paper cassette and trailing edges of sheets cut from the paper rolls for paper feed...

Страница 488: ...otor clutches sensors and switches 2 Cassette Set Sensor This detects when the cassette is set and locked in its place 3 Cassette End Sensor This sensor is above the paper cassette It detects paper en...

Страница 489: ...20V Version Name Output Connector Capacity Voltage Load Type FU101 CN100 2 T10AH 250V AC DC Power FU001 CN101 1 15A 250V AC Fusing lamps FU100 15A 250V AC Input protection FU303 CN126 3 CN402 1 T6 3AL...

Страница 490: ...Connector Capacity Voltage Load Type FU001 CN101 1 T6 3AH 250V AC Fusing lamps FU100 8A 250V AC Input protection FU303 CN126 3 CN402 1 T6 3AL 250V 24V MCU SIF FU302 CN126 2 T6 3AL 250V 24V MCU via int...

Страница 491: ...nd also controls the flow of ac current to the fusing lamp dehumidifiers x4 and anti condensation heaters x2 The following LEDs indicate the status of elements operation on the PSU 0 LED Color LED Def...

Страница 492: ...age power supply motors sensors solenoids clutches fusing temperature customer support systems etc Scanning signals sensors motors Power supply Scanner motor output The following LEDs indicate the sta...

Страница 493: ...efinition Factory Setting Comments 1 Destination Setting 1 OFF Area SW1 SW2 2 Destination Setting 2 OFF 17 ON OFF 27 OFF ON 21 ON ON 3 Jam Detect OFF OFF No jam detection at ON 4 SC Detection OFF OFF...

Страница 494: ...tus Display Normal OFF Abnormal ON LED 3 ORANGE CIS Processing IC IC10 Status Display Normal ON Abnormal OFF LED 4 ORANGE CIS Processing IC IC10 Status Display Normal ON Abnormal OFF LED 5 ORANGE CIS...

Страница 495: ...EG Line Over Interrupt OFF No abnormality if OFF LED 13 YELLOW Image Processing IC IC37 Status Display Normal ON Memory Line Over Abnormal OFF LED14 YELLOW Image Processing IC IC37 Status Display Stan...

Страница 496: ...Board LEDS DIP Switches D093 D094 7 74 SM DIP_SW5 SW No DIP SW Definition Factory Setting Comments 1 CIS Switching ON Never change these settings 2 Not Used OFF 3 Not Used OFF 4 For debugging OFF...

Страница 497: ...peration on the VDB 0 LED Color LED Definition LED State LED100 GREEN FPGA operation Normal FLASH LED101 GREEN PCLK Input Check Input from SIPU FLASH Else OFF LED102 GREEN Internal GATE signal check S...

Страница 498: ...Not Use DIP_SW1 SW No Push switch Definition Factory Setting Comments SW1 VDB reset Push to reset VDB FPGA SIF The SIF Scanner Interface controls and processes the analog to digital AD conversion of...

Страница 499: ...and SD cards installed in the slots of the controller board LEDs The following LEDs indicate the status of elements operation on the controller board 0 LED Color LED Definition LED State LED 1 RED BIO...

Страница 500: ...D 6 RED BIOS Post Code Normal ON Installing OFF Installation END ON LED 7 RED BIOS Post Code Normal OFF Installing OFF Installation END ON LED 8 RED BIOS Post Code Normal FLASH Installing FLASH Instal...

Страница 501: ...1 Selects boot device OFF Selects system software boot device No 1 OFF No 2 OFF No 3 OFF USB Boot No 1 ON No 2 OFF No 3 OFF SD Card Boot 2 Selects boot device OFF 3 Selects boot device OFF 4 Selects...

Страница 502: ...t device 2 ON Selects sub system boot device Flash ROM Boot No 5 ON No 6 ON SD Card Boot No 5 OFF No 6 OFF 6 Selects boot device 2 ON 7 Selects HDD common power supply OFF OFF VE System Power Power al...

Страница 503: ...ENERGY SAVING REVISION HISTORY Page Date Added Updated New None...

Страница 504: ......

Страница 505: ...0 min the grey area will disappear and no energy is saved before 240 min expires Timer Settings The user can set these timers with User Tools System settings Timer setting Panel off timer 10 sec 240 m...

Страница 506: ...they should consider the effects on the environment of extra energy use If it is necessary to change the settings please try to make sure that the Auto Off timer is not too long Try with a shorter se...

Страница 507: ...because the power consumption specifications are measured in a controlled environment with a constant power supply To get an exact measurement at the customers site a watt meter must be used to measu...

Страница 508: ...nter The total counter counts all pages printed Recommendation Please explain the above features to the customers so that they can reduce their paper usage Model D093 D094 Total counter SP 8581 001 Si...

Страница 509: ...D093 D094 SERVICE MANUAL APPENDICES...

Страница 510: ......

Страница 511: ...2 1 PAPER THICKNESS DEFAULT SELECTION 2 17 2 3 SP2 XXX DRUM 2 39 2 4 SP3 XXX PROCESS CONTROL 2 65 2 5 SP4 XXX SCANNER 2 67 2 6 SP5 XXX MODE 2 107 2 7 SP6 XXX PERIPHERALS 2 189 2 8 SP7 XXX DATA LOG 2...

Страница 512: ......

Страница 513: ...APPENDIX SPECIFICATIONS REVISION HISTORY Page Date Added Updated New None...

Страница 514: ......

Страница 515: ...Image Write LED array Charger Scorotron Method Printing Method Digital dry electrostatic transfer Speed 80 mm sec Languages RPCS PostScript 3 GL 2 TIFF Originals Sheet Original Image Size W x L Maxim...

Страница 516: ...10 g m 13 9 29 3 lb 68 148 m Plain paper Translucent 3 4 mils Film Copying Speed cpm copies minute D093 2 cpm A0 E SEF 4 cpm A1 D LEF D094 3 cpm A0 E SEF 6 cpm A1 D LEF Photoconductor OPC Organic phot...

Страница 517: ...oom temperature 23 C Plain Paper mode AC 120V 17 Model AC 220 240V 21 27 Model First Copy Time 1st Roll Feed 18 sec A1 LEF D LEF Cassette 19 sec A3 LEF B LEF Manual Feed 31 sec A1 LEF D LEF Copy Numbe...

Страница 518: ...xt mode Power Source 17 Ver AC 120V 60 Hz 15 A or more 21 27 Ver AC 220 240V 50 60Hz 10A or more Power Consumption 1 Mode 17 120V kw 27 220 240V kw Warm up 1 31 1 39 Ready 2 0 312 0 305 Copying 1 37 1...

Страница 519: ...Less than 1 5 kW Dimensions w x d x h 1080 x 637 x 580 mm 43 x 25 x 23 Weight Less than 107 kg 235 9 lb Optional Equipment 1 Roll Feeder Type 3601A B D504 D504 2 Paper Cassette Type 240 B853 3 Table T...

Страница 520: ...e Diameter 76 4 0 25 mm about 3 Power Source From main frame Dimensions w x d x h 1080 x 720 x 700 mm 43 x 28 x 27 Weight D503 70 kg 154 lb D504 72 kg 158 4 lb Paper Cassette B853 Type Universal Casse...

Страница 521: ...APPENDIX SP MODE TABLES REVISION HISTORY Page Date Added Updated New 241 242 06 01 2011 Updated SP1001 Bit Switch 9 added Bit 4 PJL UStatus Job End...

Страница 522: ......

Страница 523: ...mum performance CTL Means controller This is used to denote SP codes that are related to the GW controller Not Used These SP s appear in the SP mode menus but these codes are not used because Currentl...

Страница 524: ...t the adjustment outside this range part of the image will be cut off 2 2nd Roll 3 Cassette 5 By pass Feed 1003 Registration Buckle Adjustment Cassette Feed This SP eliminates the amount of buckle at...

Страница 525: ...re the hot roller reaches its target temperature SP1931 3 Low Power Mode Sets the copy ready temperature for low power mode 80 to 150 90 1 C step 5 Fusing Temperature Calibration DFU Calibrates the sc...

Страница 526: ...eration of the machine by cycling the machine off on SC559 is a Class A SC error The service technician must restore operation of the machine 1801 Motor Speed Adjustment DFU These SP s adjust the spee...

Страница 527: ...Motor Roll Translucent Paper 100 to 100 0 1 3 Feed Motor Roll Film 100 to 100 10 1 1911 By pass Feed Start Timing Adjusts the time that the operator has to adjust the paper skew manually when feeding...

Страница 528: ...e registration roller in order to reduce the effect of the trailing edge snapping away from the registration roller 5 to 0 0 0 02 1916 Fusing Motor Speed Adj SP1916 10 to 013 adjust the basic fusing m...

Страница 529: ...054 51 Roll 100 to 100 0 1 52 Bypass 100 to 100 0 1 53 Cassette 100 to 100 0 1 1918 Fusing Main Mtr Speed Change These SP modes adjust the rate of the speed reduction between the main motor and the fu...

Страница 530: ...ate of speed reduction between the main motor and fusing motor 10 Roll 1st Chg Timing Plain Width 611mm 0 to 15000 170 1mm 11 Roll 1st Chg Timing Plain Width 461 610mm 12 Roll 1st Chg Timing Plain Wid...

Страница 531: ...tte 1st Chg Timing Width 298 460mm 0 to 15000 170 1mm 43 Cassette 1st Chg Timing Width 297mm 47 Cassette 1st Chg Width 298 460mm 9 99 to 9 99 1 0 0 01 48 Cassette 1st Chg Width 297mm 9 99 to 9 99 1 3...

Страница 532: ...Film Width 461 610mm 92 Bypass 1st Chg Timing Film Width 298 460mm 93 Bypass 1st Chg Film Width 297mm 95 Bypass 1st Chg Film Width 611mm 9 99 to 9 99 0 5 0 01 96 Bypass 1st Chg Film Width 461 610mm 9...

Страница 533: ...7mm 130 Roll 2nd Chg Timing Film Width 611mm 0 to 15000 0 1mm 131 Roll 2nd Chg Timing Film Width 461 610mm 132 Roll 2nd Chg Timing Film Width 298 460mm 133 Roll 2nd Chg Timing Film Width 297mm 135 Rol...

Страница 534: ...idth 611mm 0 to 15000 0 1mm 181 Bypass 2nd Chg Timing Trans Width 461 610mm 182 Bypass 2nd Chg Timing Trans Width 298 460mm 183 Bypass 2nd Chg Timing Trans Width 297mm 185 Bypass 2nd Chg Trans Width 6...

Страница 535: ...99 0 0 01 216 Roll 3rd Chg Plain Width 461 610mm 217 Roll 3rd Chg Plain Width 298 460mm 218 Roll 3rd Chg Plain Width 297mm 220 Roll 3rd Chg Timing Trans Width 611mm 0 to 15000 0 1mm 221 Roll 3rd Chg...

Страница 536: ...in Paper 25 1st Roll 841mm Plain Paper 20 to 20 0 0 1 mm 26 1st Roll 1189mm Plain Paper 20 0 to 20 0 0 0 1 mm 27 1st Roll 2000mm Plain Paper 30 to 30 0 1 mm 28 1st Roll 3600mm Plain Paper 30 to 30 0 1...

Страница 537: ...100 to 100 0 1 mm 82 2nd Roll 297mm Plain Paper 10 to 10 0 0 1 mm 83 2nd Roll 420mm Plain Paper 84 2nd Roll 594mm Plain Paper 85 2nd Roll 841mm Plain Paper 20 to 20 0 0 1 mm 86 2nd Roll 1189mm Plain...

Страница 538: ...2nd Roll 2000mm Film 30 to 30 0 1 mm 128 2nd Roll 3600mm Film 129 2nd Roll 6000mm Film 130 2nd Roll 15000mm Film 100 to 100 0 1 mm 1923 Paper Interval Adjustment This SP slightly increases the gap bet...

Страница 539: ...re used to change the fusing temperature and amount of pressure applied by the pressure roller on the hot roller Each numbered button 1 to 5 represents a mode Mode 1 to Mode 5 These references to mode...

Страница 540: ...ness Default Selection in this section 1 Plain Mode1 120 to 220 195 5o C 2 Plain Mode2 3 Plain Mode3 4 Plain Mode4 120 to 220 185 5o C 5 Plain Mode5 120 to 220 175 5o C 6 Trans Mode1 120 to 220 205 5o...

Страница 541: ...o the paper type and thickness settings selected in User Tools see Paper Thickness Default Selection in this section After adjusting these SP s you must turn the machine power off on 1 Plain Mode1 60...

Страница 542: ...o 5 below refer to the paper and thickness settings selected in User Tools see Paper Thickness Default Selection in this section 1 Plain Mode1 0 to 50 20 5 2 Plain Mode2 0 to 50 15 5 3 Plain Mode3 0 t...

Страница 543: ...t hot roller temperature is 195o C 100 is SP1932 195 is SP1931 If the pressure roller temperature 120o C 100 20 this is SP1932 SP1935 the target hot roller temperature is 175o C 195 20 this is SP1931...

Страница 544: ...re is below the temperature set for the pressure roller paper feed will stop during a long job to perform inching to allow enough time for the pressure roller temperature to rise to the level of the p...

Страница 545: ...ength of time within which the hot roller temperature should reach 140 C If the hot roller does not reach 140 C within this time limit copying cannot start until the hot roller reaches its target temp...

Страница 546: ...ection 0 to 20 7 0 5 min 13 Low Temp Mode Paper Interval Ratio This SP sets the size of the gap between sheets of paper while the machine is in the low temperature environment cold start mode 1 to 10...

Страница 547: ...emperature by Width Press ure Roll er Use these SP s to set up the step control used in the paper type and paper thickness selections done in the User Tools see Paper Thickness Default Selection in th...

Страница 548: ...y the temperature readings of the thermistors at the center and end of the pressure roller This SP sets Step 1 of CPM down mode If the amount of the difference between the actual temperature and targe...

Страница 549: ...es or increases the length of the interval with this simple calculation This standard interval can be modified slightly with SP1923 22 Paper Interval Step 2 When the pressure roller center and end the...

Страница 550: ...rops during continuous printing the machine enters the CPM down mode to increase the distance between sheets of paper going through the fusing unit The slightly longer wait time between the trailing e...

Страница 551: ...subtracted from the temperature at the end of the pressure roller If the difference is greater than the setting of SP1940 081 the interval between sheets of translucent paper is calculated by multipl...

Страница 552: ...t paper is calculated by multiplying the normal length of the paper and the setting for SP1940 091 CPM down control compares the settings from among these three SP codes and selects the largest value...

Страница 553: ...1 Plain Mode1 0 to 50 0 5o C 2 Plain Mode2 3 Plain Mode3 0 to 50 5 5o C 4 Plain Mode4 0 to 50 15 5o C 5 Plain Mode5 0 to 50 0 5 o C 1943 Press FB Temp High Temp Special This SP sets the high temperat...

Страница 554: ...fault Selection in this section 1 Plain Mode1 0 to 50 0 5o C 2 Plain Mode2 3 Plain Mode3 0 to 50 10 5 o C 4 Plain Mode4 0 to 50 5 5o C 5 Plain Mode5 0 to 50 0 5o C 1945 Length Level Setting These SP s...

Страница 555: ...5 Normal 0 to 30 3 1o C 11 Length Level 1 Cold Start 0 to 30 10 1o C 12 Length Level 2 Cold Start 0 to 30 5 1o C 13 Length Level 3 Cold Start 0 to 30 3 1o C 14 Length Level 4 Cold Start 0 to 30 0 1o...

Страница 556: ...operate when the paper length is not prescribed length 0 But if copying was started while feedback control was not operating during a cold start for example then feedback control operates using the s...

Страница 557: ...target temperature SP1937 003 While the temperature is below 65o C copying not printing is possible before the temperature of the pressure roller reaches its target temperature and inching starts 1 Pl...

Страница 558: ...ler Ctr Temp x SP1949 xxx Press Roller FB Temp The formula above uses the setting of this SP to determine the pressure roller feedback temperature The result of this calculation is used to calculate t...

Страница 559: ...Mode4 461 610mm 43 Normal Mode4 298 460 44 Normal Mode4 297mm 51 Normal Mode5 611mm 0 to 1 0 0 1 52 Normal Mode5 461 610mm 53 Normal Mode5 298 460 54 Normal Mode5 297mm 61 Trans Mode 611mm 62 Trans M...

Страница 560: ...A1 are forced to exit at the top of the machine If the paper exit is not specified set to 0 the upper or rear exit can be selected on the machine control panel 0 to 1 0 1 0 OFF Paper exit specified 1...

Страница 561: ...650 to 1530 1220 1 V step 2 Grid Voltage Image Area Adjusts the charge grid output 160 to 1080 800 1 uA step 3 Grid Voltage ID Sensor Pattern DFU Adjusts the charge grid output for the ID sensor patt...

Страница 562: ...mage area The amount charge applied by the CGB power pack for image transfer varies depending on whether CV is high or low Toner density is controlled to raise toner density in Low Duty mode when copy...

Страница 563: ...0 1 0 Low Duty Mode Copy Jobs 400 meters day 1 High Duty Mode Copy Jobs 400 meters day 2207 Forced Toner Supply Push Execute to force toner supply Make a copy and check the image density This SP suppl...

Страница 564: ...etting raises the amount of toner applied to control image density 0 to 3 5 1 7 0 1 Steps 3 Toner Supply Mode Sets the toner supply mode This SP sets the toner supply mode for toner supply control Thi...

Страница 565: ...08 7 Long Print Mode Setting should be set accordingly The values set for this SP are reflected in the printed images after Long Print Graphic has been selected 1 to 40 3 1 6 Long Print Graphic The ma...

Страница 566: ...n the operator selects graphic mode and the setting of SP2208 6 is reflected when the operator selects line mode 2301 Transfer Current Adjustment Use these SP s to adjust the power output and power co...

Страница 567: ...03 60 004 60 Translucent Roll 006 60 007 60 008 60 009 60 Film Roll 011 80 012 80 013 80 014 80 Plain Cut Sheet 021 60 022 60 023 60 024 60 Translucent Cut Sheet 026 60 027 60 028 60 029 60 Film Cut S...

Страница 568: ...age at the center leading edge and trailing edge on plain roll paper 1 to 2 1 0 1 6 Roll Paper Translucent Before Leading Edge 0 to 230 60 1 uA 7 Roll Paper Translucent Leading Edge 0 to 230 60 1 uA 8...

Страница 569: ...21 Cut Paper Plain Paper Before Leading Edge 0 to 230 60 1 uA 22 Cut Paper Plain Paper Leading Edge 0 to 230 60 1 uA 23 Cut Paper Plain Paper Image Area 0 to 230 60 1 uA 24 Cut Paper Plain Paper Trai...

Страница 570: ...ailing edge on translucent cut sheet paper 1 to 2 1 0 1 31 Cut Paper Film Before Leading Edge 0 to 230 80 1 uA 32 Cut Paper Film Leading Edge 0 to 230 80 1 uA 33 Cut Paper Film Image Area 0 to 230 80...

Страница 571: ...The adjustment cannot be done for paper fed from the manual feed tray Independent adjustments for the type of paper plain translucent film cannot be done Both AC and DC voltages are applied The applie...

Страница 572: ...FF Timing Roll Paper AC DC OFF Cut Sheet Paper A 2401 2 ON Timing Cut Paper AC DC ON B 2401 4 Leading Edge Cut Paper DC Switching C 2401 6 OFF Timing Cut Paper AC DC OFF 1 ON Timing Roll Paper 5 to 30...

Страница 573: ...03 Separation DC Current Adjustment Adjusts the level of the separation DC current applied to separate the paper from the drum The separation DC current can be set for plain paper translucent paper an...

Страница 574: ...Execute this SP to mix the developer during machine installation or after the developer has been replaced The machine requires two packs of developer Two SP codes are provided for entering the lot nu...

Страница 575: ...o clean the charge corona wire This SP also moves the cleaning pad to the home position The cleaning requires about 20 sec to complete 2804 Corona Wire Cleaning Interval Sets the interval for charge c...

Страница 576: ...Horizontal Line 3 3 dot Grid Pattern 16 2 dot Horizontal Line 4 4 dot Grid Pattern 17 Checkered Flag 5 5 dot Grid Pattern 18 1 dot Alternating Dot Pattern 6 6 dot Grid Pattern 19 2 dot Alternating Do...

Страница 577: ...for a particular type 10 to 10 0 0 1 Notes SP2916 1 SP2916 2 should be adjusted at installation of the main machine In 1 Installation see SP Adjustments 1 Plain Paper Mode1 4 Main Scan 2 Plain Paper...

Страница 578: ...ep mode 0 to 3 1 1 0 Off 1 On 50 sec Development motor rotates 50 sec after the machine is switched on when fusing temperature is less than 50 C 122 F 2 On 30 sec Development motor rotates 30 sec afte...

Страница 579: ...is where voltage at the first level SP2301 1 switches on before the leading edge LE of the paper B This is where the voltage switches on the second voltage level SP2301 2 at the leading edge of the pa...

Страница 580: ...5 to 10 0 1 mm 6 ON Timing Cut Paper Translucent 5 to 10 0 1 mm 7 ON Timing Cut Paper Film 5 to 10 0 1 mm 10 Leading Edge 10 to 30 16 1 mm 11 Trailing Edge 30 to 10 8 1 mm 15 OFF Timing Roll Paper Pl...

Страница 581: ...ttle motor operates The motor starts 10 sec after the main power switch is switched on and if the fusing temperature is less than 50 C 122o F 0 to 30 20 5 Note Ten seconds after the machine is switche...

Страница 582: ...en toner end is detected 0 150 to 300 0 165 0 005 V 2928 Toner End Recovery Recovery starts after the toner cartridge is replaced when a toner end condition exists 0 130 to 0 215 0 145 0 005 V In the...

Страница 583: ...at is attached to LPH replacement units Always input these settings immediately after the LPH unit has been replaced 2 LPH2 3 LPH3 2952 LPH Joint Adjustment Adjust these settings only after you replac...

Страница 584: ...Sub Scan 420mm Adjusts sub scanning at LPH 2 3 for paper less than 420 mm wide This value is calculated automatically 50 to 50 0 1 2953 LPH Joint Power Correction Adjusts the four LEDs at each end of...

Страница 585: ...ntent of some settings some scratchiness or other problems may occur in the images so use this adjustment with caution 0 to 3 1 1 0 Strongest processing thinnest 1 Normal processing 2 Weaker processin...

Страница 586: ...only the outer lines The diagram above shows 1 selected for SP2954 10 The setting does not affect the horizontal line 2959 Display VDB ID This SP displays the 8 bit data that identifies the version of...

Страница 587: ...0 to 100 20 0 1 2 Initialize ID Sensor Execute Automatically adjusts the ID sensor with a sensor reading of the bare drum The initial setting is 4 0V 0 2 This SP requires about 4 sec to execute Always...

Страница 588: ...ing during print jobs 0 to 1 1 1 If 0 OFF is selected the ID sensor pattern will not be read until the job ends this means that the most recent Vsp Vsg reading at the end of the previous job is used I...

Страница 589: ...the scanned image relative to the sub scan direction 10 to 10 0 0 1 mm step A higher setting shifts the image down opposite the sub scan direction A lower setting shifts the image up in the same dire...

Страница 590: ...scanner Each edge can be set independent of the others 5 DF LEdge 0 to 9 1 5 0 1 mm 6 DF TEdge 7 DF Left 8 DF Right 0 to 9 0 5 0 1 mm 4013 Scanner Free Run These SP s set up and start the scanner fre...

Страница 591: ...0 9 to 0 9 0 0 0 1 4417 IPU Test Pattern Enter the number for the desired test pattern switch the display to the Copy Window then press the Start button 0 to 28 0 1 Scan Text Patterns 0 0 Scanner Dat...

Страница 592: ...N 17 Horiz Frequency Characteristics SCN Print Text Patterns 18 1to4 dot Ind Dot Coverage PRN 19 Horizontal Grayscale 16 Lvl PRN 20 Vertical Grayscale 16 Lvl PRN 21 16 Lvl Grayscale PRN 22 Density Pat...

Страница 593: ...ands or spacing between black and white areas Use the MTF adjust to correct this problem and emphasize image detail 0 to 15 8 1 0 Weakest 8 Medium Default 15 Strongest 6 Smoothing 0 x1 1 7 Weak Strong...

Страница 594: ...rted to electrical signals the contrast is reduced due to the influence that adjacent white and black pixels have on one another as a result of CIS properties This may cause very narrow bands or spaci...

Страница 595: ...e quality of originals scanned in the Text Photo mode selected on the operation panel 5 MTF 0 Off 1 15 Weak Strong Sets the MTF coefficient scanned in the Text Photo mode When the original image is co...

Страница 596: ...he appearance in the backgrounds of images scanned in the Text Photo mode 0 to 7 0 1 0 Default Off 1 Weakest to 7 Strongest 4554 Scanner Photo DFU These SP codes enhance the quality of originals scann...

Страница 597: ...y increase moir 9 Ind Dot Erase x1 1 7 Weak Strong Sets the level of independent dot erasure to improve the appearance in the backgrounds of images scanned in the Photo mode 0 to 7 0 1 0 Default Off 1...

Страница 598: ...awing mode 1 to 255 128 1 1 Weakest 128 Medium Default 255 Strongest Note Raising the brightness level may increase moir 8 Contrast 1 255 Sets the overall contrast of images scanned in the Drawing mod...

Страница 599: ...ands or spacing between black and white areas Use the MTF adjust to correct this problem and emphasize image detail 0 to 15 8 1 0 Weakest 8 Medium Default 15 Strongest 6 Smoothing 0 x1 1 7 Weak Strong...

Страница 600: ...converted to electrical signals the contrast is reduced due to the influence that adjacent white and black pixels have on one another as a result of CIS properties This may cause very narrow bands or...

Страница 601: ...the quality of originals scanned in color in the Glossy Photo mode selected on the operation panel 5 MTF 0 Off 1 15 Weak Strong Sets the MTF coefficient scanned in color in the Glossy Photo mode When...

Страница 602: ...9 Ind Dot Erase x1 1 7 Weak Strong Sets the level of independent dot erasure to improve the appearance in the backgrounds of images scanned in color in the Glossy Photo mode 0 to 7 0 1 0 Default Off 1...

Страница 603: ...mat hexadecimal 0 to 1023 520 1 1 BkLvl Adj Prev CIS 1 2 BkLvl Adj Prev CIS 2 3 BkLvl Adj Prev CIS 3 4 BkLvl Adj Prev CIS 4 5 BkLvl Adj Prev CIS5 4673 BkLvl Adj Value DFU This SP displays the black le...

Страница 604: ...he machine leaves the factory 4706 Gray Balance Adj DFU 1 Start Starts the grayscale balance adjustment after it was done at the factory 4 Start Confirms the results of the grayscale balance adjustmen...

Страница 605: ...ive CIS elements 1024 to 1023 0 1 Display format Hexadecimal The values are stored after the machine is cycled off on The settings are stored in the RI2005 SIB register 1 CIS 1 G Address 0x64A0 2 CIS...

Страница 606: ...15 CIS 5 B Address 0x64BC 4715 Gray Balance Adj Factory DFU These SP codes display the RGB adjustments done by the manufacturer for each of the five CIS elements Display Hexadecimal 1024 to 1023 0 1 1...

Страница 607: ...18 Gray Balance Data Present DFU Stores and displays the present factory shipping grayscale balance adjustment read for each CIS unit 0 to 255 0 1 1 CIS 1 G 2 CIS 1 R 3 CIS 1 B 4 CIS 2 G 5 CIS 2 R 6 C...

Страница 608: ...res and displays the B adjustment value for each grayscale balance adjustment done for each CIS unit by the manufacturer 0 to 255 0 1 1 CIS 1 G 2 CIS 1 R 3 CIS 1 B 4 CIS 2 G 5 CIS 2 R 6 CIS 2 B 7 CIS...

Страница 609: ...2 CIS Gain Adjustment DFU Displays the gain value of analog ASIC LM98714 of each CIS unit after white level is adjusted when the machine is powered on The peak value for standard white plate reading t...

Страница 610: ...value for standard white plate reading the shading data peak value is set to 880 20 digits by Red white level adjustment The setting can be written with this SP and the set value is reflected in the a...

Страница 611: ...g peak data after to confirm the data of the last white level adjustment after white level has been adjusted for RGB for each of the five CIS units 0 to 1023 0 1 1 CIS 1 B 2 CIS 1 R 3 CIS 1 G 4 CIS 2...

Страница 612: ...IS2_G 11 GB_ERR_CIS4_B 5 GB_ERR_CIS2_R 12 2 GB_ERR_CIS5_G 6 GB_ERR_CIS2_B 13 3 GB_ERR_CIS5_R 7 GB_ERR_CIS3_G 14 4 GB_ERR_CIS5_B MSB 4745 CIS Adjustment Error Flag White Level 1 White Level CIS 1 2 Whi...

Страница 613: ...ontrol abnormal 0 0 Black Level 6 Black Level CIS 1 7 Black Level CIS 2 8 Black Level CIS 3 9 Black Level CIS 4 10 Black Level CIS 5 Displays AGC adjustment or error flags after black level adjustment...

Страница 614: ...0000 0 7 0 6 0 5 0 4 DCM lock status display for CIS5 3 DCM lock status display for CIS4 2 DCM lock status display for CIS3 1 DCM lock status display for CIS2 0 DCM lock status display for CIS1 4750 C...

Страница 615: ...0x004 0x0080x3F8 0x3FC 0x000 0x001 3 Main Scan 0 1023 Alternate Pattern 1 0x000 0x03FF 0x000 0x03FF 4 Main Scan 0 1023 Alternate Pattern 2 0x000 0x03FF 0x000 0x03FF 5 White Coverage 0x3FF Fixed 4762 C...

Страница 616: ...for standard white plate reading the shading data peak value is set to 880 20 digits by Red white level adjustment The adjusted value is used as the default setting for the white level adjustment don...

Страница 617: ...s 4781 Gain Adjustment at Factory DFU 1 CIS 1 2 CIS 2 3 CIS 3 4 CIS 4 5 CIS 5 LED Adjustment at Factory 6 CIS 1 R 7 CIS 2 R 8 CIS 3 R 9 CIS 4 R 10 CIS 5 G 11 CIS 1 G 12 CIS 2 G 13 CIS 3 G 14 CIS 4 G 1...

Страница 618: ...1 Shading Correction AEREF Setting Displays the AEREF value used to supplement shading processing 512 to 511 0 1 2 Shading Correction Target Level Setting This SP sets the correction coefficient used...

Страница 619: ...n for digital AE processing P Wind for scanned image data in the main scan direction from the center of the orignal as a reference point starting at the left side of the original 0 to 512 60 0 1 mm 7...

Страница 620: ...ase the quality of the image 1 Independent Dot Erase Text Sets the independent dot erase mode for scanning Text Mode 0 to 7 4 1 0 Weakest 4 Medium Default 7 Strongest 2 Independent Dot Erase Generatio...

Страница 621: ...1 1 1 0 No line width correction 1 Line width correction 14 Line Width Corr Generation Mode Select Sets the strength of line correction effect for Generation Mode 0 to 8 3 1 0 Weakest 3 Default 4 Med...

Страница 622: ...orrection 19 Line Width Corr Drawing Sub Scan Sets the strength of line correction effect for Drawing Mode in the sub scan direction 0 to 1 1 1 0 No line width correction 1 Line width correction 4904...

Страница 623: ...Filter Level Drawing Sets the outline erase function for copy Drawing Mode 1 to 3 1 1 0 Weakest 3 Strongest 6 Smoothing Filter Level Patched Original Sets the outline erase function for Patched Origi...

Страница 624: ...Use the 210 mm position in the sample to check the difference This setting is used to calculate the motor clock count for adjusting the difference 2 Synchro cut Adjustment 1000mm Adjusts the synchro...

Страница 625: ...this SP if you see image distortion after CIS adjustments with SP4972 For more about how to use SP4965 please refer to Replacements and Adjustments Scanner Original Feed Unit Rollers 1 0 to 0 0 0 2 0...

Страница 626: ...r Motor Speed This SP sets the speed of the motor when it is tested with SP5804 201 8 to 320 80 0 1 mm sec 4972 Scan Correction These SP s correct the alignment the image scanned by the CIS For more s...

Страница 627: ...gnment of the image at the joints of the CIS elements 0 to 2 2 1 0 No adjustment 1 Simple adjustment at joints 2 Gradation adjustment at joint 4975 Prevent Original Falling This SP determines whether...

Страница 628: ...ment mirroring module 4 Main scan magnification left shift right shift module 5 Multi rate_filter module 6 Multi rate_line correction module 7 Multi rate_independent dot erase module 2 RGB Frame Memor...

Страница 629: ...L These SP codes setting the method and units for counting 1 Counter Method Selects the counting method 0 to 1 0 1 0 Development counter black prints 1 Paper counter Shows the total page counts 2 Coun...

Страница 630: ...y CTL This SP switches the counter list for the system administrator on off 0 to 1 0 1 0 On 1 Off 5071 Set Bypass Paper Size Display CTL This SP determines whether long paper can be fed from the bypas...

Страница 631: ...cation This lets you select a number for the external device for user access control Note SDK refers to software on an SD card 0 to 3 0 1 0 None 1 Expansion Device 1 2 Expansion Device 2 3 Expansion D...

Страница 632: ...when a copy job stops because the card is removed the card is expired or if the paper supply runs out Japan Only 0 to 2 0 1 step 0 Yes 1 Stand by 2 No 5121 Counter Up Timing CTL Determines whether th...

Страница 633: ...d it will remain in the SP mode after power is restored This SP is automatically reset to 0 disabled after the service technician closes the SP mode with the Exit soft button or after the log out time...

Страница 634: ...by switching between productivity priority 0 and tray priority 1 This SP operates only if the operator has selected Auto Paper Select 0 to 1 0 1 0 Productivity priority Switches from the current feed...

Страница 635: ...not be able to easily switch off the auto off feature 0 to 1 0 1 0 On Auto Off cannot be released 1 Off Auto Off can be released 5307 Summer Time CTL Lets you set the machine to adjust its date and t...

Страница 636: ...e the time 1 hour 1 8th If the time change is not a whole number 1 5 hours for example digit 8 should be 3 30 minutes 1 Setting Enables disables the settings for 2 and 3 0 Disable 1 Enable 3 Rule Set...

Страница 637: ...tail Options 5404 User Code Count Clear CTL Clears the counts for the user codes assigned by the key operator to restrict the use of the machine Press Execute to clear 5411 LDAP Certification CTL This...

Страница 638: ...termines whether the system waits the prescribed time for input of a correct user ID and password after an account lockout has occurred 0 to 1 0 1 0 Off no wait time lockout not cancelled 1 On system...

Страница 639: ...Mitigation Time Sets the length of time for excluding continuous access for identical user IDs and passwords 0 to 60 15 1 min 5415 Password Attack 1 Permissible Number Sets the number of attempts to...

Страница 640: ...s 3 Monitor Interval Sets the processing time interval for referencing user ID and password information 1 to 10 3 1 sec 5417 Access Attack 1 Access Permissible Number Sets a limit on access attempts w...

Страница 641: ...should be done with the System Administrator Note These functions are enabled only after the user access feature has been enabled 1 Copy Determines whether certification is required before a user can...

Страница 642: ...1 0 On 1 Off 51 SDK1 0 or 1 0 1 0 ON 1 OFF Determines whether certification is required before a user can use the SDK application 61 SDK2 71 SDK3 5430 Auth Dialog Message Change CTL 1 Message Change...

Страница 643: ...thentication Error Code These SP codes determine how the authentication failures are displayed 1 System Log Disp Determines whether an error code appears in the system log after a user authentication...

Страница 644: ...e for use of the entered code 5501 PM Alarm CTL 1 PM Alarm Level 0 to 9999 0 1 step 0 Alarm off 1 to 9999 Alarm goes off when Value 1 to 9999 PM counter 2 Original Count Alarm 0 to 1 0 1 0 No alarm so...

Страница 645: ...HLT 3 Toner Supply Alarm Switches the control call on off for the toner end 0 to 1 0 1 0 Off 1 On If you select 1 the alarm will sound when the main machine detects toner end 80 Toner Call Timing Thi...

Страница 646: ...hers 250 to 10000 1000 1 Step 132 Interval A3 133 Interval A4 141 Interval B4 160 Interval DLT 164 Interval LG 165 Interval Foolscap 166 Interval LT 175 Interval 12x18 225 Interval 36inch 250 to 10000...

Страница 647: ...to determine the length of an unattended paper jam 3 to 30 10 1 This setting is enabled only when SP5508 4 is enabled set to 1 12 Jam Detection Continuous Count Sets the number of continuous paper jam...

Страница 648: ...an SC error occurs 1 SC Call Determines whether an SC call is issued when an SC error occurs while either CSS or Remote is enabled 0 to 1 1 1 1 An SC call is issued when an SC error occurs 0 An SC cal...

Страница 649: ...IMH Memory Clr Initializes the image file system IMH Image Memory Handler 5 MCS Initializes the automatic delete time setting for stored documents MCS Memory Control Service 6 Copier Application Initi...

Страница 650: ...l Service settings 15 Clear UCS Setting Initializes the UCS User Information Control Service settings 16 MIRS Setting Initializes the MIRS Machine Information Report Service settings 17 CCS Initialize...

Страница 651: ...itches and sensors 1 Roll Unit Open Sensor 2 Cutter Sensor 3 Roll Leading Edge Sensor 4 Roll Unit Sensor 1 5 Roll End Sensor 1 6 Roll End Sensor 1 White 7 Roll Unit Sensor 2 8 Roll End Sensor 2 9 Roll...

Страница 652: ...pen Sensor Left 5V 25 Fusing Unit Sensor 26 Toner Cover Open Sensor 27 Main Motor Lock Sensor 28 Drum Motor Lock Sensor 29 Fusing Motor Lock Sensor 30 Overheat Sensor 31 Zero Cross 32 DIP SW1 33 Key C...

Страница 653: ...Sensor B2 207 Original Width Sensor B3 208 Original Width Sensor B4 209 Original Width Sensor 914 mm 210 Original Width Sensor 30 211 Original Set Sensor 212 Original Registration Sensor 213 Original...

Страница 654: ...Motor 21 Cassette Feed Motor 25 Cassette Feed Clutch 32 Main Motor 33 Fusing Motor 34 Drum Motor 35 Registration Clutch 36 Paper Junction Gate Solenoid 37 Used Toner Motor 41 Charge Corona 42 Charge G...

Страница 655: ...na Rear Edge 74 Exit Fan 201 Scanner Motor Off On 211 CIS LED R 212 CIS LED G 213 CIS LED B 5810 SC Reset Touch EXECUTE to release the machine for servicing When the machine issues a Level A SC code t...

Страница 656: ...actory and should not be changed in the field 5812 Service Tel No Setting CTL Use these SP modes to input service and support telephone numbers Enter the number and press Press the key to input a paus...

Страница 657: ...s over the Remote network 0 to 1 0 1 0 Disables remote diagnosis over the network 1 Enables remote diagnosis over the network 7 SSL Disable Controls if RCG Remote Communication Gate confirmation is do...

Страница 658: ...determines how the machine receives forum RFU Remote Forum Updates updates 0 to 1 1 1 0 All forum updates 1 Energy status update only 21 RCG C Registed This SP displays the Embedded RC Gate installat...

Страница 659: ...the HTTP proxy The length of the password is limited to 31 characters characters beyond the 31st character are ignored Note The proxy number user name and password comprise proprietary operator inform...

Страница 660: ...aiting for the certification update request from the rescue CTL URL 14 The notification of the certification request has been received from the rescue CTL URL and the certification is being stored 15...

Страница 661: ...No certification has been issued 6 CTL URL does not exist 69 CERT Up ID The ID of the request for certification 83 Firm Up Status Displays the status of the firmware update 85 Firm Up User Check This...

Страница 662: ...bytes Spaces are displayed as underscores _ Asterisks indicate that no DESS exists 91 CERT Serial Number Displays serial number for the Remote certification Asterisks indicate that no DESS exists 92 C...

Страница 663: ...M to determine whether the dial up line is for manual rotary or push button tone dialing The status of the execution of this SP dialing in progress success failure is written to SP5816 152 If the chec...

Страница 664: ...out where Embedded RC Gate M is used with a PBX system If a number is set here the number will be replaced by the number returned by the successful execution of SP5816 151 156 Dial Up User Name DFU Th...

Страница 665: ...Line Connecting DFU This SP code should be set for the customer using Embedded RC Gate M depending on the line usage whether line is shared with a fax or not 0 to 1 0 1 0 Line shared with facsimile 1...

Страница 666: ...dded RC Gate device are set 1 The Embedded RC Gate device is being set Only Box registration is completed In this status the Basil unit cannot answer a polling request 2 The Embedded RC Gate device is...

Страница 667: ...Proxy error proxy enabled 4 Proxy error proxy disabled 5 Proxy error Illegal user name or password 6 Communication error 7 Certification update error 8 Other error 9 Inquiry executing 205 Confirm Pla...

Страница 668: ...tration executing 208 Error Code Displays a number that describes the error code that was issued when either SP5816 204 or SP5816 207 was executed Cause Code Meaning Illegal Modem Parameter 11001 Chat...

Страница 669: ...ce 2391 Two registrations for same device 2392 Parameter error 2393 Basil not managed 2394 Device not managed 2395 Box ID for Basil is illegal 2396 Device ID for Basil is illegal 2397 Incorrect ID2 fo...

Страница 670: ...5825 NVRAM Data Download CTL Downloads the content of an SD card in Slot 2 to the NVRAM on the control board Remove the SD card slot cover on the back of the machine Insert a blank SD card in Slot 2 O...

Страница 671: ...is SP operates only when SP5828065 is set to 1 0 to 1 1 1 1 Resumes printing spooled jog 0 Clears spooled job 69 Spooling Protocol This SP 8etermines whether job spooling is enabled or disabled for ea...

Страница 672: ...IPv6 Stateless Address 2 151 Active IPv6 Stateless Address 3 153 Active IPv6 Stateless Address 4 155 Active IPv6 Stateless Address 5 SP codes 147 to 155 are the IPv6 stateless addresses 1 to 5 referen...

Страница 673: ...s divided into 8 blocks of 16 bits aaaa bbbb cccc dddd eeee ffff gggg hhhh The prefix length is inserted at the 17th byte Prefix Range 0x0 to 0x80 The initial setting is 0x40 64 For example the data 2...

Страница 674: ...ble Displays or does not display the Web system items 0 x 0000 to 0 x ffff 0 x ffff 0 Not displayed 1 Displayed bit0 Net RICOH bit1 Consumable Supplier bit2 15 Reserved all 237 Web shopping link visib...

Страница 675: ...display 1 Display 242 Web Link2 Name Same as 239 243 Web Link2 URL Same as 240 244 Web Link2 visible Same as 241 5831 Initial Setting Clear This SP clears all the User Tools settings and restores them...

Страница 676: ...feature cannot be initialized displayed or selected 0 to 1 0 1 0 Disable 1 Enable 2 Panel Setting Determines whether each capture related setting can be selected or updated from the initial system scr...

Страница 677: ...k Board 0 to 6 0 1 0 1 1 1 2 2 1 3 3 1 4 6 2 3 75 Reduction for Printer B W Determines the resolution conversion ratio when a binary print image document is sent to the Document Server via the MLB Med...

Страница 678: ...nt Server via the MLB Media Link Board 0 to 3 1 1 0 JFIF JPEG 1 TIFF MMR 2 TIFF MH 3 TIFF MR 91 Default for JPEG Determines the quality level of JPEG images sent to the Document Server via the MLB Med...

Страница 679: ...ss is enabled referencing the name with DNS is not allowed Default 000 000 000 000 Allowed entry 000 000 000 000 to 255 255 255 255 102 Primary srv scheme Normally this address is specified remotely f...

Страница 680: ...eme Normally this address is specified remotely for IO registration of the scheme of the secondary Capture Server Default None Character length Up to 6 characters 113 Secondary srv port number Normall...

Страница 681: ...or a captured image of a color original scanned with the scanner application Normally this address is specified remotely for IO registration of the Capture Server but it can be changed on the machine...

Страница 682: ...er 10 000 cannot be set unless SP5386 141 has been disabled switched off 10 to 10000 2000 1 5840 IEEE 802 11 CTL 6 Channel MAX Sets the maximum range of the bandwidth for the wireless LAN This bandwid...

Страница 683: ...42 Fragment Thresh Adjusts the fragment threshold for the IEEE802 11 card 256 to 2346 2346 1 This SP is displayed only when the IEEE802 11 card is installed 43 11g CTS to Self Determines whether the C...

Страница 684: ...1 This is a debugging tool It sets the debugging output mode of each Net File process Bit SW 0011 1111 Bit Groups 0 System other groups LSB 1 Capture related 2 Certification related 3 Address book re...

Страница 685: ...f the BCD binary coded decimal display 0000 to 9999 100 1 Enter as a decimal number NCS converts the number to hexadecimal number recognized as the BCD 5 Fixed USB Port This SP standardizes for common...

Страница 686: ...the setting of this SP code At times other than initialization the value set for this SP code is used 100 Notify Unsupport This SP determines whether an alert message appears on the control panel whe...

Страница 687: ...ror Display Time 0 to 999 300 1 Use this setting to determine the length of time the prompt message is displayed when a test error occurs during document transfer with the NetFile application and an e...

Страница 688: ...unction exists Bit2 1 Sender password function exists Bit1 1 Function to link MK 1 user and Sender exists Bit0 1 Sender specification required if set to 1 Bit6 is set to 0 11 Delivery Svr Capability E...

Страница 689: ...t settings 5846 UCS Setting CTL UCS User Control Service is the software that manages user codes and the address books for scan to email and scan to folder 1 Machine ID for Delivery Server Displays th...

Страница 690: ...0 to 255 0 1 sec 0 No retries 7 Delivery Server Retry Times Sets the number of retry attempts when the delivery server fails to acquire the delivery server address book 0 to 255 0 1 8 Delivery Server...

Страница 691: ...book data from an SD card to the HDD You must turn the machine power off and on after executing this SP 1 Turn the machine off 2 Install the HDD 3 Insert the SD card with the address book data in SD c...

Страница 692: ...ants full address book access to all users Procedure 1 Turn the machine off 2 Install the new HDD 3 Turn the machine on 4 The address book and its initial data are created on the HDD automatically How...

Страница 693: ...cluding user codes in the directory information managed by UCS However the accounts and passwords of the system administrators are not deleted 51 Backup All Addr Book Uploads all directory information...

Страница 694: ...d 5 Not Used 6 Not Used 7 Not Used 62 Complexity Option 1 Use this SP to set the conditions for password entry to access the local address book Specifically this SP limits the password entry to upper...

Страница 695: ...password entry to numbers and defines the length of the password 0 to 32 0 1 Note This SP does not normally require adjustment This SP is enabled only after the system administrator has set up a grou...

Страница 696: ...t server with a PC and the DeskTopBinder software This SP is available only after the File Format Converter B609 has been installed 2 Rate for Copy B W Text 0 to 6 0 1 0 1x 1 1 2x 2 1 3x 3 1 4x 4 1 6x...

Страница 697: ...cess control on and off 0000 OFF 0001 ON 4 Acc Ctrl User Directory Lower 4 Bits 9 Acc Ctrl Job Control Lower 4 Bits 11 Acc Ctrl Device Management Lower 4 Bits 21 Acc Ctrl Delivery Lower 4 Bits 22 Acc...

Страница 698: ...Setting Log Type Access DFU 0 to 0xFFFFFFFF 0 1 213 Setting Primary Srv DFU 214 Setting Secondary Srv DFU 215 Setting Start Time DFU 0 to 0xFFFFFFFF 0 1 216 Setting Interval Time DFU 1 to 100 1 1 217...

Страница 699: ...On Print 3 Total Counter Displays the total count starting from the installation date SP5849 1 5851 Bluetooth Not Used Sets the operation mode for the Bluetooth Unit Press either key 0 to 1 0 1 0 Pub...

Страница 700: ...Card Selects the destination where the debugging information generated by the event selected by SP5858 will be s to red if an error is generated 2 to 3 2 1 2 HDD 3 SD Card 5 Save to HDD Specifies the...

Страница 701: ...ll debug logs on the SD Card If the card contains only debugging files generated by an event specified by SP5858 the files are erased when SP5857 10 or 11 is executed to enable this SP the machine mus...

Страница 702: ...0 to 1 0 1 Stores SC codes generated by main machine engine errors 2 Controller SC Error 0 OFF 1 ON 0 to 1 0 1 Stores SC codes generated by CTL controller errors 3 Any SC Error 0 OFF 1 ON 0 to 65535 0...

Страница 703: ...P Auth From Field Replacement Determines whether the FROM item of the mail header is switched to the validated account after the SMTP server is validated 0 to 1 0 1 0 No From item not switched 1 Yes F...

Страница 704: ...s and re enables the email notification feature 0 to 1 0 1 0 Enable 1 Disable 5 Add Date Field This SP adds the current date to the date field of an email alert that informs the operator that an error...

Страница 705: ...t does not occur for Type A SC codes 0 The machine reboots automatically when the machine issues an SC error and logs the SC error code If the same SC occurs again the machine does not reboot 2 Reboot...

Страница 706: ...This SP determines how access to the Web Image Monitor document server is controlled These are bit settings where 1 enables and 0 disables 20 DocSvr Acc Ctrl Allows or disallows the functions of web i...

Страница 707: ...gnature on the send screen when documents are sent via email Operator has the option of selecting or not selecting a signature 1 Signature required A signature must be selected for sending 2 No signat...

Страница 708: ...as a text file txt prefixed with the number of the machine Insert the SD card in SD card Slot 1 lower slot Select SP5887 then touch EXECUTE Touch EXECUTE in the message when you are prompted 5888 Per...

Страница 709: ...ng another application to take control of the display when the application currently controlling the display is not operating because a key has not been pressed 3 to 30 3 1 s 5967 Copy Server Set Func...

Страница 710: ...Disable 1 Enable 2 Enable for Remote 1 On Board NIC 2 On Board USB 5990 SP Print Mode SMC Printout CTL 1 All Data List Prints all of the system parameter lists for the item selected Input the number...

Страница 711: ...eed Setting DFU This sets the how the bypass feed sensors read paper sizes 0 to 1 0 1 0 DOM EU Japan Europe 1 NA North America Other Group 6000 SP codes may be displayed but are not used with this mac...

Страница 712: ...Motor Shows the total operation time of the scanner motor that drivers the scanner unit rollers that feed originals 7401 Total SC Counter CTL Shows the total SC count as a 4 digit number 7403 SC Histo...

Страница 713: ...ion panel with the SP selection menu displayed you will see detailed information about the recently logged SC991 errors including the software file name line number and so on 1 Latest Display the occu...

Страница 714: ...e paper remains at the sensor for longer than the prescribed time Display range 0000 to 9999 Main Machine D093 D094 1 At Power On 3 Tray 1 No Feed 4 Tray 2 No Feed 5 Tray 3 No Feed 8 RF Exit Sn Not On...

Страница 715: ...n the paper remains at the sensor for longer than the prescribed time and causes a jam The 3rd column in the table below tells you the correct component name used in the service manual Operation Panel...

Страница 716: ...ppendix 100 A3T A4 101 A4T 106 B1T B2 107 B2T B3 108 B3T B4 109 B4T 225 36x48T 24x36 226 24x36T 18x24 227 18x24T 12x18 228 12x18T 9x12 229 9x127 234 34x44T 22x34 235 22x34T 17x22 236 17x22T 11x17 237...

Страница 717: ...s jam occurred 1 Latest Sample Display CODE 007 SIZE 05h TOTAL 0000334 DATE Mon Mar 15 11 44 50 2000 2 Latest 1 3 Latest 2 4 Latest 3 5 Latest 4 6 Latest 5 7 Latest 6 8 Latest 7 9 Latest 8 10 Latest 9...

Страница 718: ...isplayed by SP7507 and SP7508 Paper Size Code hex Paper Size Code hex A4 LEF 05 B4 SEF 8D A5 LEF 06 B5 SEF 8E LT LEF 26 DLT SEF A0 A3 SEF 84 LG SEF A4 A4 SEF 85 LT SEF A6 A5 SEF 86 Others FF 7801 ROM...

Страница 719: ...nter 1 Error Total A request for the count total failed at power on This error will occur if the device is installed but disconnected 2 Error Staple The request for a staple count failed at power on T...

Страница 720: ...e results of the last occurrence of SC990 SC990 is issued when unexpected branching and decision data is generated by the program and the module name line number and values for the error are displayed...

Страница 721: ...the document server SP8691 to SP8696 The number of pages sent from the document server Specifically the following questions can be answered How is the document server actually being used What applicat...

Страница 722: ...from another mode such as from a printer driver or by pressing the Store File but to n in the Copy mode window Sometimes they include occasions when the user uses a file that is already on the documen...

Страница 723: ...ack C Cyan ColCr Color Create ColMode Color Mode Comb Combine Comp Compression Deliv Delivery DesApl Designated Application The application Copy Fax Scan Print used to store the job on the document se...

Страница 724: ...order removal adding stamps page numbers etc K Black YMCK LS Local Storage Refers to the document server LSize Large paper Size Mag Magnification MC One color monochrome NRS New Remote Service which a...

Страница 725: ...maining Applies to the wide format model A2 only This machine is under development and currently not available Rez Resolution SC Service Code Error SC code displayed Scn Scan Sim Simplex Simplex print...

Страница 726: ...Output is specified When a copy job on the document server is printed SP8022 also increments and when a print job stored on the document server is printed SP8024 also increments When an original is b...

Страница 727: ...8024 P Pjob LS 8025 S Pjob LS 8026 L Pjob LS 8027 O Pjob LS When a copy job stored on the document server is printed with another application the C counter increments When an application like DeskTop...

Страница 728: ...etwork application Desk to p Binder Web Image Monitor etc the L counter increments 8041 T TX Jobs LS These SP s count the applications that stored files on the document server that were later accessed...

Страница 729: ...f the send is started from Desk to p Binder or Web Image Monitor for example then the O counter increments 8061 T FIN Jobs 0 to 9999999 0 1 These SP s total the finishing methods The finishing method...

Страница 730: ...Number of jobs started in Sort mode When a stored copy job is set for Sort and then stored on the document server the L counter increments See SP8066 1 806x 2 Stack Number of jobs started in Sort mode...

Страница 731: ...99999 0 1 These SP s count and calculate the number of scan jobs by size based on the number of pages in the job 8076 L Jobs PGS 0 to 9999999 0 1 These SP s count and calculate the number of jobs prin...

Страница 732: ...Email Jobs 0 to 9999999 0 1 These SP s count the total number of jobs scanned and attached to an e mail regardless of whether the document server was used or not 8135 S S to Email Jobs These SP s cou...

Страница 733: ...d during sending it may or may not be counted depending on what stage of the process had been reached when the job was cancelled Even if several files are combined for sending the transmission counts...

Страница 734: ...PGS SP 8191 to 8196 count the number of scanned sides of pages not the number of physical pages These counters do not count reading user stamp data or reading color charts to adjust color Previews do...

Страница 735: ...ocument server the C count is 6 and the L count is 6 If you enter document server mode then scan 6 pages the L count is 6 8221 ADF Org Feeds 0 to 9999999 0 1 These SP s count the number of pages fed t...

Страница 736: ...nel 4 Custom Size Selectable Originals of non standard size 5 Platen Book mode Raising the ADF and placing the original directly on the platen 6 Mixed 1side 2side Job mixed with printing one two sides...

Страница 737: ...Store File but to n from within the Copy mode screen 8241 8242 8245 8246 824x 1 Text Yes Yes Yes Yes 824x 2 Text Photo Yes Yes Yes Yes 824x 3 Photo Yes Yes Yes Yes 824x 4 GenCopy Pale Yes No Yes Yes...

Страница 738: ...can PGS ImgEdt 8255 S Scan PGS ImgEdt 8256 L Scan PGS ImgEdt 8257 O Scan PGS ImgEdt The L counter counts the number of pages s to red from within the document server mode screen at the operation panel...

Страница 739: ...9 0 1 These SP s count by size the total number of pages scanned by the Scan application Use these totals to compare original page size scanning and output page size SP 8 445 8306 L Scan PGS Size 0 to...

Страница 740: ...re not counted The Fax application does not allow finely adjusted resolution settings so no count is done for the Fax application 8381 T Total PrtPGS These SP s count the number of pages printed by th...

Страница 741: ...he count will show 1 in the High field and 00 000 000 in the Low Multiply the 1 in the High field by 1 108 100 000 000 mm 2 105 100 000 m or 3 102 100 kilometers to determine the accurate count When s...

Страница 742: ...f pages processed for printing by the application 8424 P PrtPGS Dup Comb 0 to 9999999 0 1 These SP s count by binding and combine and n Up settings the number of pages processed for printing by the pr...

Страница 743: ...es on 1 side 16 Up 842x 12 Booklet 842x 13 Magazine These counts SP8421 to SP8427 are especially useful for operators who need to improve their compliance with ISO standards for the reduction of paper...

Страница 744: ...ion 8436 L PrtPGS ImgEdt 0 to 9999999 0 1 These SP s count the total number of pages output from within the document server mode window at the operation panel with the three features below 8437 O PrtP...

Страница 745: ...to 9999999 0 1 These SP s count by print paper size the number of pages printed by the scanner application 8446 L PrtPGS Ppr Size 0 to 9999999 0 1 These SP s count by print paper size the number of p...

Страница 746: ...08 22x34 844x 253 8 5 inch Custom 844x 109 17x22 844x 254 Other Standard 844x 239 841 mm Custom A0 844x 255 Other Custom These counters do not distinguish between LEF and SEF 8451 PrtPGS Ppr Tray 0 to...

Страница 747: ...counted During duplex printing pages printed on both sides count as 1 and a page printed on one side counts as 1 8462 C PrtPGS Ppr Type 0 to 9999999 0 1 These SP s count by paper type the number page...

Страница 748: ...rs with PC applications such as Excel are also counted Magnification adjustments done for adjustments after they have been stored on the document server are not counted Magnification adjustments perfo...

Страница 749: ...s they are both limited to the Print application Print jobs output to the document server are not counted 8521 T PrtPGS FIN 0 to 9999999 0 1 These SP s count by finishing mode the total number of page...

Страница 750: ...total number of pages printed by the Scanner application 8526 L PrtPGS FIN 0 to 9999999 0 1 These SP s count by finishing mode the total number of pages printed from within the document server mode wi...

Страница 751: ...ooks FIN Not Used 8552 O PrtBooks FIN 8554 P PrtBooks FIN 8556 L PrtBooks FIN 1 Perfect Bind 2 Ring Bind 8581 T Counter 0 to 9999999 0 1 These SP s count the total output broken down by color output r...

Страница 752: ...number of pages attached to an e mail for both the Scan and document server applications Note This SP is expanded for color MFP and color LP machines For this machine the count is done for black only...

Страница 753: ...and the count is also 10 for the second 100 destinations for a total of 20 8671 T Deliv PGS PC 0 to 9999999 0 1 These SP s count by color mode the total number of pages sent to a folder on a PC Scan t...

Страница 754: ...the number of pages sent to each destination 8701 TX PGS Port 0 to 9999999 0 1 These SP s count the number of pages sent by the physical port used to send them For example if a 3 page original is sent...

Страница 755: ...gle 3 PDF 4 Other 5 PDF Comp 8721 T Deliv PGS WSD Total number of pages delivered to WSD Web Service Device by scanner printer application Note WSD is the Microsoft standard for connectivity to web se...

Страница 756: ...f use number of rotations of the development rollers for black and other color toners Note For machines that do not support color the Black toner count is the same as the total count 0 to 9999999 0 1...

Страница 757: ...1 steps is more precise better than other machines in the market that can only measure increments of 10 10 steps 0 to 100 0 1 8851 Cover Cnt 0 10 These SP s count the percentage of toner dot coverage...

Страница 758: ...pages for black toner coverage 1 Coverage BK 11 Coverage P BK 8941 Machine Status These SP s count the amount of time the machine spends in each operation mode These SP s are useful for operators who...

Страница 759: ...ower switches 6 SC Total down time due to SC errors 7 PrtJam Total down time due to paper jams during printing 8 OrgJam Total down time due to original jams during scanning 9 Supply PM Unit End Total...

Страница 760: ...the Program job settings feature 8999 Admin Counter List This SP provides a central point for display of important information for the system administrator 1 Total Print total copies and prints 3 Cop...

Страница 761: ...have no effect I O timeouts never occur bit 4 SD Card Save Mode Disabled Enabled If enabled print jobs will be output to the SD card slot not to paper bit 5 DFU bit 6 DFU bit 7 RPCS PCL Printable area...

Страница 762: ...ain purpose of this bit switch is for troubleshooting the effects of SDK applications on data bit 3 PS PS Criteria Pattern3 Pattern1 Changes the number of PS criterion used by the PS interpreter to de...

Страница 763: ...orm Feed on a standard printer Default Enabled bit 2 Job Cancel If enabled all jobs will be cancelled after a jam occurs Note If this bit switch is enabled printing under the following conditions coul...

Страница 764: ...nts the service summary sheet a summary of all the controller settings 1005 Display Version Displays the version of the printer application 1006 Sample Locked Print Enables and disables the document s...

Страница 765: ...re processing 1 3 1 1 1 MH 2 MR 3 MMR 1005 Erase Margin Remote Scan Creates an erase margin for all edges of the scanned image If the machine has scanned the edge of the original create a margin 0 to...

Страница 766: ...ed on the left rear corner of the machine Operators can scan documents to either an SD card or a USB memory device inserted into this unit This SP must be enabled set to 1 in order for the device to f...

Страница 767: ...Printer Scanner SP Tables SM Appendix 2 245 D093 D094 Appendix SP Mode Tables...

Страница 768: ......

Страница 769: ...APPENDIX UP MODE REVISION HISTORY Page Date Added Updated New None...

Страница 770: ......

Страница 771: ...e operating instructions and other manuals Push User Tools System Settings General Features Tab Program Change Delete User Text Panel Key Sound Warm Up Beeper Copy Count Display Function Priority Prin...

Страница 772: ...ttings Tray Paper Settings Tab Paper Tray Priority Copier Tray Paper Size Tray 1 Tray Paper Size Tray 2 Tray Paper Size Tray 3 Next Paper Type Bypass Paper Type Tray 1 Paper Type Tray 2 Paper Type Tra...

Страница 773: ...stem Auto Reset Timer Copier Document Server Auto Reset Timer Set Date Set Time Auto Logout Timer Interface Settings Tab Machine IPv4 Address IPv4 Gateway Address Machine IPV6 Address IPv6 Gateway Add...

Страница 774: ...rmit SSL TILS Communication Host Name Machine Name IEEE 802 1X Authentication for Ethernet Restore IEEE 802 1X Authentication to Defaults File Transfer Tab Delivery Option SMTP Server SMTP Authenticat...

Страница 775: ...t Address Book Program Change Delete Group Address Book Change Order Address Book Edit Title Address Book Switch Title Back Up Restore Address Book Display Print Counter Display Print Counter per User...

Страница 776: ...es in Document Server Next Program Change Delete LDAP Server LDAP Search Firmware Version Network Security Level Transfer Log Setting Fixed USB Port Program Change Delete Realm Copier Document Server...

Страница 777: ...Auto Tray Switches Job End Call Reproduction Ratio Tab User Reduce Enlarge Ratio Reproduction Ratio Reduce Enlarge Ratio Priority User Auto Reduce Enlarge A0 User Auto Reduce Enlarge A1 User Auto Red...

Страница 778: ...to Reduce Enlarge B3 JIS User Auto Reduce Enlarge B4 JIS Edit Tab Adjust Position Erase Border Width Erase Original Shadow in Combine Image Repeat Separation Line Double Copies Separation Line Separat...

Страница 779: ...ppendix Up Mode Stamp Tab Background Numbering Preset Stamp User Stamp Date Stamp Page Numbering Rotate Sort Auto Paper Continue Menu Protect Espanol or other language Switches the language selection...

Отзывы: