Chapter 4 Various Settings of PostScript Driver
4-4
OG
A
4.2 Printing on Custom Size Paper
Select [Printer] - [Paper Source] - [Paper Size] on the printer operation panel to configure custom paper size. And, select
[Printer] - [PostScript] - [Best Fit] to configure print condition for paper selection. Best Fit feature is effective when paper
size defined by application software is different from actual loaded paper in the printer. For information
about how to operate the printer control panel, see the “User’s Guide” that came with the printer.
The diagrams (screens) used here give an example of Windows XP.
For Windows 2000:
Select [Start] - [Settings] - [Printers].
For Windows XP/Server 2003:
Select [Start] - [Control Panel] - [Printers and Faxes].
For Windows Vista/Server 2008:
Select [Start] - [Control Panel] and double-click on
[Printer] from [Control Panel].
For Windows 7/Server 2008 R2:
Select [Start] - [Control Panel] and
click the [Devices and Printers] icon from Control
Panel. If icons are not displayed, change [View by:]
on the right hand
side of the window from [Category] to [Large icons] or
[Small icons].
For Windows 2000/XP/Server 2003:
Select [File] - [Server Properties].
For Windows Vista/Server 2008:
Right-click on the printer list and select [Server
Properties]. When [Run as administrator] is displayed,
select [Run as administrator] - [Server Properties].
For Windows 7/Server 2008 R2:
Select Fax or Printer, click [Printer server properties].
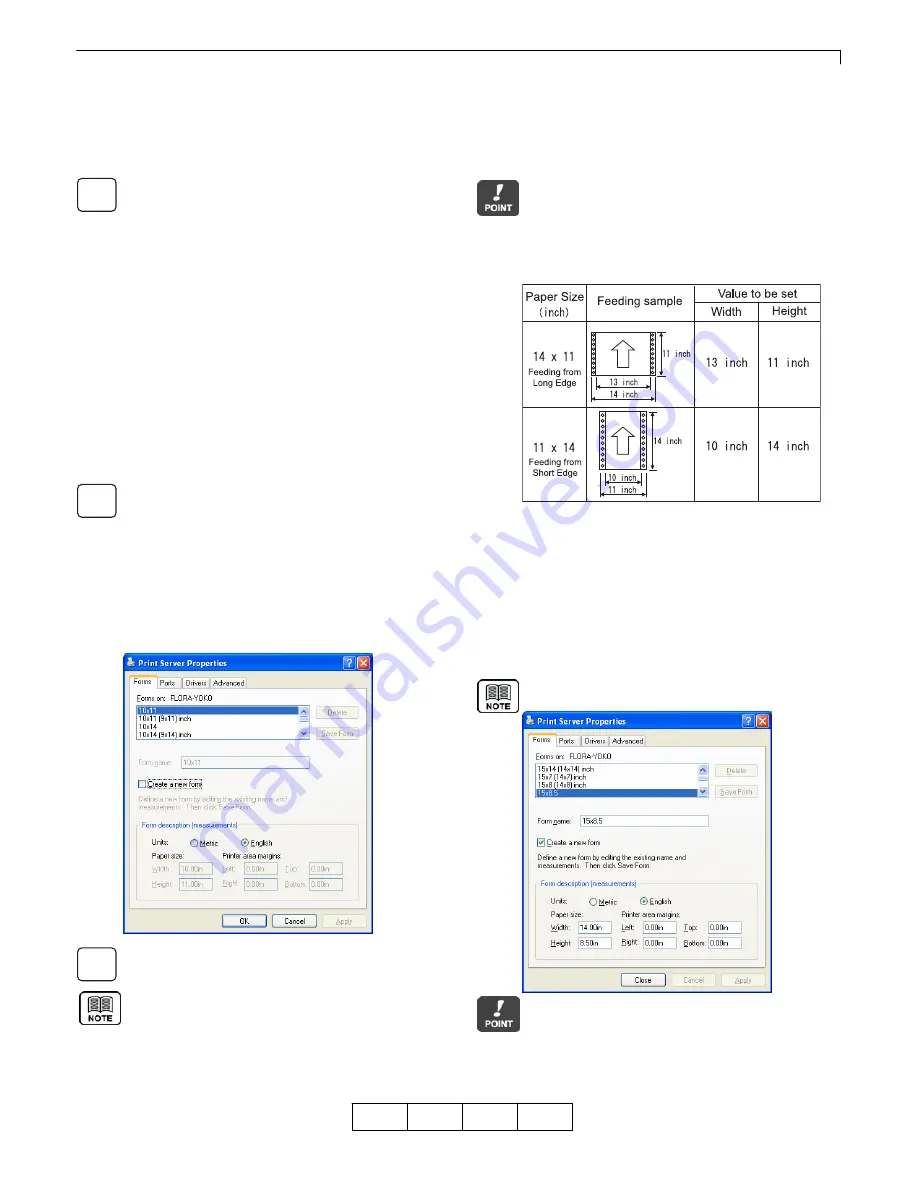
On the [Forms] tab, select [Create a new form],
set the width and height, and click [Save Form].
For Windows Server 2008 R2, when
[Change Form Settings] is displayed,
click [Change Form Settings] and
check [Create a new form], set Width/Length and
click [Save Form].
Enter vertical direction from orientation of paper as
[width] and horizontal direction as [height]. Adjust the
width and height to match the paper size set on the
printer control panel. At this time, subtract the length
of feeding holes on both edges of the paper (1 inch =
25.4 mm). An example of setting is given below:
When the custom size paper created is added to the
paper list, the added custom size paper is displayed
on the printer driver under [Paper Size]. However, it
is displayed only when the size is within the range of
[Width] and [Height] of paper that can be used as
custom size. The range of [Width] and [Height] of
paper that can be used as custom size varies
depending on the printer. For more information,
see the User’s Guide that came with the printer.
The following diagram shows an example of creating
a paper size of 15 x 8.5 inches without margins.
In the application software, specify the paper size
name that has been newly added. The newly added
paper size may not function properly depending on
the combination of application software and printer
driver. Test print and make sure that it can be properly
printed before using the newly added paper size.
01
1
2
3
Содержание 4372-001
Страница 2: ......
Страница 7: ...Chapter 1 Before Using This Product 1 1 OG A Chapter 1 Before Using This Product 00 ...
Страница 10: ...Chapter 1 Before Using This Product 1 4 OG A 00 ...
Страница 29: ...Chapter 3 Print from Windows 2000 XP Server 2003 3 1 OG A Chapter 3 Print from Windows 2000 XP Server 2003 00 ...
Страница 45: ...Chapter 4 Various Settings of PostScript Driver 4 1 OG A Chapter 4 Various Settings of PostScript Driver 00 ...


