background image

I N S T A L L A T I O N   A N D   S E T   U P

Rear Panel

350-9047 v3.0.1

DGy Model 201x User’s Guide

15

. . . . .


Disk Power Indicator

The 

Disk Power

 light indicates that power is applied to the 

removable disk drive. The power is disabled when the key lock 
is in the correct position to remove or install a drive. The drive 
cannot be removed or installed when this light is illuminated. 

Disk Indicator

The 

Disk

 activity light indicates read or write activity to the 

removable disk. Do not remove the drive while the disk is active. 

. . . . . . . . . . . . . . . . . . . . . . . . . . . . .

R E A R   P A N E L

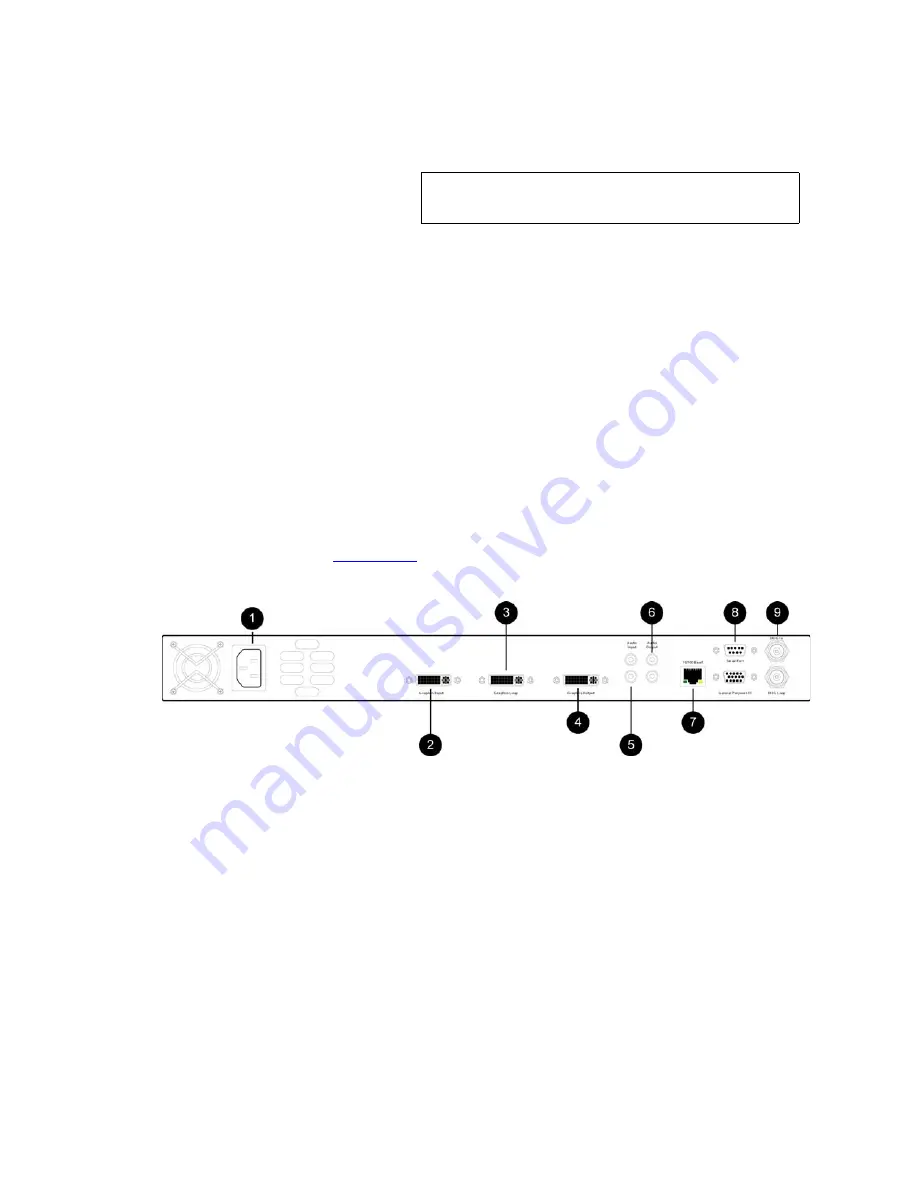
The figure below shows a view of the 

DGy 201x

 rear panel. Click on the 

numbered callouts for more information on each item. Click on each 
connector for a description. Complete pinout information can be found in 

Appendix A 

.

Figure 2-2   

DGy 201x Rear Panel

1)

Power Connector

One 

AC Power

 Connector (IEC 320 3-pin) is provided for the 

system’s universal power supply. The DGy operates from any 
power source with a line voltage in the range of 100 - 240 VAC.

2) 

Graphics Input

The 

Graphics Input

 is a DVI-I connector supporting both 

analog RGB and digital DVI input signals. An adapter is supplied 
with the unit to convert to a standard VGA 15-pin sub-miniature 
connector.

Important

Do not unlock while there is disk activity. This will 
cause loss of data.

Содержание DGy 201x

Страница 1: ... DGy 201x Graphics Resolution Digital Recording and Streaming System User s Guide May 2008 ...

Страница 2: ...m reserves the right to make any modification to this guide or the information contained herein at any time without notice All features functions and specifications are subject to change without notice or obligation COMPANY ADDRESS RGB Spectrum 950 Marina Village Pkwy Alameda CA 94501 Telephone 510 814 7000 Fax 510 814 7026 ACKNOWLEDGEMENT The RGB Spectrum Web Control Panel WCP uses the GoAhead We...

Страница 3: ...ve no obligations under this warranty with respect to any defect unless it receives notice and a description of such defect no later than five 5 business days following the expiration of the warranty period THE WARRANTIES STATED HEREIN ARE IN LIEU OF ALL OTHER WARRANTIES EXPRESS OR IMPLIED INCLUDING BUT NOT LIMITED TO ANY IMPLIED WARRANTIES OF MERCHANTABILITY OR FITNESS FOR A PARTICULAR PURPOSE IN...

Страница 4: ...ng Replay Option 5 Playback Capabilities 5 Local Playback 6 PC Software Replay Application 6 Simultaneous Record Replay Option 6 Networking and Control 7 Multi Channel Systems 8 Multicast Streaming DGy to DGy 8 Interframe Compression 9 External Timecode Synchronization 10 Chapter 2 Installation and Set Up 11 In this Chapter 11 Standard Supplied Components 11 Optional Items 12 Rack Mounting 12 Fron...

Страница 5: ...ing Tab 45 Maximum Frame Rate 45 Interframe Compression 45 Input Tab 48 Video Input 48 Audio 48 Image Adjustments 49 Making Timing Adjustments 49 Creating a New Timing Entry 51 Output Tab 52 Video Outputs 52 Output Display Mode 52 Test Pattern 52 Gamma 53 Timing List 53 Video Output Timing 53 Sync Type 53 Scan Rate 53 System Tab 54 Network Settings 54 Serial Port Settings 55 Clock Settings 55 Cloc...

Страница 6: ...Recordings to the DGy 78 Uploading Files Via the FTP Client 78 Uploading Files via FTP Command Line 82 Chapter 5 PC Playback Basic PC Software Player 84 In this Chapter 84 PC Software Player 84 Chapter 6 Command Line Interface 85 In this Chapter 85 Command Overview 85 Command Format 85 Command Line Usage 86 Command Help 86 Predefined Parameter Values 87 Query the Current Setting 87 Parameter Range...

Страница 7: ...and Pinouts 128 Standard Cables 128 Crossover Cables 129 RS 232 Connector 129 Connector Type and Pinouts 129 Null Modem 130 Appendix B Communications Setup 131 In this Appendix 131 Serial Communications 131 Launching a Hyperterminal Window 131 Ethernet Control 134 Introduction to IP Addresses 134 IP Address Setup via Serial Port 135 IP Address Setup via Ethernet 136 Appendix C Firmware Upgrade 139...

Страница 8: ...igure 3 8 Clip Browser Toolbar Edit Menu 37 Figure 3 9 Clip Files 38 Figure 3 10 Record Tab 40 Figure 3 11 Playback Tab 42 Figure 3 12 Timer Tab 43 Figure 3 13 Streaming Tab 45 Figure 3 14 Interframe Compression Adjustment Window 46 Figure 3 15 Input Tab 48 Figure 3 16 Audio Settings Dialog 48 Figure 3 17 Image Adjustment Window 49 Figure 3 18 Output Tab 52 Figure 3 19 System Tab 54 Figure 3 20 Re...

Страница 9: ... 4 13 File Transfer Screen 81 Figure A 1 DVI I Digital Analog Connector 126 Figure A 2 Ethernet Connector 128 Figure A 3 RS 232 Female Connector 129 Figure B 1 Hyperterminal Path 131 Figure B 2 Connection Description Dialog Example 132 Figure B 3 Connect To Dialog Box 132 Figure B 4 COM Properties Dialog Box 133 Figure B 5 Run Dialog Box 136 Figure B 6 Telnet Connected 137 Figure C 1 DGy 201x Appl...

Страница 10: ...ds 100 Table 6 7 Streaming Commands 106 Table 6 8 Clip and Disk Commands 108 Table 6 9 Time Commands 113 Table 6 10 Miscellaneous Commands 115 Table 6 11 Factory Timing List 118 Table A 1 Analog Graphics Input Characteristics 121 Table A 2 Digital Input Specifications 121 Table A 3 Analog Output Specifications 122 Table A 4 Digital Output Specifications 122 Table A 5 Storage Capacity 122 Table A 6...

Страница 11: ... in real time The DGy 201x codec employs the advanced wavelet based JPEG 2000 compression standard This state of the art method of coding and compression offers numerous advantages including high coding efficiency error resiliency efficient scalability and excellent image quality The DGy 201x supports single channel recording and playback of a wide variety of standard and non standard graphics sig...

Страница 12: ...on for additional details Resolution Flexibility DGy models support a wide range of resolutions and frame rates Compression and Storage DGy 201x offers selectable compression rates enabling users to balance quality and recording capacity as required for each application Quality settings and the resulting compression are shown in below For examples of recording times based on quality settings see T...

Страница 13: ...ive Option Option Remote disk mount Option 3 Option 3 Maximum input resolution 1600 x 1200 1600 x 1200 1600 x 1200 1600 x 1200 FTP file transfers 3 3 3 3 Recording channels 1 1 Single channel or dual channel mux Single channel or dual channel mux Output channels 1 DVI RGB 1 DVI RGB 1 DVI RGB 1 DVI 1 DVI RGB 1 DVI Audio Single channel stereo Single channel stereo Single channel stereo or dual chann...

Страница 14: ...0 Hz or higher refresh rates at lower resolutions Stereo Audio One analog stereo input is provided 2 x RCA phono connectors Sampling rate may be set to 44 1 kHz 22 05 kHz or 11 025 kHz IRIG Timecode optional A looping input compatible with IRIG B DCLS and 1KHz modulated formats IRIG B123 can be used to synchronize the system time clock to an external IRIG time standard The loop output is used to p...

Страница 15: ... of the two drives the encoded material will be stored R E M O T E R E C O R D I N G R E P L A Y O P T I O N A DGy 201x option enables recording to a remote disk drive over a network Remote drives include network attached storage devices servers RAID servers and networked PCs To accomplish this the remote drive is mounted as a network assigned NFS Network File System drive and appears to the DGy 2...

Страница 16: ...ngs played from a DGy 201x removable drive inserted in an appropriately configured PC equipped with a compatible removable disk drive bay The DGy 201x uses the ext2 file system found with the Linux operating system PCs running the Windows operating system will require additional software in order to mount the drive This software is commercially available Playback quality is high but note that the ...

Страница 17: ...a network LAN or directly to a PC properly equipped with a network card Direct connection requires the use of an Ethernet hub or Ethernet crossover cable This method supports a Telnet session or a standard web browser to access the DGy 201x internal Web Control Panel Telnet and web server control capability Remote storage replay capability Files can be transferred using the standard FTP protocol o...

Страница 18: ...nization and control of the record and play capabilities of multiple DGy recorders MULTICAST STREAMING DGy TO DGy The DGy 201x can encode and stream a graphics signal on the input port to multiple DGy decoder clients on a network using the multipoint multicast streaming capability The encoded bit stream is directed to the network port as a multicast transmission for remote viewing instead of direc...

Страница 19: ...ired to transmit video data over a network In interframe compression each frame is compared to the previous frame When differences between frames meet criteria defined by parameters set by the user new frames are transmitted if the criteria are not met new frames are not sent and an exact repeat of the last encoded anchor frame is used WCP and command line operation both support the use of interfr...

Страница 20: ...eal time clocks of all the DGy 201x units The DGy 201x can be synchronized to an external time source using a network connection to an NTP Network Time Protocol server Additionally the DGy 201x can be configured with an IRIG B option Using the IRIG loop through connection synchronization of all DGy 201x real time clocks can be done from a single IRIG B timecode generator IRIG DCLS or 1 kHz modulat...

Страница 21: ...onents Optional Items Rack Mounting Front Panel Rear Panel Installation DGy Applications Suite STANDARD SUPPLIED COMPONENTS The following items are included in the DGy 201x shipping carton Table 2 1 Standard Supplied Components DGy 201x Accessory Kit domestic CD ROM Power cord 110 volt DVI VGA adapter 3 Rear rack mount adapter kit Accessory Kit international CD ROM Power cord 220 volt DVI VGA adap...

Страница 22: ...r of the two mounting screws first Table 2 2 Options Item Part Number Description VGA cable 520 0298 1 15 pin HD male to 15 pin HD male 6 ft Use to connect analog output inputs to sources with a female VGA connector Fixed disk HDF 238 238 GB hard disk drive factory installed Extra removable disk HDR 238 X 238 GB hard disk drive with caddy and carrying case Extra removable disk HDR 476 X 476 GB har...

Страница 23: ...01x on and off When the unit is on the switch is illuminated Important Do not use the DGy 201x as a shelf to support other pieces of equipment as this may cause damage to the rack ears and mounting screws FUNCTION NETWORK FIXED HDD REMOVABLE HDD record activity activity activity play link full full R G B SPECTRUM digital image recorder DGy Power Switch Function Indicators Fixed Disk Indicators Rem...

Страница 24: ...aximum capacity Removable Drive Indicators The Activity LED is illuminated when there is read or write activity on the standard removable disk This indicator also flashes to indicate that a disk check fsck operation is in progress do not power off or remove the disk during this time The Full LED flashes when the removable disk is near maximum capacity Removable Disk Drive Optional removable disk d...

Страница 25: ...ure below shows a view of the DGy 201x rear panel Click on the numbered callouts for more information on each item Click on each connector for a description Complete pinout information can be found in Appendix A Figure 2 2 DGy 201x Rear Panel 1 Power Connector One AC Power Connector IEC 320 3 pin is provided for the system s universal power supply The DGy operates from any power source with a line...

Страница 26: ...provides stereo recording capability A pair of RCA phono Audio Input connectors accept analog audio signals for left and right channels The Audio Input will accept either line or microphone level inputs A choice of sample rates is provided 6 Audio Outputs A pair of RCA phono Audio Output connectors supply the line level left and right analog audio output signals 7 Ethernet Port A standard RJ 45 co...

Страница 27: ...on for pinout information 3 Audio Connections Connect the audio source and output cables 4 Connect Graphics Output Using a DVI I interconnect cable connect the Graphics Output to the desired display devices To connect to a monitor with an analog RGB input use the adapter to convert from the DVI connector directly to a 15 pin D sub connector Alternatively standard cables are available to convert fr...

Страница 28: ...n parameters refer to the RS 232 Connector section in Appendix A page 129 Launch Hyperterminal or other terminal emulator software and set the communication parameters to 115 200 Baud 8 Bits 1 Stop Bit No Parity XON XOFF Flow Control For information on setting up a Hyperterminal see Appendix B Launching a Hyperterminal Window on page 131 Ethernet Control To control the DGy 201x over a network conn...

Страница 29: ...e at http www java com en download manual jsp The DGy 201x on a LAN Local Area Network must have a static IP address compatible with the LAN CONNECTING TO THE DGY APPLICATIONS SUITE The DGy 201x is configured use a static IP address The default IP address is 192 168 1 200 but can be changed as required by the network Connect to the DGy 201x Applications Suite in one of the following ways Direct co...

Страница 30: ...ddress is 192 168 1 200 the browser entry would be as illustrated below Figure 2 3 Sample IP Address Entry If the network connection is working properly and the correct IP address has been entered the DGy 201x responds by displaying the Applications Suite page shown in Figure 2 4 Note The DGy 201x is configured at the factory with the default IP address 192 168 1 200 Before connecting the DGy 201x...

Страница 31: ...y is typically provided as part of the networking tools included in the computer operating system If using a direct Ethernet connection between the DGy 201x and control PC be sure that the PC has a valid static IP address that does not conflict with the DGy and that Ethernet crossover cable is used Verify that the PC has been set to a static IP address compatible with the DGy 201x address Check th...

Страница 32: ...ogether with the standard DGy Control Panel window Figure 2 6 Figure 2 5 Web Control Panel Configuration Window When the WCP Configuration window opens the standard DGy Control Panel is automatically launched The WCP Configuration window provides information about the configuration of the DGy 201x and two control buttons Simultaneous Mode If the DGy 201x is equipped with the simultaneous mode opti...

Страница 33: ...ormation on these commands This feature is useful to enable the command log to make or debug commands from an external controller Figure 2 6 Standard DGy Control Panel The standard DGy Control Panel supports record and playback functions including the ability to select clips play clips set event marks and randomly access event marks See Figure 3 31 on page 69 for an example of the simultaneous mod...

Страница 34: ...Gy Control Panel Ensure the system has been properly installed with all required audio video and graphic connections For details refer to the Installation section in Chapter 2 Ensure a copy of Java Runtime Environment software version 1 4 2 1 5 0 or higher is installed on the PC The software version may be referred to 4 2 and 5 0 A copy of Java software is included on the CD ROM provided with the ...

Страница 35: ...8 10 9 25 15 16 17 18 20 21 19 11 13 12 24 22 23 27 26 14 28 29 30 31 1 Disk 12 Pause 23 Previous Frame 2 Disk Status 13 Stop 24 Slow Reverse 3 Clip Status 14 Record 25 Slow Forward 4 Disk Capacity Indicator Bar 15 Fast Forward 26 Next Frame 5 Machine Status 16 Next Clip 27 A B Loop Playback 6 Clip Name 17 Goto Previous Mark 28 Streaming Control Panel 7 Clip Path 18 Set Mark 29 Send Multicast Stre...

Страница 36: ... of disk used as a percentage of the whole 5 Machine Status Icons appear in this area to indicate the Record Play status Play Pause Record Fast or Slow Forward speed Fast or Slow Reverse speed A Entry point set for play loop pending exit point A B Play Loop active 6 Clip Name This line indicates the name of the clip currently recording or playing back Click the Clip Name label to display the Clip ...

Страница 37: ...urn to normal 1x play speed directly from any speed click on the Play button If Pause is used during playback while in the Fast Reverse mode clicking on Pause again will continue in Fast Reverse at the previously selected speed If Fast Forward is selected while in the Fast Reverse mode the DGy 201x will change direction and play at the first fast forward speed Pressing the Stop button will cause p...

Страница 38: ... begins the DGy 201x records the video coming into the graphics input port If clip auto naming is enabled see Enable Clip Auto Naming on page 41 recording will begin immediately upon clicking the record button If auto naming is not enabled a prompt for a new clip name is displayed If the named clip has already been recorded a prompt to confirm to overwrite the clip is displayed 15 Fast Forward The...

Страница 39: ... Clicking the Next Clip button in the Pause mode causes DGy 201x to cue to the beginning of the next clip in the clip list see Clip Browser Window To begin playback click on the Play or Pause buttons 17 Goto Previous Mark After some Event Marks have been entered in the Event list see Set Mark in the following section the Prev and Next mark buttons can be used Click Prev to cue to the previous even...

Страница 40: ...the Event Mark List as shown in Figure 3 2 above Double click on the desired Event Mark s time stamp and the DGy 201x will stop playback cue to the selected Event Mark and enter the Pause mode Click on the Play or Pause button to continue playback from the selected Event Mark To name an Event Mark double click in the Name column of the desired Event Mark Type a name and press ENTER on the keyboard...

Страница 41: ...ck tab on the Options window Uncheck the Enable Advanced Playback Console box Figure 3 4 Figure 3 4 Options Playback Tab If the Advanced Playback Console is not displayed then it has been de activated Two methods can be used to activate the Advanced Playback Console On the DGy Control Panel Player Screen select Play or Pause Click either the Fast Forward or the Fast Reverse button The Advanced Pla...

Страница 42: ...se There are total of four slow reverse speeds x 0 8 80 of normal speed x 0 5 50 of normal speed x 0 3 30 of normal speed x 0 1 10 of normal speed The Slow Reverse mode is available only when the DGy 201x is in the Play or Play Pause mode To select the Slow Reverse mode use the following procedure Select the clip to play Click on the Clip Name label and select a clip from the Clip Browser list Cli...

Страница 43: ...only available in the Pause mode To step forward a frame use the following procedure Select the clip to play Click on the Clip Name label and select a clip from the Clip Browser list Click the Play button Click the Pause button Click the Next Frame button Each click of the Next Frame button will move the displayed image to the next frame until the end of clip is reached To cancel the Next Frame mo...

Страница 44: ...p 28 Streaming Control Panel Figure 3 5 Streaming Control Panel 29 Send Multicast Stream Click this button to begin transmitting a multicast stream of a live input signal 30 Receive Multicast Stream Click this button to begin receiving decoding and viewing a multicast stream 31 Stream Live Input Click this button before initiating the multicast stream to set the DGy to encode a live input signal ...

Страница 45: ...l Clip Browser and indicates portions of the window Figure 3 6 Clip Browser Window 1 Browser Tools The Browser Tools section includes icons for the following functions Create a new folder Copy clip Paste clip Move up one level 3 1 2 4 5 6 7 8 9 10 11 13 12 1 Browser Tools 6 Frame Rate per Second 11 Tool Bar 2 Disk Directory 7 Resolution 12 Clip Protection 3 Name Field 8 Bit Rate quality setting 13...

Страница 46: ...in frames per second fps 7 Resolution Displays the resolution in pixels of the recorded image HxV 8 Bit Rate quality setting Indicates the bit rate of the clip See Table 1 2 on page 2 for additional information 0 7 low quality 1 0 default medium quality 1 5 high quality Quality is set on the Record tab of the Options window before a recording is made 9 Audio Indicates the audio sample rate of the ...

Страница 47: ...age 61 for more information on the optional Remote Disk Mount feature Figure 3 8 Clip Browser Toolbar Edit Menu The Clip Browser Toolbar Edit menu provides the following functions Copy clip to clipboard Paste contents of clipboard to a selected folder Delete selected clip Rename selected clip Protect selected clip The Clip Browser tool icons also provide a quick way to access the Copy Paste Delete...

Страница 48: ...ng at 000000 then numbered sequentially Figure 3 9 Clip Files The maximum size of each file in a clip is 512 MB which represents a record time of about 1 7 mins file with a resolution of 1280 x 1024 at 30 frames per second and a medium quality setting 1 0 bit rate The record rate depends upon the resolution of the image the frame rate and the choice of quality level As an example a record rate of ...

Страница 49: ... length The total number of files created to support this clip will then be 38 1 7 23 To use the clip browser to show files contained within the clips click on the Show files radio button To show clips in the clip browser click on the Show clips radio button OPTIONS WINDOW The Options window uses tabs to set a variety of system record playback and setup parameters The tabs are Playback Tab Record ...

Страница 50: ...he desired recording quality from High to Low When set to High the Record Bit Rate is set to 1 5 bits per pixel 16 1 compression For most applications the Medium setting is recommended default The Medium setting provides compression of 1 0 bits per pixel compression ratio 24 1 Low quality records at 0 7 bits per pixel 34 1 compression Frame Rate Check Set to Maximum to record at the maximum frame ...

Страница 51: ...ed disk reaches the threshold level set in the full entry box If the buzzer sounds click Reset to silence the buzzer E N A B L E C L I P A UT O N A M I NG Check Enable clip auto naming to automatically create and name new clips when the Record button is clicked Automatically naming a clip provides the advantage that the DGy 201x will begin recording right away without first prompting for a clip na...

Страница 52: ...command Seeking to a timecode can be done when the DGy 201x is in either Play Pause or Stop mode Use the following procedure to go to a specific timecode 1 From the DGy Control Panel Figure 3 1 click on the Options button 2 In the Options window select the Playback tab 3 Select the date of the clip by entering directly into the Date field or using the spin controls 4 Select the desired seek time b...

Страница 53: ...el window TIMER TAB The Timer tab provides the ability to record a new clip or playback an existing clip at a user defined time like preprogramming a VCR Either a Record Timer or Play Timer can be set Figure 3 12 Timer Tab R E C O R D T I M E R To set a Record Timer event Enter a clip name into the Record Timer Clip Name dialog box A quick way to set the path name is to use the Select button to na...

Страница 54: ...button on the DGy Control Panel P L A Y T I M E R To set a Play Timer event Enter a clip name into the Player Timer Clip Name dialog box A quick way to set the path name is to use the Select button to navigate to the desired folder and select the desired clip Enter the required start date into the Date box Enter the required start time into the Time box Click in the Enable box to activate the Play...

Страница 55: ...ill automatically compute the maximum frame rate I N T ER FR A M E C O M P R ES S I O N Interframe compression for live input streaming reduces the bandwidth required to transmit video data over a network In interframe compression each frame is compared to the previous frame When differences between frames meet criteria defined by parameters set by the user new anchor frames are transmitted if the...

Страница 56: ...nterframe compression during multicast streaming Interframe compression parameter values may be entered by typing a number in the box using the arrows to increase or decrease a value or by using the slider Interframe compression parameters are Sensitivity The DGy 201x evaluates changes by examining blocks of pixels This parameter sets the number of block changes which will trigger the transmission...

Страница 57: ...minimum rate for the transmission of a new anchor frame regardless of the threshold or sensitivity setting This insures that even slow incremental changes are captured Interframe length may be set to a value between 0 and 4095 with a default of 30 Interframe length should be adjusted after threshold and sensitivity parameters have been set To calculate the refresh rate Signal frame rate Refresh ra...

Страница 58: ...ing parameters Figure 3 15 illustrates the Input tab Figure 3 15 Input Tab V I D E O I N P U T At the top of the Input tab use the pull down Video Input menu to select the DVI or RGB video input A U D I O Click on the Audio button to open the Audio Settings dialog box shown in Figure 3 16 Use this dialog to set the audio inputs to accept line or microphone level input signals Figure 3 16 Audio Set...

Страница 59: ...lay the Image Adjustment window Figure 3 17 Image Adjustment Window Two image adjustments can be made to the input signal Brightness Contrast These categories are enabled dynamically depending on the selected input To adjust a parameter use the associated slider control or adjust numerically with the up down selector M A K I N G T I M I N G A D J U ST M E N T S Timing List parameters can be used w...

Страница 60: ... timing parameters is selected from the drop down menu the timings shown in the Video Input Timing section are not updated until Load has been clicked To view the timing values before loading them check the Show Timing Values check box When the box is checked and a new entry is selected the values associated with the new entry will be displayed in the Video Input Timing section in red In the Video...

Страница 61: ...e user defined timing list There are over 100 available user entries Use the following procedure to create a new user defined entry in the timing list Click the Edit button in the Input Timing section of the Input Timing page Enter new timing parameters into each of the timing parameter boxes Scroll to an empty timing list number above 100 in the Timing List entry box Click the SAVE button A dialo...

Страница 62: ... to select the desired output format RGB or DVI When one format is enabled the other is disabled O U T P U T D I S P L A Y M O D E Select the Mode between the Playback and Freerun modes In the Playback mode the output timing parameters are automatically loaded to match the format of the played clip In the Freerun mode the output timing can be changed to suit the output device the Timing List is en...

Страница 63: ...parameters Modified settings may then be saved to the Timing List by selecting an unused entry in the list between 100 and 160 and clicking the Save button Unwanted entries to the Timing List can be deleted by selecting an entry and clicking Delete To return to the default autosync mode set the output Mode to Playback V I D E O O U T P U T T I M I N G Output timing parameters are displayed for the...

Страница 64: ...ttings or to change the system s IP address host name subnet mask and default gateway After changes are made click Apply to apply the new settings to the DGy 201x Changes to network settings will not be applied to the DGy 201x until the unit has restarted When Apply is clicked the Restart Warning is displayed Figure 3 20 Click No to cancel the reboot and go back to the old network settings click Y...

Страница 65: ... Echo On box to enable echo CL OCK S ET TIN GS The DGy 201x uses an internal real time clock to time stamp the recordings The DGy system time and date can be set manually or synchronized to the PC controlling the DGy 201x In the Clock section Click Sync to PC to load the PC s local time into the DGy 201x s temporary clock register Use the Date and Time up down selectors to adjust the date and time...

Страница 66: ...ime Synchronization At least one IP address must be in the NTS List before the Network Time Server radio button can be selected Up to three IP addresses can be set Be sure that the DGy 201x can access the time server over the network connection In Chapter 6 refer to the RealTimeClockSYNC command description for details To put an entry into the NTS list box click on the Edit button associated with ...

Страница 67: ...e required when using multiple DGy 201x recorders in a time synchronized application R E M O T E S H U T D O W N Click the Shutdown button to remotely power off the DGy 201x The recorder will go through the same shutdown procedure as when the front panel power switch is used Follow the on screen prompts to confirm or cancel shutdown Shutdown will take 10 to 15 seconds to complete During shutdown t...

Страница 68: ...AC address WCP version COMMAND LINE CONTROL The WCP provides a terminal emulator that can be used to issue serial commands from a PC and to read commands as they are issued from the DGy Control Panel This is useful when developing scripts for controlling DGy 201x from an external controller For details about serial commands see Chapter 6 on page 85 To open the Terminal Window Locate the DGy Web Co...

Страница 69: ...bottom of the Configuration Page A Terminal window similar to that shown in Figure 3 23 will appear Figure 3 23 Terminal Window Using the Terminal window When the terminal window is open it is ready to use click inside the window to begin making entries Type the desired command at the command prompt including any optional or required arguments and press ENTER ...

Страница 70: ...dow To clear the contents of the Terminal window click on the Clear button at the bottom of the Terminal window COMMAND LOG The Terminal window can be used to log commands that are sent from the DGy Control Panel to the DGy 201x This is particularly useful for debugging or in the development of a script for an external controller using the command line interface See Chapter 6 for details about eac...

Страница 71: ...e downloaded from the following web site http nfsforwindows com home It is strongly recommended that the IT manager be consulted for assistance before proceeding Use the following procedure to mount a remote disk 1 Open the Clip Browser from the DGy Control Panel win dow by clicking in the Clip Path section See Clip Browser Window on page 35 2 Click on File in the Clip Browser tool bar 3 Select Ne...

Страница 72: ... 3 To create a new folder click on the New Folder icon on the Clip Browser toolbar or select New Folder from the File menu Enter a name in the pop up dialog box and click OK R E C O R D I N G A C L I P Use the following procedure to record a clip with DGy 201x 1 From the DGy Control Panel click Options to display the Options window 2 Click the Record tab and set the desired recording parameters in...

Страница 73: ...Load Refer to the Input Tab section on page 48 for details 4 Click Close to return to the DGy Control Panel 5 On the DGy Control Panel click the Record button to begin recording the new clip 6 If the Enable Clip Auto Naming box page 41 was checked on the Record tab of the Options window recording will begin immediately If the autoname is disabled a clip name dialog box will open providing the oppo...

Страница 74: ...the Clip Browser is not open open it from the DGy Control Panel by clicking Clip Path See Clip Browser Window on page 35 2 Use the left pane of the browser Figure 3 6 to navigate to the drive and folder that contains the desired clip The removable drive is named remov and the remote drive NFS is named remot Do not to confuse the names P L A Y B A C K A C L I P Use the following steps to play back ...

Страница 75: ...otected to prevent accidental overwrite or deletion Please note event marks cannot be inserted to a protected clip The protect status of each clip is shown in the Clip Browser In Figure 3 27 clip test1 is protected as indicated by the lock icon Figure 3 27 Protected Clip To set the protection on a clip 1 Open the Clip Browser 2 Click on the desired clip 3 Click on the Edit button on the Clip Brows...

Страница 76: ...g on the DGy 201x Multicast streaming uses a Class D IP address and port on the DGy 201x acting as the stream out server The client DGy 201x s can then subscribe to the stream by connecting to the IP address and port Refer to Figure 1 3 page 9 for a setup diagram STREAMING CONTROL PANEL The streaming control panel is located at the bottom right corner of the standard DGy Control Panel The panel is...

Страница 77: ...ow and for a full discussion of interframe compression use After settings have been made close the window Close the Options Window On the streaming control panel click the Select Live Input button On the streaming control panel click the Send Multicast Stream button The Multicast Stream Info window for the output shown below will open Figure 3 29 Multicast Stream Out Info Stop the multicast stream...

Страница 78: ...values of the Multicast Stream Out of the server DGy Close the Options tab Click the Receive Multicast Stream buttonon the streaming control panel The Multicast Stream Info window for the incoming signal is shown in Figure 3 30 Figure 3 30 Multicast Stream In Info Stop receiving the multicast stream by pressing the Stop button on the DGy Control Panel ...

Страница 79: ...eous Mode is selected the DGy Control Panel displays separate control panels for Record and Playback channels The Playback Channel display and controls are identical to those in the standard DGy Control Panel with the Record button removed See the DGy Control Panel on page 25 Figure 3 31 Simultaneous Record Play DGy Control Panel The Record Channel functions are 5 10 9 8 4 2 3 6 7 1 1 Record Disk ...

Страница 80: ...he Record Clip Name and Record Clip Path See below for details The symbol appears in the status area When recording begins the DGy 201x records the visuals from the graphics input port If autonaming is enabled recording begins immediately If the clip name has already been used you will be asked to confirm to overwrite the clip 6 Record Clip Name This area indicates the name of the clip currently r...

Страница 81: ...d Play Operation 1 The Record and Play resolution of each clip must be identical Use the Clip Browser to determine the value for the playback clip This value is set on the Record and Input tabs of the Options window 2 Simultaneous Record Play functions only in single channel mode 3 The Input Timing and Output Timing must be identical 4 The maximum settings are Quality Medium 1 0 bit rate Frame Rat...

Страница 82: ...ows Media Player It is also possible to transfer files from an external drive to a DGy 201x for later replay on the DGy 201x This method can be used if it is necessary to clone a DGy 201x recorder Transfer is accomplished using the DGy 201x FTP File Transfer Protocol client FTP TRANSFER TIME Transfers can involve very large file sizes The transfer rate on a typical network connection is similar to...

Страница 83: ...download file dialog similar to the one shown in Figure 4 2 is displayed Figure 4 2 File Download Dialog Box To continue with setting up the FTP session click on the Open or Run in the File Download dialog box If additional dialog boxes appear due to security applications select Run or OK depending on the software After a pause of about 15 20 seconds the DGy 201x FTP Client window will be displaye...

Страница 84: ...e spectrum into the Password entry box lower case only The password will be hidden from view with each character replaced by the symbol 4 Click on the Connect button and wait for the status icon to the right of the button to change from red to green this may take from 30 to 90 seconds depending on network traffic The green icon indicates successful connection to the DGy 201x and that it is ready t...

Страница 85: ...onnecting to the DGy on page 74 3 Click the Download from DGy radio button to display the FTP download options as shown in Figure 4 3 4 Click on the Browse button next to the Destination box to navigate to the desired device and folder in which to store the transferred files see Figure 4 5 below Alternatively if the path name is known it can be typed directly into the Destination box Figure 4 5 FT...

Страница 86: ... the clip or file to add it to the Source Transfer list Figure 4 8 Repeat this step for each clip or file to transfer When all clips or files have been selected the Clip Browser window may be closed or it may be left open to transfer files later Important It is recommended that Show clips be used to make sure all the files associated with a clip are transferred Failure to transfer all clip files w...

Страница 87: ...ansfer list The clip files will be automatically transferred sequentially from the file transfer list The file that is currently being transferred is indicated in the File transfer screen that appears as soon as the transfer process has been started shown in the following figure Figure 4 8 File Transfer Screen Important No warning message will be displayed if the transfer will result in overwritin...

Страница 88: ...ray Transferred file Green File currently being transferred Red Transfer aborted file TRANSFERRING RECORDINGS TO THE DGy Although files are typically transferred from DGy 201x to an external device they can also be imported from an external device to the DGy 201x using either the DGy FTP Client or the command line ftp method Both methods are described in the following pages UPLOADING FILES VIA THE...

Страница 89: ... FTP Upload Dialog Box 4 Click on the Browse button next to the Destination box to navigate to the destination location within the DGy 201x for the transferred files and click Ok See Figure 4 10 Alternatively if the complete path is known it can be typed directly into the Destination entry box Figure 4 10 FTP Upload Destination Folder ...

Страница 90: ...transferred and click the Select button or double click on the file The file will then be added to the Source Transfer list Figure 4 8 Repeat this step for each clip file to be transferred To remove a file from the Source Transfer list highlight the desired file and click Remove To remove all clip files from the Source Transfer list click Reset Important Be certain that all files associated with a...

Страница 91: ... Source Transfer list The clip files will be automatically transferred sequentially from the file transfer list The file that is currently being transferred is indicated in the File Transfer screen that appears as soon as the transfer process has been started See Figure 4 13 Figure 4 13 File Transfer Screen Important No warning message will be displayed if the transfer will result in overwriting e...

Страница 92: ...ftware to the DGy 201x 1 From the Windows START menu select RUN 2 In the RUN dialog box type cmd then press OK 3 At the prompt type ftp ipadddress of the DGy then press ENTER S Example ftp 192 168 1 200 4 The DGy 201x will respond with a prompt requesting a user name Type rgb lower case and press ENTER 5 The DGy 201x will respond with a prompt requesting a password Type spectrum lower case and pre...

Страница 93: ...R where PC drive PC directory is the source directory path name S Example lcd c DGy_Samples 9 To copy a single file from the PC to the DGy 201x type put filename and press ENTER To copy multiple files use the ftp mput function DGy 201x recorded files have the file extension mj2 To copy all files with that extension use the ftp command mput mj2 and press ENTER 10 To exit the FTP process type bye an...

Страница 94: ...ware 2 Double click on DGy PC Player Software Setup This will launch the familiar Install Shield Wizard 3 Follow the prompts to load the software onto the PC 4 Copy the Simulator Sample file to a folder on the PC s hard drive 5 Launch the Windows Media Player 6 From the Media Player File choose Open then select All Files Navigate to the folder which contains the sample file 7 Click on the Simulato...

Страница 95: ... set is made up of ASCII characters Note that commands associated with file and path names are case sensitive These commands may be used to control DGy 201x via the RS 232 serial port or via the Ethernet port using the internal DGy 201x Telnet server The DGy 201x can also be controlled using the supplied DGy Control Panel graphical user interface used on a PC with a standard web browser Remote con...

Страница 96: ... or the concatenation of two or more words The short form version is an abbreviation of the command name In the example above the command BAUDrate could be entered in four ways BAUDRATE baudrate BAUD baud To execute commands each command line must be followed by a carriage return pressing ENTER COMMAND HELP S Commands Help There are two ways to use the DGy 201x s help feature Type HELP to list all...

Страница 97: ...y commands will report back on the current parameter settings To establish the current parameters associated with the command enter the command without any arguments DGy 201x will respond with the current settings of the selected parameter S Example To determine the current DGy 201x selection of input source use the INputSouRCe command without entering an argument this example assumes that the cur...

Страница 98: ... followed by lists arranged according to categories Command Summary Input Commands Image Commands Audio Commands Output Commands Play and Record Commands Streaming Commands Clip and Disk Commands Time Commands Miscellaneous Commands Note Take the time to review each of these command lists trying as many commands as possible with the DGy 201x This will ensure familiarity with the full capabilities ...

Страница 99: ...FRaMe Record Play Turns interframe compression on or off COMPressionINTerFRaMe LENgth Record Play Sets the maximum frame length for interframe compression COMPressionSENsitivity Record Play Sets the amount of motion required to trigger interframe compression COMPressionTHReshold Record Play Sets the variance per pixel to qualify as a change for interframe compression CONTrast Image Sets contrast v...

Страница 100: ... INputTiMing Input Sets the timing of the analog RGB input IPADDRess Miscellaneous Sets or reports the DGy 201x IP address IPGateWay Miscellaneous Sets or reports the IP gateway address IPSubNET Miscellaneous Sets or reports the system subnet mask IRIGSTandarD Time Sets the type of IRIG signal to be connected to the IRIG input LiStCLIPs Clip Disk Displays a list of all recorded clips in the curren...

Страница 101: ...Applies to Forward and Reverse play modes PrevCLIP Record Play Moves DGy from the current clip in Play or Pause to the beginning of the previous clip PREVMARK Record Play Sends the recorder to the previous event mark from the current position and cues there PROTECTCLIP Clip Disk Change the status of an unprotected clip to protected PWD Clip Disk Gives the absolute path of the current directory Rea...

Страница 102: ...of a specified clip at a pre determined time SYNChronizedRECord Record Play Sets up the DGy to start recording at a pre determined time SYNChronizedSTATus Record Play Reports the status of any queued synchronized commands SYNChronizedSTOP Record Play Cancels all pending queued synchronized commands SYStemReSet Miscellaneous Restarts the DGy firmware TestPattern Miscellaneous Enables or disables th...

Страница 103: ... RGB input channel This command only operates when an analog RGB signal is present and selected with the INputSouRCe command Otherwise an error message will be returned Refer to the Factory Timing List section for additional details INputMODulus none This command provides a way to optimize the input timing for the analog RGB input to exactly sample the center of each pixel A reasonably busy image ...

Страница 104: ...dditional details INputSouRCe RGB DVI This command selects between an RGB or DVI input source Default RGB INputTiMing hfp hs hbp hact vfp vs vbp vact This command sets the timing of the analog RGB input The command can be used in two different ways The syntax described here provides the ability to change or read the complete set of timing parameters with a single command An alternate method allowi...

Страница 105: ... 99 are reserved for factory defined timing settings The name parameter is a name that is used to identify the timing set for example mytiming3 hfp width of the horizontal front porch pixels hs width of the horizontal sync pulse pixels hbp width of horizontal back porch pixels hact width of the active picture area pixels vfp width of the vertical front porch pixels vs width of the vertical sync pu...

Страница 106: ... Description BRIghtness 500 500 Sets brightness value of the selected input Only valid for INputSouRCe of RGB Note This command is not active in the Play mode The brightness or contrast cannot be adjusted during playback Default 0 CONTrast 0 200 Sets contrast value of the selected input Only valid for INputSouRCe of RGB Note This command is not active in the Play mode The brightness or contrast ca...

Страница 107: ...Stereo the Left and Right audio channels are routed independently to the Left and Right audio output connectors Stereo or separate audio If AUDioMoDe is set to OFF audio is not recorded Note This command does not affect playback A clip containing audio will be replayed independent of the setting of this command Default OFF AUDioPHANTom ON OFF Supplies the low voltage phantom power required by some...

Страница 108: ...Refer to Factory Timing List page 118 for details OutPutTiMingNAME name Assigns a name to the current output timing The argument can be up to 23 alphanumeric characters with no spaces underscore is acceptable OutPutTiMingSAVE 100 160 Saves the timing data of the current output raster into the Timing List The argument specifies which Timing List position is used If OutPutTiMingSAVE is issued for an...

Страница 109: ...s that of the recorded signal being played back If the DGy is not in Playback mode the output timing reflects the last clip played Default Playback OutPuTForMaT RGB DVI The DGy has a DVI I output connector capable of carrying analog and digital outputs Only one output format is active at any time This command selects the format of the active output signal Default RGB Table 6 5 Output Commands Cont...

Страница 110: ...ultaneous Record Play option is installed multiple values will be returned RECord P clipname This command switches the DGy to Record mode If an argument is given that argument is used as the name of the clip If no argument is given the clip name reflects the record start time in the form yyyymmddhhmmss The optional P argument places the recording into a Record Pause mode In this mode the recorder ...

Страница 111: ...d This command would most likely be used to save disk space by recording at a lower frame rate For example a 1280 x 1024 image can typically be recorded at 30 frames second A setting of 15 would record at half the rate with double the available recording storage time An argument of 0 always allows recording at the maximum rate which is calculated automatically by the DGy Note RECordFrameRate must ...

Страница 112: ...he ability to set up a play back and to instantly start playback and is particularly useful in controlling multiple DGy recorders Example Play the clips named clip1 clip7 and latest_clip using the PLAY PAUSE mode PLAY P clip1 clip7 latest_clip PLAY SYNChronizedPLAY clipname starttime The SYNChronizedPLAY command is used to schedule playback of a clip at a specified time The start time must be spec...

Страница 113: ...ositive value between 1 0 and 0 0 Negative PLAYSPeeD values represent playback in reverse To play in fast reverse use a negative value greater than 1 0 To play in slow reverse use a negative value between 1 0 and 0 0 Example Set the play speed for 8 times normal in the reverse direction PLAYSPD 8 0 Example Set the play speed for 1 10 normal speed in the forward direction PLAYSPD 0 1 Default 1 0 PA...

Страница 114: ...ach event mark is assigned a number The EditMARK command may be used to associate a descriptive name with that number MarkNames must have at least one alpha character and must contain no white space The markName ALL is illegal ListEVeryMARK none The LEVMARK command lists the timecode and description of all event marks in all clips on all disks Retrieval time will be dependent upon the total number...

Страница 115: ...ied event mark and cues there To play from that spot you must issue a PLAY command STMARK will only seek within the current clip TimeCodeQuery H F Returns the timecode at the current disk position Only valid in PLAY or PAUSE modes When used without an argument the TimeCodeQuery command returns the time in the format yyyymmddhhmmss When used with the optional H argument the TimeCodeQuery returns th...

Страница 116: ... an argument Default 225 0 0 37 STREAMINPORT 5001 65535 Sets or displays the incoming multicast stream transmission port To determine the current port without changing it use the command without an argument Default 6000 STREAMINSTOP none Stops the incoming multicast stream STREAMOUT none Initiates the outgoing multicast stream transmission from the server DGy 201x STREAMOUTADDR ddd ddd ddd ddd Set...

Страница 117: ...sion on page 45 for details Default is 30 COMPressionSENsitivity 0 255 This value determines the amount of motion required to trigger interframe compression Lower values provide greater sensitivity higher values provide higher compression A setting of 0 will result in no interframe compression Default 4 COMPressionTHReshold 0 255 Sets the amount of variance per pixel to qualify as a change for int...

Страница 118: ...uzzer will sound and the front panel disk full lights will blink when there is about 12 GB of a 238 GB drive available Notes The buzzer never sounds if RECordLOOP is ON If BUZZFUNC is OFF the buzzer doesn t sound Default 95 BUZZerReSeT none Turns the buzzer off Note Using this command does not change the settings of BUZZerFUNCtion CoPyCLIP clipname1 clipname2 Creates clipname2 as an identical copy...

Страница 119: ...le Show a listing of the file jnew displaying details about frame rate and quality level Type lsclip L jnew RENameCLIP clipname1 clipname2 Renames clipname1 to clipname2 Relative or absolute pathnames are allowed Only renames to the same disk An attempt to rename a clip to a location on the other disk will return an error PROTECTCLIP clipname Write protects named clip Clipname can contain Unix sty...

Страница 120: ...ve and wish to change to the directory myclips on the removable drive use the following command cd remov myclips DELeteDIR dirname Removes the named empty directory Relative or absolute pathnames are allowed MKDIR dirname Makes a new directory Relative or absolute pathnames are allowed Example Create the directory myclips mkdir myclips PWD none Gives the absolute path of the current directory ERAS...

Страница 121: ...l recordings The location of the remote drive is identified by the network address ipaddress and sharename is the name of the shared drive as configured in the NFS server on the remote host the syntax of this name may vary with different NFS servers It is recommended that the IT manager consulted before executing the mounting procedure Example To mount the usr dgy NFS share on a Linux host at IP n...

Страница 122: ...plied VOLINFO responds with the information for the removable drive Use the f flag argument to display parameters for the fixed drive Use the n flag argument to display the parameters for the remote NFS drive VOLumeNAME name f VOLNAME can be used to read or write the DGy disk volume name The name can be up to 30 characters in length and may include spaces and punctuation characters If no name is s...

Страница 123: ...xample if the current date and time are 3 02 2005 8 01 23 then using the RAW argument DGy will respond with the string 2005302080123 RealTimeClockSET yyyymmddhhmmss Sets the internal DGy real time clock This should only be used if no other method of timesetting is available TimeZone 12 12 Sets the timezone relative to UTC For example Pacific Standard Time PSRT is 8 8 hours behind UTC DGy must be r...

Страница 124: ...P command Note that when using the NTSIP to display your local time correctly you must set the Time Zone to correspond with your geographical location Note DGy requires a full time Internet connection to provide this capability See also NTSIP and TimeZone When the RTCSYNC is set to IRIG the DGy will automatically synchronize it s internal clock to the external optional IRIG time reference connecte...

Страница 125: ...Input type VERsion none Displays the following DGy information Firmware version FPGA version number Web Control Panel WCP version number BAUDrate 9600 19200 38400 57600 115200 Sets the serial port baud rate Operation of the serial port at the highest possible speed is recommended Default 115 200 ECHO ON OFF Turns the serial echo On Off The echo is only on commands typed and sent to the unit Note T...

Страница 126: ... ddd Without an argument this command reports the DGy current IP gateway address To change the gateway address enter the command followed by an argument Example To set the gateway address to 192 168 35 1 type IPGW 192 168 35 1 and press Enter Use the SYStemReSet command to reboot the unit to activate the new IP gateway MACADDRess none Reports the physical Ethernet Media Access Controller address R...

Страница 127: ...rrectly Test patterns include CBAR 100 color bars BOX a box indicating the extent of the output image RAMP a horizontal luminance ramp PRBS a test sequence for the DVI output GRATE an fs 2 vertical grate Default OFF UpdateFirmWare none This command updates the firmware for the DGy The firmware file must be transferred to the DGy 201x using FTP prior to using this command See Appendix C Firmware Up...

Страница 128: ...defined settings Table 6 11 Factory Timing List ID TYPE HFP HS HBP HACT HFRQ VFP VS VBP VACT SYNC HPOL VPOL IL 1 VESA 640 x 350 85Hz 32 64 96 640 37 861 32 3 60 350 5 1 0 0 2 VESA 640 x 400 85Hz 32 64 96 640 37 861 1 3 41 400 5 0 1 0 3 VESA 720 x 400 85Hz 36 72 108 720 37 927 1 3 42 400 5 0 1 0 4 VESA 640 x 480 60Hz 16 96 48 640 31 473 10 2 33 480 5 0 0 0 5 VESA 640 x 480 72Hz 24 40 128 640 37 861...

Страница 129: ...242 3 0 0 1 30 720 x 576 25i 12 66 66 720 15 625 2 5 2 5 20 287 3 0 0 1 31 960 x 480 29 97i 23 69 92 960 15 734 3 3 14 242 3 0 0 1 32 960 x 576 25i 23 69 100 960 15 625 2 5 2 5 20 287 3 0 0 1 33 1280 x 720 24 70 40 260 1280 18 000 5 5 20 720 3 0 0 0 34 1280 x 720 30 70 40 260 1280 22 500 5 5 20 720 3 0 0 0 35 1280 x 720 60 70 40 260 1280 45 000 5 5 20 720 3 0 0 0 36 1920 x 1080 24i 594 44 192 1920...

Страница 130: ...DGy 201x and in addition a description of connector and pin out information GENERAL SPECIFICATIONS The following section provides detailed tables of functional and performance specifications High Resolution Analog Input Digital Input Specifications Graphic Output Specifications Storage Capacity Control Specifications IRIG Time Code Power and Physical Specifications ...

Страница 131: ...aced Number of inputs 1 Signal formats RGB Note RGB inputs operate in single channel mode only Signal level Nominal 0 7 V peak to peak Input impedance 75 ohms nominal Sample rate Up to 170 MHz Resolution 640 x 480 to 1600 x 1200 Sync 3 wire sync on green 4 wire separate composite sync 5 wire separate H V sync Sync Level 0 3 V peak to peak 3 wire 1 to 5 V 4 and 5 wire Table A 2 Digital Input Specif...

Страница 132: ...ing sync Output impedance 75 ohms nominal Sample rate Up to 240 MHz Resolution Up to 1600 x 1200 progressive scan Sync type Available sync types 3 wire sync on green 4 wire separate composite sync 5 wire separate H and V sync Sync level 0 3 V peak to peak 3 wire 5 V maximum 4 and 5 wire Table A 4 Digital Output Specifications Parameter Specification Number of outputs 1 Type 1 DVI single link Max b...

Страница 133: ...various frame rates and quality levels are shown in the table below Table A 6 DGy 201x Record Time 238 GB Disk Resolution Quality Setting Compression Ratio High 16 1 Mid 24 1 Low 34 1 1280 x 1024 5 fps 53 8 hrs 80 7hrs 114 3hrs 1280 x 1024 10 fps 26 9 hrs 40 4 hrs 57 2 hrs 1280 x 1024 20 fps 13 5 hrs 20 2 hrs 28 6 hrs 1280 x 1024 30 fps 9 hrs 13 5 hrs 19 1 hrs 1600x 1200 5 fps 55 1 hrs 78 0 hrs 16...

Страница 134: ... over a network connection using a Telnet server client architecture Internal DGy 201x web server provides the Web Control Panel WCP a graphical user interface used with a standard web browser The DGy 201x Ethernet port connector is a standard RJ45 modular connector see the Ethernet Connector on page 128 RS 232 Port DGy 201x commands can be sent through the RS 232 port to control the system The RS...

Страница 135: ... power and physical specifications Table A 8 IRIG Timecode Specification Parameter Specification IRIG Type IRIG B time frame of 1 sec BCD time of year SBS Format B123 Interface DCLS dc level shift code 1 kHz amplitude modulated Signal Level 2 3 V peak to peak 10 V maximum Connector Type BNC female looping input bridging impedance Table A 9 Power and Physical Specifications Parameter Specification ...

Страница 136: ...his is a standard connector based on the work of the Digital Display Working Group DDWG C O N N E C T OR T Y P E A N D PI N OU T S The connector used in the DGy 201x is a 29 pin DVI I connector supporting both analog and digital signals The DVI I connector as shown below is used for the standard DGy 201x DVI input and output signals Figure A 1 DVI I Digital Analog Connector The 29 pin DVI I connec...

Страница 137: ...n sub miniature D adapters that are provided as a standard accessory with DGy 201x units 8 Analog Vertical Sync 9 TMDS Data 1 10 TMDS Data 1 11 TMDS Data 1 3 shield 12 NC 13 NC 14 5V Power 15 Ground 16 Hot Plug Detect 17 TMDS Data 0 18 TMDS Data 0 19 TMDS Data 0 5 shield 20 NC 21 NC 22 TMDS Clock shield 23 TMDS Clock 24 TMDS Clock C1 Analog Red C2 Analog Green C3 Analog Blue C4 Analog H sync C5 An...

Страница 138: ...hernet connector is a standard RJ 45 type connector Figure A 2 Ethernet Connector The 8 pin RJ 45 Ethernet connector has the following signals S T A N D A R D C A B L E S Standard Ethernet cables are available commercially in many different lengths The standard cable is wired pin for pin straight through which means that pin 1 of the connector at one end of the cable is wired to pin 1 of the conne...

Страница 139: ...re of the pair is white with a stripe of the same color as the other wire e g Orange and White Orange RS 232 CONNECTOR The RS 232 port is configured according to the Electronic Industries Association Standard RS 232 C published in August 1969 The DGy 201x can be explicitly controlled with ASCII Command Set instructions sent via the RS 232 serial port from either a computer or an ASCII terminal Ref...

Страница 140: ...f a null modem is to reverse the Transmitted Data and Received Data connections within the cable Also the Request to Send RTS and Clear to Send CTS connections are reversed This may be done by using a special null modem cable or by inserting a small null modem box or cable in series with a regular straight through cable 6 DSR Data Set Ready 7 CTS Clear to Send 8 RTS Request to Send 9 not connected...

Страница 141: ...RTERMINAL WINDOW A command line interface is provided for DGy 201x using the serial port A full description of available commands is provided in Command Line Interface on page 85 PCs running the Windows Operating system are provided with serial emulation software known as Hyperterminal This provides a convenient method to communicate with the DGy 201x Use the following steps to launch a Hypertermi...

Страница 142: ...e B 2 Connection Description Dialog Example 2 In the dialog Enter a name Choose an icon Click OK to display the Connect To Dialog Figure B 3 Connect To Dialog Box 3 In the Connect To dialog ignore the Country Area Code and Phone Number fields In the Connect Using field select the PC s COM port to which the serial cable from DGy 201x is connected 4 Click OK to display the COM Properties dialog ...

Страница 143: ...its per second baud 115 200 default Data bits 8 Parity None Stop bits 1 Flow control XOn XOff The DGy 201x can be configured to operate at baud rates from 9600 baud to 115 kbaud The recommended baud rate is 115 kbaud default baud rate In Chapter 6 refer to the Commands on page 88 for details about changing baud rates 6 Click OK to display the Hyperterminal window 7 In Chapter 2 please continue wit...

Страница 144: ...the setup of communications parameters is automatic However because this is a network connection a unique address known as the IP address is required For proper operation DGy 201x requires a fixed IP address also known as a static IP address At the factory DGy 201x is programmed with a default IP address 192 168 1 200 but this address must be changed if the DGy 201x will be used on a network S Rec...

Страница 145: ...ollowed by a space and the new IP address as provided to by the network administrator S Example If the new IP address is 192 168 1 190 type IPADDR 192 168 1 190 and press ENTER 4 DGy 201x responds with the following message The system must be restarted for your changes to take effect Do you want to restart the system y n Press y to restart DGy 201x and use the newly assigned IP address Press n to ...

Страница 146: ... s Ethernet port the network port of the PC 2 From the Start menu at the bottom of the Windows desktop select Run 3 In the Open dialog box type cmd as shown in the following figure Figure B 5 Run Dialog Box 4 Click the OK to open the Windows command window 5 At the command prompt in the command window type telnet ipaddress 8000 where ipaddress represents DGy 201x s current IP address S Example If ...

Страница 147: ... you want to restart the system y n Type y to accept the new address or n to retain the current address 7 If y is pressed in the step above the DGy 201x reboots and the Telnet connection is lost Repeat steps 2 through 4 to establish a new Telnet session except in step 4 type the new IP address 8 Confirm the new setting by typing the command IPADDR and pressing ENTER If the DGy 201x has accepted th...

Страница 148: ...ng up the IP address via Ethernet The DGy 201x can now be controlled either by directly issuing ASCII commands from the Telnet Window or from the Web Control Panel using a standard web browser Refer to Chapter 6 Command Line Interface for a complete command list Note To close a Telnet session type EXIT or use the keystroke sequence Control D ...

Страница 149: ... Manual Update Procedure OBTAINING THE FIRMWARE Each revision of firmware is provided with a copy of the firmware release notes which identifies changes and improvements associated with the new version Reading the release notes before upgrading the firmware is recommended Please contact RGB Spectrum Customer Service for questions and assistance Download the latest revision of the firmware from the...

Страница 150: ...P configuration window STARTING THE FTP CLIENT 1 Connect to the DGy 201x by typing the IP address of the DGy 201x in the address line of a browser The first page that the browser displays is the DGy 201x Applications Suite page as shown in Figure C 1 If the DGy WCP is open close it before proceeding Figure C 1 DGy 201x Application Suite Page 2 Click on DGy FTP to open the client A file download di...

Страница 151: ...y applications click the appropriate button to continue After a pause of about 15 20 seconds as the FTP Client application loads and the DGy 201x FTP Client window shown in Figure C 3 is displayed Figure C 3 DGy 201x FTP Client Window FIRMWARE UPDATE 4 Enter the IP address of the DGy 201x in the IP address entry box to the right of the Add button 5 Click Add to add the IP address of the DGy 201x t...

Страница 152: ...owse button to navigate to the folder containing the firmware upgrade files copied to the PC Select the file FWDGY_x y z tgz Alternatively if the path is known it may be typed directly into the entry box A third method is to drag the file onto this area Figure C 5 FTP Select Firmware Archive File The file name now appears in the box to the left of the Browse button as shown in Figure C 6 ...

Страница 153: ...tart button to begin the firmware upload from the PC to the DGy 201x A File transfer status window will display the progress The DGy 201x will automatically update the firmware after it has transferred the file When the update is complete The FTP Client window will indicate readiness for the next step as shown in Figure C 7 Figure C 7 FTP Updating Firmware Status ...

Страница 154: ... file The DGy 201x will automatically reboot upon completion of the firmware upgrade During this time communication with the DGy 201x will be lost 9 Reconnect to the DGy 201x Applications Suite after the system has rebooted and relaunch the DGy WCP Open the WCP from the Application Suite the WCP Configuration window will indicate the new firmware version The upgrade is now complete ...

Страница 155: ... Begin a Telnet session See IP Address Setup via Ethernet for instructions on opening a command window 2 Change to the directory on the PC that contains the new firmware 3 Type dir to verify that the firmware files are present 4 Type ftp followed by the IP address of the DGy 201x S Example Assuming that the DGy 201x IP address is currently set to 192 168 1 150 Type ftp 192 168 1 150 and press ENTE...

Страница 156: ...begin a new Telnet session Figure C 9 Update Firmware Command 12 Type the ufw command and press ENTER 13 Type y to proceed or n to terminate the process After about 30 seconds the connection to the host will be lost FTP FPGA FILE 14 Re establish the FTP connection as described in Step 4 above 15 Enter the user name rgb 16 Enter the password spectrum case sensitive Caution Failure to enter the bin ...

Страница 157: ...oceed or n to terminate the process 24 Reconnect the serial emulator or start a new Telnet session with the DGy 201x and type ver The DGy 201x should respond with the new firmware version number Alternately restart the Applications Suite and click on DGy WCP The new firmware version will be displayed in the WCP Configuration window The firmware upgrade process is now complete Important Communicati...

Страница 158: ...pectrum can be reached by phone fax mail and e mail as listed below RGB Spectrum 950 Marina Village Parkway Alameda CA 94501 Phone 510 814 7000 Fax 510 814 7026 E Mail technical support support rgb com E Mail sales and product information sales rgb com Website http www rgb com ...

Отзывы: