background image

RED DSMC OPERATION GUIDE: WEAPON/SCARLET-W

COPYRIGHT © 2016 RED.COM, INC  

   955-0116_V6.1, REV-U  |   75

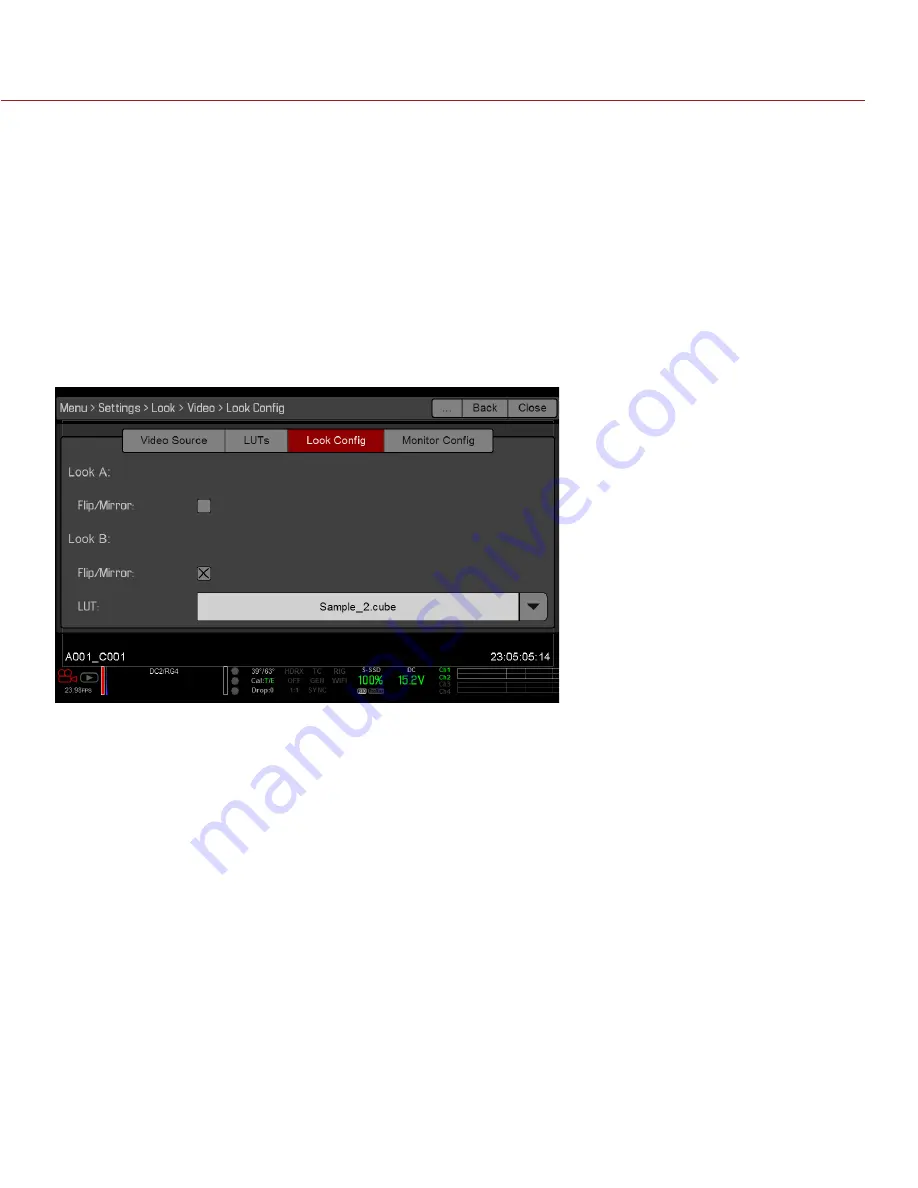
LOOK CONFIG (LOOK CONFIGURATION)

Use the Look Config menu to set up Look A and Look B. In the Look Config menu, you can rotate the image 

or apply a 3D LUT. 
To apply Looks to monitors, go to 

“Monitor Config (Monitor Configuration)” on page 76

FLIP/MIRROR

Mirror and flip (invert) the graphical user interface (GUI) and footage, effectively rotating the entire displayed 

image 180°. Use this setting when mounting a monitor or the entire camera rig upside down. This setting only 

affects the monitor, and does not affect captured footage.

LUT

Assign a 3D LUT to Look B. LUTs are loaded to the camera in the LUTs menu. For more information, go to 

“LUTs” on page 74

.

Содержание SCARLET-W Series

Страница 1: ...WEAPON CF WEAPON MG SCARLET W RED DRAGON MONOCHROME V6 1 RED COM RED DSMC OPERATION GUIDE W EA PO N SCARLET W...

Страница 2: ...ed Menus 60 Advanced Menus 60 Settings Menu 61 Media Menu 117 Playback Menu 118 Power Menu 122 HDRX Menu 123 Focus Menu 124 Exposure Assist 130 Presets Menu 132 Chapter 6 Record and Monitor Audio 135...

Страница 3: ...rks or registered trademarks of their respective holders RED has no affili ation to is not associated with or sponsored by and has no express rights in third party trademarks Adobe and Adobe Premiere...

Страница 4: ...result in interfer ence to radio and TV reception The user is cautioned that changes and modifications made to the equipment without the approval of manufacturer could void the users authority to oper...

Страница 5: ...otential negative effects on human health and the environment which could otherwise arise from inappropriate waste handling Please contact your local authority for further details of your nearest desi...

Страница 6: ...If there are any performance issues with your camera or acces sories when operating within this temperature range please file a support ticket on https support red com Modules expanders and lens mount...

Страница 7: ...y may generate heat if they come into contact with the battery DO NOT discard the battery into fire or heat DO NOT store use or recharge the battery near a heat source such as a fire or a heater DO NO...

Страница 8: ...ras see the DSMC Operation Guide EPIC SCARLET available at www red com downloads The WEAPON SCARLET W system includes the following cameras organized by sensor type SENSOR TYPE CAMERA RED DRAGON 5K SC...

Страница 9: ...sually lossless wavelet based compression codec that reduces R3D RAW files into a manageable size allowing longer recording times on media The ability to compress RAW data is one of the significant te...

Страница 10: ...c range up to six 6 stops by simultaneously capturing two 2 images of identical resolution and frame rate The first image is a normally exposed track A track while the second is an underexposed track...

Страница 11: ...raphy RED com downloads Go to the RED Downloads page to download the latest firmware operation guides and post production software DSMC Toolkit Go to the RED Downloads page to find the DSMC Toolkit wh...

Страница 12: ...cal Gear and Cables on page 31 WARNING Modules expanders and lens mounts are NOT HOT SWAPPABLE meaning you cannot remove or install these items while the camera is turned on Before installing or remov...

Страница 13: ...odules This modular approach allows you to customize your camera and make use of the ports that are most applicable to your needs The RED Tactical Hand Controller T H C cannot pair directly to the cam...

Страница 14: ...Status LED PWR Off No power present camera off Green Power present camera on Amber flashing Power present 5 10 min of battery time available Amber Power present camera booting Red flashing Power pres...

Страница 15: ...DSMC2 RED Touch LCD The secondary LCD EVF port and an HDMI port cannot be used at the same time For more information go to LCD EVF 2 HDMI Select on page 69 4 Focus Hook Mounting Point4 Mount the focu...

Страница 16: ...ions for the media bay CONTROL DESCRIPTION 1 User Key 1 Programmable key User Key 1 2 Press Eject Media 2 REC button Programmable key Full Press Record Toggle Half Press AF Start 3 User Key 2 Programm...

Страница 17: ...ce available Amber Record finalizing or playback mode Amber flashing slow Formatting media Red flashing slow Media mounted with 5 and 10 of media space available Red flashing fast Media mounted with 5...

Страница 18: ...and editing RED offers the following RED MINI MAG SSDs ITEM PART NUMBER REQUIRED FIRMWARE RED MINI MAG 120GB 750 0075 v6 1 35 or later RED MINI MAG 240GB 725 0082 v5 1 47 or later RED MINI MAG 512GB...

Страница 19: ...put I O needs Manufactured from lightweight and durable magnesium this low profile module mounts directly to the BRAIN and offers interface connections for power DC IN HDMI 3G SDI HD SDI CTRL and SYNC...

Страница 20: ...accessories and more A rear facing 4 Pin 0B LEMO AUX PWR output supports Start Stop Trigger IN Tally OUT and provides power out up to 1 5 Amps A front facing 2 Pin 0B LEMO AUX PWR port provides 3 0A...

Страница 21: ...ddition the DSMC2 Jetpack Expander offers custom tailored support and connectors for HDMI and USB power out perfect for housings and low profile setups The DSMC2 Jetpack Expander also features a selec...

Страница 22: ...r is provided via the DC IN connector on the expander This feature allows you to use a connected DC input supply to turn the BRAIN on and off when the camera is mounted in remote or difficult to maneu...

Страница 23: ...r the camera system when the module is attached to the camera An included protective baseplate enables the DSMC2 REDVOLT XL Module to serve as a portable and stand alone REDVOLT XL battery charger Plu...

Страница 24: ...280 x 720 730 0019 RED Touch 5 0 LCD2 800 x 400 730 0008 RED Touch 7 0 LCD2 1920 x 1136 730 0007 RED Touch 9 0 LCD2 1280 x 768 730 0011 RED PRO LCD 7 2 1024 x 600 730 0009 DSMC2 RED EVF OLED 2 1920 x...

Страница 25: ...a handle are not covered under warranty WARNING DO NOT use the threaded holes in the RED Touch LCD base to mount the display to the camera Damage to a RED display or other components of the camera sys...

Страница 26: ...O NOT point the BOMB EVF OLED eyepiece at direct sunlight Continued exposure to direct sunlight may damage the EVF Point the eyepiece away from sunlight when not in use Damage to the BOMB EVF OLED cau...

Страница 27: ...tions for each camera type WARNING DO NOT point the DSMC2 RED EVF OLED eyepiece at direct sunlight Continued exposure to direct sunlight may damage the EVF Point the eyepiece away from sunlight when n...

Страница 28: ...cy EVF LCD LEMO port The DSMC2 LEMO Adaptor A is designed to attach to the primary top or the secondary side EVF LCD port on the WEAPON SCARLET W When used along with the DSMC2 LEMO Adaptor B this ada...

Страница 29: ...ekick is compatible with WEAPON Carbon Fiber WEAPON Magnesium and SCARLET W DSMC2 SIDEKICK The DSMC2 Sidekick is a lightweight interface solution that offers intuitive integrated control over critical...

Страница 30: ...l handle and shooting method for your camera DSMC2 OUTRIGGER HANDLE The DSMC2 Outrigger Handle offers a low profile side handle designed with an ergonomic molded grip and integrated Record Start Stop...

Страница 31: ...r OLPFs The WEAPON SCARLET W camera system includes intelligent modular OLPFs The camera automatically recognizes the OLPF type installed eliminating the need to configure OLPF settings in the camera...

Страница 32: ...voltage or remaining battery capacity of third party power options POWER PRIORITY When multiple power sources are connected to the camera power consumption is prioritized in this sequence 1 DC power...

Страница 33: ...nates yellow as the camera turns on The Power Status LED then illuminates green to confirm that the camera is turned on and ready to use NOTE The Power Status LED flashes red when there is less than f...

Страница 34: ...ring your camera system INSTALL THE DSMC2 SIDEKICK This section applies to the following items DSMC2 Sidekick Forged CF DSMC2 Sidekick Woven CF DSMC2 Sidekick Magnesium NOTE Each DSMC2 Sidekick is com...

Страница 35: ...ore installing or removing a DSMC2 expander you MUST turn off the camera REQUIRED TOOL T20 TORX driver 1 Turn off the camera 2 Position the expander on the rear of the camera aligning the connector on...

Страница 36: ...DSMC2 REDVOLT XL Module you MUST turn off the camera REQUIRED TOOL T20 TORX driver 1 Turn off the camera 2 Loosen the four 4 captive screws in a cross pattern X pattern using a T20 TORX driver 3 Remov...

Страница 37: ...M3x0 5 x 3 mm set screw from the focus hook mounting point on the media bay using a 1 5 mm hex key NOTE Store the screw in a safe location or install it in the focus hook storage location after you r...

Страница 38: ...Fs DO NOT use DSMC OLPFs For any questions about OLPF compatibility please contact your Bomb Squad representative SWAP AN INTERCHANGEABLE OLPF REQUIRED TOOLS T20 TORX driver 1 Turn off the camera 2 Re...

Страница 39: ...t the optical cavity is clean and free from dust or debris 9 Ensure the new OLPF module is clean and free of debris 10 Install the new OLPF module straight into the optical cavity keeping the front fa...

Страница 40: ...s down on the OLPF module while turning the lock 12 Replace the lens mount 13 Replace and loosely tighten the four 4 M4x0 7 x 8 mm lens mount screws in a cross pattern X pattern using a T20 TORX drive...

Страница 41: ...C Quick Release Platform Pack 790 0183 Quick Release Platform Pack Bolt On 790 0078 Quick Release Platform Dovetail 790 0079 Quick Release Platform Mini 790 0390 Dovetail Mounting Plate Long 790 0083...

Страница 42: ...MC2 Outrigger Handle Double Tap Right 25 to Record on an attached touchscreen display when enabled NOTE To enable Double Tap Right 25 to Record go to Menu Settings Display Monitor Control Advanced Ges...

Страница 43: ...onnectors on page 198 You can record to an external recorder without recording to an SSD To record to an external device only follow the instructions below 1 Attach a DSMC2 expander that has an HD SDI...

Страница 44: ...u controls enable convenient access to menus overlays and other critical camera information Functionality varies based on monitor output type and firmware version The GUI menu is separated into three...

Страница 45: ...TEM DESCRIPTION FOR MORE INFORMATION GO TO 1 Frame Rate FPS Recording frame rate Frame Rate on page 82 2 ISO Camera sensitivity ISO on page 79 3 Aperture Lens aperture F stop information Aperture on p...

Страница 46: ...r every Upper Status Row item you can select the Advanced button to access the related menu in the Advanced Menus For example select Advanced in the Frame Rate menu to open Menu Settings Project Frame...

Страница 47: ...ATURE EDIT LIST Select the Edit List button in the Upper Status Row menus to change the values that display for each setting For example if you open the Frame Rate menu and select Edit List the camera...

Страница 48: ...is installed and a supported lens is attached This enables you to adjust the aperture of the attached lens Select the Advanced button to access the Menu Settings Setup Lens screen For more informatio...

Страница 49: ...ensor projection area Guides on page 77 5 Clip Filename Filename of the clip being recorded or filename of the next clip to be recorded DSMC Media Operation Guide 6 Timecode Value Current timecode val...

Страница 50: ...ibration on page 110 Cal T E CAL T E Indicator on page 52 HDRX Displays when HDRx mode is on HDRX Menu on page 128 False Color Mode Displays modes False Color Modes on page 68 Magnify Tallies 1 1 if m...

Страница 51: ...aults the camera to Continuous Record Motion mode includes the following features Motion recording modes Continuous Record on page 97 Internal Timelapse Timer on page 97 Frame Trigger on page 97 Speed...

Страница 52: ...e that are noisy or clipped in relation to the total number of pixels in the image For example if the left RAW Level Bar is 1 8 of the total height that means that approximately 1 8 of the total pixel...

Страница 53: ...settings and camera settings are not aligned so phasing of the sync between cameras is not guaranteed For more information go to Timecode Genlock Multi Camera Setup on page 156 SYNC INDICATOR The SYN...

Страница 54: ...displays When powering the camera using batteries the remaining battery capacity displays The remaining capacity is indicated by the following colors Green 12 0 V and up Yellow 11 8 V to 11 9 V Red 11...

Страница 55: ...on page 103 Navigate the menus using a touchscreen by using the following gestures Tap Tap has many functions Tap to select a Basic Menu submenu or button If a menu is open tap anywhere outside the me...

Страница 56: ...UP SHORTCUT DESCRIPTION 1 Camera Mode1 Select Playback Motion or Stills 2 Tools Set Horizon RAW Magnify Zebras and False Color 3 Media View as Percentage or Time Remaining eject media view clip thumb...

Страница 57: ...vigate menus and menu items 3 ENTER key Press ENTER to confirm a setting or access the selected menu Navigate the menus using a DSMC2 Sidekick using the following controls Press ENTER to open the menu...

Страница 58: ...s NOTE DSMC2 Sidekick keys are programmable For more information go to Key Mapping on page 103 OPERATION MODES The DSMC2 Sidekick display reflects the currently selected mode Use the Scroll Wheel and...

Страница 59: ...e when a supported Canon Nikon or Cooke lens is attached 3 White Balance Color temperature 4 REDCODE REDCODE compression setting 5 Media Status Displays media location and remaining media capacity 6 T...

Страница 60: ...rded to the attached SSD Playback Menu on page 118 Power Power sources settings status and shutdown Power Menu on page 122 HDRX HDRx mode and settings HDRX Menu on page 123 Focus Focus modes features...

Страница 61: ...8 NOTE False color modes affect video recorded through HDMI or HD SDI to an external recorder if the Tools check box is selected in the Monitor Control menu When recording through HDMI or HD SDI use f...

Страница 62: ...IRE 96 98 Red IRE 99 100 FOCUS Emphasizes contrast and edges in the image without changing brightness or image content making it easier to judge focus Adjust zoom and focus to easily see which object...

Страница 63: ...5600K ISO 800 ISO Tint 0 Tint NOTE When enabled RAW affects video recorded via HDMI or HD SDI to an external recorder Otherwise RAW image parameters DO NOT affect image metadata the parameters only af...

Страница 64: ...applicable to the selected monitor NOTE Changes to Monitor Control settings take effect when you close the menu MODE Determines the elements displayed on the monitor Clean Only the video displays The...

Страница 65: ...o to Flip Mirror on page 65 Flip footage horizontally so that it is upside down This setting only affects the monitor and does not affect captured footage FLIP MIRROR NOTE This setting is ONLY availab...

Страница 66: ...overlay template in the Overlay Editor Clone Create a new custom overlay using the selected camera overlay as a template in the Overlay Editor Edit Edit the selected camera overlay in the Overlay Edit...

Страница 67: ...m Label LBL you can only add each element once If you add an element you have already added to the overlay the element moves to the new position PRIORITY The camera can only have one 1 control monitor...

Страница 68: ...h Screen Touchscreen control is locked To unlock tap the screen and follow the on screen instructions Use Small Dialogs on 9 LCD The dialogs on the RED Touch 9 0 LCD are smaller than the default dialo...

Страница 69: ...ame rate in this mode the shutter angle stays the same but the exposure time changes POWER Current Batt Displays the remaining percentage of active battery Default Total Time Displays the total run ti...

Страница 70: ...Live Action Area when rack focus is enabled For more information go to Set Up Rack Focus on page 128 Off Does not display the focus distance of rack points when rack focus is enabled Default GUIDES U...

Страница 71: ...GENERAL TAB Enable Disable and select the location Relative To color and opacity of the following elements Center The center crosshair Grid Rule of thirds grid Shading The shaded region outside of th...

Страница 72: ...rs to match The ISO can later be adjusted around one 1 stop for fine tuning Range is ISO 250 to 12 800 Default is ISO 800 FLUT Floating Point Lookup Table FLUT is an exposure control exclusive to RED...

Страница 73: ...he Video Source drop down menu Graded Select this to choose a color space and graded gamma space Graded ACES Select this to output a graded ACES proxy RLF Select this to output REDLogFilm Then choose...

Страница 74: ...age 183 MANAGE 3D LUTS To manage 3D LUTs go to Menu Settings Display Monitor Control 3D LUTs can be stored on the camera or transferred to SSD so that you can build a library of 3D LUTs or quickly cop...

Страница 75: ...itors go to Monitor Config Monitor Configuration on page 76 FLIP MIRROR Mirror and flip invert the graphical user interface GUI and footage effectively rotating the entire displayed image 180 Use this...

Страница 76: ...nitor NOTE The Curve drop down menu is available if the Video Source is set to RLF or ACES For more information go to Video Source on page 73 COLOR TEMPERATURE Select a color temperature The range is...

Страница 77: ...lso referred to as the capture frame rate The recording frame rate is the number of frames per second FPS that are recorded The recording frame rate is different from the project time base which is th...

Страница 78: ...1 44 3 5K 16 9 HD 134 13 6K 3 2 82 81 3 5K 3 2 116 54 6K 6 5 82 81 3 5K 4 3 103 69 6K 4 1 150 42 3 5K 5 4 97 25 6K 8 1 299 28 3 5K 4 1 287 92 5 5K FF 84 26 3 5K 8 1 400 00 5 5K 2 1 88 15 3K FF 160 27...

Страница 79: ...c format is the same NOTE Frame rates below are based on a 23 98 time base 8 1 compression and Lookaround disabled FORMAT MAX FRAME RATE FPS FORMAT MAX FRAME RATE FPS 6K FF 54 98 3 5K FF 138 94 6K 2 1...

Страница 80: ...FRAME RATES The table below describes the maximum frame rate for each resolution of the following cameras SCARLET W SCARLET W Monochrome The minimum frame rate is always 1 FPS The table below omits r...

Страница 81: ...ncreasing shutter speed decreases the amount of time that light hits the sensor which decreases exposure and motion blur of moving objects The Upper Status Row displays the exposure as either shutter...

Страница 82: ...mecode go to Timecode Genlock Multi Camera Setup on page 156 TIMECODE SOURCE MODE DESCRIPTION User Provided Internal Use Real Time Clock RTC Uses the internal Real Time Clock as the timecode counter s...

Страница 83: ...e For more information go to Anamorphic on page 88 The camera offers a 6 5 aspect ratio for each resolution Using a 6 5 aspect ratio at 2x anamorphic gives you a 2 40 1 aspect ratio RESOLUTION DIMENSI...

Страница 84: ...9 20 12 80 23 08 4K 4 3 3840 2880 19 20 14 40 24 00 4K 5 4 3840 3072 19 20 15 36 24 59 4K 4 1 4096 1024 20 48 5 12 21 11 4K 8 1 4096 512 20 48 2 56 20 64 3 5K FF 3584 1876 17 92 9 38 20 23 3 5K 2 1 35...

Страница 85: ...22 2 5K 3 2 2400 1600 12 00 8 00 14 42 2 5K 4 3 2400 1800 12 00 9 00 15 00 2 5K 5 4 2400 1920 12 00 9 60 15 37 2 5K 4 1 2560 640 12 80 3 20 13 19 2 5K 8 1 2560 320 12 80 1 60 12 90 2K FF 2048 1080 10...

Страница 86: ...5 60 10 80 27 78 5K 16 9 HD 4800 2700 24 00 13 50 27 54 5K 6 5 3240 2700 16 20 13 50 21 09 5K 4 1 5120 1280 25 60 6 40 26 39 5K 8 1 5120 640 25 60 3 20 25 80 4 5K FF 4608 2412 23 04 12 06 26 01 4 5K 2...

Страница 87: ...10 80 18 00 3K 5 4 2880 2304 14 40 11 52 18 44 3K 4 1 3072 768 15 36 3 84 15 83 3K 8 1 3072 384 15 36 1 92 15 48 2 5K FF 2560 1340 12 80 6 70 14 45 2 5K 2 1 2560 1280 12 80 6 40 14 31 2 5K 2 41 1 WS...

Страница 88: ...ZED ASPECT RATIO When you enable anamorphic both the actual format and the de squeezed format display at the bottom of the Format menu When anamorphic is enabled the camera does not crop the sensor im...

Страница 89: ...ound limits the available frame rates At high resolutions the recording area on the display shows the full sensor area or full sensor height so there is no extra room for Lookaround SENSOR FLIP MIRROR...

Страница 90: ...imelapse Timer mode In Internal Timelapse Timer mode the camera records a specified number of frames at a specified interval The current recording frame rate determines the timing of the frames per pu...

Страница 91: ...tional 4 Select a Pre Count and Post Count For more information go to Pre Count and Post Count on page 93 5 Close the menu 6 Start recording The overlay displays the number of frames recorded out of t...

Страница 92: ...you have mapped to start the speed ramp The frame rate transitions to the target frame rate during the duration you set up NOTE If using speed ramp mode select an exposure that is valid for each ramp...

Страница 93: ...ion These restrictions are removed because the camera records first to the camera s memory and then offloads while recording to SSD after the camera s buffer fills up Since the camera records only as...

Страница 94: ...mode follow the instructions below 1 Set the camera to Stills mode 2 Go to Menu Settings Recording Mode 3 Select Multi Shot from the Mode drop down menu 4 Use the Limit Recording to fields to set the...

Страница 95: ...s only available On WEAPON 6K Carbon Fiber When recording to QuickTime only When recording to the following codecs Apple ProRes 422 Apple ProRes 422 HQ Apple ProRes 422 LT If HDRx is enabled only the...

Страница 96: ...I MAG RDM Folder RDC Folder mov R3D rtn RED Thumbnail file NOTE The camera creates mulitple mov files similar to how the camera creates multiple R3D files When recording QuickTime only this is the fil...

Страница 97: ...t displays in the Lower Status Row 4 REDCODE RAW Select a target REDCODE compression ratio from the REDCODE menu For more information go to REDCODE on page 53 5 QuickTime Select a resolution from the...

Страница 98: ...image that is brighter and possibly blurrier than any of the original frames so you can use frame summing to achieve the effect of long exposure FRAME AVERAGING Frame Averaging combines the specified...

Страница 99: ...the drop down menu 4 If you want map a Release or CW action to the key A Release action occurs when a pressed key is released OPTIONS Lock Side Module keys None of the module keys perform any actions...

Страница 100: ...Set CAM_A_L to 1 48 exposure to a group of cameras Example Set 3DRIG_A to 48 FPS or to all cameras Example Start Recording on all cameras CAMERA NAME Use the Camera menu to set up a unique identifier...

Страница 101: ...o configure the GIG E port Each camera or device requires a unique IP address For camera to camera communication via Ethernet both cameras need to be in the same sub net have the same netmask address...

Страница 102: ...int and communicate through that wireless network NOTE To connect the camera to an app the app must have been programmed using the REDLINK SDK which is available through the REDLINK Development Kit NO...

Страница 103: ...will be required to access the network 7 Close the WiFi screen 8 Connect your device to the ad hoc network created by the camera The steps in this procedure depend on what type of device and operating...

Страница 104: ...2 Make sure that you know the name and password for the network since you will need that information to connect the camera to the same network 3 Go to Menu Settings Setup Communication 4 Select the Wi...

Страница 105: ...of the access point displays at the bottom of the WiFi screen after the camera connects to the access point 10 Connect your device to the same wireless network that the camera is connected to The step...

Страница 106: ...a genlock input BRAIN Default Rear Module BRAIN GPIO NOTE Using general purpose inputs outputs requires a DSMC2 expander For more information go to Input Output Connectors on page 198 GPI Function Ca...

Страница 107: ...s guides for proper temperature calibration NOTE Maximum speeds are intended as target speeds only actual fan speeds may be higher at times due to long recording times or high ambient temperatures ADA...

Страница 108: ...the lens mount This feature is enabled by default but the camera saves the last selected setting Deselect when using a Fujinon T2 9 Cabrio Premier PL lens If you disable this feature for the Fujinon C...

Страница 109: ...image quality by ensuring that pixel sensitivity remains consistent throughout the sensor Black shading generates a calibration map based on system and environment settings After calibration the senso...

Страница 110: ...ss takes several minutes To perform a Manual Capture follow the instructions below 1 Ensure that the camera reaches the temperature you want to use for your shoot 2 Set the exposure to the exposure yo...

Страница 111: ...a properly formatted SSD is attached to the camera 4 Go to Menu Settings Maintenance Calibrate Sensor Auto Capture 5 Select Start Auto User Black Shade A dialog box displays reminding you to cover the...

Страница 112: ...overlay to function properly The Gyro Acc calibration file is stored in the flash memory of the camera so you DO NOT need to recalibrate after restoring the camera or upgrading firmware For more info...

Страница 113: ...ated 6 To calibrate the next focal length follow the instructions below A Go to Menu Settings Maintenance Calibrate Lens B Select the calibration file name in the Camera list and select Edit C Manuall...

Страница 114: ...selected file Create Create a new file This option is disabled if you already have a calibration file for the attached lens Prompt for calibration of unsupported lenses Select this check box to ensure...

Страница 115: ...all blue Press and hold the touchscreen Press the Enter or Menu button on the DSMC2 Sidekick RESTORE SYSTEM Restore System changes all settings to the factory default values To perform a Restore Syst...

Страница 116: ...amera and project settings CAMERA INFO Displays the following camera information Type Camera type and sensor type Firmware Version Current firmware version PIN The personal identification number that...

Страница 117: ...e and adjusts the color scienced based on the selected OLPF To view your OLPF type go to Menu Settings Maintenance OLPF The OLPF that is installed in your camera displays in the Type field The MEDIA M...

Страница 118: ...of Apple ProRes files PLAYBACK MENUS In Playback mode the menu is pared down so you cannot access all menus Some menus offer different options MEDIA Lists all available clips on the attached SSD You c...

Страница 119: ...LET W COPYRIGHT 2016 RED COM INC 955 0116_V6 1 REV U 119 PLAYBACK STATUS BAR Displays the progress of the clip during playback When using the touchscreen swipe your finger right and left to fast forwa...

Страница 120: ...IGHT 2016 RED COM INC RED DSMC OPERATION GUIDE WEAPON SCARLET W 955 0116_V6 1 REV U 120 PLAYBACK CONTROLS 1 2 3 4 5 6 7 8 13 9 10 11 12 14 15 17 18 16 Playback Controls Playback Controls Playback Cont...

Страница 121: ...field 12 Playback Speed Option to select x1 x2 x4 x8 or x16 playback speed 13 Marker Options Displays the following subset of options In Point Remove In Out Point Out Point Previous Marker and Next Ma...

Страница 122: ...FAULT A short or overcurrent tripped the electronic fuse Remove the device that is connected to the module as it may be drawing too much power Select RESET to clear the fault POWER SAVE You can select...

Страница 123: ...efault HDRX is disabled and the HDRX indicator in the Lower Status Row is grey To enable HDRX follow the instructions below 1 Go to Menu HDRX 2 Select HDRX The HDRX text in the Lower Status Row turns...

Страница 124: ...e drop down menu Manual When selected all focus operations are manual Confirm Enables the Center or Spot focus target This mode provides additional focus assistance by using red yellow and green color...

Страница 125: ...o Rack Focus on page 128 In Single Continuous and Touch Track modes a single target displays on the screen that indicates where the image will be in focus In Rack mode multiple targets display on the...

Страница 126: ...e monitor dedicated to using the Enhanced A F feature from the Monitor drop down menu BRAIN HDMI BRAIN HD SDI The selected monitor is in Clean mode no overlay with a set resolution of 720p and update...

Страница 127: ...N GUIDE WEAPON SCARLET W COPYRIGHT 2016 RED COM INC 955 0116_V6 1 REV U 127 8 Close the Focus menu The target displays on the touchscreen and the monitor that you selected for the Enhanced A F feature...

Страница 128: ...to Menu Focus Mode 3 Select Rack from the Mode drop down menu Spot is automatically selected from the Zone drop down menu since rack focus only works with Spot zone 4 Select a size from the Size drop...

Страница 129: ...it to be NOTE To view the focus distance for each rack point on the main screen go to Menu Settings Display Modes and enable Rack Show Distance mode For more information go to Lens Tab on page 70 10 S...

Страница 130: ...determine when the AE tools go into effect Off The AE tools are not enabled Single Shot Map one of the following actions to trigger the AE tools AE Start AE AF Start Continuous in Preview The AE tools...

Страница 131: ...Slow Settings adapt in small steps Use this setting for fewer and gradual adjustments Normal Settings adapt in medium steps Fast Settings adapt in large steps SELECTION The Selection setting determin...

Страница 132: ...s for Startup Preview Motion Stills and Playback You can create custom presets and Looks Presets and Looks can be stored on the camera or transferred to SSD so that you can build a library of presets...

Страница 133: ...et options Display Key Look Project and System 6 Select the following Add selected setting to the preset All Add all settings to the preset X Remove selected setting from the preset 7 Select Create Th...

Страница 134: ...owing actions with imported Looks Export selected Looks from camera to SSD All Export all Looks from camera to SSD Apply Apply the selected Look Delete Delete the selected Look AUTO PRESETS On Startup...

Страница 135: ...ignals are routed via a high quality pre amplifier and soft clip analog limiter the limiter is optional to achieve the desired recording levels and maximize dynamic range Audio data is synchronized wi...

Страница 136: ...NDER CONNECTORS None N A N A N A CAM Internal Ch1 Ch2 Ch3 Ch4 DSMC BRAIN MIC 1 MIC 2 Base Expander Ch1 Ch2 Ch3 Ch4 DSMC2 Base Expander Stereo Microphone NAME You can rename each audio channel The defa...

Страница 137: ...e the Pre Amp pre amplifier sliders up and down to adjust the amplification levels NOTE To link the amplification for each channel select Link HEADPHONE VOLUME The volume range for Left and Right is 6...

Страница 138: ...Headphone Mix Headphones plugged into the camera Audio Out Mix Line out plugged into an expander The input gain is fixed Monitor Mix External HDMI and HD SDI monitors that support audio AUDIO OUTPUT...

Страница 139: ...76 When recording to an external device use the Output levels to help accurately monitor recorded audio AUDIO METER LEVELS The camera updates the Audio Meter 12 times per second with the maximum sign...

Страница 140: ...etadata and in HANC metadata provided by the HD SDI monitor output The camera can generate timecode on its own or can receive and sync to timecode generated by an external source Timecode displays in...

Страница 141: ...ons below 1 Go to Menu Settings Project Timecode 2 Select the desired Timecode Display mode 3 Set Source to User Provided 4 Use the additional controls to sync TOD timecode with the RTC or set manuall...

Страница 142: ...mation go to Input Output Connectors on page 198 1 Connect the external timecode generator to the camera using a 3BNC to 00 LEMO Sync Cable A Connect the yellow BNC connector to the output on the time...

Страница 143: ...rovided that is compatible with the current monitor output frequency Monitor Sync is achievable even if the camera is using another form of synchronization to sync the camera sensor 1 Connect the desi...

Страница 144: ...Settings Project Frame Rate NOTE HDRx is not available when Genlock Sensor Sync is enabled To set up and enable Sensor Sync Mode follow the instructions below 1 Connect the desired genlock device to...

Страница 145: ...t two times 2x the fastest trigger rate used When using MoCo REDCODE is calculated based on FPS 2 Therefore if you are in MoCo mode and the frame rate is 100 83 FPS the maximum REDCODE is calculated b...

Страница 146: ...c Out from the GPO Function drop down menu Optional Supply a pulse from the Motion Control device to sync the shutter to the rising edge of the sync input For more information refer to the manufacture...

Страница 147: ...nt ACC 501 Clockit Controller Ambient ACD 301 Lockit Slate Denecke SB 3 Syncbox Time Code Generator Sound Devices 788T Sound Devices 744 Sound Devices PIX 240 Zaxcom Nomad 12 Zaxcom ZFR100 Zaxcom ZFR2...

Страница 148: ...ra and format the SSD B Go to Menu Presets and copy user generated Camera Preset and Look files to the SSD C Go to Menu Settings Display Monitor Control and copy user generated Overlay files to the SS...

Страница 149: ...es to display until it is accepted 13 Go to Menu Settings Maintenance System Status Camera Info and verify that the firmware version listed matches the firmware version that you downloaded 14 To resto...

Страница 150: ...rranties WARNING Use caution with compressed air and gas dusters since the high pressure oily residue cold air particulates and moisture may cause damage You may use a filtered non residue gas duster...

Страница 151: ...en tested on RED products and may cause damage or streaking Compressed air Gas dusters Solvents Rubbing alcohol Isopropyl alcohol Windex Third party cleaning kits Pre packaged lens cleaner containing...

Страница 152: ...creen in a RED Microfiber bag Storing devices in a RED Microfiber bag preserves the superior quality of the specialized AR and AS coatings on the LCDs Hand wash and air dry the RED Microfiber bag regu...

Страница 153: ...est available frame rate 6 Perform a secure format of the SSD 7 Record a full SSD of footage 8 Perform a secure format of the SSD 9 Repeat step 6 to step 8 to test multiple SSDs 10 If any errors occur...

Страница 154: ...ps support red com PRESET COULD NOT BE APPLIED SYMPTOM The display shows the following message Preset Could Not Be Applied POTENTIAL RESOLUTION Turn off the camera power it back up and attempt to appl...

Страница 155: ...L RESOLUTIONS Ensure that your lens is completely locked in place Remove your lens mount Check the connection points for damage or debris Install your lens mount Perform a Hardware Rediscover For more...

Страница 156: ...irmware to the SSD B On the SSD create a new folder and name it force_preset C Download the DSMC Toolkit from www red com downloads D Open the Preset_Files folder E Open the folder that corresponds to...

Страница 157: ...nut using a pair of heavy duty strong point tweezers WARNING DO NOT OVERTIGHTEN OPTIONAL Add a small amount of Loctite 222 low strength thread locker to the threads of the DC IN connector nut to preve...

Страница 158: ...tive fan mode to regulate the camera temperature Noise occurs when the temperature from the applied calibration map is not in sync BLACK AND WHITE IMAGE SYMPTOM The display shows that an image is in b...

Страница 159: ...e RED MINI MAG is fully inserted in the media bay Perform a system restore Reformat the RED MINI MAG on the computer For more information see the DSMC Media Operation Guide at www red com downloads Re...

Страница 160: ...to Swap an Interchangeable OLPF on page 42 Install a different OLPF If your camera still does not recognize the OLPF please submit a Technical Support request at https support red com CAMERA KEEPS PRO...

Страница 161: ...REV U 161 AUDIO BUFFER OVERFLOW WARNING SYMPTOM When you press the Record key the error message Audio Buffer Overflow Warning displays POTENTIAL RESOLUTIONS Perform a Secure Format of the SSD For more...

Страница 162: ...the maximum available REDCODE values see the DSMC Media Operation Guide at www red com downloads REDCODE RAW Acquisition Formats Go to WEAPON Formats on page 83 for a full list Apple ProRes Apple ProR...

Страница 163: ...SMPTE Timecode HANC Metadata 24 bit 48 kHz Audio Monitor Options DSMC2 RED Touch 7 0 LCD DSMC2 RED Touch 4 7 LCD and DSMC2 RED EVF OLED with cable free connection RED Touch 9 0 LCD RED Touch 5 0 LCD...

Страница 164: ...up to 2K 2048 x 1080 and up to 120 FPS Apple ProRes 4444 up to 2K 2048 x 1080 and up to 120 FPS Apple ProRes 422 HQ up to 2K 2048 x 1080 and up to 120 FPS Apple ProRes 422 up to 2K 2048 x 1080 and up...

Страница 165: ...de at www red com downloads 2 Third party non linear editing NLE applications may have limited compatibility with R3D files SCARLET W 5K SCARLET W 5K TECHNICAL SPECIFICATIONS SPECIFICATION DESCRIPTION...

Страница 166: ...NC Metadata 24 bit 48 kHz Audio Monitor Options DSMC2 RED Touch 7 0 LCD DSMC2 RED Touch 4 7 LCD and DSMC2 RED EVF OLED with cable free connection RED Touch 9 0 LCD RED Touch 5 0 LCD RED PRO 7 LCD RED...

Страница 167: ...M INC 955 0116_V6 1 REV U 167 WEAPON SCARLET W BRAIN DIMENSIONS NOTE Dimensions are shown in mm The optical axis height of the camera is 95 90 mm WEAPON and SCARLET W have identical BRAIN dimensions T...

Страница 168: ...COPYRIGHT 2016 RED COM INC RED DSMC OPERATION GUIDE WEAPON SCARLET W 955 0116_V6 1 REV U 168 BACK VIEW...

Страница 169: ...RED DSMC OPERATION GUIDE WEAPON SCARLET W COPYRIGHT 2016 RED COM INC 955 0116_V6 1 REV U 169 SIDE VIEW RIGHT...

Страница 170: ...COPYRIGHT 2016 RED COM INC RED DSMC OPERATION GUIDE WEAPON SCARLET W 955 0116_V6 1 REV U 170 SIDE VIEW LEFT...

Страница 171: ...RED DSMC OPERATION GUIDE WEAPON SCARLET W COPYRIGHT 2016 RED COM INC 955 0116_V6 1 REV U 171 TOP VIEW...

Страница 172: ...COPYRIGHT 2016 RED COM INC RED DSMC OPERATION GUIDE WEAPON SCARLET W 955 0116_V6 1 REV U 172 BOTTOM VIEW...

Страница 173: ...lowing expanders DSMC2 Base Expander DSMC2 Base I O V Lock Expander DSMC2 REDVOLT Expander DSMC2 Jetpack Expander NOTE When connecting a cable to a connector align the key and red marker on the cable...

Страница 174: ...ne 3 5mm stereo Stereo Microphone on page 183 2 Headphone Jack 3 5mm stereo Headphone on page 183 3 SYNC 4 pin 00B LEMO SYNC Video Sync In with SYNC Trigger Button Circuit on page 180 4 CTRL 4 pin 00B...

Страница 175: ...e 3 5mm stereo Stereo Microphone on page 183 3 Headphone Jack 3 5mm stereo Headphone on page 183 4 USB Power USB 2 0 Type A power only USB Power on page 185 5 SYNC 4 pin 00B LEMO SYNC Video Sync In wi...

Страница 176: ...shed 1 2 3 4 5 6 8 7 11 13 9 12 10 CONNECTOR CONNECTOR TYPE 1 AUX PWR 4 pin 0B LEMO 2 SDI 1 and 2 BNC 3 HDMI HDMI 1 2 Type A 4 CTRL 4 pin 00B LEMO 5 GIG E 9 pin 0B LEMO 6 DC IN 6 pin 1B LEMO 7 GENLOCK...

Страница 177: ...NNECTOR CONNECTOR TYPE FOR MORE INFORMATION GO TO 1 CTRL 4 pin 00B LEMO CTRL RS232 Control on page 182 2 HDMI HDMI 1 2 Type A HDMI Out on page 179 3 DC IN 6 pin 1B LEMO DC IN Power Input on page 184 4...

Страница 178: ...D2 FREQUENCY HZ 3 SMPTE STANDARD 720p 23 98 24 00 25 00 29 97 30 00 50 00 59 94 SMPTE ST 292 1 1 485 Gbps 1080p 10 bit 4 2 2 23 98 24 00 25 00 29 97 30 00 SMPTE ST 292 1 485 Gbps 1080p 10 bit 4 2 2 50...

Страница 179: ...ect a frequency supported by your monitor 2 The HDMI output is progressive scan p it does not support progressive segmented frame PsF or interlaced i scan formats COMPATIBLE CABLE 790 0331 RED HDMI Ca...

Страница 180: ...r 5 V tolerant The trigger is not a switch closure circuit so it requires that the trigger source supplies current Both edges of the input signal may be used as a trigger NOTE The SYNC trigger button...

Страница 181: ...EMO SYNC connector accepts timecode genlock and General Purpose Input GPI signals 1 2 4 3 4 PIN 00B LEMO SYNC CONNECTOR PIN SIGNAL DESCRIPTION DIRECTION 1 GROUND Common ground N A 2 GPI General purpos...

Страница 182: ...n pins 1 and 3 When used as a record tally the rising edge of the pulse indicates start of record falling edge represents end of record For more information about controlling the camera via RS232 down...

Страница 183: ...HONE JACK PIN SIGNAL DESCRIPTION DIRECTION TIP LEFT Left channel audio In RING RIGHT Right channel audio In SLEEVE GND Camera ground N A HEADPHONE The following expanders feature a headphone jack DSMC...

Страница 184: ...cable that wires only one 1 pair of VBATT and GROUND pins may damage the power supply or the camera Damage to the power supply or other components of the camera system caused by using an inappropriat...

Страница 185: ...es 5 V of power The maximum sustained current draw is 1 5A You can use the USB power out connector to provide power to an attached HDMI wireless transmitter NOTE The USB connector only offers power ou...

Страница 186: ...d IR filter for improved image color and contrast For more information see the MOTION MOUNT Operation Guide available at www red com downloads NOTE HDRx is not available while the MOTION MOUNT is inst...

Страница 187: ...m lens mount screws in a cross pattern X pattern using a T20 TORX driver NOTE The DSMC Mg PL Mount 2 0 has captive screws that are not removable from the mount NOTE Screw removal may require a large h...

Страница 188: ...kwise so that you can acess the lens mount screws 5 Replace and loosely tighten the four 4 M4x0 7 x 8 mm lens mount screws in a cross pattern X pattern using a T20 TORX driver WARNING DO NOT FULLY TIG...

Страница 189: ...ystem for all but the lightest lenses WARNING Failure to use lens supports appropriate for the lens and camera setup may lead to damage of the camera and lens mount Any damage caused by not using a le...

Страница 190: ...e LDS i Select switch to Off 4 Connect an external power source to the lens 5 Go to Menu Settings Setup Lens 6 Deselect the Enable Power to Lens check box NOTE This option is only available when a cam...

Страница 191: ...SM Canon EF 24 70mm f 4L IS USM Canon EF 24 105mm f 4L IS Canon EF 28mm f 1 8 USM Canon EF 28mm f 2 8 Canon EF 28mm f 2 8 IS USM Canon EF 28 105mm f3 5 II USM Canon EF 28 300mm f 3 5 5 6L IS Canon EF...

Страница 192: ...ender Canon EF 400mm f 2 8L IS with 2x Extender Canon EF 400mm f 4 0 DO IS Canon EF 400mm f 5 6L Canon EF 500mm f 4L IS Canon EF 500mm f 4L IS USM Canon EF 500mm f 4L IS with 1 4x Extender Canon EF 50...

Страница 193: ...For more information refer to the original manufacturer s instructions This section also lists lenses supported by the DSMC Nikon F Mount WARNING ALWAYS protect your equipment when it is not in use b...

Страница 194: ...f 2 8G DX AF S Nikkor 50mm f 1 4 G AF S Nikkor 70 200mm f 2 8G ED VR II AF S Nikkor 85mm f 1 4 G AF S Nikkor 200 400mm f 4G VR II AF S Nikkor 600mm f 4G ED VR N AF S Micro Nikkor 60mm f 2 8 G ED AF S...

Страница 195: ...the locking ring clockwise to secure the lens in place DETACH LEICA M LENSES 1 Rotate the locking ring counter clockwise to release the Leica M lens 2 Remove the Leica M lens from the DSMC AL Leica M...

Страница 196: ...e User 2 Press Exposure Check Toggle User 1 2 Press LCD Toggle Lock EVF Primary and Secondary User 1 Press Magnify Toggle User 2 Press Exposure Check Toggle DSMC2 Sidekick User A Press AF Mode Cycle U...

Страница 197: ...ATION GUIDE WEAPON SCARLET W COPYRIGHT 2016 RED COM INC 955 0116_V6 1 REV U 197 ITEM KEY FUNCTION DSMC2 Outrigger Handle Record Full Press Record Toggle Multi Shot Start Record Full Release Record Mul...

Страница 198: ...EAPON SCARLET W 955 0116_V6 1 REV U 198 See the menu map on the following page The menu map is applicable to the following cameras except as noted throughout this guide WEAPON 6K Carbon Fiber WEAPON 6...

Страница 199: ...tter Angle Timecode Timecode Display Mode Source Slate Scene Camera Project Auto Slate Format Format Anamorphic UHD Sensor Flip Mirror Scan Direction PROJECT Control Channel 1 2 Channel 3 4 Pre Amp Ga...

Страница 200: ...All trademarks trade names logos icons images written material code and product names used in association with the accompanying product are the copyrights trademarks or other intellectual property ow...

Отзывы: