36
for further information consult our website
www.raleigh.co.uk •
for video support & download
bmX bikEs
BMXs are designed for maximum bike control at slow speeds. The frames are
built for strength rather than speed and the basic design does not vary a lot,
although there are various styles of riding. Only one size of frame is normally
available, though the saddle adjusts up and down to cater for riders of
varying height.
Some BMX riding styles and practices place an extraordinary load on the
frame and mechanical parts. Riders should therefore read the guarantee on
page 51, which covers normal off road riding only.
There is only one gear on these bikes, so the best way to change the gearing
is to fit a larger or smaller sprocket. However, basic BMXs use a one piece
chainset, so you can’t change the gearing anyway. Higher up the range,
they’re similar to a normal cotterless chainset and it is possible to alter the
gearing.
Maybe the hardest part of a BMX to understand is the braking system. Most
BMXs are fitted with compact U brakes front and back. However, many tricks
involve spinning the handlebars, which would be impossible without a
special device called a Gyro or an Oryg. This features a back brake cable that
splits into two near the brake lever. The cable adjusters screw into a loose
plate at the top of the headset with the nipples located in the middle plate.
A second pair of cables connects to the middle and lower plates but join into
one again before reaching the back brake. When you spin the handlebars,
the stem and headset revolve but the cable mounting plates stay still.
It nearly always requires a fair bit of trial and error to get the brake cable
adjustment right. So if you have trouble, consult your retailer. He will also be
able to supply a replacement for the special rear cable.
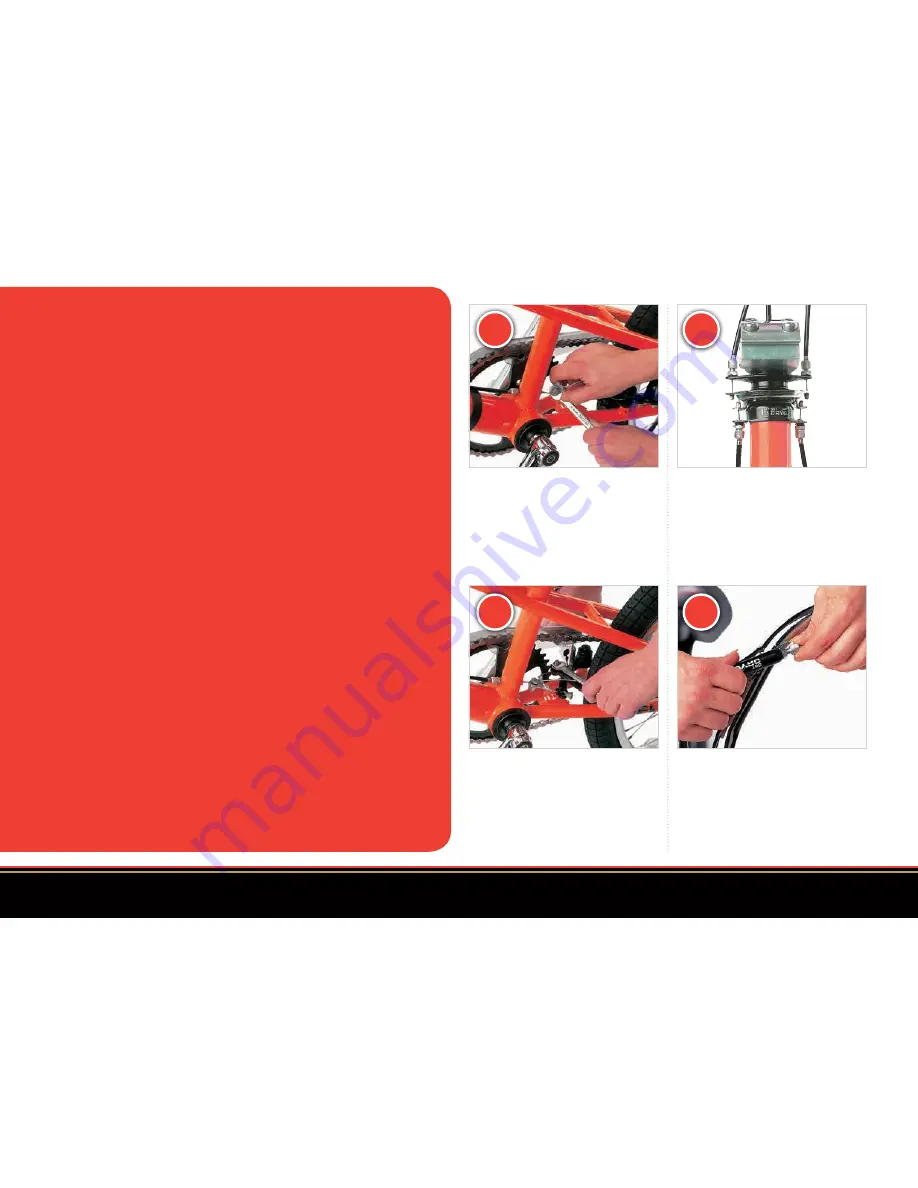
Now check the cable assembly just
below the handlebars. Make sure that
the middle plates are free to move.
Adjust the brake cables so that both
moving plates are an equal distance
apart at their ends and level with the
ground.
Test the tension on the top section of the
rear brake cables. If they’re slack, increase
the tension using the cable adjuster near
the brake lever. Then test the back brake,
tightening the cable using the adjuster
on the frame if necessary.
When setting up the back brakes, screw
the adjuster in as far as possible. Then
loosen off the straddle wire yoke and
position it about half an inch from the
frame and retighten, The idea is to allow
the longest possible straddle wire.
Release one end of the straddle wire
and run it round the yoke. If it won’t
reach, fit a new straddle cable and
repeat. Refit the straddle cable to
the brake arm, tension the straddle
wire with pliers and then tighten the
clamp bolt.
1
2
3
4


