background image

      Performing the MCU Initial Configuration | 41

RADVISION | Installation Guide for SCOPIA Elite 5100 Series MCU Version 7.7


Dual-NIC functionality requires two subnets, where each subnet must have its own router or 
default gateway. 

Procedure

Step 1

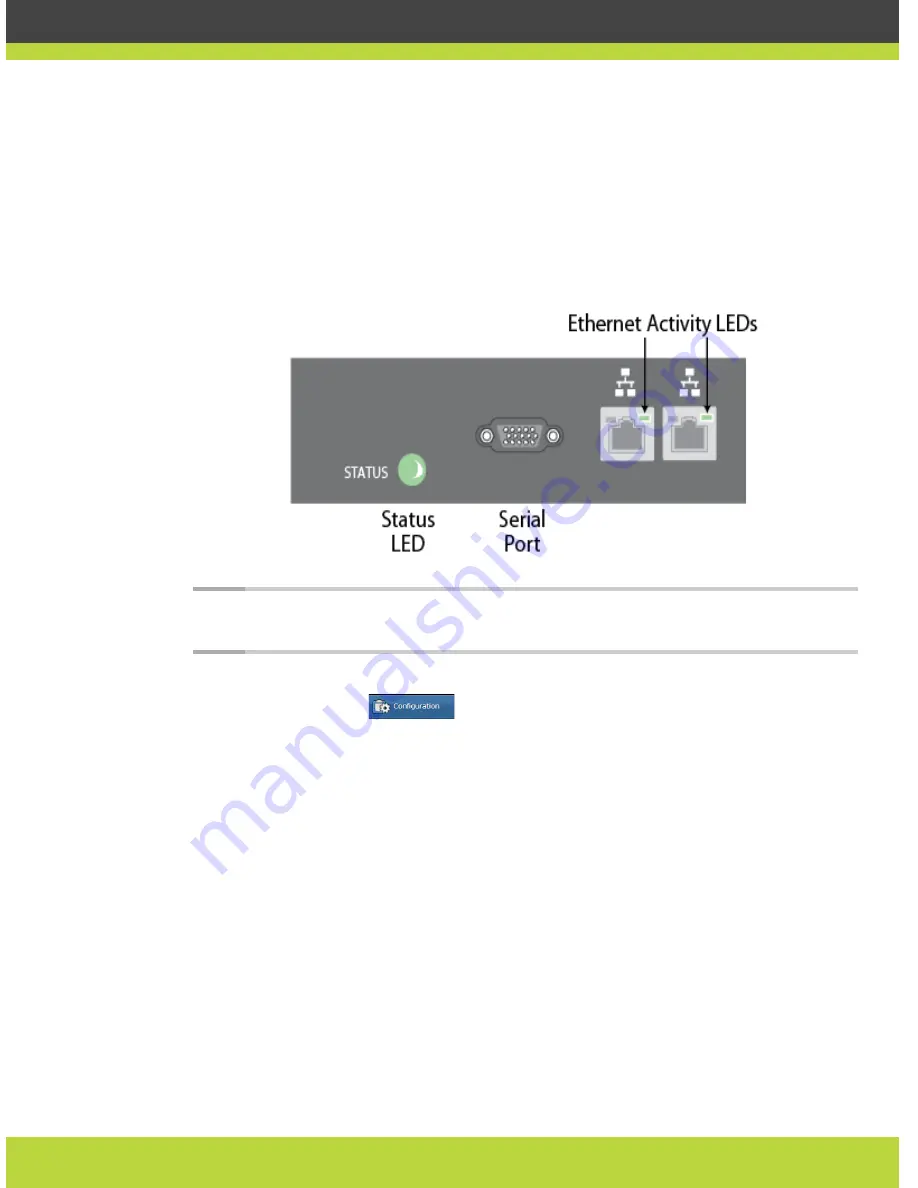
Connect the network cable of the management subnet to the left ethernet port only, and activate 
the unit. 

Figure 5-11  

Two Ethernet connectors of the SCOPIA Elite MCU

Note:

Do not connect the media subnet cable until the MCU has been reset at the end of this 

procedure.

Step 2

Access the MCU in a web browser and login.

Step 3

Select the Configuration  

tab.

Содержание Scopia Elite 5100 Series

Страница 1: ...SCOPIA Elite 5100 Series MCU Version 7 7 Installation Guide ...

Страница 2: ...n this guide is made either by RADVISION Ltd or its agents RADVISION Ltd reserves the right to revise this publication and make changes without obligation to notify any person of such revisions or changes RADVISION Ltd may make improvements or changes in the product s and or the program s described in this documentation at any time If there is any software on removable media described in this publ...

Страница 3: ... Centralized Topology for MCU 7 Ports to Open for the SCOPIA Elite 5100 Series MCU 10 3 Preparing the MCU Setup Checking Site Suitability 13 Unpacking the Device 14 Inspecting for Damage 15 4 Setting up the MCU Verifying Rack Suitability 17 Choosing the Type of Rack 17 Making Space for the MCU 17 Complying with MCU Lifting Guidelines 19 Mounting the MCU onto the Rack Using a Shelf 19 Locating a Sh...

Страница 4: ...the MCU User Interface Language 34 Setting a Text Overlay Language 35 Configuring Protocols for the MCU 36 Configuring H 323 Protocol Settings 36 Configuring SIP Server Settings 37 Configuring a Dual NIC MCU 40 Configuring Ports on All Models of the SCOPIA Elite MCU 43 Limiting the UDP Port Ranges for RTP RTCP on the SCOPIA Elite MCU 43 Configuring the TCP Port Range for H 245 on the SCOPIA Elite ...

Страница 5: ...ultiple endpoints both H 323 and SIP It includes many powerful features including Video processing Video and audio processing is carried out per user rather than per conference Each user connects using unique optimized audio and video settings to enjoy the best audio and video quality supported by their endpoint and network without affecting the other participants in a conference Seamless interope...

Страница 6: ...sed content sharing The MCU supports sharing presentations and other content via SIP using the BFCP standard and H 323 using the H 239 standard A user can connect to a meeting from a SIP or H 323 endpoint to share content such as presentations spreadsheets documents and movies Video quality The MCU delivers high quality video and audio processing using latest industry standards and upgradeable DSP...

Страница 7: ...nce control and administrative flexibility for an enhanced user experience Unlimited number of conferences The number of supported conferences depends on the number of ports provided by your license The SCOPIA Elite MCU supports a dynamic port capacity that enables extra calls to be connected even after maximum call capacity is reached By downspeeding existing 1080p calls to 720p the MCU can accep...

Страница 8: ... announcements Note If your MCU deployment includes iVIEW Management Suite use the IVR from your iVIEW Management Suite Video switching The MCU supports the switching of HD resolutions 720p and 1080p at the capacity of up to 120 calls depending on the video resolution and call bitrate Video switching is available for H 264 and H 261 video codecs When using switched video all endpoints in the confe...

Страница 9: ...ion DC 335W 50 C AC 392VA 50 C Heat dissipation BTU Hr 50 C 1445 BTU Hr 50 C Grounding and electrostatic discharge External 4mm grounding stud per TUV requirement Environmental requirements Operating temperature 0 C to 45 C 32 F to 113 F Humidity 5 to 90 non condensing Storage and transit temperature 25 C to 70 C 13 F to 158 F ambient Acoustics 56dBA Physical dimensions Size 448mm 17 6 width x 133...

Страница 10: ...eased Capacity license option resolutions of 720p and lower use 1 port and resolutions of 1080p use 2 ports Note By default all conferences are in Continuous Presence mode which supports different layouts and endpoints with various resolutions To increase your call capacity you can configure your conference for video switching see the Configuring the Conference Mode section in the Administrator Gu...

Страница 11: ...lized Topology for MCU When your organization has more than one site like a headquarters and several branches RADVISION offers a unique method of cutting video bandwidth costs Administrators can choose whether to place all MCUs centrally in the headquarters Figure 2 1 on page 8 or they can opt for a distributed deployment where multiple MCUs are spread over multiple sites Figure 2 2 on page 9 Cent...

Страница 12: ...d conferences where local participants connect to their local MCU and the conference is cascaded by connecting between the MCUs using a fraction of the bandwidth compared to the centralized deployment Users of distributed MCU deployments do not need to choose a specific MCU The powerful functionality of virtual rooms enables you to dial the same number anywhere in the world while the SCOPIA Soluti...

Страница 13: ...that might influence when the system chooses to cascade to a different MCU For example if the maximum bandwidth threshold is breached the system would attempt cascading with a different MCU The priorities of cascading can be customized in a number of ways Default to using a local MCU first and only cascade conferences if required Prioritize cascading wherever possible to keep bandwidth costs to an...

Страница 14: ...depends on where your SCOPIA Elite MCU and other SCOPIA Solution products are deployed Table 2 1 Bidirectional Ports to Open on the SCOPIA Elite 5100 Series MCU Port Range Protocol Destination Functionality Result of Blocking Port Required 1024 1324 H 245 TCP Any H 323 device Enables H 245 signaling Cannot connect H 323 calls Mandatory To configure see Configuring the TCP Port Range for H 245 on t...

Страница 15: ...nfigure MCU via the XML API Mandatory if deployed with iVIEW Management Suite 5060 SIP TCP UDP Any SIP video network device Enables SIP signaling Cannot connect SIP calls Mandatory if using SIP over TCP UDP To configure see Configuring the TCP UDP TLS Port for SIP on the SCOPIA Elite MCU on page 50 5061 SIP TLS Any SIP video network device Enables secure SIP signaling Cannot connect SIP calls over...

Страница 16: ... Cannot record audio streams Optional 22 SSH TCP SSH Client Enables you to view logs Cannot view logs in real time logs are collected on the compact flash card Optional 80 HTTP TCP Web client Provides access to the MCU Administrator and Conference Control web user interfaces used for software upgrade Cannot configure MCU Mandatory if using HTTP To configure see Configuring the HTTP Port on the SCO...

Страница 17: ...cking the Device page 14 Inspecting for Damage page 15 Checking Site Suitability Prior to installing the MCU you need to verify your site suitability for System power requirements System environmental requirements The device physical dimensions Read the Technical Specifications page 5 to learn about these requirements Ensure to make necessary changes in case you find that the site does not meet an...

Страница 18: ...tuated on top of the device inside the shipping box and can be damaged if the box is placed upside down Pay attention to the This Side Up symbol on the shipping box to handle the box correctly at all times Warning To prevent injury and equipment damage follow lifting guidelines described in the Safety Guide when lifting or moving the shipping box Step 3 Cut the plastic straps Caution The plastic s...

Страница 19: ...cting for Damage After you verify that all of the equipment is included carefully examine the cards power supplies and cables for any damage resulting from shipping If you suspect any damage from shipping contact your local freight carrier for procedures on damage claims If you observe any physical defects in the items you ordered contact RADVISION Technical Support for Return Material Authorizati...

Страница 20: ...k Use a shelf to support the device in the rack Figure 4 1 on page 16 Figure 4 1 Shelf mounted MCU These sections describe how to set up the device Verifying Rack Suitability page 17 Complying with MCU Lifting Guidelines page 19 Mounting the MCU onto the Rack Using a Shelf page 19 Attaching the System Ground page 26 Connecting Cables to the Device page 26 ...

Страница 21: ...ollections eia index htm Notice that the vertical square holes on the rack posts are not spaced equally They form a repeating pattern of two holes close together then one hole separate then two holes close together and so on See Figure 4 2 on page 17 Figure 4 2 Hole distribution on 19 rack Making Space for the MCU When checking for an empty space to setup the device be aware of its physical dimens...

Страница 22: ...ck posts The MCU takes up 3 holes 1U on the posts You need at least 2 additional holes to slide the device into the rack See Figure 4 3 on page 18 Figure 4 3 Height of the MCU in the rack To mount the MCU between two posts the width between the inner sides of the two posts must be at least 17 7 inches 45 cm See Figure 4 4 on page 18 Figure 4 4 Width between inner sides of posts ...

Страница 23: ...is solid and balance the weight of the object between your feet Lift the device slowly never move suddenly or twist your body as you lift Keep your back straight and lift with your legs not your back If you must bend down to lift the device bend at the knees not at the waist to reduce the strain on your lower back muscles Lift the device from the bottom Grasp the underside of the device with both ...

Страница 24: ...se to mount the shelf see the manufacturer s guidelines for mounting a shelf When looking for a location on the rack see Figure 4 5 on page 20 Choose a shelf on a rack with at least 1 73 inches 4 4 cm of empty space above Verify that the shelf you want to use is properly mounted and secured Verify that the shelf can support the device weight See Technical Specifications page 5 Verify a hole is pre...

Страница 25: ...cessories necessary for mounting the device see Figure 4 6 on page 21 2 mounting brackets left and right 4 cage nuts M6 each with its hexagon socket cap screw M6x10 DIN 7984 8 Phillips screws Note Make sure you have a ruler an Allen wrench 4 mm diameter and a screwdriver Nr 1 tip ready to hand before you start the setup Figure 4 6 Accessories required for mounting ...

Страница 26: ...e device front panel faces toward you Step 2 Unscrew the four black Phillips screws on either side of the device See Figure 4 7 on page 22 Figure 4 7 Removing the Phillips screws on the side panel Step 3 Attach the brackets on each side of the device side panel with the Phillips screws See Figure 4 8 on page 22 Use the Phillips screws of the accessories kit as they have the same color as the metal...

Страница 27: ...re you plan to attach them so you can be sure they are level and properly placed Procedure Step 1 From inside the front facing rack post mark the location of the lower device fixing cage nut measured at 0 20 inches 0 5 cm above the shelf See Figure 4 9 on page 23 Figure 4 9 Marking the location of the device fixing cage nut on the rack Step 2 Mark the location of the upper device fixing cage nut m...

Страница 28: ...rks on the rack Procedure Step 1 Rotate the bottom cage nut so that its wings are on the top and bottom sides of the cage nut See Figure 4 9 on page 23 Step 2 Compress the wings From the back side of the post insert first the wide wing then the narrow wing into the marked square hole Release the wings after the nut is in position Mounting the MCU onto the Shelf After you have inserted the cage nut...

Страница 29: ...ep 2 Slide the device onto the shelf until the holes on the device s brackets align with the cage nuts you mounted previously See Figure 4 11 on page 25 Figure 4 11 Sliding the MCU onto the shelf Step 3 Insert the four remaining screws you set aside through the bracket holes into the cage nuts in the rack Using the Allen wrench tighten the screws to secure the device to the front posts See Figure ...

Страница 30: ...tain that suitable grounding is available on the site The MCU grounding stud is located on the rear panel The grounding equipment is user supplied Make sure to use an18 AWG 1 mm2 or larger grounding wire and appropriate grounding lug The length of the grounding wire depends on the MCU location or on the site environment Connecting Cables to the Device Follow the safety guidelines described in the ...

Страница 31: ...e power cable into the AC power connector see Figure 4 13 on page 27 Figure 4 13 Rear panel of the device c Plug in the other end of the power cable into the mains d Power on the device using the On Off switch on the rear side of the device see Figure 4 13 on page 27 Figure 4 14 Device front panel e Turn on the power distribution unit PDU ...

Страница 32: ... using different subnets for media and management Use the left Ethernet connector for management and the right connector for media For more information see the Configuring a Dual NIC MCU section in the Installation Guide for the SCOPIA Elite MCU Step 3 Connect a computer to the device with a serial cable Connect one end to the PC serial port and the other end to the MCU Serial connector This conne...

Страница 33: ...e 34 Setting a Text Overlay Language page 35 Configuring Protocols for the MCU page 36 Configuring a Dual NIC MCU page 40 Configuring Ports on All Models of the SCOPIA Elite MCU page 43 Configuring Security Access Levels for the SCOPIA Elite MCU page 51 Verifying the MCU Installation page 52 Setting the IP Address Use the serial port on the MCU front panel to assign a new IP address to your MCU Yo...

Страница 34: ...n the message Please press Enter to activate this console appears on the screen press Enter within 10 seconds The network configuration Main menu appears Figure 5 1 on page 30 Figure 5 1 Main Menu Caution If you do not press a key before the countdown ends the device continues its initialization and you will need to reboot the device to return to the network configuration Main menu Step 7 Enter N ...

Страница 35: ...he IP address of the router associated with the segment in which the unit will be installed at the Default Router prompt and press Enter Step 14 Press Enter at the Preferred DNS prompt Step 15 Press Enter at the Alternate DNS prompt Step 16 Press Enter at the DNS suffix prompt Step 17 Enter Y Step 18 Enter Q at the prompt and press Enter Step 19 Allow the unit to complete the reboot process A new ...

Страница 36: ...isplayed in the language you selected Step 3 Enter the Administrator user name and password in the appropriate fields and select Go The default global user name is admin The default password is password Note If you try to sign in as an Administrator and another Administrator is currently signed in the MCU signs you in as a Read only user The words Read Only appear at the top of the window and a po...

Страница 37: ...for audio and video calls We recommend starting with this service and modifying it as necessary to suit your needs You can modify existing prefixes to suit your network dialing plan or define new services and add them to the list You must ensure that the service prefix numbers are not identical to the first digits of any of your network endpoint phone numbers or aliases Procedure Step 1 Select Con...

Страница 38: ...ntrol interfaces and a different set of languages for the text overlay Table 5 1 Supported Languages in the MCU Interface Setting the MCU User Interface Language The procedure in this section explains how to set the language of the MCU Administrator interface and the Conference Control interfaceMCU By default the interface language is set to English Note To view Chinese or Japanese fonts properly ...

Страница 39: ...user interface language list Figure 5 3 Basics section of the Setup tab Step 4 Select Apply at the bottom of the Setup tab Setting a Text Overlay Language Perform the procedure in this section to set the language of the text overlay messages The text overlay feature is set to English by default Procedure Step 1 Select Configuration Step 2 Select Customization Step 3 Select the required language Fi...

Страница 40: ...tive calls You do need to reset the MCU to disable support for the H 323 protocol Procedure Step 1 Select Configuration Step 2 Select Protocols Step 3 Locate the H 323 section Figure 5 5 H 323 protocol section of the Protocols tab Step 4 Select H 323 to enable the MCU to operate with the H 323 protocol Step 5 Enter the IP address and port number for the gatekeeper The default port is 1719 Step 6 S...

Страница 41: ...nfigure settings for SIP server profiles which set how the MCU and the registrar interact Depending on connection types supported by the SIP server MCU supports these transport connection types for sending messages to SIP server UDP TCP TLS Procedure Step 1 Select Configuration Step 2 Select Protocols Step 3 Select Enable SIP protocol to enable MCU communication with the SIP server Step 4 Enter th...

Страница 42: ... for example sipserver company com Figure 5 7 SIP Protocol section of the Protocols tab The communication port number of the SIP server address The default port is 5060 The transport connection type The default is UDP Figure 5 8 Type list Note The Locate automatically option works only if you have configured a valid IP address at Configuration Setup Network DNS server1 or DNS server2 Step 6 To ins...

Страница 43: ...ng to the type supported by the SIP registrar The default is UDP Step 7 Select More The Local signaling port section is displayed Figure 5 9 Local signaling port section Step 8 Enter the number of the signaling port on which the MCU communicates with the SIP server The default is 5060 Step 9 Select Use proxy digest authentication to enable MCU authentication with a SIP server using user name and p...

Страница 44: ...opens c Locate the Status Map section This section is a graphic representation of the MCU chassis Figure 5 10 The Status Map section showing the SIP Server connection d Verify that the MCU is connected to the Ethernet e If you registered the MCU with SIP registrar verify that the MCU is connected to the SIP Server Configuring a Dual NIC MCU The MCU can be configured to work as a dual NIC device im...

Страница 45: ...own router or default gateway Procedure Step 1 Connect the network cable of the management subnet to the left ethernet port only and activate the unit Figure 5 11 Two Ethernet connectors of the SCOPIA Elite MCU Note Do not connect the media subnet cable until the MCU has been reset at the end of this procedure Step 2 Access the MCU in a web browser and login Step 3 Select the Configuration tab ...

Страница 46: ... router you must use the MCU s VLAN functionality to send both media and management data to the same router It will then route the media and management data to different virtual subnets or VLANs For more information on VLAN functionality see the online help Step 6 Enter the IP information for the media and signaling subnet in the Media and Signaling Interface section Step 7 Select Apply at the bot...

Страница 47: ...guring the TCP UDP TLS Port for SIP on the SCOPIA Elite MCU page 50 Limiting the UDP Port Ranges for RTP RTCP on the SCOPIA Elite MCU The SCOPIA Elite MCU 5000 Series has designated UDP ports 12000 13200 for video and 16384 16984 for audio for RTP RTCP To provide additional security for your firewall you can limit these ranges Every call uses two audio ports and six video ports For highly utilized...

Страница 48: ...ld c Select Execute Step 4 Select Close Configuring the TCP Port Range for H 245 on the SCOPIA Elite MCU The SCOPIA Elite MCU 5000 Series has designated TCP ports 1024 1324 for H 245 You can set the base port which is the lower end of the port range H 245 is a Control Protocol used for multimedia communication that enables transferring information about the device capabilities as well as opening c...

Страница 49: ...ue select Execute Step 3 Modify the port value in the Value field Step 4 Select Execute Step 5 Select Close Configuring the HTTP Port on the SCOPIA Elite MCU The SCOPIA Elite MCU 5000 Series has designated port 80 for HTTP You can configure a different port to use HTTP if necessary in your environment Procedure Step 1 Navigate to the MCU Advanced Commands section by doing the following a Select th...

Страница 50: ...value in the Value field Step 4 Select Execute Note After selecting Execute a warning message appears notifying you that the unit will be reset and any active conferences will be disconnected Step 5 Select Yes to continue Step 6 Select Close Note After applying the new port value you must enter it as a suffix to the MCU IP address in order to access the web server For example if your new HTTP port...

Страница 51: ...ort for the Gatekeeper on the SCOPIA Elite MCU on page 48 Note If you close port 1719 you must configure another port for both RAS and the gatekeeper If you configure a different port for RAS you do not need to configure a different port for the gatekeeper Procedure Step 1 Navigate to the MCU Advanced Commands section by doing the following a Select the icon b Select Advanced parameters c Locate t...

Страница 52: ...ot need to configure a different port for RAS Procedure Step 1 Navigate to the MCU H 323 Protocol section by selecting Configuration Protocols Step 2 Locate the Enable H 323 protocol section see Figure 5 17 on page 48 Figure 5 17 H 323 Protocol section of the Protocols tab Step 3 Enter the port value in the Gatekeeper port field Step 4 Select Apply Configuring the TCP Port Q 931 on the SCOPIA Elit...

Страница 53: ...Installation Guide for SCOPIA Elite 5100 Series MCU Version 7 7 Figure 5 18 H 323 Signaling Port Configuration Step 2 Select the icon in the Review column Step 3 Enter the port value in the H323 SIG port number field Step 4 Select Apply Step 5 Select Close ...

Страница 54: ...n by selecting Configuration Protocols Step 2 Locate the Enable SIP protocol section and select More see Figure 5 19 on page 50 Figure 5 19 SIP Port Configuration Step 3 Do one of the following If your SIP server or Registrar is not configured with TLS enter the port value in the Local signaling port field If your SIP server or Registrar is configured with TLS enter the port value in the Local TLS...

Страница 55: ...ould be enabled If you would like control or error response messages to be sent ICMP ping should be enabled If you are performing configuration procedures or would like to receive traps SNMP should be enabled Note You can view trap events in the Events tab of the web user interface Procedure Step 1 Access the MCU security settings by selecting Configuration Setup Step 2 Locate the Security section...

Страница 56: ...the Ethernet activity LED is lit green Note The left LED on the Ethernet connector lights green if the connection speed reaches 1000 Mbps and lights orange if the connection speed reaches 100 Mbps Step 4 If one of the LEDs does not light as described in the previous steps the device is not functioning properly See the MCU Troubleshooting Guide to resolve the issue Step 5 Verify the device is ready...

Страница 57: ...ng systems innovative converged mobile services and highly scalable video enabled desktop platforms on IP 3G and emerging next generation IMS networks To gain additional insights into our products technology and opinions visit blog radvision com For more information about RADVISION visit www radvision com This document is not part of a contract of license as may be expressly agreed RADVISION is re...

Отзывы: