background image

QuickFX

The 

QuickFX

 tool is different from all of the other QuickTools. The QuickFX is intended to apply an 

effect to already-running cues. 

The main features of the 

QuickFX

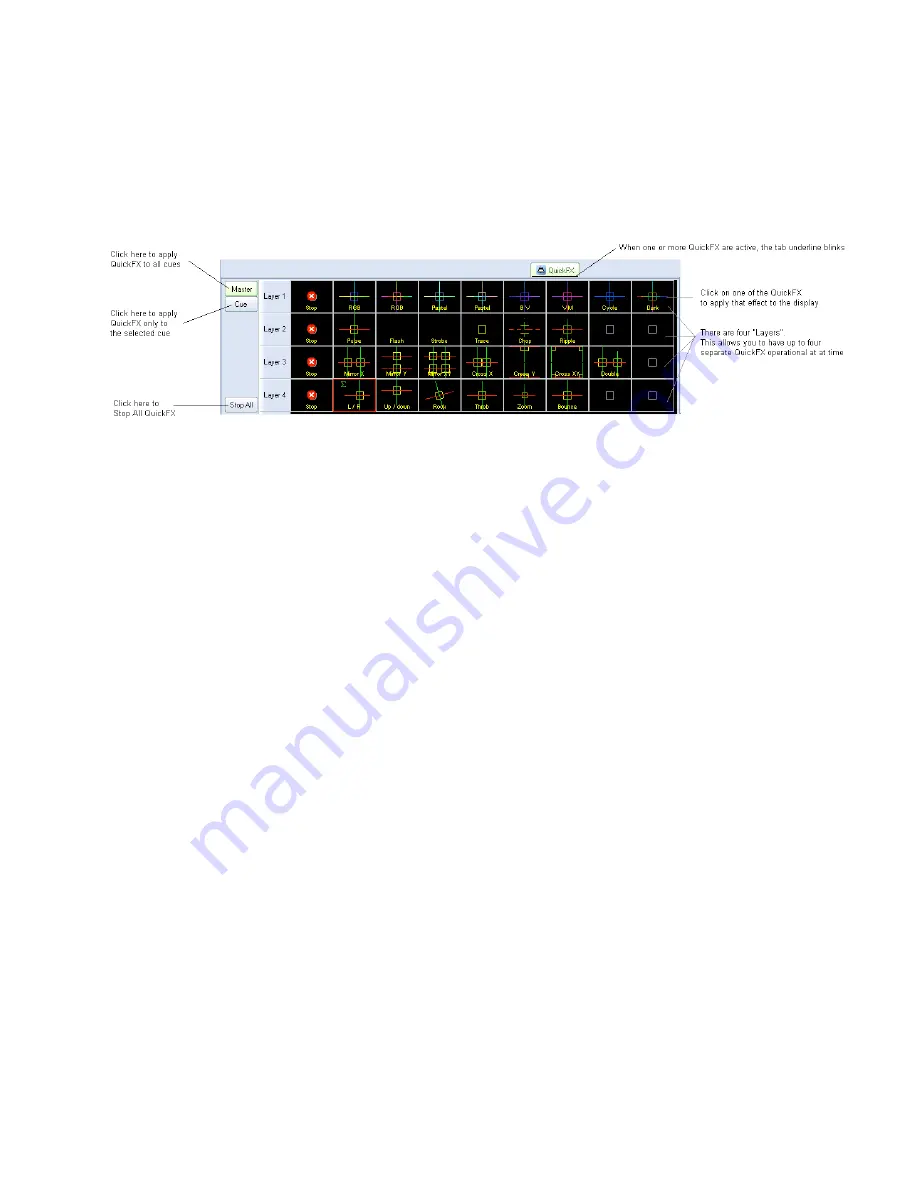
 tool are shown and described in the picture below. 

As shown, you simply clock on a desired effect, and it will be applied on top of all playing cues (if the 

Master

 button is pressed) or it will be applied to only the selected cue (if the 

Cue

 button is pressed). 

Up to four FX can be active at a time

There are multiple Layers of FX available. This allows you to pick an effect from Layer 1, and a 
separate effect from Layer 2, and have both effects active simultaneously. Since there are four layers of 
effects, this allows up to four effects to be active at the same time. 

    69


Содержание FB3-QS

Страница 1: ...Lasershow Designer QuickShow And FB3 QS User Manual...

Страница 2: ...ights reserved QuickShow User Interface Patent Pending QuickShow was written by Alexey Sinitsyn Valery Furmanov and William R Benner Jr with development assistance and testing by Derek Garbos Due to o...

Страница 3: ...36 Toolbar 36 Cue triggering mode 37 Transition between cues 37 Playing only one cue at a time or multiple cues 38 Beat synchronization system 38 Virtual Laser Jockey button 38 Blackout and Pause 38...

Страница 4: ...kTimeline 67 QuickCapture 68 QuickFX 69 Advanced Tools overview 70 Cue properties 71 Laser Frame Animation editor 74 Advanced Text editor 87 Advanced Shape abstract editor 88 Advanced Clock editor 89...

Страница 5: ...he Year Award in 2006 This credit card sized wonder can play laser graphics beams and even complete Pangolin quality shows The tiny Flashback 3 has everything you need to control your laser projector...

Страница 6: ...diting Live control of many effects parameters during cue playback Live total control of the FB3 QS The FB3 QS hardware contains the following basic functions USB power supply 12 bit X and Y outputs w...

Страница 7: ...nd Y Installing the QuickShow software The QuickShow software installation should begin installation when the DVD is inserted To manually install the QuickShow software application simply copy the QS...

Страница 8: ...8...

Страница 9: ...ndly enough for beginners to use QuickShow is also a very deep program It is not likely that you will ever exhaust the power and capabilities of QuickShow no matter what your application As such we en...

Страница 10: ...w to your needs and the needs of your projector Step 1 Specify a user level The first step in the process is to familiarize QuickShow with the type of user you are When choosing a user level you shoul...

Страница 11: ...he high performance setting is only for American made scanners as well as the most expensive German and Chinese scanners Step 3 Indicate the number of lasers in your projector The third step in the pr...

Страница 12: ...modulated lasers or Analog modulated lasers Generally less expensive and lower power laser projectors have TTL lasers while more expensive and higher power projectors use Analog modulated lasers You s...

Страница 13: ...shed it is important to setup the targeted beam positions after that Selecting your language QuickShow currently supports the ability to show the user interface in English Chinese French Dutch German...

Страница 14: ...n this menu is Projector Settings This accesses the Projector Settings window which will help to configure QuickShow for your type of projector Available settings include size position scan rate color...

Страница 15: ...setup DMX 512 for input or output Use this if you want to control QuickShow using an external DMX lighting console or if you want to control external lighting devices or fog machines using DMX 512 Us...

Страница 16: ...cture below Setting the Master size and position and extra options Within the Master size and position tab shown above the most important thing to do is to show a test pattern and then adjust the size...

Страница 17: ...r Settings window is the Scan rate tab as shown below Setting up the colors The Color Settings tab is shown below Be sure to indicate the number and type of lasers in your projector and the color modu...

Страница 18: ...touching the sides of the square when the ILDA Test Pattern is displayed at the correct scan speed points per second Scanning too slow Circle outside of square Scanning correctly Circle touches midpoi...

Страница 19: ...ately centered Color shift too high Horizontal lines shifted too far right As you are projecting the ILDA test Pattern look very carefully at the horizontal lines below the letter Y Adjust the Color B...

Страница 20: ...ts Beam Settings window you will see a message which explains what QuickTargets is for and asks that you confirm that you understand the purpose of this tool and the associated risks Neither the Beam...

Страница 21: ...for that particular zone along with the Preview Window Appearance for that zone and a Beam Attenuation Map that can control the brightness in that particular zone The Projection Zones window is shown...

Страница 22: ...atterns available for selection a Simple test pattern and a Grid test pattern The simple test pattern has roughly 500 points and the grid test pattern has roughly 1000 points Using the simple test pat...

Страница 23: ...specify whether the preview for that zone should be normal laser graphics or audience scanning beam effects If you specify that the preview should be Audience Scanning Beams you get a few more option...

Страница 24: ...will look like in the final venue Beam Attenuation Map section The next section shows the Beam Attenuation Map section for the selected zone and allows you to adjust it The Beam Attenuation Map allow...

Страница 25: ...Map can be used for graphics atmospheric and beam effects Example Beam Attenuation Map use with laser graphics One common graphics use would be to prevent scanning above or below a certain point For...

Страница 26: ...nother common use would be to reduce the brightness below the horizon to a level that would be more pleasing for audience scanning viewers This can easily be done by selecting a reduced brightness lev...

Страница 27: ...k box is checked it will make is so that the output of this zone is not affected at all by any effect that would cause beam frames to no longer hit their intended targets For example if you painstakin...

Страница 28: ...checked all scanner output will be dedicated strictly to producing laser output and the Minimum number of points setting is ignored 28...

Страница 29: ...n size used for raster graphics retained for compatibility with LD2000 zones Zone 7 Any scanner Hot Beams Used for high intensity beams which may or may not be directed within the audience area Zone 8...

Страница 30: ...o use DMX Input or Output using the Connection portion of the dialog box After that specify the COM port where the DMX to USB controller is connected QuickShow gives you the ability to test the connec...

Страница 31: ...specify the Starting DMX Channel address where you want QuickShow to appear within the DMX stream As shown above the DMX Channel Assignment for QuickShow is exactly the same as that of the FB3 SE DMX...

Страница 32: ...s that QuickShow should transmit The default is 24 but you can enable QuickShow to send up to 512 channels The DMX Output settings also has advanced controls that allow you to control the timing of th...

Страница 33: ...a very popular device which is freely available from many vendors on the internet Pangolin also normally carries a limited stock of these devices as well DMX daughter board on FB3 SE can not be used A...

Страница 34: ...es and perhaps access a few Live Control features For that reason QuickShow provides a facility that allows you to indicate which features you want available in the User mode Setting up the User mode...

Страница 35: ...35...

Страница 36: ...ue Grid This is where you select and trigger cues The lower section contains the QuickTools where new content creation takes place The right section contains the Live control tab and Effect Editor tab...

Страница 37: ...ach time you click on them For example if you have an animation which counts down to zero the count down will restart each time you click on the cue if Restart mode is chosen If the Flash mode is chos...

Страница 38: ...the BPM label or press the SPACE BAR repeatedly to the beat of the music When you do this the average BPM of the clicks or key presses will be calculated and this will be used to synchronize the time...

Страница 39: ...hat an untrained operator might activate the laser during a time that is not appropriate for example when workers are in a room preparing for an event laser output is always disabled by default and it...

Страница 40: ...ed keys a s d f etc and others are accessed using shifted keys A S D F etc Page tabs On the top of the cue grid you will see tabs These tabs allow you to access the Pages in QuickShow To change pages...

Страница 41: ...ues related to graphics will be shown To add change or rename categories just right click in the Categories section Types of cues Each cue can contain a Frame or animation Text Shape abstract Timeline...

Страница 42: ...pasted into other pages Previewing contents of each Cue You can preview the contents of each cue by simply hovering the mouse pointer over a cue This will give you an accurate representation of what t...

Страница 43: ...Paste from the main menu Or as a short cut you can simply click the left mouse button in the preview window and drag the preview window contents directly into a cue Using the preview window to select...

Страница 44: ...separate ways of accomplishing this Live Performance tools When a cue is playing Live Performance tools can be seen on the bottom of the cue These tools provide a way to quickly and easily start and...

Страница 45: ...e position rotation angle and other geometric properties of a cue is by clicking on the Cue button within the Live Controls panel and making adjustments there Visibility of Live Performance and Cue ed...

Страница 46: ...allows you to configure the way in which the Virtual Laser Jockey works Using externally input audio with the Virtual Laser Jockey Note that you can indicate that the Virtual Laser Jockey should trigg...

Страница 47: ...ults In any event we are including this feature in the software as a kind of experiment Users may use it or not As a final note all of us on the Pangolin staff believe that tapping the space bar to th...

Страница 48: ...the Virtual Laser Jockey is triggering cues doesn t mean that you can t Indeed QuickShow allows you to play cues and trigger effects even while the Virtual Laser Jockey is running This can be like ha...

Страница 49: ...Live Control tab overview The Live Control tab is on the right side of the QuickShow window and it is the main tab that is used during Live performances 49...

Страница 50: ...nly the geometric properties for the selected cue This depends on whether the Master or Cue button is pressed as explained below Live Controls only affect the cues not QuickTools Note that the Live Co...

Страница 51: ...ithin each cue Live Control tab Size controls Using the Live Control tab you can affect the Size of everything together when in Master mode or the size of individual cues when in Cue mode The picture...

Страница 52: ...valent for Invert Rotation Speed You can invert the rotation speed by pressing shifted or unshifted tilde key right below the ESC key This can be a handy tool to use while a show is playing For exampl...

Страница 53: ...the Brightness or Visible Points slider its value will be reset to 100 If you click the right mouse button on the Color slider the color will be reset to Normal Live Control tab Playback controls Usi...

Страница 54: ...ng laser show The QuickTools are found at the bottom of the Main Control Window and are shown below All of the QuickTools work in a similar manor You click on the tab that corresponds to the type of c...

Страница 55: ...To edit content originally created with a QuickTool simply drag from the Cue grid back down to the most relevant QuickTool tab Visibility of certain QuickTools depends on your user level Note that so...

Страница 56: ...peatedly click on the button labeled Slower To increase the speed repeatedly click on the button labeled Faster Selecting an effect The large central area within the QuickText tab allows you to select...

Страница 57: ...se either upward or downward to affect the image Displaying text momentarily To display the text that you have created simply click on the Show it now button Saving the QuickText to a cue You can save...

Страница 58: ...ertical line horizontal line triangle square pentagon or hexagon Choosing a continuous line or shape made of points beams The shape can be made of a continuous line or made of points When the shape is...

Страница 59: ...as the Live Performance Tools within a cue Simply click down the mouse over one of the controls and then drag the mouse either upward or downward to affect the image Displaying the shape momentarily...

Страница 60: ...ion mode best for high quality company logos and business card graphics Highlight separation mode best for lower quality images and continuous tone photographs Centerline mode best for line art such a...

Страница 61: ...ither upward or downward to affect the image Displaying the traced image momentarily To display the traced image that you have created simply click on the Show it now button Saving the QuickTrace to a...

Страница 62: ...reate a sequence Although the QuickTargets tool can be used to trigger a single beam or several beams to output continually thus requiring only a single Step typically the QuickTargets tool is used to...

Страница 63: ...ck on the Time button indicated by a Clock icon this indicates time instead of beats Stepping through the sequence manually You can review the output of each step by simply clicking the left mouse but...

Страница 64: ...as you want in the sequence For example if you want to have a four step sequence simply click on the button until you see four steps Controlling the speed of the sequence The speed of the sequence is...

Страница 65: ...h channel a different name by clicking the right mouse button on the label below the slider and entering a name Changing the color and control type You can change the color of each slider by right cli...

Страница 66: ...Changing how channels are viewed You can view the DMX either as sliders as shown above or as a spreadsheet format or as a waveform showing how the channel values will change at each step 66...

Страница 67: ...w as you are creating it You can also drag the time slider by clicking and dragging the mouse in the timeline area Displaying the show momentarily To display the show that you have created simply clic...

Страница 68: ...es playing you can capture that into a single cue so that next time you want to trigger the same three cues you can do it by merely clicking on a single cue The main features of the QuickCapture tool...

Страница 69: ...and it will be applied on top of all playing cues if the Master button is pressed or it will be applied to only the selected cue if the Cue button is pressed Up to four FX can be active at a time Ther...

Страница 70: ...ickly but with limited parameters QuickShow also includes a full featured Laser Frame Animation editor Advanced Text editor Advanced Shape abstract generator and an Advanced Clock editor These advance...

Страница 71: ...will be used to extract a single frame for the purpose of previewing in the Cue Grid Destination section The Destination section controls the destination of the cue i e where the cue will be routed on...

Страница 72: ...e of animation used with most cues Beat based animation allows you to control the animation based on the Beat system This is very handy for visuals that go to the beat of the music Scan rate and optim...

Страница 73: ...When rerouting is prevented in this way the cue will have a special icon indicating that it can t be rerouted by the preview window 73...

Страница 74: ...eadaches out of creating laser frames because points are placed automatically Just click on a drawing tool found in the upper left side of the window choose a color and start drawing You can even load...

Страница 75: ...rst frame then hold SHIFT and Click last frame to highlight selected group of frames to use this function Open Background Open a Bitmap image for tracing Clear Background Removes Bitmap image after tr...

Страница 76: ...in Frame Edit Window Quick Rotate Gives you options of quick degrees of rotation of frame content such as 90 Clockwise etc Quick Resize Quick Resize gives you options such as double or half size to e...

Страница 77: ...2 3 4 5 6 7 8 9 10 11 12 13 14 15 16 1 New Frame 2 Open Frame Folder to find frame files 3 Save 4 Undo 5 Copy 6 Paste 7 Delete 8 Show Points 9 Show Blanking Path 10 Zoom in 11 Zoom out 12 Effects Eff...

Страница 78: ...es use frame repeats to adjust the animation speed Uses less memory space 15 Density Adjusts the point density or number of points per frame which relates to scan speed and playback speed and visual p...

Страница 79: ...e box Note Using the RGB picker on a TTL only system may have some adverse effects If your system is TTL only choose primary colors as you will only have 7 colors to choose from Frame File List Shows...

Страница 80: ...es Some cues already are animated Others are single frames for use as a DMX workspace to use DMX to control movement and other attributes that make single frames nice in DMX mode a Select Existing sin...

Страница 81: ...imation you desire Remember to few frames the animation is fast 1 100 1 Fast 100 Slow Enter 50 for now click OK j Presto Instant 50 frame animation which you should see in the Frame File List k Click...

Страница 82: ...elease Left Mouse Button iii You will be prompted iv Click yes to confirm Note if you drag a cue to a occupied cue the cue information in the occupied cue will be lost 3 Create New Cues by Importing i...

Страница 83: ...m action Done The file will now be present in the Cue Drawing Use a variety of tools to draw images This program interface is similar to any paint program See the following steps to make a simple draw...

Страница 84: ...iv In the Frame File List select the first frame v Right Click Duplicate vi Select First Frame vii Transform Menu 84...

Страница 85: ...half another color like Cyan xii Select the first frame Right Click Create Animation Between Current frame and next frames xiii Choose 40 frames xiv Click Ok Now you have created a 40 frame animation...

Страница 86: ...k Paste Frame Which now a copy of frame 1 should be frame 83 9 Now Click Frame 82 Right Click Create animation between current and next frames Add 40 frames Click OK 10 Now you have just made a 123 fr...

Страница 87: ...the main controls Applying effects to the entire text image or to individual characters The Advanced Text Editor allows you to apply an effect to the entire text image or to individual characters wit...

Страница 88: ...es Even though it s capable of stunning imagery the Advanced Shape abstract editor is still very easy to use since it is based on the easy concepts of QuickShape You just pick a base shape and then ad...

Страница 89: ...e used to create analog or digital clocks that can count up and down and in horizontal or vertical orientation The main window of the Advanced Clock editor is shown below along with a view of the main...

Страница 90: ...Editor The Effect Editor in QuickShow is continuously available and is found on the right side of the QuickShow window The Effect Editor window shown below along with an explanation of the main featu...

Страница 91: ...Adding an effect and adjusting parameters Quickly accessing often used values 91...

Страница 92: ...ffers three different types of effects Oscillating Effects typically used to perform functions to the beat of the music such as zooming fading rotating etc Key Effects these are time based effects whi...

Страница 93: ...Oscillating Effects The list of Oscillating Effects can be seen below Key Effects The list of Key Effects can be seen below 93...

Страница 94: ...this will be used to synchronize the timer beat system Note that you can press the BACKSPACE key on the computer keyboard to re synchronize the timer beat system to the beat of the music in case the...

Страница 95: ...r computer will need to be since QuickShow computes the output for all laser systems using the PC processor First steps Once you have connected more than one FB3 to your computer you should do the fol...

Страница 96: ...to more than one zone i e laser simultaneously so if you check both the Zone 1 and Zone 2 boxes above the cue will be directed to both lasers simultaneously You may go through each cue in the workspa...

Страница 97: ...cues will be directed to the zone you selected Two handed keyboard control Note that the layout of the nine zones is exactly like that of the numeric keypad on your computer keyboard Therefore what yo...

Страница 98: ...re will show a little pointer icon to help indicate that you have captured a pointer to the cue The little pointer icon indicates that this QuickCapture will simply click on cue location 1 within the...

Страница 99: ...ght clicking on the cue and choosing Cue Properties Keyboard Equivalents QuickShow has many keyboard equivalents Some of them are listed in the menus some of them are shown in the cue cells themselves...

Страница 100: ...wn or hidden and shown by pressing CTRL SHIFT M Invert Rotation Speed You can invert the rotation speed by pressing or shifted or unshifted tilde key right below the ESC key Cue editing Copy cue CTRL...

Страница 101: ...y time using the File menu in the QuickShow Advance Shape editor QuickShow Timeline based show qsho Timeline based show files contain information about cues and effects used on the timeline within Qui...

Страница 102: ...l Likewise if you click on a MIDI key with your mouse this will trigger the associated cue And finally as MIDI messages come into the computer you will see these keys activate and deactivate In this w...

Страница 103: ...to select up to four MIDI Input devices and one MIDI Output device Once you have selected the Input Devices you should configure each device on the Input Options tab Input Options This tab allows you...

Страница 104: ...treated for the purposes of directing MIDI Input to QuickShow cues Prevent jump to corresponding page on the grid When MIDI Input is directed to a specific page in QuickShow and you press a key on th...

Страница 105: ...set to Use original Channel then events that are echoed will have their channel number modified as specified in the Channel drop down list box Output Options This tab allows you to enable and disable...

Страница 106: ...rder to use the Metronome function you must enable MIDI Output and preferably select a MIDI device that Enabled Channels This tab allows you to either ignore or process messages depending on the Chann...

Страница 107: ...3 0V to 5V Interlock A 4 Red 5 0V to 5V Green 6 0V to 5V Blue 7 0V to 5V Deep blue 8 Yellow 9 Cyan 10 Z 11 Not connected 12 Shutter 13 0V to 5V X 14 5V to 5V Y 15 5V to 5V Intensity Blanking 16 0V In...

Страница 108: ...108...

Страница 109: ...nnection to QuickShow Solid Yellow Connected to the Quickshow or other software but offline Red Slow Flash Online but output inactive dummy stream no cue active Red Fast Flash Online and output active...

Страница 110: ...compliant stock through our distribution network and our customers stock management and purchasing systems Confirmation of compliance status by our suppliers is either because the products do not con...

Отзывы: