background image

Cleaning

QL-300 User Guide

356


Cleaning Schedule

Check the condition of the equipment at the start and end of operations, and clean it as needed. 
Cleaning guidelines are noted below.

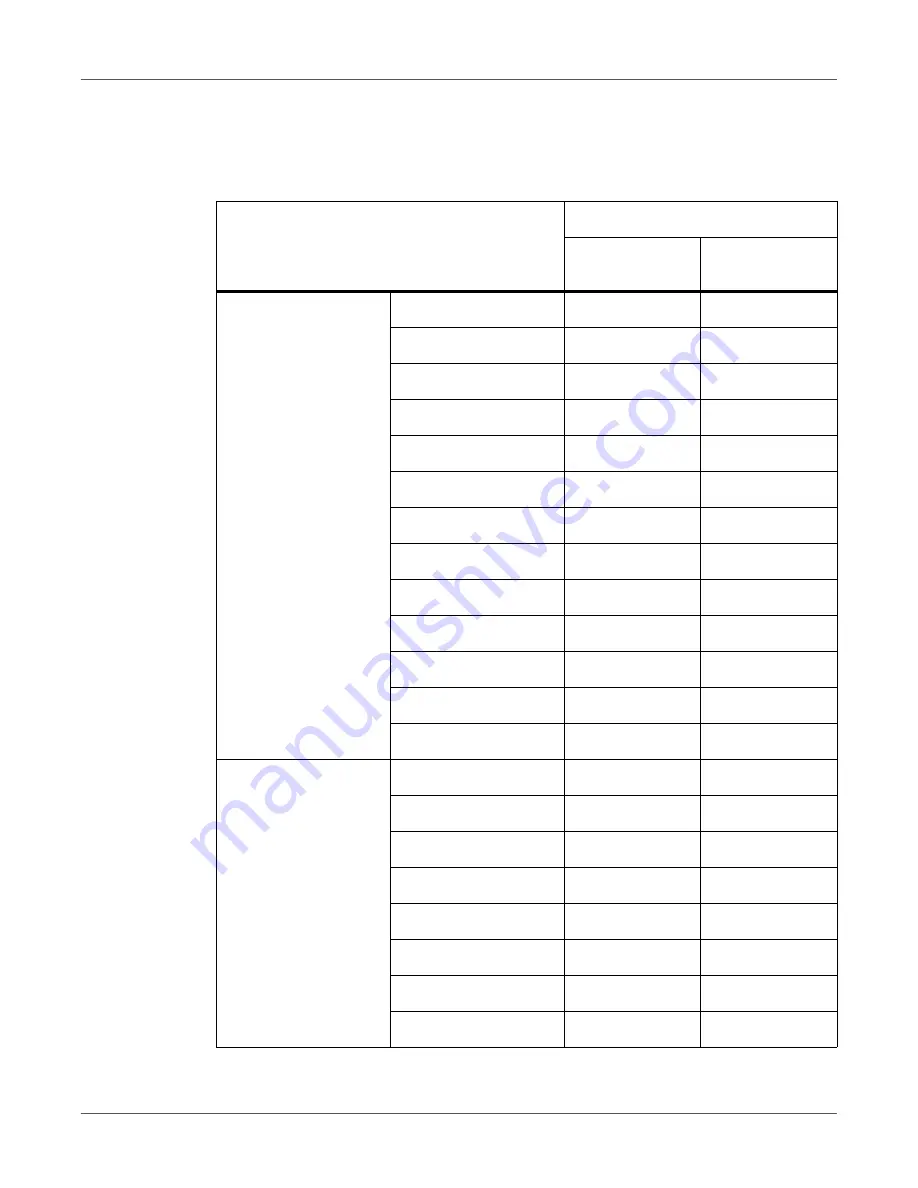
Cleaning schedule

Every day

When dirt is 

noticeable

Unwinder

Surface

No

Yes

Flange

Yes

Yes

Side-Guide-8Inch

No

Yes

Tension Bar

Yes

Yes

Guide-Side-Roller-F

Yes

Yes

Paper Guide

Yes

Yes

Sheet Guide

Yes

Yes

Roll Paper Guide

Yes

Yes

F0 Roller Unit

Yes

Yes

Sensor Cover (Upper)

Yes

Yes

Sensor Cover (Lower)

Yes

Yes

F1 Roller Unit

Yes

Yes

Cutter Unit

Yes

Yes

Printer

Surface

No

Yes

Paper Guide

Yes

Yes

Feed Unit

Yes

Yes

Sensor Cover (Lower)

Yes

Yes

Sensor Cover (Upper)

Yes

Yes

Exit Unit

No

Yes

LED Heads

No

Yes

Fuser Unit

No

Yes*

Содержание QL-300

Страница 1: ......

Страница 2: ...Label An AstroNova Division World Headquarters 600 East Greenwich Ave West Warwick RI 02893 Tel 1 401 828 4000 Fax 1 401 822 2430 E mail info QuickLabel com www QuickLabel com Technical Support Tel 1...

Страница 3: ...furnished on an exchange basis and will be either reconditioned or new The customer is responsible for freight to return the printer or component to our factory We will ship the repaired or replaced...

Страница 4: ...m remotely or request the customer to furnish this information This warranty does not cover QL 300 toner cartridges that have been emptied refilled remanufactured modified refurbished misused or tampe...

Страница 5: ...1 800 565 2216 quicklabel ca Latin America Av Insurgentes Sur No 1602 4 Piso Suite 467 Col Credito Constructor Ciudad de Mexico CDMX 03940 Mexico Tel 52 55 1000 9116 quicklabel com es Denmark Marielu...

Страница 6: ...measures Reorient or relocate the receiving antenna Increase the separation between the equipment and receiver Connect the equipment into an outlet on a circuit different from that to which the recei...

Страница 7: ...pplication des Decisions du Conseil Anwendbar fur die Richtlinien Applicazione delle Direttive del Comitato 2014 30 EU 2006 42 EC 2011 65 EU I the undersigned hereby declare that the equipment specifi...

Страница 8: ...on 31 Installing Cable Clamps 31 Installing the Unwinder on the Printer 32 Power 35 Precautions about the Electric Power 35 Connecting a Power Cord 37 Turning on the Power 37 Turning off the Power 38...

Страница 9: ...n 74 Using the Numeric Keypad 74 Function Number Input Screen 75 Function Number List 76 Chapter 5 Paper Settings 78 Usable Media Types 78 Paper Types Size and Thickness 79 Storing Media 81 Registerin...

Страница 10: ...Print Start Position 196 Other Print Functions 199 Specifying the Page Order 199 Overlaying Stamps for Printing Watermarks 200 Collating Printed Output Sorted Printing 202 Printing a Mirror Image 203...

Страница 11: ...er 11 Troubleshooting 252 Troubleshooting Solutions Procedure 252 Troubleshooting when an error message is displayed 252 Troubleshooting when an error message is not displayed 252 Paper Jams 252 Check...

Страница 12: ...nter Settings From a Computer 413 To check using the Status Screen 413 To check using the Status Window 414 Changing Printer Settings From a Computer 415 Encrypting Communication SSL TLS 415 Configuri...

Страница 13: ...ecifications 467 Major Specifications 467 Roll Paper Specifications 470 Continuous paper normal printing 470 Continuous paper printing on large size paper 472 Continuous paper with black marks 474 Die...

Страница 14: ...ter Printer Print cartridges One each of yellow magenta cyan black and white 1 1 QL 300s only Power cord Note The package does not include a LAN cable USB cable or hub Procure them separately Note The...

Страница 15: ...n on page 15 Choosing an Installation Location on page 15 Installation Space on page 17 Be sure to read these sections before starting installation work Precautions Related to Installation Warnings Do...

Страница 16: ...e Do not install the equipment in direct sunlight or in a very dusty or humid location Do not install the equipment in an environment subject to salt air NOx SOx or corrosive gases Do not install the...

Страница 17: ...Eco mark No 155 printers in regard to dust ozone styrene benzene TVOC and dispersion of ultrafine particles Testing has been done based on the testing methods in the Blue Angel RAL UZ 171 2012 appendi...

Страница 18: ...the equipment when lifting it Do not hold the control panel while lifting There is a risk of injury if you hold the control panel because the control panel may come off and you could drop the equipme...

Страница 19: ...e Printer This section describes how to unpack the printer Note The packing box and packing materials are needed to transport the machine Keep them and do not throw them away 1 Open the top of the pac...

Страница 20: ...Installation QL 300 User Guide 20 2 Remove the top layer of packing materials...

Страница 21: ...Installation QL 300 User Guide 21 3 Remove the handles 4 pieces and then remove the top of the packing box...

Страница 22: ...QL 300 User Guide 22 4 Open out the bottom part of the box place your hands on the printer s handles 2 in front 2 in back and support the printer as you remove the front and back packing materials on...

Страница 23: ...Installation QL 300 User Guide 23 5 Cut and remove the bands that secure the printer 6 Remove the plastic bag...

Страница 24: ...e installation space that you have confirmed in advance Allow enough space to work when installing the unwinder The weight of the equipment including wear items is about 95 lbs 43 kg Install it on a s...

Страница 25: ...Pad TC from the top of the print cartridge and then remove the tape that is securing the lift up lever 11 The print cartridges lift up so turn the lift up lever to lower the print cartridges Print car...

Страница 26: ...the top cover there is a risk of pinching your fingers or hands in the top cover or the top cover s support Press on the top of the top cover to close it Caution There is a risk of pinching your finge...

Страница 27: ...inder This section describes how to unpack the unwinder Note The packing box and packing materials are needed to transport the unwinder Keep them and do not throw them away 1 Open the top of the packi...

Страница 28: ...Installation QL 300 User Guide 28 3 Remove the unwinder...

Страница 29: ...Installation QL 300 User Guide 29 4 Remove the plastic bag from the unwinder and then remove the accessories...

Страница 30: ...Installation QL 300 User Guide 30 5 Peel off the tape from two locations...

Страница 31: ...L 300 User Guide 31 Installation Installing Cable Clamps Cable clamps are provided with the unwinder Use them to run the cable connected to the printer s interface along the front 1 Install cable clam...

Страница 32: ...Be careful that you do not pinch your hands or fingers between the unwinder and the printer Caution Securely tighten the three screws If they are loose there is a risk that the unwinder may fall off...

Страница 33: ...QL 300 User Guide 33 2 Hold the unwinder close to the mounting pins and mounting hole and then press it against the right side of the printer and lower it 3 Use three screws to secure the unwinder to...

Страница 34: ...tallation QL 300 User Guide 34 Tighten the screws in order 1 2 then 3 as shown in the following diagram 4 Extend the adjuster so it contacts the stand Be careful not to extend the adjuster too far 1 3...

Страница 35: ...htning rod or anything similar Fire electric shock or gas explosion could result Always hold the power cord by the plug when you plug or unplug it Pulling on the power cord could damage the power cord...

Страница 36: ...is rated for at least 100 V at 15 A Fire or electric shock could result if you use one that is outside the specified range Do not turn off the power or unplug the power plug while printing Damage or e...

Страница 37: ...ninterruptible power source or inverters Connecting a Power Cord 1 Securely insert the power cord provided into the power connector on the machine 2 Plug the power plug into the power socket Turning o...

Страница 38: ...the POWER button for five seconds or longer forces the power to turn off Do this only if some trouble occurs See Troubleshooting on page 252 Warning Do not touch the power plug or power socket if your...

Страница 39: ...bration and then press the OK button 4 Press the scroll button several times to select Adjust Density and then press the OK button 5 Check that Execute has been selected and press the OK button 6 Pres...

Страница 40: ...feeds and a demo page is printed If the paper does not feed well or there are printing issues confirm that the printer is installed correctly Adjusting the Position of the Sensor You need to adjust t...

Страница 41: ...Installation QL 300 User Guide 41 Unwinder Black mark Gap sensor...

Страница 42: ...e printer driver Connecting to a PC with a USB Connection 1 Connect the cable 2 Turn on the printer 3 Turn on the computer 4 Install the printer driver Operating Environment This printer supports the...

Страница 43: ...connector as standard A LAN cable can be used to connect to a network while a USB cable can be used to connect to a computer Connecting a LAN Cable When the printer is connected to a LAN Ethernet or...

Страница 44: ...e Category 5e or higher twisted cable straight and hub it is up to you to prepare them Note The initial factory default setting of the Admin Setup is Gigabit network Disabled This setting needs to be...

Страница 45: ...ling the Printer Driver USB on page 58 1 Prepare a USB cable Note The printer does not come with a USB cable You need to prepare a USB 2 0 cable that is no longer than two meters Note If you are plann...

Страница 46: ...To connect the printer to a computer over a network connection you first need to set the printer s IP address Next install the printer driver on the computer If there is no DHCP server or BOOTP server...

Страница 47: ...setup Setting the Printer s IP Address on the Control Panel When configuring a small scale network to connect the printer to a single computer set an IP address as shown below RFC1918 compliant Comput...

Страница 48: ...ator password The factory default password is 999999 Press the OK button after inputting each character 4 Press the OK button 5 Check that Network Setup is selected and then press the OK button 6 Pres...

Страница 49: ...ll button several times to select IPv4 Address and then press the OK button 9 Press the scroll buttons and or the numeric keypad to input the first three digits of the IP address and then press the OK...

Страница 50: ...e OK button 11 Input the subnet mask the same way as the IP address After input is complete press the BACK button 12 Press the scroll button to select Gateway Address and then press the OK button 13 I...

Страница 51: ...er Settings on the Computer If your computer already has an IP address and other settings configured or if an IP address is obtained automatically advance to Installing the Printer Driver Network on p...

Страница 52: ...PC Connection QL 300 User Guide 52 4 Click Change adapter settings 5 Click the icon showing the name of the Network adapter 6 On the Ethernet Status screen click Properties...

Страница 53: ...ess subnet mask default gateway and DNS server and then click OK Note When obtaining an IP address automatically from a DHCP server select Obtain an IP address automatically without inputting an IP ad...

Страница 54: ...ted to the network via a LAN cable See Connecting a LAN Cable on page 43 2 Start the driver installation software You can obtain the software from www QuickLabel com downloads 3 When the language sele...

Страница 55: ...PC Connection QL 300 User Guide 55 5 Verify the pre installation check items and then click Next 6 Click Easy Installation Network...

Страница 56: ...searches for printers After supported printers are detected select the printer from the device list 8 Select the driver version that matches your printer model For example select QuickLabel QL 300s if...

Страница 57: ...Then click OK 10 The printer driver will be installed After installation is complete click Finish USB Connection USB Setup Flow Note Confirm that the printer is turned off Note PC administrator privil...

Страница 58: ...ia the USB cable Note Do not connect the USB cable until prompted later in this procedure 2 Start the driver installation software You can obtain the software from www QuickLabel com downloads 3 When...

Страница 59: ...PC Connection QL 300 User Guide 59 5 Verify the pre installation check items and then click Next 6 Click Easy Installation Local...

Страница 60: ...ver version that matches your printer model For example select QuickLabel QL 300s if you are using a QL 300s printer Then click Next 8 When prompted connect the QL 300 to your PC with a USB cable Then...

Страница 61: ...is complete click Finish Dealing with Setup Problems If you run into problems while setting up a network connection or USB connection refer to Troubleshooting on page 252 This section describes possib...

Страница 62: ...Control Panel Displays the printer status and menus and is used when configur ing function settings See Control Panel on page 69 3 Power Connector Connect the supplied power cord here 4 Fuser and Exi...

Страница 63: ...uide 63 Printer Exit Part Description 1 Fuser and Exit Unit Handle Pull upwards when removing the fuser and exit unit 2 Exit Feed Cover Open when clearing a paper jam 3 Release Lever Press downwards w...

Страница 64: ...isplayed while the Sup plies Life is specified for the standby screen of the control panel The print cartridge is a wear item 2 Print Cartridge Set Remove when replacing the belt unit 2nd transfer rol...

Страница 65: ...s full of waste toner The waste toner box is a wear item 2 2nd Transfer Roller Transfers toner to the paper The 2nd transfer roller is a wear item The 2nd transfer roller is included with the belt uni...

Страница 66: ...n 1 LAN Network Interface Connector For connection of a LAN cable Use this connector when connecting the printer on a network 2 USB 2 0 Interface Connector For connection of a USB 2 0 cable Use this c...

Страница 67: ...per to the roll paper holder so the roll paper set on the roll paper holder feeds straight 4 Flange Locking Lever Use when removing mounting the flange 5 Roll Paper Holder Knob Use when securing the c...

Страница 68: ...de to the width of the paper to be printed 2 Roll Paper Guide Align the roll paper guide along the edge of paper to be printed 3 F0 Roller Unit The F0 roller unit is a roller for feeding roll paper Th...

Страница 69: ...n the printer corrective action can be taken while monitoring messages that appear on the LCD Part Description 1 Display screen Shows the printer s status and menus The standby screen shows either of...

Страница 70: ...range 8 Scroll buttons and menu but tons Use these buttons to select menu screen items and to scroll menu pages forward or back On a value input screen these buttons are used when inputting values 9 O...

Страница 71: ...of setting options selecting the item and then pressing the OK button displays the applicable screen While a setting is displayed pressing the OK button applies it A check mark appears to the left of...

Страница 72: ...rd The factory default password is 999999 Press the OK button after inputting each character 4 Press the OK button 5 Press the scroll button several times to select Panel Setup and then press the OK b...

Страница 73: ...to the message Pressing a control panel button while an error screen is displayed changes the status of the printer as described below Button Action POWER SAVE Puts the printer into the Power Save Mod...

Страница 74: ...he help screen press the HELP button again The help screen can also be closed by pressing the BACK button ON LINE button or CANCEL button Using the Numeric Keypad The numeric keypad is used when input...

Страница 75: ...he Fn key 2 Cycles with each press 2 a b c 3 Cycles with each press 3 d e f 4 Cycles with each press 4 g h i 5 Cycles with each press 5 j k l 6 Cycles with each press 6 m n o 7 Cycles with each press...

Страница 76: ...ears you can check the current setting and change it if you want Function Number List Function Num ber Function Number Menu Item 90 Paper Size 91 X Dimension 1 92 Y Dimension 1 93 Media Type 94 Media...

Страница 77: ...6 Drum Cleaning 237 Hex Dump 238 Transfer Roller Cleaning 300 Adjust Density 301 Adjust Registration 302 Print Color Tuning Pattern 310 Cyan Density 311 Magenta Density 312 Yellow Density 313 Black De...

Страница 78: ...ng it is necessary to use paper that satisfies conditions regarding quality thickness paper finish etc Only print on media recommended by QuickLabel If using a paper medium that is curled or wrinkled...

Страница 79: ...e covered with label paper Continuous Label Black Mark Paper that is not die cut into a label shape with the entire surface covered with label paper and black marks printed on the back surface Media T...

Страница 80: ...ase it could damage the equipment Cast coated paper is not recommended Printing quality cannot be guaranteed when it is used If the paper length label length or black Mark Interval for a single sheet...

Страница 81: ...ctrostatic charge is generated In a location subjected to very high temperatures or sudden temperature changes Next to a photocopying machine air conditioning equipment heater or duct Note Proper prin...

Страница 82: ...ct Printing preferences 4 On the Setup tab click User defined paper 5 Input information about the paper you want to register a Use Registered user defined paper to select New Paper b In the Paper Name...

Страница 83: ...e length from the leading edge of the first label or black mark leading edge to the leading edge of the 11th label or black mark leading edge Use this as L mm 2 Divide the length you measured in 1 by...

Страница 84: ...103 b If you want to fine tune the image position enter the position shift amount into Print position correction c If you want to fine tune the paper cut position enter the position shift amount into...

Страница 85: ...to select the paper whose print position you want to correct If the paper you want to use is not in the list select New paper and add it See Registering a Desired Paper Size with the Printer Driver on...

Страница 86: ...the Printing preferences screen 9 Open the file to be printed 10 Specify the paper size and then print Using the Printer Driver to Fine tune the Cut Position 1 Click Start and select Control Panel in...

Страница 87: ...t the paper whose cut position you want to correct Note If the paper you want to use is not in the list select New paper and add it See Registering a Desired Paper Size with the Printer Driver on page...

Страница 88: ...aper Settings QL 300 User Guide 88 7 Click Overwrite 8 Click OK as many times as necessary to exit the Printing preferences screen 9 Open the file to be printed 10 Specify the paper size and then prin...

Страница 89: ...he paper before you use it Do not load paper while the tape is still attached and feed it into the equipment There is a risk of damaging the equipment b Cut off the part of the paper 2 on which there...

Страница 90: ...ng the print position not being able to print or damaging the equipment Standard media and continuous labels dry edge Standard media with black marks and continuous labels dry edge 1 2 to 4 0 mm 0 047...

Страница 91: ...ed on the Unwinder see Paper Types Size and Thickness on page 79 Note When setting roll paper be careful not to drop it As roll paper is heavy when you drop it there is a risk of injury Note If you dr...

Страница 92: ...Printing QL 300 User Guide 92 If the printer is turned OFF press the POWER button to turn it on 1 Open the Flange Locking Lever 2 Remove the flange...

Страница 93: ...aft 4 Slide roll paper onto the Roll Paper Holder shaft as far as it will go Note Make sure to slide the roll paper as far as it will go Insufficiently sliding the roll paper can adversely affect prin...

Страница 94: ...until it clicks 6 Aligning the Flange with the Roll Paper Holder shaft as shown in the illustration attach the Flange 7 Slide the Flange as far as it will go in accordance with the roll paper width No...

Страница 95: ...Locking Lever Caution After loading roll paper take care not to rest your body weight on the top of the Roll Paper Holder shaft Doing so risks causing injury due to the device falling 9 Lower the Unwi...

Страница 96: ...Printing QL 300 User Guide 96 Open the Unwinder Cover manually in the direction indicated by the arrow until it locks Note Open the Unwinder Cover until it locks securely...

Страница 97: ...10 Before loading the paper rotate the Roll Paper Guide Adjustment Knob counterclockwise and move the Roll Paper Guide towards you 11 Pull up the F0 Roller Release Lever 12 Press the Tension Bar Open...

Страница 98: ...Printing QL 300 User Guide 98 13 Pass paper below the Tension Bar and F0 Roller and align the leading edge of the paper with the Roll Paper Guide 1 and Paper Guide 2...

Страница 99: ...Printing QL 300 User Guide 99 14 Check the paper status from the direction indicated by the arrow 15 Rotate the Roll Paper Guide Adjustment Knob to adjust the paper until it is straight...

Страница 100: ...per Guide Adjustment Knob in Direction A the roll paper moves in the direction C Direction B the roll paper moves in the direction D 16 Lower the F0 Roller Release Lever to fix the roller in place 17...

Страница 101: ...If the Paper Guide is not set correctly the width of the paper cannot be detected correctly Note Be careful that the Roll Paper Guide does not press too strongly on the paper Doing so could damage the...

Страница 102: ...per Guide is aligned to the width of the paper In the following example the Paper Guide is too tight 19 Close the Unwinder Cover Caution When closing the Unwinder Cover there is a risk of pinching you...

Страница 103: ...n you load a different type of paper When you switch the type of sensor from black mark sensor to gap sensor When you switch the type of sensor from gap sensor to black mark sensor If the sensor posit...

Страница 104: ...ing the Unwinder Sensor Position 1 Lower the Unwinder Cover Open Lever to open the Unwinder Cover Open the Unwinder Cover manually in the direction indicated by the arrow until it locks Note Open the...

Страница 105: ...Printing QL 300 User Guide 105 2 Confirm the sensor position a Check the black mark sensor position Align the paper and check the actual position of the black mark and the black mark sensor position...

Страница 106: ...djustment Dial to adjust the position go to step 3 The black mark sensor position is set 10 mm from the edge of the paper If the black mark is about 15 mm from the edge of the paper you do not need to...

Страница 107: ...Dial to adjust the position go to step 3 The gap sensor position is set 16 5 mm from the edge of the paper If there is 10 mm or less on the right and left edges of the liner then adjustments are not n...

Страница 108: ...ou rotate the Sensor Position Adjustment Dial in direction A the sensor position moves in the direction C If you rotate the Sensor Position Adjustment Dial in direction B the sensor position moves in...

Страница 109: ...00 User Guide 109 2 Remove the print cartridge set 3 Place the removed print cartridge set on a flat surface covered with newspaper or something similar and cover it with paper so it is not exposed to...

Страница 110: ...Printing QL 300 User Guide 110 4 Turn the two belt locking keys counterclockwise to release the lock...

Страница 111: ...belt unit at an angle Caution Be careful not to spill waste toner while removing the belt unit Caution Be careful to not pinch your hands or fingers between the handle and the machine while removing...

Страница 112: ...QL 300 User Guide 112 6 Place the belt unit with the right side down on a flat surface covered with paper Caution Place the belt unit on a flat surface as shown in the diagram above Do not stand it on...

Страница 113: ...Printing QL 300 User Guide 113 Caution Do not touch the belt surface or damage the belt...

Страница 114: ...sensor position If the position of the black mark and the black mark sensor position do not align rotate the Sensor Position Adjustment Dial to adjust the position go to step 8 The black mark sensor...

Страница 115: ...step 8 The gap sensor position is set at the factory to 65 mm from the right edge of the label liner Adjust the position of the arrow so it is in the center of the labels of the media you are using 8...

Страница 116: ...align the arrow labels red on the belt unit and printer to position it and then open the belt unit handles blue on the left and right Caution Be careful to not pinch your hands or fingers between the...

Страница 117: ...int cartridge set Hold the handle parts of the basket for this operation 12 Close the top cover Caution When closing the top cover there is a risk of pinching your fingers or hands in the top cover or...

Страница 118: ...0 icon and then select Printing preferences 4 On the Setup tab click User defined paper 5 Input information about the paper you want to register To adjust settings that are already registered select t...

Страница 119: ...k Next Before performing the next steps of this procedure make sure that paper is loaded If there are no paper size settings configured on the control panel it may cause a paper size mismatch on the d...

Страница 120: ...in the printer for the adjustment results and whether to apply it when printing By standardizing the registration numbers of the sensor adjustment results you can get the same print results by specif...

Страница 121: ...el Black Mark 3 Configure the paper size Paper Size Custom X Dimension Input the label width For die cut labels black marks Paper length Input the label length Gap Length Input the gap length Otherwis...

Страница 122: ...d when Continuous Label Black Mark are used 1 Press the Fn key The numerical values input screen will be displayed 2 Press 8 9 1 function numbers and then press the OK button 3 Select 6 Continuous Lab...

Страница 123: ...The display will return to the standby screen 7 Press the Fn key and then press the following buttons 9 1 OK 8 Use the numeric keypad to enter the label width press the OK button and then press the ON...

Страница 124: ...1 Use the numeric keypad to enter the Black Mark Interval press the OK button and then press the ON LINE button The display will return to the standby screen 12 Press the Fn key and then press the fol...

Страница 125: ...ute Calibration and then press the OK button 15 Enter the sensor calibration name and then press the OK button You can leave the name blank if you want 16 If an execution confirmation screen appears s...

Страница 126: ...n Calibrating the Gap Sensor You can adjust the distance between die cut labels using the gap sensor 1 Press the Fn key The numerical values input screen will be displayed 2 Press 8 9 1 function numbe...

Страница 127: ...andby screen 5 Press the Fn key and then press the following buttons 9 0 OK 6 On the Paper Size menu select Custom press the OK button and then press the ON LINE button The display will return to the...

Страница 128: ...button The display will return to the standby screen 9 Press the Fn key and then press the following buttons 9 2 OK 10 Use the numeric keypad to enter the label length press the OK button and then pre...

Страница 129: ...3 Use the numeric keypad to enter the gap length press the OK button and then press the ON LINE button The display will return to the standby screen 14 Press the Fn key and then press the following bu...

Страница 130: ...ute Calibration and then press the OK button 17 Enter the sensor calibration name and then press the OK button You can leave the name blank if you want 18 If an execution confirmation screen appears s...

Страница 131: ...and black mark interval on the device Registering these settings improves your printing results However it does waste approximately 10 sheets of paper 1 Click Start and select Control Panel in Windows...

Страница 132: ...ack Mark Continuous Label Black Mark If Paper interval detection does not appear return to step 4 of this procedure 7 Confirm the displayed paper information and then click Measure This starts checkin...

Страница 133: ...the OK button 4 Select Execute and then press the OK button to start paper interval detection and close the dialog box Printing After loading the paper use the computer to open the file you want to pr...

Страница 134: ...ng on the Setup tab as required 6 When the settings are complete click OK in the Setup screen 7 Click Print in the Print screen to print Canceling a Print Job Use the procedure below to cancel a print...

Страница 135: ...ows what printing results will be based on current settings This example is just an approximation and does not indicate the exact actual number of print pages and cut positions Paper settings Specifie...

Страница 136: ...tection Before printing to black mark or die cut labels click to execute learning on the device to improve the print position before starting Note that executing this function will cause some paper to...

Страница 137: ...paper type Media Weight Specifies the paper thickness Sensor settings Specifies the settings from among those registered on the device to be used for printing Sensor Adjustment Click to calibrate the...

Страница 138: ...hrome printing When color is selected clicking Detail displays the Detail dialog box which can be used to configure detailed color printing settings Spot Color Specifies how white toner should be used...

Страница 139: ...Extend Tab Item Description Overlays Specifies whether or not a form should be overlaid on the document to be printed or whether the document should be registered as a new form in the device Item Des...

Страница 140: ...machine Menus Used to configure system settings print position adjustment color and other settings Admin Setup Administrator sets the network settings changes passwords etc Print Statistics Check the...

Страница 141: ...ly Magenta Print Car tridge Remaining nnn Yellow Print Car tridge Remaining nnn Black Print Cartridge Remaining nnn White Print Cartridge Remaining nnn Waste Toner Box Remaining nnn Shows the remainin...

Страница 142: ...sk Gateway Address xxx xxx xxx xxx Displays the gateway address When TCP IP is enabled shows the setup of the following control panel setting Admin Setup Network Setup Gateway Address MAC Address xx x...

Страница 143: ...Version xx xx Displays the control unit firmware ver sion PU Version xx xx xx Displays the printer unit firmware ver sion RAM xxMB Shows the total availability of all mounted RAM Flash Memory xxMB Fx...

Страница 144: ...ser media list Displayed when the user media is reg istered Test Print 1 Execute Prints the patterns for analyzing the print quality Test Print 2 Execute Prints the patterns for analyzing the CMYK pri...

Страница 145: ...Guide 145 Menus Unwinder Config Item Value Description Media Form Continuous Paper Continuous Paper Black Mark Die cut Label Gap Die cut Label Black Mark Continuous Label Continuous Label Black Mark S...

Страница 146: ...er Width 29 4 millimeter 1 16 inch 105 6 millimeter 4 16 inch 109 0 millimeter 4 29 inch 130 0 millimeter 5 12 inch Inputs the width of the liner Appears when the Liner Width Mode is Custom The initia...

Страница 147: ...ry depending on your operat ing environment Y Dimension 12 7 millimeter 0 50 inch 101 6 millimeter 4 00 inch 148 0 millimeter 5 83 inch 152 4 millimeter 6 00 inch 1320 8 millimeter 52 00 inch Sets the...

Страница 148: ...the actual length of the page such that it exceeds 101 6 mm 4 00 inch The initial values vary depending on your operat ing environment Gap Length 3 0 millimeter 0 12 inch 10 0 millimeter 0 39 inch Se...

Страница 149: ...TYPE1 USERTYPE2 USERTYPE3 USERTYPE4 USERTYPE5 USERTYPE6 USERTYPE7 USERTYPE8 USERTYPE9 USERTYPE10 USERTYPE11 USERTYPE12 USERTYPE13 USERTYPE14 USERTYPE15 USERTYPE16 USERTYPE17 USERTYPE18 USERTYPE19 USER...

Страница 150: ...Set3 Set4 Set5 Set6 Set7 Set8 Set9 Set10 Sets the sensitivity of the gap sensor or black mark sensor Only the adjusted sensor setting is displayed Appears when the Media Form is something other than C...

Страница 151: ...e default value fluctuates according to the results of the calibration Appears when the black mark sensor is used Sensor Calibra tion Set1 Set2 Set3 Set4 Set5 Set6 Set7 Set8 Set9 Set10 Adjust Slice Le...

Страница 152: ...on The default value fluctuates according to the results of the calibration Appears when the gap sen sor is used Sensor Calibra tion Set1 Set2 Set3 Set4 Set5 Set6 Set7 Set8 Set9 Set10 Adjust Slice Lev...

Страница 153: ...ing numbers You can use up to eight characters of single byte upper case English and numbers Sensor Calibra tion Set1 Set2 Set3 Set4 Set5 Set6 Set7 Set8 Set9 Set10 Reset Setting Execute Initializes th...

Страница 154: ...the end of the job and at the end of the job collation Specified Interval Cuts in units of the specified num ber of pages Cuts at the end of the collation job Cut Interval 1 9999 Sets how many pages a...

Страница 155: ...ble Warning ONLINE Job Sets the timing until clear able warning display turns OFF Timeout InJob Off 5 seconds 10 seconds 20 seconds 30 seconds 40 seconds 50 seconds 60 seconds 90 seconds 120 seconds 1...

Страница 156: ...printing Excludes net work Timeout Network 0 seconds 5 seconds 90 seconds 290 seconds 295 seconds 300 seconds Sets the time for the net work port to be kept opened after printing Error Report On Off...

Страница 157: ...limeters 2 00 millimeters 0 1 millimeters Adjusts the overall image print position perpendicu larly horizontally in the direction of paper feed 0 1 mm intervals Y Adjust 0 00 millimeters 0 1 millimete...

Страница 158: ...tarts printing For short leading edges printing just starts Applicable for the gap black mark setting Mode2 For short or long leading edges this setting automatically cuts outputs and then starts prin...

Страница 159: ...ardless of the length or type of media Media Transfer Setting Black 0 1 2 3 3 2 1 Performs fine adjustment if black is faded or tiny white spots appear when printing with the black K print car tridge...

Страница 160: ...rring White is displayed with QL 300s only Magenta Yellow Black White BG Setting Cyan 0 1 2 3 3 2 1 Compensates for print results variation due to dif ferences in the temperature and humidity using in...

Страница 161: ...nd dark streaks appear for magenta and or red toner Raise the setting value if the high density portion of magenta and or red is thin ner Transfer Setting Yellow Transfer Setting 0 1 2 3 3 2 1 Lower t...

Страница 162: ...ensity portion of white is thinner White is displayed with QL 300s only DV Roller Cleaning 1 On Off Adjust the toner disposal threshold On Image quality priority Off Toner life priority DV Roller Clea...

Страница 163: ...xxx Sets the subnet mask Appears when Enable is set on the control panel for TCP IP Appears when Manual is set on the control panel for IP Address Set Gateway Address xxx xxx xxx xxx Sets the gateway...

Страница 164: ...ormal Small Normal Printer operates effectively even if con nected to a hub with span ning tree functions However printer startup time becomes longer when two or three computers are connected to a sma...

Страница 165: ...isables access using a USB interface Speed 480Mbps 12Mbps Sets the maximum baud rate using a USB interface Soft Reset Enable Disable Enables disables the soft ware reset command Serial Number Enable D...

Страница 166: ...ng is enabled only if Collate is checked and 1 is specified as the number of copies in the PCL printer driver Edge to Edge On Off Sets the print margin Resolution 600dpi 1200dpi Sets the resolution To...

Страница 167: ...the service life of the print car tridge Off A warning screen is displayed but printing con tinues because priority is given to productivity Default Orientation Portrait Landscape Sets the print orie...

Страница 168: ...font width Increases and reduces in 0 01 CPI units Displayed when the font selected using Font Num ber is an outline font with fixed spacing Font Height 4 00 points 12 00 points 999 75 points Sets the...

Страница 169: ...n Off Specifies whether to use mixed CMYK or black toner only for printing black of image data Pen Width Adjust On Off Compensates so that thin lines are visible Item Value Description Item Value Desc...

Страница 170: ...lay Supplies Life Unwinder Config Sets the information dis played in the standby screen Panel Brightness During Operation 5 31 Adjusts the brightness backlight luminosity of the control panel LCD The...

Страница 171: ...ts the time difference from GMT in 15 minute units If the time zone set ting is changed the time differences before and after the change are reflected in the current time Daylight Saving On Off Sets w...

Страница 172: ...MB Sets the resource saving area size Storage Common Setup Check File System Execute Implements management data FAT information recovery and resolves mis matches between the actual free space in the...

Страница 173: ...ese English French German Italian Japanese Russian Spanish Specifies the control panel display language Language Initialize Execute Deletes the message files that have been down loaded Also the Select...

Страница 174: ...t job Long Hold down for 2 to 5 seconds to cancel a print job Off Disables the CANCEL button Inquiry Display On Off Sets whether to display the inquiry screen when a job is canceled Focus Position Yes...

Страница 175: ...aying a confirmation message Rewinder Distance 600 millimeter 24 inch 900 millimeter 36 inch 1200 millimeter 48 inch Specifies the amount to be fed when the FEED button is pressed in the stand by stat...

Страница 176: ...is executed on the control panel Item Value Description Item Value Description New Password Sets a new password to be entered in the Admin menu and Boot Menu Verify Password Sets a new password to be...

Страница 177: ...Password 1 New Password Sets the new password to be entered in Print Statis tics Not displayed if Disable is set for the control panel Print Statistics Usage Report item Verify Password Sets a new pa...

Страница 178: ...sity This setting is enabled from printing after the density compensation has been implemented Color Density Yellow Density 3 0 3 Adjusts yellow density This setting is enabled from printing after the...

Страница 179: ...enta and yellow matching Base Color Tuning Mid Tone A 1 A 2 B 1 B 2 O 1 O 2 Matches the color balance for the parts displayed as most clear in the mid tone area of the printed color tuning pattern The...

Страница 180: ...un ing Highlight 4 0 4 Matches the highlights light areas of the cyan shade characteristics Mid Tone 4 0 4 Matches the intermediate areas of the cyan shading characteristics Dark 4 0 4 Matches the dar...

Страница 181: ...Highlight 4 0 4 Matches the highlights light areas of the magenta shading characteristics Mid Tone 4 0 4 Matches the intermediate areas of the magenta shad ing characteristics Dark 4 0 4 Matches the...

Страница 182: ...g Highlight 4 0 4 Matches the highlights light areas of the yellow shading characteristics Mid Tone 4 0 4 Matches the intermediate areas of the yellow shad ing characteristics Dark 4 0 4 Matches the d...

Страница 183: ...the highlights light areas of the black shading characteristics Mid Tone 3 0 3 Matches the intermediate areas of the black shading characteristics Dark 3 0 3 Matches the dark dark areas of the black s...

Страница 184: ...e shading characteristics Displayed with QL 300s only Mid Tone 3 0 3 Matches the intermediate areas of the white shading characteristics Displayed with QL 300s only Dark 3 0 3 Matches the dark dark ar...

Страница 185: ...etup Check File System Execute Executes management data FAT information recovery and resolves mis matches between the actual free space in the file system and the dis played free space Check All Secto...

Страница 186: ...printer s setup Off Prints using regular density without economizing the toner Save Level Low Prints using medium light toner Save Level Middle Prints using light toner Save Level High Prints using c...

Страница 187: ...t cartridge can be prolonged by separating it from the belt unit Setting combinations are shown in the table below Example Printing using the CMYK Print Cartridge only In this example the White W Prin...

Страница 188: ...L 300s only 1 Grasp the top cover open lever and open the top cover 2 Check the position of the unused print cartridge via the label letters and color 3 Turn the lift up lever on the print cartridge t...

Страница 189: ...of pinching your fingers or hands if you hold the LED head while closing the top cover Press on the top of the top cover to close it Fine Quality Printing Changing Print Quality Resolution Set Quality...

Страница 190: ...ing Photograph Printing More Vivid Photo Enhance You can print more natural and vivid images such as photos etc Note This function can be used with Windows PCL printer drivers only Windows PCL Printer...

Страница 191: ...u can prevent misaligned lines being printed when ultra fine lines are specified from the application This function is normally ON Depending on the application bar code and other intervals will narrow...

Страница 192: ...eType fonts with printer built in fonts The font replacement function stores the document fonts but font designs cannot be reproduced If it is necessary to print font designs accurately disable the fo...

Страница 193: ...inter this check box is selected as the default setting 6 Use the Font Substitution Table to specify which printer fonts should replace the TrueType fonts 7 Print Using Computer Fonts You can output T...

Страница 194: ...ution check box Download as Outline Font The font image is created by the printer Download as Bitmap Font The font information is created by the printer driver 6 Print Adjusting the Print Position on...

Страница 195: ...95 Using the Roll Paper 1 Press the Fn key The numerical values input screen will be displayed 2 Press 2 2 0 function numbers and then press the OK button 3 Press the scroll button or to select the it...

Страница 196: ...ter when you want to get the same print results on multiple printers See Using the Printer Driver to Fine tune the Print Position on page 84 Adjusting the Print Start Position This section explains ho...

Страница 197: ...media on which you are actually printing d Measure the distance at A or B as shown in the diagram for all five sheets and then calculate the average of these values e Calculate the difference in the...

Страница 198: ...ding edge of the black mark to the printed matter on five sheets When using a gap sensor At the point that the label intersects the position of the gap sensor on the printer measure the distance at B...

Страница 199: ...ow them away when you are done 3 The adjustments are complete when printing is done in the position you want Reset the cutter settings and then start printing Other Print Functions Specifying the Page...

Страница 200: ...n the Copies area 5 Print Overlaying Stamps for Printing Watermarks The details to be printed from the application can be independently printed overlaying Samples Confidential etc Windows PCL Printer...

Страница 201: ...Print Function Settings QL 300 User Guide 201 4 On the Extend tab click Watermarks 5 Click New 6 On the Watermarks screen enter text into Text and configure Size and other settings...

Страница 202: ...in the device memory and collate the printing Printing by specifying batches x2 sets Printing without specifying batches x2 sets Note This feature is not usable with some applications Windows PCL Prin...

Страница 203: ...Mirror Image Print using mirror print when you want to print image to appear normal when the page is viewed from the back Windows PCL Printer Driver 1 Click Start and select Control Panel in Windows...

Страница 204: ...be printed 7 Select Page Setup in the File menu 8 Select the paper size and print orientation and then click OK 9 Select Print in the File menu 10 For printing onto a color paper with QL 300s On the C...

Страница 205: ...2 Click View devices and printers 3 Right click the QL 300 icon and then select Printing Preferences 4 On the Overlays tab select Overlay Print 5 To register a form to the printer select Register prin...

Страница 206: ...lick OK Changing the Check Unnecessary Print Cartridge Setting You can have an error displayed and cancel the print job to prioritize the service life of a print cartridge that is detected to be down...

Страница 207: ...int Setup and then press the OK button 4 Select Check Unnecessary Print Cartridge and then press the OK button 5 If you want an error to be generated when a print cartridge is detected to be down even...

Страница 208: ...e next and following times you change the settings all you have to do is specify the driver settings so that those settings in the multiple locations are automatically changed to the settings that you...

Страница 209: ...a Saved Setup 1 Open the file to be printed 2 On the File menu select Print 3 Click Preferences or Properties 4 On the Setup tab configure Favorites 5 Print Delete a Saved Setup 1 Click Start and sel...

Страница 210: ...a file and then export import the file The file extension for exporting importing is xmn Export a Setup 1 Click Start and select Control Panel in Windows 2 Click View devices and printers 3 Right clic...

Страница 211: ...k Management 5 Click Import 6 On the Import screen click Open the file 7 Specify the file you want to import and then click Open 8 Check the names of the settings in the List of favorite settings and...

Страница 212: ...ck Start and select Control Panel in Windows 2 Click View devices and printers 3 Right click the QL 300 icon and then select Remove device 4 If a verification message is displayed click Yes Note If a...

Страница 213: ...C Updating a Printer Driver PC administrator privileges are required 1 Obtain the printer driver from QuickLabel 2 Double click the file you downloaded 3 Select the desired language and then click OK...

Страница 214: ...tically according to the conditions of use If the color drift is noticeable you can also implement compensation manually 1 Press the Fn key The numerical values input screen will be displayed 2 Press...

Страница 215: ...To compensate automatically turn On the density compensation matching setting In the default factory settings density compensation matching is implemented automatically 1 Press the scroll button or 2...

Страница 216: ...sation mode but if the print density is noticeable it can also be compensated manually Density adjustment values are set by specifying Cyan Density Magenta Density Yellow Density Black Density and Whi...

Страница 217: ...djust the densities of colors that are used as the references for density compensation Adjust each color separately for the parts where the density is noticeable from the print results This section de...

Страница 218: ...tune black press the Fn key and then press the following buttons 3 1 3 OK To tune white press the Fn key and then press the following buttons 3 1 4 OK This option is only available on the QL 300s 3 Pr...

Страница 219: ...stment when you want to adjust the gray balance of the halftones which is not sufficiently adjusted by the auto density compensation The densities of the colors are mutually dependent on each other so...

Страница 220: ...ress 3 0 2 function numbers and press the OK button c Check that Execute has been selected and press the OK button d The color tuning pattern will be printed 2 Use the print results for the color tuni...

Страница 221: ...ms most similar to the adjacent CMY mixed colors part and single color K part in the Highlight Mid Tone or Dark areas matches the Current on the left of the color tuning pattern the color balance is n...

Страница 222: ...ress the OK button f Specify the number of the desired square in the Dark area of the pattern and then press the OK button g The pattern number specified in each area will be displayed If the pattern...

Страница 223: ...overall tone adjust the black tone in Fine Color Tuning in the direction 4 Check the color balance adjustment results a Print the color tuning pattern b Use the print results for the color tuning pat...

Страница 224: ...adjustment several times until the desired color balance is achieved 1 Print a color tuning pattern a Press the Fn key The numerical values input screen will be displayed b Press 3 0 2 function numbe...

Страница 225: ...and Black The 11 columns represent color tone and vertical broken lines are labeled as Highlight Mid Tone and Dark 3 Use the print results for the color tuning pattern to adjust the color balance wate...

Страница 226: ...he specified value Select 0 1 to 4 0 to make density slightly darker or 0 1 to 4 0 to make it slightly lighter Note however that the black adjustment ranges are 0 1 to 3 0 and 0 1 to 3 0 g Press the O...

Страница 227: ...the reproduced colors unless individual machine characteristics are taken into consideration To maintain color consistency from data creation to output it is necessary to consider the color differenc...

Страница 228: ...ic or Simple Adjustment is selected for the CMYK color space print data In this case select Graphic Pro Setup Items RGB Color Setting Specifies the method for expressing the colors processed using col...

Страница 229: ...ut any modification Only colors that fall outside the printer s color gamut are matched with the outer shell Suitable for matching specific colors Black Finish Sets the black finish when printing in c...

Страница 230: ...ick Color then select Graphic Pro and then click OK 5 Print Color Matching No Color Matching Prints using the specified colors as is without implementing color matching using the printer drivers or de...

Страница 231: ...mode is set to Simple Adjustment This setting cannot be configured on the Graphic Pro Composite Black CMYK Synthesizes black using cyan magenta yellow and black toner The black is close to brown Ideal...

Страница 232: ...cs and then click OK 6 Print Monochrome Black and White Printing The color data is printed using grayscale shades of black and white without touching the print data Note If implementing color printing...

Страница 233: ...background Not usable with some applications Black overprint cannot be used if the text is not 100 black the text has been rendered as graphics by extracting the outlines or if the text is an image If...

Страница 234: ...lored lines between two overlapping objects due to print misalignment Windows PCL Printer Driver 1 Open the file to be printed 2 On the File menu select Print 3 Click Preferences or Properties 4 On th...

Страница 235: ...B CMYK Input Profiles SWOP ISO Coated Japan Color JMPA Note Enabled when Color Mode is set to either Simple Adjustment or Graphic Pro Windows PCL Printer Driver 1 Open the file to be printed 2 On the...

Страница 236: ...all network settings 1 Press the scroll button several times to select Admin Setup and then press the OK button 2 Use the numeric keypad to input the administrator password The factory default passwor...

Страница 237: ...correctly allocating the IP address may cause major malfunctions such as crashing of the network Thoroughly consult the network administrator before making the settings To use the device in a DHCP env...

Страница 238: ...The factory default password is 999999 Press the OK button after inputting each character 3 Select Network Setup and then press the OK button 4 Select IP Address Set and then press the OK button 5 Se...

Страница 239: ...page and log in as an administrator See Web Utility on page 405 2 Select Admin Setup 3 Select Network Setup TCP IP Change Settings Get IP address automatically BOOTP 4 Click Submit IPv6 This printer i...

Страница 240: ...age 405 regarding the printer web page 2 Select Network TCP IP If all the global addresses are displayed as 0 it is possible an error has occurred in the router being used Press the scroll buttons to...

Страница 241: ...total print results Error Log Prints the errors detected and saved by the printer Color Profile List Prints the color profile list Color Adjustment Pattern Prints the patterns to match the shading cha...

Страница 242: ...d down Printing Printer Setup Lists Configuration Print the device information Print to see the remaining quantity of wear items and other set values such as IP addresses and MAC addresses and to chec...

Страница 243: ...rmation QL 300 User Guide 243 Printing result sample Printing Printer Information Lists Demo Page Prints demonstration pages 1 Press the scroll button several times and when Print Information appears...

Страница 244: ...e of the items to be printed and then press the OK button 4 Confirm that Execute is selected and then press the OK button Error Log Prints the history of the errors that have occurred in the device 1...

Страница 245: ...Usage Report Prints the total print results Note Not displayed if Usage Report of Print Statistics is set to Disable 1 Press the Fn key The numerical values input screen will be displayed 2 Press 1 0...

Страница 246: ...press the OK button Printing Print Lists Color Profile List Prints the table of the ICC profiles registered on the printer 1 Press the scroll button several times and when Print Information appears pr...

Страница 247: ...en Print Information appears press the OK button 2 Select User Media List and then press the OK button 3 Confirm that Execute is selected and then press the OK button Test Print Prints the print quali...

Страница 248: ...times and when Print Information appears press the OK button 2 Select Test Print 1 Test Print 2 Test Print 3 or Test Print 4 and then press the OK button 3 When Execute appears press the OK button Ch...

Страница 249: ...istrator password and then press the OK button 3 Select Change Password and then press the OK button 4 Enter the new password and then press the OK button Specify a password that is at least six chara...

Страница 250: ...standby screen Checking the Print Count You can check the quantity of paper printed from the unwinder to date 1 Press the scroll button several times to select Configuration and then press the OK but...

Страница 251: ...Viewing Machine Information QL 300 User Guide 251 4 Press the OK button 5 Press the ON LINE button to return to the standby screen...

Страница 252: ...6 4 If you cannot solve the problem record the message displayed on the control panel Contact Technical Support Troubleshooting when an error message is not displayed 1 If trouble occurs refer to the...

Страница 253: ...n the display screen of the control panel and the ATTENTION lamp will blink Or when an error occurs causing printing to stop and leaves paper inside the printer an error notification message appears o...

Страница 254: ...for details 391 Open Top Cover Paper Jam Please see HELP for details 380 381 Check Fuser and Exit Unit Paper Jam Please see HELP for details 382 Remove Paper Printing Page Lost Please see HELP for de...

Страница 255: ...r When paper is left inside the printer because an error occurred and the printer stopped Paper Detection Error SENSOR_ERROR Please see HELP for details 7381 Open Unwinder Cover Roll Paper End Please...

Страница 256: ...nd the ATTENTION lamp will blink 1 Press the HELP button The error code will appear and the condition of paper jam will be displayed 2 Press the scroll button The next page will appear and solution pr...

Страница 257: ...ll return the display to the Standby screen and the remaining printing will start Removing Jammed Paper Use the following instructions to remove jammed paper This procedure can be used to resolve erro...

Страница 258: ...Troubleshooting QL 300 User Guide 258 2 Lower the unwinder cover open lever to open the unwinder cover Note Securely open the unwinder cover so it does not close while cleaning...

Страница 259: ...Troubleshooting QL 300 User Guide 259 3 Turn the roll paper holder in the direction of the arrow to wind up the roll paper 4 Raise the cutter unit lock levers at both ends of the cutter unit...

Страница 260: ...Troubleshooting QL 300 User Guide 260 5 Raise the F0 roller release lever If any paper is left in the printer do not forcefully remove it 6 Grasp the top cover open lever and open the top cover...

Страница 261: ...L 300 User Guide 261 7 Remove the print cartridge set 8 Place the removed print cartridge set on a flat surface covered with newspaper or something similar and cover it with paper so it is not exposed...

Страница 262: ...Troubleshooting QL 300 User Guide 262 9 Turn the two belt locking keys counterclockwise to release the lock...

Страница 263: ...the belt unit at an angle Caution Be careful not to spill waste toner while removing the belt unit Caution Be careful to not pinch your hands or fingers between the handle and the machine while remov...

Страница 264: ...ng QL 300 User Guide 264 11 Place the belt unit with the right side down on a flat surface covered with paper Caution Place the belt unit on a flat surface as shown in the diagram above Do not stand i...

Страница 265: ...Troubleshooting QL 300 User Guide 265 Caution Do not touch the belt surface or damage the belt 12 Pull up the paper guide release lever...

Страница 266: ...e lever is lifted slide the paper guide in the direction of the arrow to remove it 14 If any paper is jammed pull it out in the direction of the arrow There may be some unfused toner on the paper Caut...

Страница 267: ...Troubleshooting QL 300 User Guide 267 15 If paper is being output from the printer use scissors to cut it between two labels...

Страница 268: ...Troubleshooting QL 300 User Guide 268 16 While pulling the fuser and exit unit locking lever towards you pull out the fuser and exit unit...

Страница 269: ...Troubleshooting QL 300 User Guide 269 17 While supporting the fuser and exit unit with one hand lift up the fuser unit handle...

Страница 270: ...er Guide 270 18 Hold the fuser and exit unit with both hands and remove it to a level spot Caution Be careful the fuser unit is very hot immediately after printing 19 Slowly pull the paper straight ou...

Страница 271: ...Troubleshooting QL 300 User Guide 271 20 Lower the release lever of the fuser and exit unit open the exit feed cover and put the fuser unit handle below the exit feed cover...

Страница 272: ...0 User Guide 272 21 Slowly pull out the paper that is left in the fuser and exit unit in the direction of the arrow 22 Close the exit feed cover 23 Lift the fuser and exit unit with both hands and put...

Страница 273: ...Troubleshooting QL 300 User Guide 273 24 Push down the fuser unit handle and firmly push it inside...

Страница 274: ...Troubleshooting QL 300 User Guide 274 25 Lift up the fuser and exit unit locking lever...

Страница 275: ...Troubleshooting QL 300 User Guide 275 26 Raise the blue lever in the unwinder and then remove the cutter unit Be careful that the cutter unit does not hit the sensor cover upper when removing it...

Страница 276: ...ting QL 300 User Guide 276 27 Check for any paper or paper dust that has accumulated in the cutter unit and remove any that has accumulated 28 Remove any paper that is left in the paper feed path in t...

Страница 277: ...Troubleshooting QL 300 User Guide 277 29 Raise the blue lever and install the cutter unit...

Страница 278: ...Troubleshooting QL 300 User Guide 278 30 Align the positions of the paper guide s edge 1 and the guide notch on the printer...

Страница 279: ...Troubleshooting QL 300 User Guide 279 31 Firmly push the paper guide all the way in the direction of the arrow and then push on the A position to lock it...

Страница 280: ...and align the arrow labels red on the belt unit and printer to position it and then open the belt unit handles blue on the left and right Caution Be careful to not pinch your hands or fingers between...

Страница 281: ...print cartridge set Hold the handle parts of the basket for this operation 35 Close the top cover Caution When closing the top cover there is a risk of pinching your fingers or hands in the top cover...

Страница 282: ...Troubleshooting QL 300 User Guide 282 36 Lower the F0 roller release lever 37 Lower the cutter unit lock levers at both ends of the cutter unit...

Страница 283: ...e 368 Is the roll paper guide set correctly Are you using paper that is compatible with the printer Are there any fragments of paper remaining inside the printer Is there glue on it Are the sensor pos...

Страница 284: ...NLOAD or OK But ton Please see HELP for details 461 Blinking The paper settings for the unwinder are different from the print driver specifica tions To cancel printing press the CANCEL button If multi...

Страница 285: ...tegory Message displayed on the display screen Error code ATTENTION lamp Causes and Troubleshoot ing Print cartridges Install New COLOR Print Cartridge Print Cartridge Life Please see HELP for details...

Страница 286: ...over or unwinder cover is displayed Fuser and exit unit Install New Fuser and Exit Unit Fuser and Exit Unit Life Please see HELP for details 354 Blinking The lifespan of the fuser and exit unit has be...

Страница 287: ...ve according to the guidance shown on the Help screen Check Print Cartridge COLOR Please see HELP for details 3400 3401 3402 3403 3404 Blinking Print cartridge has not been set correctly Install the p...

Страница 288: ...ff the display press the OK button Please see HELP for details 7386 Blinking Printing was stopped and the data was deleted because the paper width settings were different from those specified in the p...

Страница 289: ...04 7200 7201 7202 7203 7204 Blinking Print cartridge is not intended for use with this printer model Use a print cartridge intended for use in this model Non Genuine Fuser and Exit Unit Please see HEL...

Страница 290: ...ta to be updated Check data Fuser and Exit Unit Not Installed Please see HELP for details 699 Blinking The fuser and exit unit is not installed properly Press the HELP button and solve according to th...

Страница 291: ...see HELP for details 7380 Blinking The position of the white print cartridge is different from that specified in the printer driver Printing has been stopped and the data was deleted Check the order o...

Страница 292: ...nce shown on the Help screen Install Paper Guide Re set the Paper Guide Please see HELP for details 7384 Blinking The paper guide is not set correctly Press the HELP button and solve according to the...

Страница 293: ...utton Press the HELP button and solve according to the guidance shown on the Help screen Paper Detection Error SENSOR_ERROR Press the OK Button SENSOR_ERROR Detailed information of the error will be d...

Страница 294: ...f in the control panel LAN Cable USB Cable is disconnected Check that cables are correctly connected to the printer and the computer See Connecting Cables on page 43 Cables are defective Replace with...

Страница 295: ...ble is defective Reconnect with a new or a different network cable and check again Incorrect IP address Check that IP address settings of the printer and IP address of the printer set in the computer...

Страница 296: ...pply cord is disconnected Switch off the power supply and firmly insert the power supply cord See Connecting a Power Cord on page 37 Power outage Check if electricity is flowing in the power socket Do...

Страница 297: ...a problem with the print function From Print Information Config uration Execute on the control panel check whether you can print the printer information or not Interface is disabled From Admin Setup...

Страница 298: ...select Admin Setup Power Setup Power Save to disable the mode Cleaning of print cartridge may be in progress Please wait Temperature adjustment of the fuser unit is under progress Please wait Process...

Страница 299: ...is not registered on the printer Correctly register on the printer the information for the paper being used Symptom Solution Procedure Icon of the printer is not created in the Devices and Printers fo...

Страница 300: ...een speci fied in the print settings on the application To solve this manually turn off the batch settings that were turned on automatically in the application See Collating Printed Output Sorted Prin...

Страница 301: ...ings in the printer driver Even if the application is suitable when you want to cut collated printouts specify the pages in To specify the number of pages per cut so they match the pages being collate...

Страница 302: ...s on page 387 Low toner Replace the print cartridge See Replacing Print Cartridges on page 322 Deposit of foreign substances Replace the print cartridge See Replacing Print Cartridges on page 322 Wind...

Страница 303: ...ou continue using the 1 to 3 setting in SMR Setting See Replacing Print Cartridges on page 322 The toner is clumping Shake the print cartridge up and down and left and right See Replacing Print Cartri...

Страница 304: ...d humidity Paper not suitable Check the roll paper specifica tions and then use paper that is described on the roll paper specifi cations Paper not suitable Type and thickness setting of paper is inap...

Страница 305: ...e the value in Print Adjust Media Transfer Setting Black or Media Transfer Setting Color There are scratches dents or for eign matter including glue from labels on the belt unit Replace the belt unit...

Страница 306: ...ne together with the belt unit which is a wear item See Replacing the Belt Unit and 2nd Transfer Roller on page 326 The area around the 2nd transfer roller or the paper transfer path is dirty Wipe the...

Страница 307: ...age 348 Print cartridge is exposed to light Return the print cartridge inside the printer and do not use the printer for a few hours If it does not rectify even after that replace the print cartridge...

Страница 308: ...t is described on the roll paper specifi cations Paper is moist Replace with new paper Rubbing paper removes the toner Type and thickness setting of paper is inappropriate Correct Media Weight in the...

Страница 309: ...he paper When media is pinched in F0 roller streaks appear stiff media becomes curled and images may be affected After printing remove the paper Also always remove the paper if you will not use the eq...

Страница 310: ...s Change to color matching option of the printer driver No color balance Select Calibration on the control panel and then run Adjust Den sity Misalignment of color Open the top cover at once and the c...

Страница 311: ...paper specifi cations The surface of the roller in the feed path is dirty If foreign matter is found on the surface of the roller in the feed path remove the dirt with a soft cloth or tissue paper Th...

Страница 312: ...Belt Unit and 2nd Transfer Roller on page 326 Implement protection against for eign matter and do daily mainte nance cleaning Or check the cutting position if it has shifted readjust the cutting posi...

Страница 313: ...just the registration and execute paper interval detection before you start printing and install the printer in a room that has humidity that is as stable as possible The gap interval between labels i...

Страница 314: ...pages of the actual print pattern you are using set Cut Mode Specified Inter val Cut Interval to 20 so you can compensate for the position that printing starts Printing extends off the trailing edge o...

Страница 315: ...eshooting Symptom Cause Troubleshooting Paper jam occurs frequently Device is tilted Install on a stable and a flat sur face The paper feed path is dirty Clean the paper feed path See Cleaning the Ins...

Страница 316: ...e in the paper settings on the printer driver as the above countermeasures The width of the paper being used and the width of the paper guide do not match Or the paper width set in the printer driver...

Страница 317: ...re large differences in the reflective ness of the black marks or the transmittance of the liner Calibrate the sensor Paper is not fed The paper settings for the printer are different from the paper s...

Страница 318: ...different intervals between labels cannot be used Use rolls of labels that have regular intervals The gap interval between labels is not from 3 to 10 mm A gap between labels from 3 to 10 mm can be us...

Страница 319: ...and remaining quantities of the print cartridge belt unit fuser and exit unit and waste toner box 1 Press the scroll button several times to select Configuration and then press the OK button 2 Select...

Страница 320: ...f Wear Items Guidelines for replacement of wear items are as follows Service life estimates are for reference The actual service life will vary based on label design usage status powering on off and a...

Страница 321: ...ge CMYK printing is possible even if the white cartridge life has been reached See Print ing Using the Specified Print Cartridge Only Lift Up on page 187 Belt Unit 2 610 000 linear inches at 5 toner d...

Страница 322: ...oxes on page 337 Waste Toner Near Full Install New Waste Toner Box Waste Toner Full Please see HELP for details Item Message displayed on the display screen When the replacement period approaches When...

Страница 323: ...oner gets on your hands or skin carefully wash it off with soapy water If it gets on your clothes rinse it off with cold water If you wash them with warm water or heat the toner it will stain the clot...

Страница 324: ...cribes how to replace the yellow Y print cartridge Adjust the procedure based on the print cartridge you are replacing 1 Grasp the top cover open lever and open the top cover 2 Check the position of t...

Страница 325: ...ove the new print cartridge from the packing bag and then shake it vertically and horizontally 5 Check the position where a label with the same text and colors has been applied and firmly and levelly...

Страница 326: ...n though you have replaced the print cartridge the print cartridge may not be securely installed Install it correctly If Error709 appears after you replace a print cartridge refer to Messages about Ot...

Страница 327: ...toner box is mounted inside the belt unit 1 If roll paper has been fed through the printer press the UNLOAD button to cut the roll paper The cut paper will be fed to the supply side and the feeding s...

Страница 328: ...s QL 300 User Guide 328 3 Remove the print cartridge set 4 Place the removed print cartridge set on a flat surface covered with newspaper or something similar and cover it with paper so it is not expo...

Страница 329: ...Replacing Wear Items QL 300 User Guide 329 5 Turn the two belt locking keys counterclockwise to release the lock...

Страница 330: ...ve the belt unit at an angle Caution Be careful not to spill waste toner while removing the belt unit Caution Be careful to not pinch your hands or fingers between the handle and the machine while rem...

Страница 331: ...Items QL 300 User Guide 331 7 Place the belt unit with the right side down on a flat surface covered with paper Caution Place the belt unit on a flat surface as shown in the diagram above Do not stand...

Страница 332: ...Replacing Wear Items QL 300 User Guide 332 Caution Do not touch the belt surface or damage the belt 8 Hold the 2nd transfer roller unit 1 knob blue and remove it...

Страница 333: ...packaging 10 Set the new 2nd transfer roller 1 into the printer Note Do not touch the roller part sponge part of the 2nd transfer roller Touching it damages the surface of the roller which degrades pr...

Страница 334: ...Replacing Wear Items QL 300 User Guide 334 11 Remove the new belt unit from its packaging Caution Do not touch the belt surface or damage the belt...

Страница 335: ...t unit and printer to position it and then open the belt unit handles blue on the left and right Caution Be careful to not pinch your hands or fingers between the handle and the machine while installi...

Страница 336: ...e parts of the basket for this operation 15 Close the top cover Caution When closing the top cover there is a risk of pinching your fingers or hands in the top cover or the top cover s support Press o...

Страница 337: ...print quality Caution Do not disassemble the belt unit and the waste toner box and do not force them open Doing so may cause toner to spray out to be inhaled or to soil your clothing and hands If you...

Страница 338: ...s QL 300 User Guide 338 2 Remove the print cartridge set 3 Place the removed print cartridge set on a flat surface covered with newspaper or something similar and cover it with paper so it is not expo...

Страница 339: ...Replacing Wear Items QL 300 User Guide 339 4 Turn the two belt locking keys counterclockwise to release the lock...

Страница 340: ...ve the belt unit at an angle Caution Be careful not to spill waste toner while removing the belt unit Caution Be careful to not pinch your hands or fingers between the handle and the machine while rem...

Страница 341: ...Items QL 300 User Guide 341 6 Place the belt unit with the right side down on a flat surface covered with paper Caution Place the belt unit on a flat surface as shown in the diagram above Do not stand...

Страница 342: ...Replacing Wear Items QL 300 User Guide 342 Caution Do not touch the belt surface or damage the belt...

Страница 343: ...Replacing Wear Items QL 300 User Guide 343 7 Remove the waste toner box from the back of the belt unit...

Страница 344: ...Replacing Wear Items QL 300 User Guide 344 8 Remove the new waste toner box from its packaging 9 Insert the new waste toner box into the belt unit and firmly push it inside...

Страница 345: ...Replacing Wear Items QL 300 User Guide 345 10 When facing the belt unit hold the handles blue on its left and right sides...

Страница 346: ...nit and align the arrow labels red on the belt unit and printer to position it and then open the belt unit handles blue on the left and right Caution Be careful to not pinch your hands or fingers betw...

Страница 347: ...the handle parts of the basket for this operation 14 Close the top cover Caution When closing the top cover there is a risk of pinching your fingers or hands in the top cover or the top cover s suppor...

Страница 348: ...ns provided by the local municipality Use the box and packing bag from the new waste toner box for when the used waste toner box is recycled Replacing the Fuser and Exit Unit 1 If roll paper has been...

Страница 349: ...Replacing Wear Items QL 300 User Guide 349 2 While pulling the fuser and exit unit locking lever towards you pull out the fuser and exit unit...

Страница 350: ...Replacing Wear Items QL 300 User Guide 350 3 While supporting the fuser and exit unit with one hand lift up the fuser unit handle...

Страница 351: ...Replacing Wear Items QL 300 User Guide 351 4 Hold the fuser and exit unit with both hands to remove it 5 Remove the new fuser and exit unit from its packaging...

Страница 352: ...300 User Guide 352 6 Pull the fuser and exit unit locking lever on the new fuser and exit unit towards yourself and lift the fuser unit handle 7 Lift the new fuser and exit unit with both hands and p...

Страница 353: ...Replacing Wear Items QL 300 User Guide 353 8 Push down the fuser unit handle and firmly push it inside...

Страница 354: ...ts Caution Do not disassemble the fuser output unit and do not force it open If you must dispose of the used fuser and exit unit put it in a plastic bag and be sure to dispose of it according to the l...

Страница 355: ...ng Required Materials for Cleaning Prepare the following things for cleaning the various parts of the printer Clean lint free cloth Cleansing solvent IPA isopropyl alcohol Water or neutral cleanser Sc...

Страница 356: ...e No Yes Flange Yes Yes Side Guide 8Inch No Yes Tension Bar Yes Yes Guide Side Roller F Yes Yes Paper Guide Yes Yes Sheet Guide Yes Yes Roll Paper Guide Yes Yes F0 Roller Unit Yes Yes Sensor Cover Upp...

Страница 357: ...Unwinder This section describes how to clean the various parts of the unwinder Cleaning the Surfaces of the Unwinder Items to be prepared Water or neutral washing agent two sheets of soft dry cloth N...

Страница 358: ...rmore wipe off with another dry cotton cloth Cleaning the Inside of the Unwinder 1 Press and hold the POWER button for approximately 1 second to switch off the power supply Wait a moment and the LED l...

Страница 359: ...Cleaning QL 300 User Guide 359 2 Press down the flange locking lever 3 Remove the flange...

Страница 360: ...Cleaning QL 300 User Guide 360 4 Rotate the roll paper holder knob to narrow the axial diameter of the roll paper holder 5 Remove the roll paper...

Страница 361: ...User Guide 361 6 Use a clean lint free cloth moistened with alcohol to wipe any dirt off the sides of the flange and Side Guide 8Inch 7 Mount the roll paper 8 Press up on the tension bar open lever u...

Страница 362: ...tension bar 1 Use the hand that is restraining the tension bar to rotate it 2 as you finish cleaning each side until the entire tension bar is clean 10 While rotating the guide side roller F use a li...

Страница 363: ...Cleaning QL 300 User Guide 363 12 Lower the unwinder cover open lever to open the unwinder cover Note Securely open the unwinder cover so it does not close while cleaning...

Страница 364: ...ed with alcohol to wipe in one direction the dirt off the sheet guide 15 Move the roll paper guide to confirm that there is no glue or paper scraps on it If there are scraps of paper or glue from the...

Страница 365: ...guide and secure the screw 19 Remove the screws two places for the F0 roller unit 20 Remove the F0 roller unit 21 As you rotate the gears with one hand use a lint free cloth moistened with alcohol to...

Страница 366: ...asten the two screws 23 Use a lint free cloth moistened with alcohol to wipe in one direction the dirt off the sensor cover upper 24 Use a lint free cloth moistened with alcohol to wipe in one directi...

Страница 367: ...prepared Water or neutral washing agent two sheets of soft dry cloth Note Do not use Benzene or thinner as it may damage plastic parts and coating Note Only use water or neutral washing agent Note It...

Страница 368: ...rmore wipe off with another dry cotton cloth Cleaning the Inside of the Printer 1 Press and hold the POWER button for approximately 1 second to switch off the power supply Wait a moment and the LED la...

Страница 369: ...e top cover open lever and open the top cover 3 Remove the print cartridge set 4 Place the removed print cartridge set on a flat surface covered with newspaper or something similar and cover it with p...

Страница 370: ...Cleaning QL 300 User Guide 370 5 Turn the two belt locking keys counterclockwise to release the lock...

Страница 371: ...belt unit at an angle Caution Be careful not to spill waste toner while removing the belt unit Caution Be careful to not pinch your hands or fingers between the handle and the machine while removing...

Страница 372: ...QL 300 User Guide 372 7 Place the belt unit with the right side down on a flat surface covered with paper Caution Place the belt unit on a flat surface as shown in the diagram above Do not stand it on...

Страница 373: ...Cleaning QL 300 User Guide 373 Caution Do not touch the belt surface or damage the belt 8 Pull up the paper guide release lever...

Страница 374: ...er guide in the direction of the arrow to remove it 10 Turn the paper guide over 11 Use a lint free cloth moistened with alcohol to wipe the dirt off the F4 roller F3 roller F2 roller and feed surface...

Страница 375: ...tion If the area around the 2nd transfer roller is dirty clean it carefully without touching the rollers 12 If the rollers and feed surface of the feed unit on the bottom of the paper guide are dirty...

Страница 376: ...Cleaning QL 300 User Guide 376 13 Open the sensor cover 14 Use a lint free cloth moistened with alcohol to wipe in one direction the dirt off the sensor cover lower and upper...

Страница 377: ...Cleaning QL 300 User Guide 377 15 While pulling the fuser and exit unit locking lever towards you pull out the fuser and exit unit...

Страница 378: ...Cleaning QL 300 User Guide 378 16 While supporting the fuser and exit unit with one hand lift up the fuser unit handle...

Страница 379: ...Cleaning QL 300 User Guide 379 17 Hold the fuser and exit unit with both hands and remove it to a level spot Caution Be careful the fuser unit is very hot immediately after printing...

Страница 380: ...over the exit feed cover will close Note Do not remove your hand from the exit feed cover while you are cleaning Note The inlet of the fuser unit may be stained by toner during use However this does n...

Страница 381: ...er Guide 381 20 Close the exit feed cover 21 Use a lint free cloth moistened with alcohol to wipe the dirt off exit 2 roller from the outside 22 Lift the fuser and exit unit with both hands and put it...

Страница 382: ...Cleaning QL 300 User Guide 382 23 Push down the fuser unit handle and firmly push it inside...

Страница 383: ...Cleaning QL 300 User Guide 383 24 Lift up the fuser and exit unit locking lever...

Страница 384: ...Cleaning QL 300 User Guide 384 25 Align the positions of the paper guide s edge 1 and the guide notch on the printer...

Страница 385: ...Cleaning QL 300 User Guide 385 26 Firmly push the paper guide all the way in the direction of the arrow and then push on the A position to lock it...

Страница 386: ...d align the arrow labels red on the belt unit and printer to position it and then open the belt unit handles blue on the left and right Caution Be careful to not pinch your hands or fingers between th...

Страница 387: ...this operation 30 Close the top cover Caution When closing the top cover there is a risk of pinching your fingers or hands in the top cover or the top cover s support Press on the top of the top cover...

Страница 388: ...around text If the LED heads are dirty it could cause a paper jam Caution Do not use methyl alcohol or thinner Doing so could damage the LED heads 1 Press and hold the POWER button for approximately 1...

Страница 389: ...e dirty because toner or something is on them 4 Lightly wipe the lenses of the LED heads with a clean lint free cloth Caution Do not use methyl alcohol or thinner Doing so could damage the LED heads 5...

Страница 390: ...cover to close it Cleaning the Fuser Unit This section describes how to clean the various parts of the fuser unit This procedure is for cleaning the inside of the fuser unit Streaks may appear when p...

Страница 391: ...Cleaning QL 300 User Guide 391 2 Load the cleaning paper onto the printer 3 Press the scroll button or 4 Select Print Information and press the OK button 5 Select Cleaning Page and press the OK button...

Страница 392: ...the cutter s blades while cutting roll paper This causes problems with cutting and feeding Glue is more likely to accumulate on the cutter s blades when using continuous label paper because the part...

Страница 393: ...he cleaning swabs and wiping solvent should be the recommended products Contact Technical Support to purchase the recommended products 1 Press and hold the POWER button for approximately 1 second to s...

Страница 394: ...Cleaning QL 300 User Guide 394 4 Lower the unwinder cover open lever to open the unwinder cover Note Securely open the unwinder cover so it does not close while cleaning...

Страница 395: ...Cleaning QL 300 User Guide 395 5 Raise the cutter unit lock levers at both ends of the cutter unit...

Страница 396: ...300 User Guide 396 6 Hold the handle of the cutter to remove the cutter unit Note Be careful that the cutter unit does not hit the sensor cover upper when removing it 7 Remove any paper left in the c...

Страница 397: ...leaning QL 300 User Guide 397 If there is paper left inside the cutter unit after you have removed it remove that paper 8 Disassemble the cutter unit a Use a flathead screwdriver to remove the 3 screw...

Страница 398: ...r unit in the direction of the arrow Slide the F0 roller unit at an angle arrow direction and remove it Caution There are blades inside the cutter unit for cutting roll paper Do not touch the blades o...

Страница 399: ...e is glue stuck to the inside of the cutter unit use the tweezers to remove as much as possible b Clean the glue off the cutter blades There are two types of cutter blades the spiral blade rotating bl...

Страница 400: ...r again in the same way Confirm that there are no scraps or threads from the cloth left inside the blades of the cutter or the cutter unit If there are any left wipe the machine again After cleaning w...

Страница 401: ...Cleaning QL 300 User Guide 401 Cleaning the lower roller Cleaning the upper roller 12 Assemble the cleaned cutter unit...

Страница 402: ...cutter unit for cutting roll paper Do not touch the blades of the cutter with your hands There is a risk of injury a Assemble the F1 roller unit Hold the F0 roller unit and insert it at an angle arro...

Страница 403: ...Guide 403 b Use a flathead screwdriver to tighten the 3 screws 13 Put the cutter unit into the unwinder a Align the positions of the cutter unit lock levers on both ends of the cutter unit with the no...

Страница 404: ...Cleaning QL 300 User Guide 404 b Lower the cutter unit lock levers at both ends of the cutter unit 14 Close the unwinder cover...

Страница 405: ...following URL then press Enter http printer IP address This displays the printer status screen If the IP address includes a one digit or two digit number do not enter leading zeros Doing so may cause...

Страница 406: ...r password is 999999 3 Specify the configuration information that can be checked on the network and then click OK or SKIP Note You can skip configuring settings by clicking SKIP Note Selecting the Do...

Страница 407: ...also check the operational status of each network service a con figuration list and the IP address assigned to the printer Tray Count Shows the print count Supplies Life Shows the remaining life of w...

Страница 408: ...n Information Print Can be used to configure print and check information about the network the font list and other printer settings Item Description General Printer Set tings Can be used to configure...

Страница 409: ...o configure print position adjustment print quality and to adjust other settings Unit of Measurement You can set the units that are displayed Item Description Network Setup Can be used to configure TC...

Страница 410: ...ion Normal Setting Adjusts the density of each color and other print quality settings Customize Menu Used to perform density and registration adjustment Item Description Links Displays links configure...

Страница 411: ...edure below to change the password for logging in to the printer as an administrator 1 Click Admin Setup Management Edit Links Allows administrator to set any URL Up to five support links and five oth...

Страница 412: ...the screen as a series of dots as you enter it You can enter from 6 to 12 alphanumeric English characters for a password Note that passwords are case sensitive so enter upper case and lower case lette...

Страница 413: ...413 Checking Printer Settings From a Computer You can use the procedures below to check the printer status from a computer over a network To check using the Status Screen 1 Access the printer web pag...

Страница 414: ...mation about the printer and its status is displayed in this window Click Refresh to update the window with the latest information The color of the printer status icon indicates whether printing is po...

Страница 415: ...click Submit Encrypting Communication SSL TLS Communication between the computer client and printer can be encrypted when configuring settings performing IPP printing and when receiving print data wi...

Страница 416: ...become invalid Do not change the printer s IP address after creating a certificate 1 Log in as an administrator See Logging in as an Administrator on page 405 2 Click in the following sequence Admin...

Страница 417: ...play the encryption SSL TLS setup screen and then configure protocol settings to enable encryption c Click Submit 8 CA Certificate Note This step applies only to CA certificates a This displays the in...

Страница 418: ...trator 2 Select Admin Setup 3 Select the following Network Setup IPP Setup 4 Follow the instructions that appear on the display to configure the setup 5 Click Submit To set up the printer as an IPP pr...

Страница 419: ...e driver installation software You can obtain the software from www QuickLabel com downloads 9 For Copy manufacturer s files from browse to the appropriate folder and then click Find PCL driver Driver...

Страница 420: ...ransport Mode It does not support Tunnel Mode Printer response may slow down while IPsec is enabled depending on network communication conditions Note IPsec does not operate with the mail send functio...

Страница 421: ...ec setup fails because the configured parameters do not match the computer or because of some other reason If this happens use the control panel Network Setup item to disable IPsec or perform network...

Страница 422: ...der STEP3 configure the settings of the Phase1 Proposal parameters For IKE Encryption Algorithm select one of the following settings AES CBC 256 AES CBC 192 AES CBC 128 3DES CBC DES CBC For IKE Hash A...

Страница 423: ...haracters Here we will show an example where ipsec is entered for the character string 8 Under STEP5 set the Key PFS a For Key PFS select KEYPFS or NOPFS b If Key PFS is selected select one of the fol...

Страница 424: ...ication algorithm will not be applied To configure AH settings a For AH Authentication Algorithm select SHA 1 or MD5 b For LifeTime enter and set a value in the range of 600 seconds to 86 400 seconds...

Страница 425: ...l with Advanced Security Windows Firewall with Advanced Security Local Group Policy Object right click Connection Security Rules and then select New Rule 6 Select Custom and then click Next 7 Select E...

Страница 426: ...de 426 8 Select Require authentication for inbound connections and request authentication for outbound connections and then click Next 9 Select Advanced and then click Customize 10 In the First authen...

Страница 427: ...Web Utility QL 300 User Guide 427 11 Select Preshared Key and enter the key and then click OK 12 Click OK 13 Click Next 14 Click Next...

Страница 428: ...Utility QL 300 User Guide 428 15 After confirming that all of the check boxes are selected click Next 16 Enter a name and then click Finish 17 Open the Local Security Policy of the Administrative Too...

Страница 429: ...Windows Firewall with Advanced Security right click and then select Properties 19 Select the IPsec Settings tab Next in the IPsec defaults section click Customize 20 In the Key exchange Main Mode sect...

Страница 430: ...In the Data protection Quick Mode section select Advanced and then click Customize 23 Configure the settings you want and then click OK Note Support is provided only for time indicated by the key lif...

Страница 431: ...QL 300 User Guide 431 24 In the Authentication method section select Advanced and then click Customize 25 In the First authentication section click Add 26 Select Preshared Key and enter the key and th...

Страница 432: ...Web Utility QL 300 User Guide 432 27 Click OK 28 Click OK to exit Customize IPsec Settings 29 Click OK...

Страница 433: ...isable under the printer initial default settings Note Take care to enter the IP address correctly An incorrectly entered IP address can make it impossible to access the printer using IP protocol 1 Lo...

Страница 434: ...ddresses enter the range of hosts that are allowed to print and configure settings For the IP addresses use single byte numerals separated by periods Entry of IP address 0 0 0 0 is invalid When there...

Страница 435: ...om a host with the IP address specified with Administrator s IP Address setting If the printer is being accessed via a proxy the intermediate device s address will be displayed as Your Current Local H...

Страница 436: ...ses Note Incorrectly entering a MAC address can make it impossible to access the printer using a network Exercise caution when entering an address 1 Log in as an administrator See Logging in as an Adm...

Страница 437: ...for communication from specific MAC addresses Using MAC addresses enter the range of hosts whose communications are allowed or rejected For the MAC addresses use single byte numerals separated by peri...

Страница 438: ...he printer is being accessed via a proxy the intermediate device s address will be displayed as Your Host MAC Address Consequently the address shown by Your Host MAC Address may be different from your...

Страница 439: ...n It can be configured to send a mail message whenever an error occurs You can select whether to send a periodic mail message about errors or to send a mail message as soon as an error occurs 1 Log in...

Страница 440: ...name you need to configure DNS server settings with the TCP IP setup The mail server needs to be configured to allow the printer to send mail For information about mail server settings consult with y...

Страница 441: ...col for STEP3 Otherwise jump to step 16 of this procedure 7 Click Security Settings 8 For SMTP Port Number specify the mail server port number 9 Select Enable for SMTP Auth a For User ID specify the u...

Страница 442: ...dress for the mail sent from the printer Normally specify the mail address of the printer administrator 16 Click OK 17 Click Submit 18 Settings are saved on the printer and the network function is res...

Страница 443: ...ty QL 300 User Guide 443 To send periodic notifications about problems 1 Log in as an administrator See Logging in as an Administrator on page 405 2 Click Admin Setup Network Setup 3 Click Email Alert...

Страница 444: ...Setting of the mail address you want to specify Malfunction notification condition settings can be copied to another addressee by clicking Copy This is useful when sending malfunction notifications to...

Страница 445: ...iguration of the malfunction notification conditions To display as a list click Show current settings table Check the configuration and then close the window To compare the setting conditions of two r...

Страница 446: ...ail address of the malfunction notification recipient 3 Click Setting of the mail address you want to specify Malfunction notification condition settings can be copied to another addressee by clicking...

Страница 447: ...e generated only over a long period of time Setting 0 hours 0 minutes for the delay time causes the message to be sent immediately after an error occurs 7 Click OK 8 Check the configuration of the mal...

Страница 448: ...nction is restarted Using SNMPv3 This printer implements an SNMPv3 compatible agent You can use an SNMPv3 compatible SNMP manager to encrypt printer administration with SNMP for greater security 1 Log...

Страница 449: ...d in STEP1 and then click To STEP2 If SNMPv3 is selected you will not be able to view or configure settings with SNMPv1 If SNMPv3 v1 is selected you will be able to view settings with either SNMPv1 or...

Страница 450: ...MP manager to be used specify v3context Using IEEE802 1X Authentication is in accordance with IEEE802 1X IEEE802 1X Setup Flow To configure IEEE802 1X settings on the printer first connect the printer...

Страница 451: ...e IEEE802 1 settings 1 Log in as an administrator See Logging in as an Administrator on page 405 2 Click Admin Setup Network Setup 3 Click IEEE802 1X If PEAP is to be used proceed to To use PEAP If EA...

Страница 452: ...eck box is selected there is no confirmation to determine if the connection is to a properly authenticated server This displays the Import of CA Certificate screen 7 Enter the file name of the CA cert...

Страница 453: ...e 4 Select the Not use SSL TLS Certificate for EAP authentication check box 5 Click Import of Client Certificate This displays the Import of Client Certificate screen 6 Enter the file name of the clie...

Страница 454: ...le formats are PEM DER and PKCS 7 The CA certificate is imported by the printer 11 Click Submit 12 Settings are saved on the printer and the network function is restarted When the standby screen appea...

Страница 455: ...umbers shown in the diagrams indicate the numbers for the residual risk associated with the relevant locations as described in the List of Risks for the product For details about the various risks ref...

Страница 456: ...Safety QL 300 User Guide 456...

Страница 457: ...hile lift ing it Two or more people are required to lift the machine 2 Installation transporta tion Carefully read User Guide A CAUTION Because the machine the printer alone weighs 43 kg there is a ri...

Страница 458: ...with their hands while the printer is operat ing Workers must not put their faces close to or look into the out put roller area on the fuser and exit unit while the printer is operating 6 Electrical...

Страница 459: ...nd exit unit 11 Usage maintenance Carefully read User Guide G CAUTION There is a risk of injury if the print cartridge set falls while it is being pulled out Workers must grip the handles on the toner...

Страница 460: ...ser Guide K CAUTION There is a risk that hands could be pinched in the cover of the unwinder Workers must press on the cover of the unwinder 17 Usage maintenance Carefully read User Guide K CAUTION Th...

Страница 461: ...he roll paper is dropped or over turned Workers must wear rubber gloves or simi lar gloves while installing or removing roll paper Workers must confirm the stor age and installa tion procedures so the...

Страница 462: ...r while the machine is oper ating Workers must not touch the shaft of the roll paper holder while the printer is operating Workers must not put their faces close to or look into the shaft of the roll...

Страница 463: ...p ping on the cores of roll paper or on rolls of paper that are left on the floor Workers must confirm the stor age and installa tion procedures so they do not drop or overturn the roll paper 28 Insta...

Страница 464: ...32 Usage Carefully read User Guide P CAUTION Smoke or fire could occur if the air vents are blocked The air vents must not be blocked No Job Qualifications and training needed for job Location on mach...

Страница 465: ...outlet and contact your dealer Electric shock fire or injury may result Unplug the power plug regularly and clean the bases of and in between the plug blades If the power plug is left plugged into th...

Страница 466: ...ed Do not use an uninterruptible power supply or inverter Fire may result Symbol Caution Do not go near the paper output part when you turn the power on or when printing is in progress Injury may resu...

Страница 467: ...tandby Average 27 W In power conservation modes Power save mode 25 W or less Auto power off 1 W or less This product does not consume power if the main power switch is turned off even if it is plugged...

Страница 468: ...Printable width Paper width Roll paper 25 4 mm 1 inch 130 mm 5 1 inches including liner Printable width Roll paper 21 16 mm 0 83 inches 125 76 mm 4 95 inches Reference position Right edge facing feed...

Страница 469: ...onditions Image stretching Less than 0 5 of length of paper When using recommended media and rec ommended operating conditions Warmup time Approx within 50 seconds after turning power on at room tempe...

Страница 470: ...r Guide 470 Roll Paper Specifications Continuous paper normal printing Item Specification Paper weight 0 07 to 0 25 mm 0 003 to 0 0098 inches Roll core Inner diameter 76 2 mm 3 inches Outer diameter 2...

Страница 471: ...of one label is less than 101 6 mm 4 inches then the shortest length is 101 6 mm 4 inches as multiple sheets are cut L5 Upper edge cutting margin 2 12 mm 0 0835 inches L6 Lower edge cutting margin 2...

Страница 472: ...300 User Guide 472 Continuous paper printing on large size paper Item Specification Paper weight 0 07 to 0 25 mm 0 003 to 0 0098 inches Roll core Inner diameter 76 2 mm 3 inches Outer diameter 203 2 m...

Страница 473: ...ver if the length of one label is less than 101 6 mm 4 inches then the shortest length is 101 6 mm 4 inches as multiple sheets are cut L5 Upper edge cutting margin 2 12 mm 0 0835 inches L6 Lower edge...

Страница 474: ...ns QL 300 User Guide 474 Continuous paper with black marks Item Specification Paper weight 0 07 to 0 25 mm 0 003 to 0 0098 inches Roll core Inner diameter 76 2 mm 3 inches Outer diameter 203 2 mm 8 in...

Страница 475: ...iple sheets are cut L5 Upper edge cutting margin 1 7 mm 0 067 inches L5 Position of leading edge of paper 1 2 to 4 0 mm 0 0472 to 0 1575 inches Length of leading margin when paper is loaded L6 Lower e...

Страница 476: ...fications QL 300 User Guide 476 Die cut label paper Item Specification Paper weight 0 07 to 0 25 mm 0 003 to 0 0098 inches Roll core Inner diameter 76 2 mm 3 inches Outer diameter 203 2 mm 8 inches or...

Страница 477: ...ze when in cut mode 101 6 mm 4 inches or more However if the length of one label is less than 101 6 mm 4 inches then the shortest length is 101 6 mm 4 inches as multiple sheets are cut L5 Upper edge c...

Страница 478: ...QL 300 User Guide 478 Die cut label paper with black marks Item Specification Paper weight 0 07 to 0 25 mm 0 003 to 0 0098 inches Roll core Inner diameter 76 2 mm 3 inches Outer diameter 203 2 mm 8 i...

Страница 479: ...an 101 6 mm 4 inches then the shortest length is 101 6 mm 4 inches as multiple sheets are cut L5 Upper edge cutting margin 1 7 mm 0 067 inches L5 Position of leading edge of paper 1 2 to 4 0 mm 0 0472...

Страница 480: ...ns QL 300 User Guide 480 Full sheet labels normal printing Item Specification Paper weight 0 07 to 0 25 mm 0 003 to 0 0098 inches Roll core Inner diameter 76 2 mm 3 inches Outer diameter 203 2 mm 8 in...

Страница 481: ...nches L4 Cut size when in cut mode 101 6 mm 4 inches or more However if the length of one label is less than 101 6 mm 4 inches then the shortest length is 101 6 mm 4 inches as multiple sheets are cut...

Страница 482: ...00 User Guide 482 Full sheet labels printing on large size paper Item Specification Paper weight 0 07 to 0 25 mm 0 003 to 0 0098 inches Roll core Inner diameter 76 2 mm 3 inches Outer diameter 203 2 m...

Страница 483: ...320 8 mm 0 5 to 52 inches L4 Cut size when in cut mode 101 6 mm 4 inches or more However if the length of one label is less than 101 6 mm 4 inches then the shortest length is 101 6 mm 4 inches as mult...

Страница 484: ...QL 300 User Guide 484 Full sheet label paper with black marks Item Specification Paper weight 0 07 to 0 25 mm 0 003 to 0 0098 inches Roll core Inner diameter 76 2 mm 3 inches Outer diameter 203 2 mm 8...

Страница 485: ...less than 101 6 mm 4 inches then the shortest length is 101 6 mm 4 inches as multiple sheets are cut L5 Upper edge cutting margin 1 7 mm 0 067 inches L5 Position of leading edge of paper 1 2 to 4 0 mm...

Отзывы: