background image

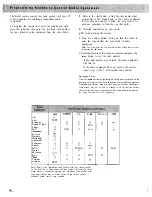
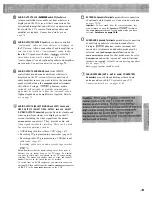
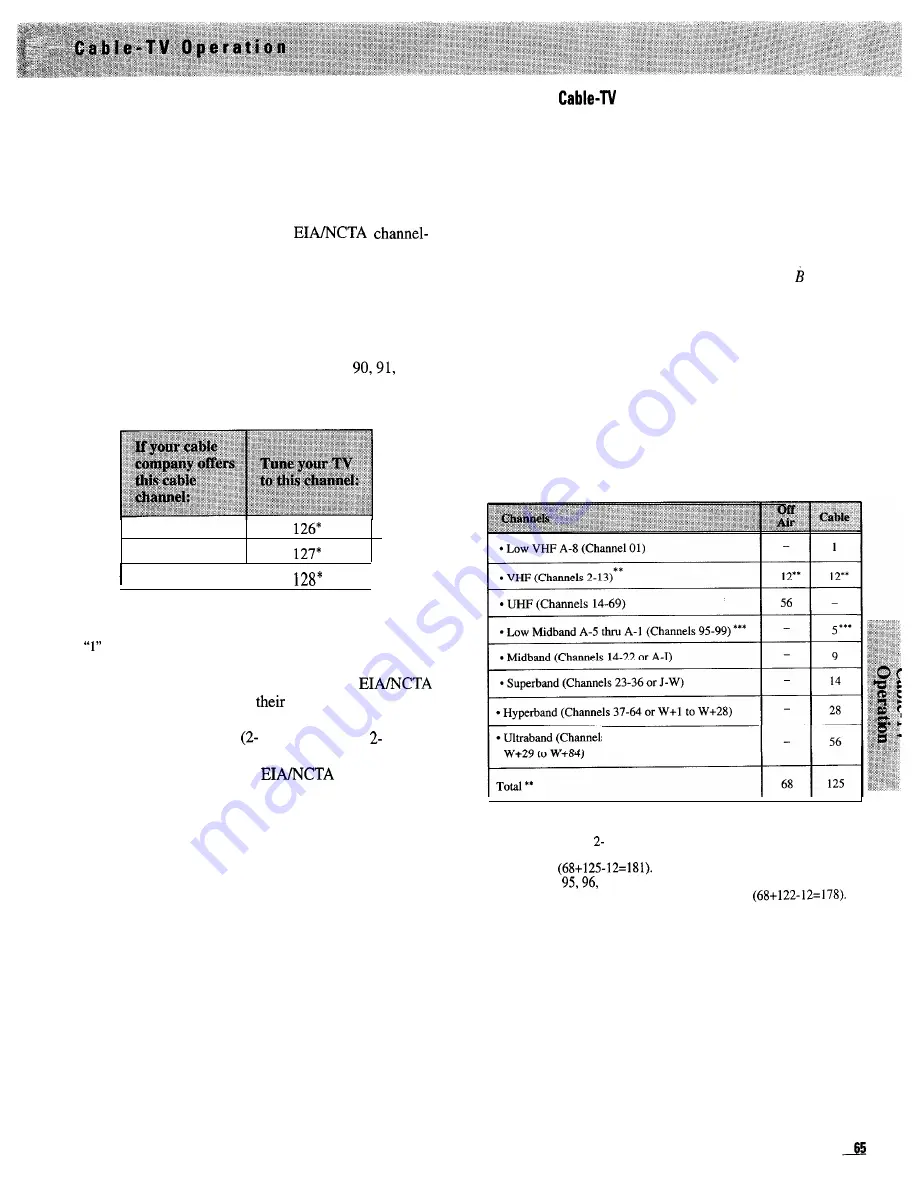
Your new TV is designed to receive up to 181 channels in
the U.S.A. including 125 unscrambled cable channels (see
chart at right). To use this TV with a cable-TV system,
confirm that the cable-TV system is properly connected to
your TV. Since cable systems vary, you may wish to
consult your local cable-TV company for additional
information.

If your cable-TV company follows 


identification standards, most of the channels offered by
your cable company will be identified by channel numbers
that are identical to those on your TV. For example, if your
cable-TV system has programs on cable channel 20, you
can choose this channel by selecting channel 20 on
your TV.

If your cable company offers cable channels 

 or 92

you can tune them by selecting the TV channels shown

below.

90

91

92

I

I

* To tune cable channels 100 through 128, press and hold number button

 until “1--” appears on the screen, then enter the other two numbers.

Some cable-TV companies do not follow the 
standards and instead assign 

 own channel

identification. For example, some use the standard
broadcast channel numbers 

 13) for channels 

 13, but

identify their other channels with letters. If your cable
company does not follow the 

 standards, ask

them for a cross reference that shows to which channels
you should tune your TV to receive their cable-TV
channels.

Not all cable-TV channels will be active on your particular
cable-TV system. Also some cable companies may require
the use of a decoder with their cable-TV system. Consult
your cable company or local dealer for details.

Scrambled 

 Channels

Some cable companies offer scrambled “premium-pay”
channels. Descrambling these signals for normal viewing
requires the use of a descrambler device (cable box) which
is generally provided by the cable company.

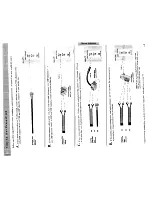
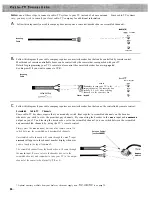
How you connect the cable box to your TV depends upon
whether or not the cable box can be controlled by remote
control. The TV’s remote can also control most brands of
cable boxes, so if your cable box is remote controllable,
you will want to connect it as 

shown in Diagram   on

page 

62. Instructions for programming the TV’s remote to

control the cable box 

are on page 64.

If your cable box can not be controlled by remote control,
you will still be able to remotely switch between a
scrambled channel and unscrambled channels with the
connection 

shown in Diagram C on page 62 or in

Diagram D on page 63.

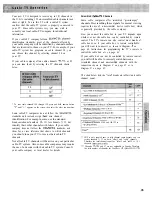
The chart below lists the “total” broadcast (off-air) and cable
channel count.

s 65-94 and 100-125 or

** VHF is only counted once in total channel count because you can

receive channels 

 13 on both “off-air” and “cable” channels.

Therefore the total channel count for “off-air” and “cable” is 18 1
channels 

*** Channels 

 and 97 are not applicable in Canada. Therefore

the total number of channels for Canada is 178 

Содержание PS52682

Страница 1: ...tor Panel 60 Tips to Read Before Connecting Components 61 Home Antenna Connections 62 63 Cable TV Connections 64 Programming Remote to Control Cable Box 65 Cable TV Information and Channel Chart Optional Accessories 74 75 Accessory Cables 75 76 Accessory Order Form Reference Section 77 Design Specifications 77 Cleaning and Care 78 79 Trouble Checks 79 Warranty 80 81 Index Alphabetical 82 83 Quick ...

Страница 2: ...AUDIO SETUP MENUS The individual setup menus allow you to adjust individual features for the audio mode ...

Страница 3: ...ghlight the desired function then press the MENU button to enter or adjust that function When one of the menus shown at the right appears repeatedly press the or button to highlight the desired function and then press the MENU button to enter or adjust that function or display the next menu ...

Страница 4: ... have a very simple solution It s called ProScan State of the art technology that real people can use Thank you for choosing ProScan And welcome to our company wide commitment to your complete satisfaction and viewing enjoyment This page folds open to display the menus We designed this page so that you could leave it open 7 and use it as a quick reference guide while reviewing the manual A ...

Страница 5: ...ans la borne correspondante de la prise et pousser jusq6 au fond All operating controls and their functions are identified and explained in this manual For warranty service or routine maintenance contact the nearest Authorized ProScan TV Servicenter All servicing and adjustments to electrical components should be done by a qualified service technician Warning To prevent fire or shock hazard do not...

Страница 6: ...etails see page 50 l Previous Channel Feature For details see page IO l 181 Channel Tuning Capability in U S A For details see page 65 Check your cable company s compatibility requirements One Minute Manual l On Screen Menus for operation of all features l AutoProgramming automatically searches for and stores all active channels Eliminates the need for manual set up For details see page 46 l Frequ...

Страница 7: ...use the collapsed back makes the TV narrower After the TV is positioned in your home you can easily extend the back cover to its normal operating position by following the instructions below 1 Remove the four wing nuts from the literature bag 2 Remove the two screws labeled A from the shipping brackets You will use these screws later in step 6 Back Collapsed Alignment Hole for Locating Pin Alignme...

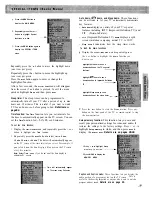
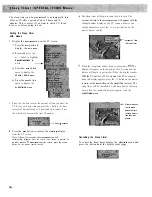
Страница 8: ...to help displays do not automatically appear on your TV screen the instructions in the next column explain how to turn them on 4 Press MENU button to display MAIN MENU Help displays automatically appearon screen To turn on auto help displays 1 Press MENU to display the MAIN MENU 2 Repeatedly press or to highlight Setup in w h i t e 3 Press MENU again to display the SETUP menu 4 Repeatedly press or...

Страница 9: ...IN MENU 2 Repeatedly press or to highlight Video Adjust in white 3 Press MENU again to display the VIDEO ADJUST menu 4 Repeatedly press or to highlight Projection setup in white 5 Press MENU again to display the CONVERGENCE menu 3 When properly converged all three colors in the pattern red blue and green should align to form white lines If you see any red or blue lines in the pattern you can move ...

Страница 10: ...ghlight Setup in white 3 Press MENU again to display the SETUP menu 4 Repeatedly press or to highlight Channel memory in white 5 Press MENU again to display the CHANNEL MEM menu Press the MENU button to select underline the Channel function Enter the number of the channel you want to add or erase from the channel memory scan list Press to enter a channel with a higher number or press to enter a ch...

Страница 11: ...TV DISPLAY or CHANNEL up or down button to see if the correct time and day of the week appear on the TV screen along with the channel number display 11 The correct time will now appear on the screen whenever you change channels or press the DISPLAY or TV button Notes The CLOCK SET menu will automatically disappear from the screen within a few seconds if no button is pressed If the CLOCK SET menu d...

Страница 12: ...teries Never place anything heavy on top of the remote control or lay it upside down This may accidentally depress the buttons for a long time and discharge the batteries Do not mix new and used batteries or different brands of batteries If battery leakage occurs wipe up the liquid inside the compartment and replace the batteries with new ones Using the Remote Controls Aim either remote control at...

Страница 13: ... basic functions of the component you selected in Step 1 To control a different component first press its component button VCRI VCR CABLE AUDIO or IV and then press the desired function button Note Not all components have functions that can be controlled by these buttons but you can experiment with your particular component to discover exactly which buttons will control it The N button automatical...

Страница 14: ... see the next higher channel in memory or press CHANNEL down to see the next lower channel in memory Your TV will automatically program active channels for your area into memory when you start the AutoProgram feature described on page 46 You can also add or remove individual channels from memory as described on page 47 0 3 0 4 VOLUME Buttons Press VOLUME up to increase volume or press VOLUME down ...

Страница 15: ...e on page 41 0 15 MENU Button and and Buttons Press MENU once to display the MAIN MENU then press or to highlight the function you want Next press MENU again to enter or adjust that function or display the next menu Details about using eachfunction begin on page 13 0 16 INPUT Button lets you quickly view signals from the I N P U T jacks Pressing this button switches the TV from its current channel...

Страница 16: ...ribed on page 46 You can also add or erase individual channels as described on page 47 0 4 MENU Button Press MENU to display the MAIN MENU Use and and MENU to select and adjust other menu functions Details about using each menu function begin on page 13 1 0 1 o 2 o 3 4 0 o 5 0 5 and Buttons Use these buttons after you have pressed the MENU button to enter or adjust functions 0 6 Stereo Headphone J...

Страница 17: ... are on page 17 The Audio Adjust menu allows you to adjust the equalizer adjust the headphone s volume adjust right and left balance select one of eight different audio modes each with individual setup features and set the volume limit of your TV Details are on pages 23 36 The Video Adjust menu allows you to adjust the color tint contrast brightness sharpness color temperature noise reduction and ...

Страница 18: ... reached 3 After you have zoomed in press the arrow buttons to move pan around the screen Sometimes you may want to freeze the picture first and then zoom in or you can zoom in and then freeze the picture 4 To reduce the zoom amount and return to normal size press and hold O U T or press the OFF button Freeze and Zoom with menus To Freeze the Main Picture Press MENU to display the MAIN MENU Press ...

Страница 19: ...e t or button to highlight Done and press the MENU button to return to the Pix In Pix menu Press MENU Button Pix In Pix Menu 4 When you are finished repeatedly press the or button to highlight Done and press the MENU button to remove the Pix In Pix menu from the TV screen Note The menu will automatically disappear after a few seconds if no button is pressed You can also quickly remove the menu fro...

Страница 20: ...ect Solarize Effect When the effect Mosaic or Solarize is highlighted repeatedly press the MENU button to select the amount of effect you want l You can increase the amount of mosaic effect from 00 to 07 l You can increase the amount of solarization effect from 00 to 04 7 Select the speed of the digital effect Repeatedly press the or button to highlight the Speed function Then press the MENU butto...

Страница 21: ...ton again Starting Channel Guide with menus Press the MENU button to display the MAIN MENU Then press the or button to highlight the Channel Guide function Press MENU again to start displaying the channels on the screen 1 Press MENU to display the MAIN MENU 2 Repeatedly press the button to highlight Channel Guide 3 Press MENU again to start Channel Guide w l The screen will display all the channel...

Страница 22: ... on Big Picture Different Channel on little Picture Notes The remote must be in the TV mode when you press the PIP button To put the remote in the TV mode press the TV button After you press the PIP button pressing the CHANNEL up or down button will automatically change channels on the small picture PIP will appear in the channel number display To change channels on the big picture press the N but...

Страница 23: ...screen To see the signal from a source connected to the INPUT jacks first press PIP and then repeatedly press the I N P U T button or press two number buttons to select channel 91 or 92 If you have added channel 91 or 92 to your channel memory scan list on page 47 you can use the CHANNEL up or down button l Select channel 9 1 if the other video source is connected to the TV s INPUT I jacks l Selec...

Страница 24: ...nel on Small Picture Note To change channels on the big picture press or to highlight the Ch cha PIP Main function Then press MENU to change this function to Ch chg Main Press the CHANNEL up or down button The menu will disappear from the screen w 3 Whenever you have the PIP feature turned on you can move enlarge reduce freeze or swap the big and little picture with the Pix In Pix menu Press MENU ...

Страница 25: ...cture up move small picture down l To change the size of the small picture Repeatedly press the or button to highlight the Size function Then press the MENU button to display the PIP size up dn display on the TV screen Press the button to increase the size of the small picture or the button to reduce the size of the small picture Pressing the MENU button will return you to the Pix In Pix menu Repe...

Страница 26: ...ay not be strong enough for quality reception The signal may drift or the reproduction may become noisy Should this occur change the Mode stereo mono function on the STEREO SETUP menu to Mode mono to receive clearer cleaner sound Details are on page 28 B External right and left front speakers connected If you have external right and left front speakers connected to the speaker connectors labeled E...

Страница 27: ...ound sound from a stereo broadcast and create the effect of being in a large room Details are on page 36 l Select the Stadium surr surround mode to hear surround sound from a stereo broadcast and create the effect of being in a stadium Details are on page 36 D External surround speaker s connected Connect this speaker s to speaker F connector s labeled SURROUND on the back of the TV 7 Surround E l...

Страница 28: ...ont speakers Details are on page 31 l Prologic provides separate surround center right and left sound from Dolby encoded sources Requires external right and left front speakers and rear surround speaker s Details are on pages 32 33 l Prologic phantom is the prologic mode to select if you have no external speakers connected or only external surround speaker s connected It uses the prologic decoder ...

Страница 29: ...ess MENU to display the MAIN MENU Press or to highlight the PIP function Press MENU to display the Pix In Pix menu Press or to highlight the Hphones function Then press MENU to change the function You can also select whether you want the sound from the headphone jack to come from the main picture or the PIP Picture In Picture small inset picture with the 4 Hphones Main PIP function Adjusting Headp...

Страница 30: ...ors and few furnishings commonly boom or resonate in the upper bass range Adjusting the 150 Hz band could control that without taking away good deep bass that a conventional bass control would reduce Saving Restoring and Returning to Factory Settings The TV will remember your settings for the Graphic Equalizer even when you turn it off To prevent losing your personal settings because someone chang...

Страница 31: ... it can soften strident music 2 kHz Strongly affects the harmonics overtones of voices and some instruments This frequency is most easily heard by the ear Increasing this control will project most instruments and vocals Reducing it helps control brilliance and allows more subtle sounds in the other ranges to be heard 4 5 kHz Affects harmonics overtones of voices and some instruments particularly b...

Страница 32: ...pears to the right of Stereo If it is not on press or to highlight Stereo and then press MENU Press MENU again to exit the AUDIO MODE menu and return to the AUDIO ADJUST menu Setup will already be highlighted Press the MENU button to enter the STEREO SETUP menu Adjust the STEREO SETUP menu to your personal preference Press or to highlight the function Press MENU when the Speakers int ext off funct...

Страница 33: ...ersonal settings because someone changes them accidentally you can save them using the MEMORY MENU After the settings have been saved you can restore them at a later date using the MEMORY MENU The MEMORY MENU also lets you easily restore the EXPD STEREO menu to its factory settings Details are on page 39 To Select and Setup Stereo Expand Mode with menus 1 Display the AUDIO MODE menu 1 Press MENU t...

Страница 34: ...oning lets you display the audio portion of a program as text on the TV screen This is useful to the hearing impaired or anyone who wants to watch a program without the sound Eight types of closed captioning are available Ccl CC2 CC3 CC4 Textl Text2 TexD and Text4 Selecting when Closed Captioning is displayed 1 Display the SPECIAL ITEMS menu 1 Press the MENU button to display the MAIN MENU 2 Press...

Страница 35: ...t spkrs on if you want to hear the sound from the TV s internal speakers which produce the center channel sound Press MENU when the Ext spkrs external speakers on off function is highlighted to turn the external right and left speakers on or off Leave the Ext spkrs function set to Ext spkrs on if you want to hear the sound from the speakers connected to the EXTERNAL speaker connectors 1 i lY L i A...

Страница 36: ...actured under license from Dolby Laboratories Licensing Corporation Additionally licensed under one or more of the following patents U S numbers 3 632 886 3 146 792 and 3 959 590 Canadian numbers 1 004 603 and 1 037 877 32 Selecting Prologic Mode 1 Connect external speakers to the EXTERNAL speaker connectors and connect the surround Speaker S to the SURROUND speaker connector s on the back of the ...

Страница 37: ...ker s has a lot of voices instead of mostly background ambience you may want to adjust the INPUT BALANCE display to minimize the voices With the INPUT BALANCE display on the TV screen press the and buttons to move to the right and to the left of the scale Stop at the point where voices are minimal in the surround speaker s j i Note When adjusting the INPUT BALANCE the front speakers will automatic...

Страница 38: ... button again to display the HELP MENU After the HELP MENU is displayed press or to highlight Audio Adjust and then press the MENU button Now follow the instructions on the TV screen Selecting Prologic Phantom Mode with menus 1 Connect surround speaker s to the SURROUND speaker connector s on the back of the TV Details on connecting speakers are on pages 72 73 Position the speakers as shown 2 Disp...

Страница 39: ...this at mid scale If the sound coming from your surround sound speaker s has a lot of voices instead of mostly background ambience you may want to adjust the INPUT BALANCE display to minimize the voices With the INPUT BALANCE display on the TV screen press the and buttons to move to the right and to the left of the scale Stop at the point where voices are minimal in the surround i i speaker s Note...

Страница 40: ... the TV s internal speakers Select Speakers ext if you have external front speakers and you want to hear the sound from them instead of the internal speakers Select Speakers off if you do not want any sound from the internal or external front speakers Press MENU when Volume is highlighted to enter the VOLUME display Press to increase or to decrease the TV s volume This volume control raises and lo...

Страница 41: ...ss to increase contrast or press to decrease contrast Brightness adjusts the brightness of the dark portions of the picture Press to increase brightness or press to decrease brightness 6 Adjust sharpness for a pleasing level of picture sharpness For weak signals the picture may be more pleasing with sharpness decreased 7 Set the Auto color Color temp and Noise reduce features to your personal pref...

Страница 42: ...ENU 2 Press or to highlight Special functions in white 3 Then press MENU again to display the SPECIAL ITEMS menu 4 Press or to highlight the Setup memory function i Then press MENU to display the MEMORY MENU 2 To Save Your Personalized Settings Press the or button to highlight the Save video setup function Then press the MENU button to save your settings for color tint contrast brightness and shar...

Страница 43: ... Audio Settings with menus 1 Dismay the MEMORY MENU 1 Press MENU to display the MAIN MENU 2 Press or to highlight Special functions in white 3 Then press MENU again to display the SPECIAL ITEMS menu 4 Press or to highlight the Setup memory function 5 Then press MENU to display the MEMORY MENU Press MENU to restore audio to the settings you previously saved To Restore Factory Audio with menus Setti...

Страница 44: ...he program will play only once or repeat every week at the same time Press the MENU button when Scheduler is highlighted to display the S C H E D U L E R menu Details are on pages 44 45 The Channel memory function allows you to add or erase channels from the channel memory scan list turn SAP on or off turn parental control on or off and add or erase channel labels Details are on pages 30 and 47 50...

Страница 45: ...is allows you to add or erase channels into each channel memory scan list The channel memory scan list is the list of channel numbers your TV will stop on when you press the CHANNEL up or down button When you use the Autoprogram function the TV automatically checks both inputs and sets up a separate channel memory scan list for each Changing Antenna Input with master remote control 1 Press the ANT...

Страница 46: ... appear with the channel number Details about labeling channels are on pages 48 49 Press the or button to select another channel Repeat steps 2 through 5 to enter up to six channels that you want in your priority channel memory scan list When you are finished highlight Done and press the MENU button to remove the PRIORITY CHAN menu from the screen Note After a few seconds the PRIORITY CHAN menu wi...

Страница 47: ... usually 03 or 04 next to the CABLE function the TV will automatically tune to that channel each time you press the CABLE button on the remote This function is especially convenient if you have a remote controllable cable box that can be operated by the CABLE button on the remote as described on page 64 j Pressing the CABLE button will then not only switch the I remote to cable mode but will also ...

Страница 48: ...am number Optional Select an entry current or clear Repeatedly press the or button to select underline entries Then press the MENU button to highlight entries and repeatedly press the or button to select clear current or a blank space for no entry l If you select entries current when you press the MENU button the channel number and antenna input you are tuned to current time and day of the week wi...

Страница 49: ...eek that you want the program to come on For example if you want a program to come on Monday through Friday highlight M T w T and F Monday Tuesday Wednesday Thursday Friday Saturday I I I Sunday MTWTFSS Program the TV to play your program one time or to repeat it every week Press the button to select underline the mode function Then repeatedly press the MENU button to select off once or rpt weekly...

Страница 50: ...casionally an active channel may be missed if its signal is very weak or the channel happened to be off the air during AutoProgramming An inactive channel may be included in the channel memory scan list if there happens to be some sort of noise or stray signal on the channel during AutoProgramming Signals from sources connected to the INPUT jacks on the back will not be AutoProgrammed Channel 91 I...

Страница 51: ...add a channel press MENU to change the Scan List in out function to Scan List in l To erase a channel press MENU to change the Scan List in out function to Scan List out 5 When you are finished press the or button to highlight Done and press the MENU button Note After a few seconds the CHANNEL MEM menu will automatically disappear from the screen if no button is pressed Pressing the CLEAR button o...

Страница 52: ... the next label in the list or press to return to the previous label 2 Press the MENU button to select the label remove underline Note Several of the built in channel labels for standard channels have art that will automatically appear in the channel display area along with the channel number and label These labels are followed by an asterisk in the chart below 3 Press the or button to highlight D...

Страница 53: ... When you are finished press the button to move the underline highlight to the asterisk and press the MENU button remove underline to enter your label 6 Continue to label channels by entering the channel number in the Channel function and selecting a label with the Label function When you are finished highlight Done and press the MENU button Erasing Channel labels with menus Display the CHANNEL ME...

Страница 54: ...HANNEL MEM menu 2 Enter the channel you want to lock out Press MENU to select underline the Channel function Then press for a channel with a higher number or for a channel with a lower number Note The currently tuned channel number will automatically appear in the Channel function 3 Press MENU and then press or to highlight the Parent Ctrl on off function 4 Press MENU to turn the Parent Ctrl on of...

Страница 55: ...the time display to automatically appear Time will automatically appear on TV screen every 5 minutes Auto demo IDTV demo and Sleep demo These functions can be activated to let your TV automatically demonstrate key features l Auto demo displays a variety of your TV s special features including IDTV Improved Definition TV and PIP Picture In Picture l IDTV Improved Definition TV demo displays a split...

Страница 56: ... the screen if no button is pressed To quickly remove the SLEEPTIMER from the screen press the CLEAR button on the master remote control The sleep timer will begin to count down to zero The amount of time in the SLEEPTIMER menu will appear with the channel number display on the TV screen whenever you change channels or press the TV or D I S P L A Y button on the master remote control Amount of Tim...

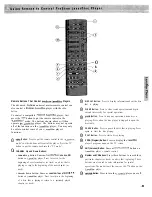
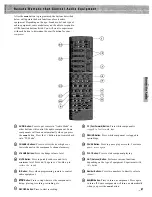
Страница 57: ...button Same as CHAPTER TRACK SEARCH 4 4 button on LaserDisc player Press to return to the beginning of a disc that is playing or return to a previously played chapter or track 0 3 0 4 0 5 DISPLAY Button Press to display information about the disc that is playing CLEAR Button Press to clear search operations and digits entered incorrectly for special operations STOP Button Press to stop any operati...

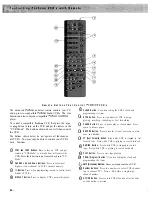
Страница 58: ... to control other brands of VCR s 0 4 DISPLAY Button Press to display VCR s normal displays 0 5 0 6 0 7 0 8 0 9 0 1 0 0 1 1 0 12 A CLEAR Button Use when setting the VCR s clock and programming its timer STOP Button Press to stop whatever VCR is doing playing recording rewinding or fast forwarding PAUSE Button Press to pause play or record mode Press again to release pause RECORD Button Press to re...

Страница 59: ...uch as PLAY PAUSE STOP REWIND FF and RECORD will control the VCR when the remote is in the VCR mode To change channels on the VCR press VCR1 or VCRZ then CHANNEL up or down To turn off the VCR press VCR1 or VCR2 then OFF ON This remote will control the basic functions of compatible VCR s It will not be able to control the advanced functions of all brands of VCRs You may have to reprogram your remo...

Страница 60: ...r the code number for your brand of audio equipment Note You must press the two number buttons within three seconds of pressing the ID button 5 Point the remote at the audio equipment and press the OFF ON button to test the code number l If the right number was entered the audio equipment will turn on l If the audio equipment does not react to the remote repeat steps 1 thru 5 with another code num...

Страница 61: ...el 0 4 MUTE Button Press to quickly reduce sound to its minimum level Press MUTE again or VOLUME up to restore the sound 0 5 ID Button Press when programming remote to control audio equipment 0 6 STOP Button Press to stop whatever the component is doing playing recording rewinding etc 0 7 RECORD Button Press to start recording 0 8 FF Fast Forward Button Press while component is stopped to fast for...

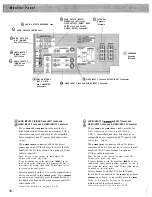
Страница 62: ...e sure to also connect the normal video cable S Video video can not be viewed on the small picture Select channel 92 on the TV to see the signals from a device connected to the INPUT 2 jacks Press CHANNEL up or down or repeatedly press the INPUT button or two number buttons on the master remote control to select channel 92 Connections details are on pages 66 69 0 2 4 AUDIO INPUTS 1 tUlblON0 and LE...

Страница 63: ... recording These can be used for several applications such as l VCR editing with two or three VCR s page 67 l Recording TV programs onto a camcorder page 69 l Recording cable TV programs onto a VCR that is not cable ready page 67 l Recording audio onto an audio cassette tape recorder page 70 Notes Remember that the signal coming out of these jacks is whatever you see and or hear on the TV screen S...

Страница 64: ...TV If this does not correct the problem you may need to converge the TV as described on page 5 Plugging in Power Cords Do not plug your TV s power cord into another component s outlet switched or unswitched Your TV should only be plugged into a wall outlet or suitable power strip outlet Do not plug any power cord into a wall outlet until you are finished making connections Many components have con...

Страница 65: ...I I I I I I I I I I t 1 I I I I 1 II 1 I 1 ...

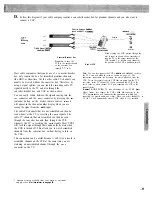
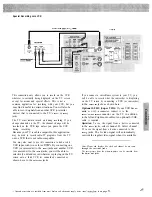
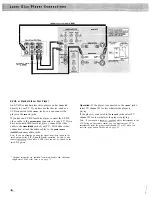
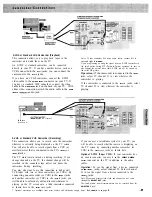
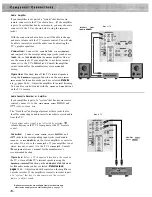
Страница 66: ...ollow this diagram if your cable company requires a converter decoder box that can not be controlled by remote control Scrambled Cable TV Channels Some cable TV decoders require that you manually switch from regular to scrambled channels on the decoder whenever you wish to view the premium pay channels By connecting the decoder to the ANT A input and CONVERTER output on your TV and leaving the dec...

Страница 67: ...CR whenever the TV is receiving the ANT B signals Most VCR s will feed the signal through their antenna jacks even when the VCR is turned off This allows you to watch scrambled channels from the converter box without having to turn on the VCR This connection can be useful because it will let you record a scrambled channel on the VCR at the same time you are watching an unscrambled channel through ...

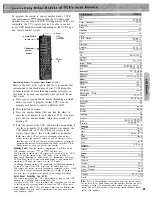
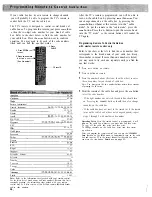
Страница 68: ...er to the chart at the left to find the code number that corresponds to the brand name of your cable box Keep this number in mind If more than one number is listed you may need to try each one separately until you find the one that works Press C A B L E button on remote Press I D button on remote Press two number buttons first one then the other to enter the code number for your brand of cable box...

Страница 69: ...tune your TV to receive their cable TV channels Not all cable TV channels will be active on your particular cable TV system Also some cable companies may require the use of a decoder with their cable TV system Consult your cable company or local dealer for details Scrambled Cable TV Channels Some cable companies offer scrambled premium pay channels Descrambling these signals for normal viewing req...

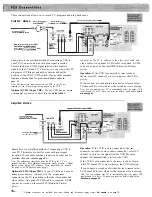
Страница 70: ...an program your TV to automatically select the proper VCR input channel 91 or 92 when you press the VCR1 or VCR button Details are on page 43 Simplified Method Coaxial Antenna Cables such as AH037 or AH0651 Shown here is a simplified method of connecting a VCR to your TV This method is best for areas with poor signal reception If your cable company requires a decoder box for premium channels refer...

Страница 71: ... to the INPUT 2 jacks you will be able to selectively edit and record whatever is playing on the TV screen onto a third VCR or camcorder connected as shown here to the SELECT OUT jacks If you connect a surveillance system to your TV you will be able to record what the camcorder is displaying on the TV screen by connecting a VCR or camcorder to the SELECT OUT jacks as shown here Optional S VHS Supe...

Страница 72: ...udio jacks Note If you are planning on using the signal from these inputs in the small picture during PIP Picture In Picture operation be sure to also connect the normal video cable S VHS video can not be viewed on the small PIP picture Operation If the player is connected to the INPUT 1 jacks select TV channel 91 to view whatever the player is playing If the player is connected to the INPUT 2 jac...

Страница 73: ...is currently being displayed on the TV screen You will also be able to record signals from a VCR or similar device that is connected to the TV s INPUT I or INPUT 2 jacks The TV must remain turned on during recording If you change channels on the TV the channel change will be recorded on the camcorder tape unless you pause the camcorder during recording If you connect a surveillance system to your ...

Страница 74: ...sette Recorder or Amplifier If your amplifier is part of a system that has its own remote control connect it to the AUDIO OUTPUTS SELECT R MONO and LE V jacks as shown here The fixed level audio signal present at these jacks is also ideal for connecting an audio cassette recorder to record audio from the TV This constant audio signal is not affected by pressing the volume buttons on the TV s front...

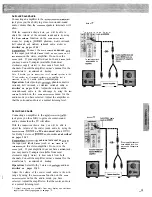
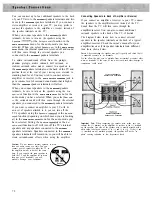
Страница 75: ...he audio mode you have selected Adjust the amplifier so that the surround audio is at a normal listening level Center Sound Audio Connecting an amplifier to the Am0 OuTPuTsCENTER jack gives you the ability to get more center sound audio volume than the TV will allow With the connection shown here you will be able to adjust the volume of the center sound audio by using the Center volume fun On On t...

Страница 76: ... at in the AUDIO ADJUST SETUP menu for the audio mode you have selected Setting the Speakers int ext off or the Ext spkrs on off function to off will turn off the TV s internal speakers and any speakers connected to the EXTERNAL speakers terminals Speakers connected to the SURROUND speakers terminals will remain on so you will be able to create surround sound effects when using the amplifier Cauti...

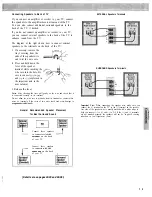
Страница 77: ... the important note in the next column SURROUND Speakers Terminals 3 Release the lever Notes After releasing the lever pull gently on the wire and check that it is connected securely to its terminal Do not allow the wire core to protrude from its terminal or contact other wires or terminals If the cores of two wires touch each other damage to General Recommended Speaker Placement for Best Surround...

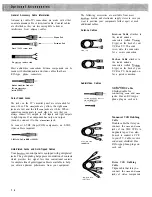
Страница 78: ...g helps prevent oxidation of contacts which provides less signal loss than conventional contacts A complete line of gold tipped cables is available to help you obtain optimum performance from your equipment The following accessories are available from most ProScan dealers and electronics supply stores in case you want to position your components farther apart or need additional cables Antenna Cabl...

Страница 79: ...ements or spares can be X ordered as needed ti 8 2s 2 E Accessory Order Form for ProScan TV Description Part No Price Screw on Antenna Cable 3 ft Signal Splitter Gold Tipped Antenna Cable 6 ft Gold Tipped Antenna Cable lo ft Gold Tipped Audio Video Cable 3 ft Gold Tipped Audio Video Cable 5 ft Gold Tipped Stereo Audio Cable 3 ft Gold Tipped Dubbing Cable 6 ft Gold Tipped Dubbing Cable 6 ft VCR Con...

Страница 80: ... to cancel To place your order by mail detach and mail the completed order form with credit card information money order or check in U S currency made payable to Thomson Consumer Electronics Inc to the following address ProScan Video Accessories P O Box 8419 Ronks PA 17573 For more information on these accessories or current prices write to the following address Video Accessories Customer Service ...

Страница 81: ......

Страница 82: ...have been activated because of a power surge Wait 30 seconds and then turn on again If this happens frequently the voltage in your house may be abnormally high Turns on unexpectedly l SCHEDULER function may have been activated SCHEDULER does not turn TV on and off at correct time l Check SCHEDULER functions Make sure time including am or pm and day of week are entered correctly SCHEDULER Mode off ...

Страница 83: ...onnections l Try adjusting SHARPNESS function to improve weak signals l If recording one channel on VCR connected to ANT input and watching another channel on the TV make sure the VCR s TVA CR switch is in correct position VCR indicator turned off No picture while using picture in picture with VCR laser disc player or camcorder l If using an S VHS component make sure its regular video cable is als...

Страница 84: ... Channel Memory Scan List 6 46 47 Channel Number Display 12 Channels Normal Priority Function MAIN MENU 42 Checks for Trouble 78 79 Cleaning and Care 77 CLEAR Button 10 l 1 53 54 CLOCK SET Menu 7 Closed Captioning 30 Color Picture Adjusting 37 Component Connection Tips 60 Components Positioning 60 Connecting Amplifiers 70 7 1 Connecting Cable TV System 3 62 63 Connecting Camcorders 69 Connecting C...

Страница 85: ......

Страница 86: ......

Страница 87: ...Control Buttons VCR 54 Remote Control Sensor 12 Replacing Batteries Remote Controls REWIND Button 54 57 S VIDEO INPUT 1 Connector 58 66 68 69 S VIDEO INPUT 2 Connector 58 66 68 69 Safety Precautions 1 SAP Audio 30 Saving and Restoring Audio Settings 39 Saving and Restoring Video Settings 38 Scan List Channel Memory 6 46 47 Scheduler Function SETUP Menu 44 45 SELECT AUDIO R MONO and LEFT Jacks 58 5...

Страница 88: ...low the instructions below Si un livret d instructions en francais n est pas inclus avec votre appareil vous pouvez en obtenir un indiquer le numtro de modble votre nom et votre adresse en vous adressant Zu Thomson 6lectronique Grand Public du Canada Service des donnees techniques 6540 Tomken Rd Mississauga Ontario L5T 2E9 An RCA Entertainment Product Thomson Consumer Electronics 600 N Sherman Dr ...

Отзывы: