background image

44

Français

2

Description générale (Fig. 1)

1. Bac de réception (réception des billets comptés)
2. Panneau de commande
3. Poignée de transport
4. Guides réglables d’alignement des billets
5. Bouton de réglage de l’épaisseur
6. Interrupteur
7. Prise du câble d’alimentation
8. Prise de raccordement de l’écran externe
9. Couvercle arrière
10. Bac de départ (chargement des billets à compter dans la compteuse)
11. Prise de raccordement du souris externe
12. écran externe
13. Souris externe

3

Spécifications

Vitesse de comptage, Billets/Min......................................................................900/1200/1500
Capacité du bac de départ, Billets......................................................................................500
Capacité du bac de réception, Billets .................................................................................200
Pré-programmation de lots, Billets ..................................................................................1-999
Consommation, W ................................................................................................................50
Alimentation, V/Hz .........................................................................................................220/50
Poids net, kg ........................................................................................................................5,5
Poids emballé, kg ...................................................................................................................6
Dimensions, mm ..................................................................................................

270x240x250

4

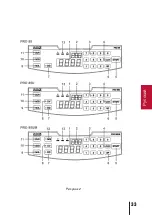
Fonctions du panneau de commande (Fig. 2)

1. Ecran de l'opérateur (écran 1)

affiche la quantité totale de billets comptés et les informations suivantes lorsque les
paramètres suivants sont modifiés:
• niveau de sensibilité du capteur magnétique
• niveau de sensibilité du capteur ultra-violet
• niveau de la densité optique
• niveau de sensibilité de détection de la largeur du billet

2. Ecran de liasses (écran 2)

affiche les informations suivantes:
• nombre indiquant la quantité des billets sélectionnée en mode de mise en liasses
• informations de service lorsque les paramètres sur l’écran de l’opérateur ont été modifiés
• codes d'erreurs

3. Clavier numérique

Est utilisé pour introduire les valeurs numériques sur l’écran de liasses dans le mode mise en
liasses lors du comptage (comptage d'un nombre défini de billets). En appuyant sur l'une des
touches de chiffres (0-9), le mode mise en liasses est activé automatiquement.

Содержание PRO 85

Страница 1: ...85U 85UM www pro intell com Gebrauchsanweisung User manual Manuel d utilisation Instrukcja obslugi Banknotenz hlmaschinen Currency counters Compteuse de billets Liczarka do banknot w Fran ais English...

Страница 2: ...g der Banknotenz hlmaschine 9 7 Einstellung und Justierung 12 8 Error codes St rungsbehebung 14 9 Herstellergarantie 16 Contents 1 Main functions of PRO 85 series counters 18 2 Appearance 19 3 Specifi...

Страница 3: ...s curit 46 6 Fonctionnement de la compteuse de billets 47 7 Modification des param tres de la compteuse de billets 49 8 Codes d erreurs 51 Obligations de garantie 53 Spis tre ci 1 G wne funkcje 54 2...

Страница 4: ...hnell die Konstruktion und einzelne Funktionen des Ger tes kennen zu lernen sowie alle seine M glichkeiten auszuprobieren und sie weiterhin regelm ig zu nutzen Bevor Sie mit der Arbeit beginnen lesen...

Страница 5: ...5 Deutsch 2 Bedienungselemente Au enansicht Abbildung 1...

Страница 6: ...ewicht 6 5 kg Abmessungen 270x240x250 mm 4 Bedienfunktionen der Steuerungstafel 1 Hauptanzeige Z hlanzeige Auf dem Bildschirm werden folgenden Angaben angezeigt Anzahl der gez hlten Banknoten Ergebnis...

Страница 7: ...7 Deutsch Abbildung 2...

Страница 8: ...rkennungsmethode 9 MUL Taste Auswahltaste f r automatischen oder manuellen Start des Z hlvorgangs Im manuellen Startmodus das Zeichen leuchtet soll die Taste START STOP jedes Mal bet tigt werden um Z...

Страница 9: ...r Werkeinstellungen dringend geboten 10 Versuchen Sie bitte nicht den Banknotenz hler auseinanderzubauen oder umzubauen um Verletzungen der Benutzer und Besch digungen des Ger ts zu vermeiden Wenden S...

Страница 10: ...m ig ist die Formaterkennung in allen Modellen aktiviert 6 1 4 Ultraviolett Erkennung f r Modelle PRO 85U PRO 85UM Die UV Erkennung wird zur Pr fung von verschiedenen W hrungen und s mtlichen Banknote...

Страница 11: ...stopp Funktion Anzeige ein 2 Wiederholen Sie den Z hlvorgang entsprechend dem Punkt 6 2 3 Entfernen Sie die gez hlten Banknoten aus demAusgabefach 4 Bei Bedarf legen Sie noch weitere Banknoten in das...

Страница 12: ...n der Banknotenz hlmaschine 7 2 1 Empfindlichkeitsgrads der Ultraviolett Erkennung Um den Empfindlichkeitsgrad der Ultraviolett Erkennung UV zu ver ndern dr cken Sie die Taste UV und halten Sie diese...

Страница 13: ...ats Dr cken Sie die Taste DD und halten Sie diese ca 4 Sekunden gedruckt Es erscheint dd auf dem Hauptdisplay Aur dem Display 2 wird das aktuelle Empfindlichkeitsniveau angezeigt Der Einstellbereich l...

Страница 14: ...eitsgrad der optischen St rke ein siehe Punkt 7 2 3 4 berpr fen Sie die W hrungseinstellungen Anzeige auf dem Display dd 1 Banknote der abweichenden Gr e Breite entdeckt 2 Banknoten liegen falsch im A...

Страница 15: ...enem sauberem Tuch Bei Verschmutzung k nnen die Sensoren falsche Information liefern 4 Wartungsarbeiten einschlie lich teilweise Demontage des Banknotenz hlers empfehlen wir Ihnen in unserem Sevicezen...

Страница 16: ...triebsparametern betrieben wurden die in der im Lieferumfangs des Produkts enthaltenen Benutzerdokumentation festgelegt sind c aufgrund der Verwendung nicht von PRO hergestellter Teile oder d durch nd...

Страница 17: ...17 Deutsch...

Страница 18: ...sly integrated into the workplace with maximum convenience for the operator 1 Main functions of PRO 85 series counters Counting adding new counting results to the previous results batch mode Suspiciou...

Страница 19: ...19 English 2 Appearance Figure 1...

Страница 20: ...99 Power consumption W 50 Power supply 220V 50Hz For U S 110V 60Hz Net weight 5 5kg 12 1lb Gross weight 6 5kg 14 3lb Dimensions 270 240 250mm 10 3 5 9 2 5 9 4 5 4 Control panel operation 1 Main count...

Страница 21: ...21 English Figure 2...

Страница 22: ...ting in the manual mode In automatic mode the counter starts automatically when you place a stack of banknotes in the hopper indicator is off by default 10 ADD button ON OFF summation mode Indicator l...

Страница 23: ...ve period of time it is necessary to keep it at the room temperature for no less than 4 hours Remember The producer is in no way responsible for damage to the device or injury to the operator in the e...

Страница 24: ...d will continue counting When a suspicious banknote is recognized without the proper magnetic marks the counter stops and an error message En will be shown on the display Suspicious banknote will be p...

Страница 25: ...than 5 degrees The counter speed should be 1200 banknotes per minute If adjusting the feeder slot size results in the sensor responding slowly slow separation of joined banknotes irregular stacking of...

Страница 26: ...ion is OFF In the event of a high sensitivity level the device may reject excessively worn folded or torn banknotes and will display the error code dd Press START button to enter a new figure in the d...

Страница 27: ...ck the currency type RUR USD or EURO currency indicator should be on dd 1 Banknote with different width detected 2 Wrong banknote position 1 Remove the banknotes from the stacker and take away the sus...

Страница 28: ...r failed Clean or replace the sensor E02 Left sensor is either blocked or failed Clean or replace the sensor E05 Starting sensor is blocked by the banknotes or is dirty Remove banknotes from the hoppe...

Страница 29: ...charged separately Warranty service does not include any training for equipment maintenance or other use of the device connection testing customizing preventive works etc which the customer can compl...

Страница 30: ...ELLECT TECHNOLOGY PRO 85 CASH LINE PRO 85 EURO USD RUR USD EURO 4 1 PRO 85 CDF USD EURO 3 900 1200 1500 500 200 MG USD EURO 10 UV 10 10 6 0 9 2 C 900 1200 1500 500 200 0 9999 1 999 50 220 50 5 5 6 5 2...

Страница 31: ...31 3 1...

Страница 32: ...32 2 1 2 3 4 5 6 7 8 9 10 11 12 13 4 1 MG 2 1 3 2 0 9 4 CLR 2 5 START 1 2 6 SP SP 1...

Страница 33: ...33 2...

Страница 34: ...34 900 1200 1500 START 7 DD 8 UV 9 MUL START STOP 10 ADD ADD 11 CUR CUR RUR USD EURO 13 6 1 12 MG 13 5...

Страница 35: ...35 4 12 6 1 0 1 8 6 1 6 1 1 CDF EURO CUR 13 6 1 2 4 dd 4 1 1000 10 1000 4 10 1 6 1 3 PRO 85U PRO 85UM UV Eu 1...

Страница 36: ...36 6 1 4 PRO 85UM 2 PRO 85UM 5 10 EURO En 1 4 En 6 2 CUR 13 1 1 6 2 1 START 8 6 3 3 2 6 2 2 CLR 8 6 2 6 4 ADD...

Страница 37: ...37 6 2 1 START 8 6 4 7 7 1 1 5 5 1200 Eh c 5 Ed Ec dd c 5 7 2 7 2 1 UV 4 1 Eu 2 0 9 0 9 START 7 2 2 MG 4 1 En 2 0 9 0 9 START...

Страница 38: ...38 7 2 3 ADD 4 1 Ed 2 0 9 0 9 START 8 7 2 4 DD 4 1 dd 2 4 9 4 9 4 4 0 dd START c 8 30 Ed 5 dd 4 Eu 5 En 5...

Страница 39: ...39 Eh 1 2 1 2 Ec 1 2 7 1 Ed 1 2 7 1 3 7 2 3 4 RUR USD EURO dd 1 2 1 3 7 2 4 Eu En 1 RUR USD EURO 2 1 4 3 st START...

Страница 40: ...40 E01 E06 E01 E02 E05 E06...

Страница 41: ...41 9...

Страница 42: ...c un client Les informations expos es dans le pr sent manuel d utilisation vous permettront de vous familiariser avec la compteuse et son fonctionnement ainsi que d utiliser au maximum l ensemble de c...

Страница 43: ...43 Fran ais Fig 1...

Страница 44: ...g 6 Dimensions mm 270x240x250 4 Fonctions du panneau de commande Fig 2 1 Ecran de l op rateur cran 1 affiche la quantit totale de billets compt s et les informations suivantes lorsque les param tres s...

Страница 45: ...45 Fran ais Fig 2...

Страница 46: ...utomatique ou manuel Si le d part est manuel le comptage d bute d s que la touche START STOP est appuy e Si le d part est automatique par d faut le voyant lumineux n est pas allum le comptage d bute d...

Страница 47: ...euse de billets Pr paration de la compteuse pour utilisation Raccordez le c ble d alimentation la prise de r seau lectrique Mettez l interrupteur en position ON La compteuse s allume L cran de l op ra...

Страница 48: ...e billet suspect se trouve au dessus de la liasse dans le bac de r ception Il faut retirer le billet suspect et reprendre le comptage En ce cas le billet suspect n est pas inclus dans la quantit total...

Страница 49: ...e 7 Modification des param tres de la compteuse de billets Faites attention ce point Cela vous permettera d viter les fautes au cours d utilisation de la compteuse de billets et du comptage 7 1 R glag...

Страница 50: ...lectionnez le niveau de sensibilit qui peut se varier de 0 9 niveau de plus grande sensibilit Pour sauvegarder les modifications des param tres de la compteuse et quitter le mode de modification des...

Страница 51: ...voyant conforme doit etre allum dd 1 Largeur du billet diff rente de celle s lectionn e est d tect 2 Position incorrecte des billets dans le bac de d part 1 Retirez les billets du bac de r ception enl...

Страница 52: ...s cellules senseurs capteurs encrass s peuvent provoquer de fausses erreurs Il est recommand de proc der une maintenance qui inclut le d montage partiel de l appareil par un technicien tous les 30 jou...

Страница 53: ...ant un suppl ment Le service de garantie ne comprend pas l apprentissage pour l utilisation de l appareil ni pour l ex cution des autres fonctions n cessaires au fonctionnement de l appareil brancheme...

Страница 54: ...nych banknot w za pomoc detektora magnetycznego MG Rozpoznawanie podejrzanych banknot w w wietle ultrafioletowym UV Sprawdzanie szeroko ci banknot w Sprawdzanie g sto ci banknot w i detekcja podw jnyc...

Страница 55: ...55 Polski 3 Wygl d Rys 1...

Страница 56: ...wybranych do odliczania banknot w Informacje o b dach Zmiany parametr w na g wnym wy wietlaczu 1 3 Przyciski cyfrowe S u ywane do wprowadzania warto ci na wy wietlacz 2 w trybie odliczania zadanych i...

Страница 57: ...57 Polski Rys 2...

Страница 58: ...czanie wy czanie detekcji magnetycznej 13 Dioda kontrolna rodzaju waluty Dioda pokazuje wybrany typ waluty Kiedy adna si nie wieci oznacza to wybranie opcji any currency 5 rodki Ostro no ci Przed rozp...

Страница 59: ...ku ustawienia wysokiej czujno ci sensor mo e je wychwyci podczas akcji w przypadku wykrycia pokazuje si wiadomo b du Ta detekcja jest ustawiona na domy lnie w czona dla wszystkich liczarek Kiedy adna...

Страница 60: ...r wnym stosie na podajniku przed rozpocz ciem liczenia Po banknoty w podajniku g rnym Maszyna rozpocznie prace automatycznie po 1 sekundzie Wynik liczenia zostanie pokazany na wy wietlaczu 1 Powtarza...

Страница 61: ...dzi nowy poziom czu o ci i wyj z trybu zmian czu o ci detekcji UV 7 2 2 Zmiana ustawie poziomu czu o ci MG Trzymaj przycisk MG przez 4 sekundy Na wy wietlaczu 2 pojawi si komunikat Ed G wny wy wietlac...

Страница 62: ...podejrzany banknot z g ry i kontynuuj liczenie Skontaktuj si z serwisem Ec Wykryty a cuch banknot w Usu podejrzany banknot z g ry i powt rz procedur liczenia Dopasuj wej cie patrz poz 7 1 Ed Wykryty...

Страница 63: ...Gwarancja nie obejmuje szkolenia z u ywania ani wykonywania jakichkolwiek operacji na urz dzeniu pod czania Testowania ustawiania kt re posiadacz mo e zrobi w asnor cznie z pomoc tej instrukcji Gwara...

Страница 64: ...64 PRO 85 PRO INTELLECT TECHNOLOGY corp CASH LINE PRO 85 1000 10 50 100 500 1 CDF 900 1200 1500 500 200 10 10 10 6 0 9 2 900 1200 1500 500 200 0 9999 1 999 50W 220V 50Hz 5 5kg 6 5kg 270 x 240x 250mm...

Страница 65: ...65 1 3...

Страница 66: ...66 1 2 3 4 5 6 7 8 RS 232 9 10 11 12 13 4 1 2 1 3 0 9 4 CLR 2 5 START 1 2 6 SP SP 900 1200 1500 START 7 DD 8 UV 9 MUL ST ART...

Страница 67: ...67 2 10 ADD 11 CUR CUR 2 13 6 1 12 MG 13...

Страница 68: ...68 5 4 6 1 7 0 1 8 6 1 6 1 1 CDF CUR 2 13 6 1 2 dd 4 4mm 1 1 1000 10 10 1000 10 4...

Страница 69: ...69 6 1 3 PRO 85U PRO 85UM UV Eu 6 1 4 PRO 85UM 5 10 En 1 4 En 6 2 CUR 2 13 1 6 2 START 1 8 6 3 0 9 2 6 2 CLR 2 8 6 2 6 4 ADD 6 2 1 START 8 6 4...

Страница 70: ...7 7 1 1 5 5 1200 Eh 5 Ed Ec dd 5 7 2 7 2 1 UV 4 1 Eu 2 0 9 0 9 9 START 7 2 2 MG 4 1 En 2 0 9 0 9 9 START 7 2 3 ADD 4 1 Ed 2 0 9 0 9 9 START 7 2 4 DD 4 1 dd 2 4 9 4 9 4 4mm 0 dd START Ed 5 dd 4 Eu 5 En...

Страница 71: ...71 8 30 8 E01 E07 E01 E02 E05 E06...

Страница 72: ...72 Eh 1 2 1 2 Ec 1 2 7 1 Ed 1 2 7 1 3 7 2 3 4 dd 1 2 1 2 7 2 4 Eu En 1 2 1 4 3 st START...

Страница 73: ...73 9...

Страница 74: ...74...

Страница 75: ...75...

Страница 76: ...PRO INTELLECT TECHNOLOGY www pro intell com...

Отзывы: