background image

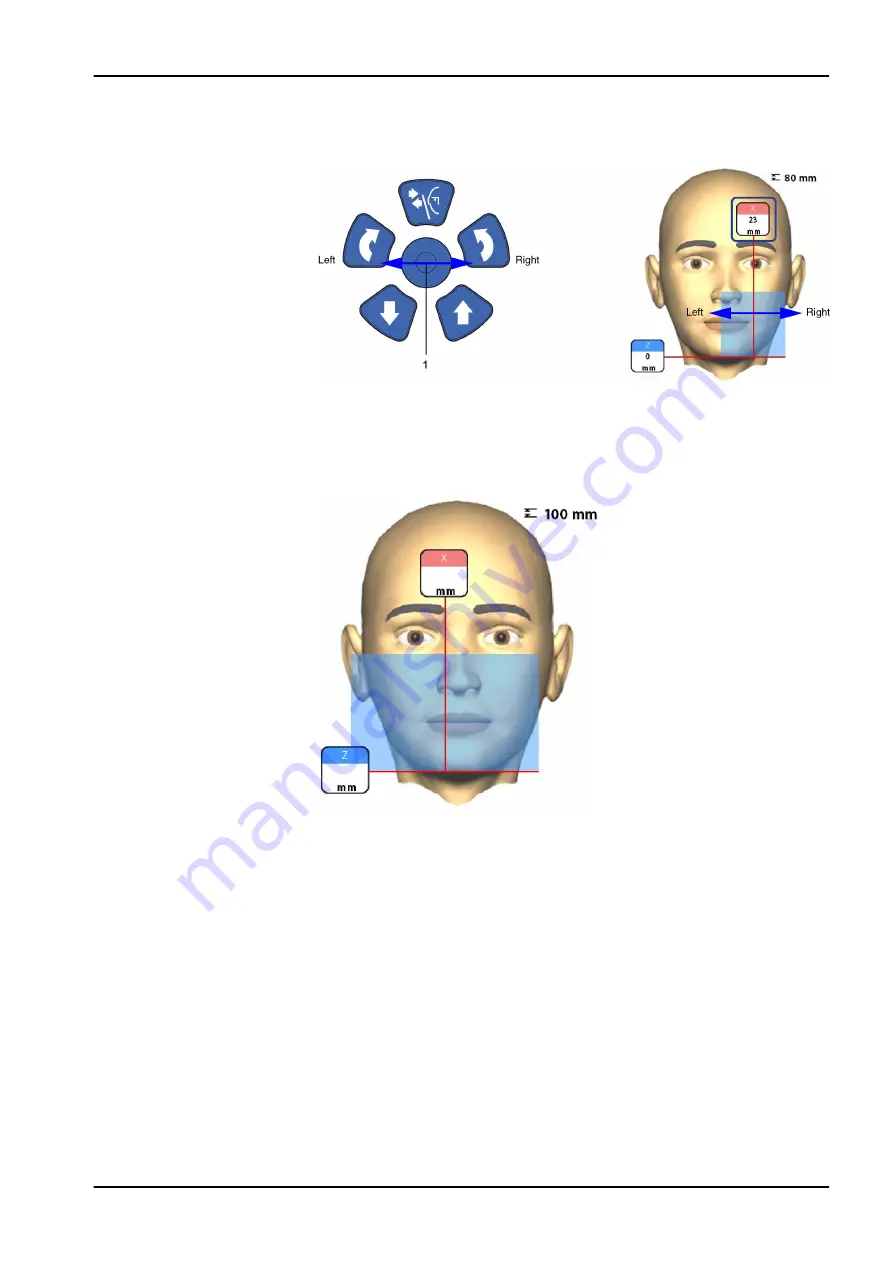
Move the positioning joystick to your left or right. The front light (i.e. the

image volume centre as seen from the front) moves accordingly on your

patient’s face.

NOTE

Image volumes with large diameters (3D Plus: Ø > 70 mm / 3D Mid: Ø > 80

mm) are slightly offset towards the column. These image volumes cannot be

moved to the left or right.

8  3D patient exposure

User's manual

Planmeca ProMax 45

Содержание ProMax 3D Mid

Страница 1: ...PlanmecaProMax 3D Plus 3D Mid user s manual 3D imaging EN 10032998 10032998...

Страница 2: ...the appropriate requirements such as IEC 60364 equipment is used according to the operating instructions Planmeca pursues a policy of continual product development Although every effort is made to pro...

Страница 3: ...X ray unit up down 20 6 10 2 Positioning joystick 21 6 10 3 Image volume up down 21 6 10 4 Open close temple supports 21 7 Planmeca ProMax 3D Plus and 3D Mid programs 22 7 1 3D Dental 22 7 2 3D Ear No...

Страница 4: ...bration material 58 10 1 2 Selecting settings 60 10 1 3 Taking a calibration exposure 63 10 2 Taking an exposure of an impression or plaster cast 64 10 2 1 Selecting settings 64 10 2 2 Taking an expos...

Страница 5: ...The X ray images can be used to examine Dentomaxillofacial area Ear nose and throat Cervical spine Other cranial anatomies The 3D face photo can be used for patient education or in order to follow th...

Страница 6: ...onjunction with the documentation for the Planmeca Romexis program The Romexis package contains the following manuals User s Manual Technical Manual The original language of the manuals is English NOT...

Страница 7: ...trical and electronic equipment according to Directive 2002 96 EC WEEE Refer to instruction manual booklet Standard ISO 7010 Emergency stop Standard IEC 60417 Warning Electricity Standard ISO 7010 To...

Страница 8: ...fety requirements are met CAUTION The patient positioning lights are laser lights Do not stare into the laser beam CAUTION Do not drop the sensor Planmeca limited warranty does not cover damage which...

Страница 9: ...TE FOR CANADIAN USERS All patients must be provided with a shielded apron for gonad protection and a thyroid shield The use of a thyroid shield is especially important in children The shielded apron a...

Страница 10: ...pment not complying to IEC 60601 shall be kept outside the patient area more than 2m 79 in from the X ray unit Any person who connects external equipment to signal input signal output or other connect...

Страница 11: ...e bottom of the screen to test the C arm rotation before you take a 3D exposure NOTE Do not touch the arm structures when the X ray unit is moving NOTE Patients are not allowed to hang on the patient...

Страница 12: ...e X ray system off when it is not in active use 5 1 Switching X ray unit on The on off switch is located on the underside of the column top 5 2 Switching 3D reconstruction PC on The on off switch is l...

Страница 13: ...X ray system 1 X ray unit 2 3D reconstruction PC 3 Planmeca Romexis program 4 ProTouch desktop application optional see section ProTouch desktop application on page 18 5 Ethernet switch 6 Main parts...

Страница 14: ...ient supports on page 12 5 Patient support table 6 Patient handles 7 Patient positioning controls see section Patient positioning controls on page 19 8 Touch screen see section Touch screen on page 14...

Страница 15: ...lanmeca ProMax 3D Plus and Planmeca ProMax 3D Mid 2 ProFace sensor for Planmeca ProMax 3D Plus and Planmeca ProMax 3D Mid 6 4 Tube head 1 Non rotating tube head 2 Rotating tube head 6 Main parts User...

Страница 16: ...ts 6 5 1 Head supports option A or B Option A 1 Adjustable head support 2 Temple pads for children 3 Fastening straps 4 Support bars Option B 1 Head band 25 2 Support bars 6 Main parts 12 Planmeca Pro...

Страница 17: ...posure button and on the touch screen when the X ray system is getting ready for an exposure The green lights stop flashing and stay on continuously when the X ray system is ready for an exposure Duri...

Страница 18: ...stop button The X ray unit will automatically restart 6 8 Touch screen NOTE The options shown on the touch screen depend on the unit configuration The X ray unit can be upgraded with new programs and...

Страница 19: ...ton takes you directly to the screen where you can take an exposure Program group buttons To view all the programs that are available for a program group select the program group button Making selecti...

Страница 20: ...ead of cancelling it select the pause button Moving forward To go to the next screen select either the forward button or the next symbol at the bottom of the screen Moving backward To go back to a pre...

Страница 21: ...the exposure Changing settings To change a setting select the settings symbol on the main screen This takes you to the settings menu where you can adjust the settings of the X ray unit For more inform...

Страница 22: ...the X ray unit The two control panels are synchronised and you can use either or both of them NOTE You need a licence if you wish to use the application for moving to the ready status Contact your dea...

Страница 23: ...l red cross in the top right corner of the screen 6 10 Patient positioning controls NOTE Never allow patients to press the positioning controls when they are positioned in the X ray unit NOTE Pressing...

Страница 24: ...ss the up button The maximum height can be adjusted to suit offices with a low ceiling Contact your service technician for help NOTE Make sure that there is no object under the X ray unit when you pre...

Страница 25: ...e image volume in 3D imaging Use the buttons when the patient is positioned in the X ray unit The X ray unit moves slowly when you press the up down button The height of the patient support table is n...

Страница 26: ...vailable 160 x 90 mm 160 x 90 mm 160 x 160 mm 160 x 160 mm 200 x H100 mm 200 x H100 mm 200 x H170 mm 200 x H170 mm Two vertical image volumes 7 2 3D Ear Nose Throat NOTE The values in parentheses repr...

Страница 27: ...x H68 mm 7 3 Special programs NOTE The values in parentheses represent the child size volumes Program Planmeca ProMax 3D Plus Planmeca ProMax 3D Mid Braces Not available 80 x 80 mm 68 x 68 mm 100 x 1...

Страница 28: ...e If you have any reason to believe that the sensor might be faulty take a test exposure before taking a patient exposure NOTE The available sensors are shown in section Sensor on page 11 NOTE FOR PRO...

Страница 29: ...sition 3 Push in the C arm electrical connector button on the other side This will make the electrical connection between the sensor and C arm 8 1 1 2 Detaching sensor from C arm NOTE Do not remove th...

Страница 30: ...trical connector This will disconnect the electrical connection between the sensor and C arm 2 Turn the locking knob 180 degrees This will release the locking mechanism 8 3D patient exposure 26 Planme...

Страница 31: ...b has to switch off first 8 1 2 Attaching patient supports NOTE The available head supports are shown in section Head supports option A or B on page 12 8 1 2 1 Attaching support bars Insert the suppor...

Страница 32: ...Head support A Attaching adjustable head support If you are using the adjustable head support slide it onto the support bars Then turn the adjusting knob to adjust the head support to suit the size of...

Страница 33: ...or additional head support if needed Attach one strap in front of the forehead and two at the back of the head as shown NOTE Be careful when you handle the straps Do not let the straps hit the patient...

Страница 34: ...bars as shown Set the side with the large openings against the patient s forehead 8 1 2 4 Attaching chin cup Use these patient supports NOTE FOR ORTHODONTISTS Use these patient supports if you wish t...

Страница 35: ...e any loose items of clothing e g scarf tie that might get caught in the arm structures of the X ray unit NOTE High contrast objects such as gold teeth or amalgam may cause artefacts in the image If y...

Страница 36: ...select the patient size XS Child S Small adult M Medium sized adult L Large adult XL Extra large adult NOTE Selecting child patient XS automatically reduces the volume size and patient dose NOTE The e...

Страница 37: ...more information on Planmeca 3D Plus and 3D Mid programs see section Planmeca ProMax 3D Plus and 3D Mid programs on page 22 8 3 4 Selecting volume height Use this button to select the height of the i...

Страница 38: ...program 8 3 6 Selecting jaw side Use this button to select the jaw side right left both sides that you wish to expose NOTE The available options depend on the selected program and image resolution 8...

Страница 39: ...patient to the X ray unit The patient can sit or stand during the exposure NOTE We recommend that you image patients with poor health in a sitting position 2 Adjust the X ray unit to suit the height...

Страница 40: ...targets 3 High definition Better image quality for small targets e g ear bones 4 High resolution Sharp images 5 Endodontic Very sharp images for endodontic applications and other small targets for ex...

Страница 41: ...posure values have been preset at the factory for each patient size image resolution and ULD Ultra Low Dose setting The preset exposure values are average values and they are only meant to guide the u...

Страница 42: ...D X ray units with 90 kV X ray tube Child XS 90 3 6 1 4 Small adult S 90 4 5 1 8 Medium sized adult M 90 5 6 2 2 Large adult L 90 7 1 2 8 Extra large adult XL 90 9 3 6 X ray units with 120 kV X ray tu...

Страница 43: ...5 9 X ray units with 120 kV X ray tube D 059SBR Child XS 100 6 3 2 8 Small adult S 120 5 2 5 Medium sized adult M 120 6 3 3 2 Large adult L 120 8 4 Extra large adult XL 120 8 5 X ray units with 120 kV...

Страница 44: ...7 1 Medium sized adult M 90 12 5 9 Large adult L 90 14 11 Extra large adult XL 90 14 14 X ray units with 120 kV X ray tube D 059SBR Child XS 100 9 4 5 Small adult S 120 8 4 Medium sized adult M 120 8...

Страница 45: ...nd then compensates for the effects of the movement during image reconstruction NOTE The Planmeca CALM algorithm is for use only on live patients and is not recommended for use for example in imaging...

Страница 46: ...The image is taken with a laser scan We recommend that you use this option if you need to take very sharp photos 8 8 Adjusting volume position The volume positions are preset at the factory for a stan...

Страница 47: ...on if they are not already on do one of the following a Press the thumb wheel on the underside of the patient support table b Press any of the positioning controls button or joystick The lights autom...

Страница 48: ...lume centre lights cross in the middle of the image volume With the patient positioned in the unit the volume centre lights form red lines on the front front light X laser and on the left side side li...

Страница 49: ...centre as seen from the front moves accordingly on your patient s face NOTE Image volumes with large diameters 3D Plus 70 mm 3D Mid 80 mm are slightly offset towards the column These image volumes ca...

Страница 50: ...on If you need to move the image volume to the front or back do one of the following Move the thumb wheel that is located on the underside of the patient support table Move the positioning joystick to...

Страница 51: ...rams 2100 on page 77 You can take a scout image or 2D views LAT PA or LAT PA of the selected image volume before you take the actual 3D image This allows you to check the volume position or if necessa...

Страница 52: ...ay on continuously when the X ray system is ready for an exposure 3 Ask the patient to stay as still as possible 4 Move to a protected area 5 Press and hold down the exposure button for the entire dur...

Страница 53: ...he procedure until the image volume is in the correct place NOTE The scout view function yields results for Jaw and Face programs that look different to the scouts for Tooth and Teeth programs 8 10 Ta...

Страница 54: ...nt in the distance so that the eyes will point in their natural direction in the resulting image 4 Move to a protected area 5 Press and hold down the exposure button for the entire duration of the exp...

Страница 55: ...o is taken NOTE Do not release the exposure button before the end of the last exposure NOTE Maintain audio and visual contact with the patient and X ray unit during exposure If the C arm stops moving...

Страница 56: ...oFace sensor on page 41 9 1 Before exposure Attach the support bars and the adjustable head support as described in section Attaching patient supports on page 27 NOTE To get a realistic image of the p...

Страница 57: ...their hair away from their face and ears NOTE We recommend that you image patients with poor health in a sitting position 4 Adjust the X ray unit to suit the height of the patient To do this press ei...

Страница 58: ...back of the head as shown here 6 Ask the patient to grasp the patient handles 9 3 Selecting exposure settings 1 To go to the next screen select This symbol OR The forward button 2 Use this button to...

Страница 59: ...n the patient s face 3 Rotate the C arm 90 degrees clockwise by selecting the 90 button at the bottom of the screen This will give you a better view for checking the position of the side light Y laser...

Страница 60: ...stay on continuously when the X ray system is ready for an exposure 2 Ask the patient to stay as still as possible Tell the patient that a bright light will come on during the exposure but the patient...

Страница 61: ...is shown on the computer screen 5 Release the patient from the head support by turning the adjusting knob at the top 6 Guide the patient away from the X ray unit 9 3D face photo User s manual Planmec...

Страница 62: ...rial that is used The X ray unit needs to be calibrated only once for each material NOTE FOR IMPRESSIONS Only monophase impression materials can be used NOTE FOR PLASTER CASTS If the plaster cast cons...

Страница 63: ...set The setting time depends on the material used Wait slightly longer than recommended in the instructions supplied by the manufacturer to ensure proper hardening 4 Remove all excess material from t...

Страница 64: ...number 10030330 into the adapter 3 10 1 2 Selecting settings 1 On the X ray unit select the program For impression material select 3D Models Impression For plaster material select 3D Models Plaster Ca...

Страница 65: ...r X ray units with 90 kV X ray tube 80 kV and 11 mA for X ray units with 120 kV X ray tube If you need to adjust the preset exposure values proceed as described in section Adjusting exposure values fo...

Страница 66: ...In the Planmeca Romexis program select the patient 6 Select 3D Imaging Model Capture 7 Select the option Add Material in the window that displays 10 3D model exposure 62 Planmeca ProMax User s manual...

Страница 67: ...y on continuously when the X ray system is ready for an exposure 2 Move to a protected area 3 Press and hold down the exposure button for the entire duration of the exposure During exposure yellow rad...

Страница 68: ...ray unit has to be calibrated for each new material that is used Refer to the previous section for details NOTE FOR IMPRESSIONS Do not use impression trays made of metal 10 2 1 Selecting settings 1 Re...

Страница 69: ...sts select 3D Models Plaster Cast 3 To go to the next screen select This symbol OR The forward button The positioning lights volume center lights and volume bottom light come on The volume center ligh...

Страница 70: ...ving purposes High resolution Long exposure time and higher resolution for best results 5 Select the exposure values that you used in the calibration process for this material Refer to section Adjusti...

Страница 71: ...edge of the model and the volume center cross is 40 mm 1 6 in NOTE FOR PLASTER CASTS ON PLANMECA PROMAX 3D MID Move the C arm up about 13 mm 0 5 in by pressing the image volume up button 1 Volume cent...

Страница 72: ...The exposure values shown here are only examples 10 2 2 Taking an exposure 1 Select the radiation symbol or the forward button Green lights flash on the touch screen and exposure button when the X ray...

Страница 73: ...n the exposure switch and on the touch screen and you hear a radiation warning tone Additionally a radiation warning symbol is shown on the touch screen 4 The image is shown on the computer screen NOT...

Страница 74: ...configuration The displays shown here are only examples Select the settings symbol on the main screen to enter the settings menu Settings that can be entered by the user User Program About Settings th...

Страница 75: ...se 3 Select the green check mark button 11 1 2 Time and Date 1200 To set time display format 1 Select User 1200 Time and Date 1210 Set System Time and Time Date Display Format Time Display Format 2 Se...

Страница 76: ...mark button To set time 1 Select User 1200 Time and Date 1210 Set System Time and Time Date Display Format Change System Time 2 Use the plus and minus buttons to change the time 3 Select the green che...

Страница 77: ...Select the green check mark button 11 1 3 Operational Settings 1300 To select mode 1 Select User 1300 Operational Settings 1310 Use Mode 2 Select the mode you wish to use In demo mode you can practic...

Страница 78: ...Use the minus or plus button to reduce or increase the volume Set the volume level to 0 if you do not wish to use this function 3 Select the green check mark button To manage settings for patient posi...

Страница 79: ...and held down for the entire duration of the exposure 3 Select the green check mark button To control exposure settings 1 Select User 1300 Operational Settings 1340 Exposure Settings 2 Select Continu...

Страница 80: ...ettings 11 1 5 Testing Routines 1500 To take a test exposure 1 Select User 1500 Testing Routines 1510 Test Exposure 2 Use the minus or plus buttons to set the exposure values you wish to use 3 Select...

Страница 81: ...process will take several minutes After a successful process the message OK is shown 5 Select the green check mark button NOTE Contact your service technician for help if error message E332 Severe arc...

Страница 82: ...t available are shown with faded buttons Select also the ULD Ultra Low Dose button if you wish to adjust the presets for the ULD function 5 Use the minus or plus buttons to set the exposure values you...

Страница 83: ...g program Advanced Panoramic Programs Additional 2D panoramic TMJ and sinus programs Cephalometric DEC Dynamic Exposure Control for 2D cephalometric programs with Dimax sensor 2D Views for 3D LAT PA a...

Страница 84: ...o reset to factory defaults 1 Select Program 2500 Reset to Factory Defaults The function will restore the exposure values that have been preset at the factory i e overrule your own settings in menu Pr...

Страница 85: ...ray unit The errors are shown in chronological order with the latest error message on top To view exposure statistics Select About 4200 Archive Exposure Statistics to view statistical data about the...

Страница 86: ...k button 4 Follow the instructions on the registration page Note that when you enter the X ray unit serial number you have to include any letters shown at the beginning of the number 11 Settings 82 Pl...

Страница 87: ...ication H105 Emergency stop button The emergency stop button has been activated All movements of the X ray unit are blocked and no radiation is generated Guide the patient away from the X ray unit The...

Страница 88: ...it for a few minutes for the lift motor to cool down H165 The temperature of the tube head is too high for the selected exposure values Wait for a few minutes for the tube head to cool down H166 The m...

Страница 89: ...or help H194 The control panel touch screen or ProTouch desktop application is not connected to the ProMax main software Operating in standalone mode H195 Request timed out while waiting for ProMax to...

Страница 90: ...r message e g E201 appears on the touch screen An error message indicates that the X ray unit has a problem that needs to be solved before further exposures can be taken The X ray unit will not accept...

Страница 91: ...e the surface with the cloth Contact your service technician for help if sprays liquids or foams enter the system Planmeca approved cleaning agents Manufacturer Brand name Alpro Medical CleanWipes Alp...

Страница 92: ...ese parts after each patient using a Planmeca approved surface disinfectant Use a Planmeca approved cleaning agent for cleaning stains and dirt if needed 3D patient supports Panoramic patient supports...

Страница 93: ...Cephalometric patient supports Patient handles and touch screen 14 Cleaning and disinfection User s manual Planmeca ProMax 89...

Страница 94: ...NOTE FOR HEAD BAND 25 Wipe the head band after each patient using a mild cleaning agent and a clean soft cloth Do not use disinfectants 14 Cleaning and disinfection 90 Planmeca ProMax User s manual...

Страница 95: ...Wipe the other surfaces regularly using a Planmeca approved surface disinfectant Use a Planmeca approved cleaning agent for cleaning stains and dirt if needed 14 Cleaning and disinfection User s manua...

Страница 96: ...ean the laser windows regularly using compressed air NOTE The parts in the figure below can be autoclaved at 134 C 273 F The parts can be autoclaved up to 100 times 14 Cleaning and disinfection 92 Pla...

Страница 97: ...arantee patient and user safety and ensure consistent image quality The annual maintenance service includes inspection of the following X ray unit adjustments and quality control checks Data security...

Страница 98: ...ponents containing hazardous materials must be disposed of in accordance with waste legislation and instructions issued by the local environmental authorities The following parts contain hazardous was...

Страница 99: ...3D Mid with X ray tube D 054SB 0 5 x 0 5 mm 3D Plus 3D Mid 3D Max with X ray tube D 059SBR or SXR 130 10 0 5 SC 0 5 x 0 5 mm 3D Max with X ray tube D 067SB 0 6 x 0 6 mm Filtration Pan ceph Total 2 5 m...

Страница 100: ...1 16 mA 10 Scanning ceph 1 16 mA 10 Planmeca ProCeph 11 mA 10 mAs range min max as indicated 10 0 2 mAs mGy range min max as indicated 40 Linearity of radiation output 0 1 DEC accuracy 10 Cooling peri...

Страница 101: ...cycle for height adjustment 25 s ON 400 s OFF Line voltage 100 220 V 50 60 Hz 230 240 V 50 Hz Line current 8 17 A Line harmonics Cos better than 0 9 Max permissible apparent impedance of supply mains...

Страница 102: ...les Image properties Pan ceph CCD Pixel size 48 m Pan active surface 6 x 146 mm 0 24 x 5 74 in Ceph active surface 6 x 292 mm 0 24 x 11 15 in Planmeca ProCeph Flat panel pixel size 139 m Flat panel ac...

Страница 103: ...Frequency for fluorescent lamps 100 Hz Even and uniform lighting No natural light Original manufacturer Planmeca Oy Asentajankatu 6 FIN 00880 Helsinki Finland Phone 358 20 7795 500 Fax 358 20 7795 555...

Страница 104: ......

Страница 105: ......

Страница 106: ...Planmeca Oy Asentajankatu 6 00880 Helsinki Finland tel 358 20 7795 500 fax 358 20 7795 555 sales planmeca com www planmeca com...

Отзывы: