24
EN
ENGLISH
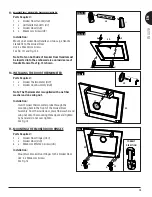
36. ATTACHING CHARCOAL TRAY LIFT SYSTEM
Parts Required :
1 x Charcoal Tray Lift Handle Assembly
(#20)
1 x Charcoal Main Chamber
2 x Hinge Pin
(#K)
2 x R Clips
(#L)
Installation
:
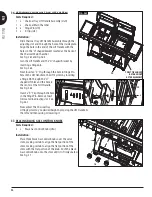
• Slide Charcoal Tray Lift Handle Assembly through the
adjusting slot and through the hole of the inside plate.
Align the hole in the end of the Lift Handle with the
holes in the "U" shaped bracket located at the back of
the Charcoal Main Chamber.
See Fig. 36.1 and Fig. 36.2.
• Join the Lift Handle and the "U" shaped Bracket by
inserting a Hinge pin.
See Fig. 36.3.
• Next Insert an "R" Clip through the hole in Hinge Pin.
Attach the Lift Handle to the Lift System by inserting
a Hinge Pin through the "U"
shaped Lift Arm and the hole in
the center of that Lift Handle.
See Fig. 36.4.
• Insert a "R" Clip
through the hole
in the Hinge Pin. Remove twist
tie located in adjusting slot. See
Fig. 36.1.
• Now, adjust the Charcoal Tray
Lifting System to you desired height by moving the Lift Handle to
the left and then raising or lowering it.
TWIST TIE SHOULD
BE TAKEN OUT
AFTER ASSEMBLY.
FIG. 36.1
20
K
L
L
K
FIG. 36.2
FIG. 36.3
FIG. 36.4
L
L
K
K
20
20
20
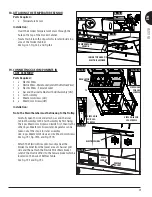
37. PLACING BLACK GAS CONTROL KNOBS
Parts Required :
3 x Black Gas Control Knobs
(#16)
Installation
:
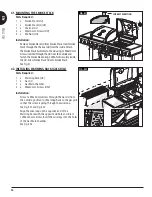
• Place three black Gas Control Knobs over the valve
stem, making certain to align the flat portion of the
stem, making certain to align the flat portion of the
stem with the flat portion of the knob. Push the black
Gas Control Knob onto the stem until it is firmly seated.
See Fig. 37.
FIG. 37
16


