


Recording
49
En
06
• Pioneer takes no responsibility for
recording failure due to power cuts,
defective discs, or damage to the
recorder.
• See also
Disc/content format playback
compatibility
on page 7 for detailed disc
compatibility information.
Recording to DVD-R DL/DVD+R DL
discs
Recording to DVD-R DL/DVD+R DL discs is
generally the same as recording to regular
single-layer discs; however, please note the
following points:
• When the recorder switches from the
first layer to the second during recording
a DVD-R DL (Video mode) disc, a new
title is automatically started on the new
layer.
• Up to 99 titles can be recorded on a
DVD-R DL (Video mode) disc. If the 99th
title is being recorded when the layer is
switched, recording will stop.
• Up to 49 titles can be recorded on a
DVD+R DL disc.
• You cannot play, record additional
material to, edit or finalize a DVD-R DL or
DVD+R DL disc that has been recorded
on but not yet finalized on another DVD
recorder.
About HDD recording
Recording to the internal hard disk drive
(HDD) is very flexible; you have the full
choice of recording quality options,
including manual mode, and of course you
can record, erase and re-record as many
times as you like.
The capacity of the hard disk drive means
that you can store many hours of video on it,
even using the higher quality recording
modes.
Important
• The maximum number of titles/chapters
per title that can be recorded on the
HDD is 999 and 99 respectively. No more
recording is possible on the HDD after
the maximum number of titles has been
reached.
• The maximum continuous recording
time for one title is 12 hours.
• It is possible to record both PAL and
NTSC titles on the HDD. Before
recording, you need to make sure that
the Input Line System setting (page 124)
matches the TV line system of the source
you’re recording.
HDD Video mode compatibility
When recording to the HDD you can choose
to record in one of two formats. Set the
format from the HDD Recording Format
item in the Initial Setup menu (see
page 120).
When set to Video Mode On, high-speed
copying from HDD to DVD-R/-RW (Video
mode) or DVD+R/+RW is possible. When
recording a bilingual broadcast, set which
channel you want to record from the Initial
Setup menu (see
Bilingual Recording
on
page 116).
When HDD Recording Format is set to Video
Mode Off, high-speed copying from HDD to
DVD-R/-RW (Video mode) or DVD+R/+RW
isn’t possible. However, both channels of
bilingual broadcasts are recorded and you
can switch the audio on playback.
Recorded audio
In all except the
LPCM
mode, sound is
recorded in two channel Dolby Digital format
(only Dolby Digital 2.0 can be recorded; Dolby
Digital 5.1 recording is not possible)
. When
set to
LPCM
, sound is recorded in high
quality, uncompressed Linear PCM format.
If the broadcast audio is bilingual and you
are recording to DVD-R/-RW (Video mode),
DVD+R/+RW, or to the HDD with the HDD
Recording Format set to Video Mode On, or
DVR550H_WV_EN.book 49 ページ 2006年12月28日 木曜日 午後4時21分
Downloaded From Disc-Player.com Pioneer Manuals
51
En
06
• If the NICAM audio setting (see
NICAM
Select
on page 116) is set to
NICAM
and
you are watching a NICAM broadcast,
you can switch between
NICAM
and
Regular
(non-NICAM) audio.
• If the NICAM broadcast is bilingual, you
can also select the language.
• You can also select the language for a
non-NICAM bilingual broadcast.
• When watching a recording made from
an external input with
Bilingual
recording selected (see
External Audio
on page 116), you can switch the audio
channel between left (
L
), right (
R
) or both
(
L+R
).
Note
• When recording to the HDD with HDD
Recording Format set to Video Mode On,
to DVD-R/-RW (Video mode) , to DVD+R/
+RW, or on the
LPCM
setting, only one
channel of a bilingual broadcast is
recorded. In this case, decide which
language you want to record before
recording by setting the Bilingual
Recording setting (see
Bilingual
Recording
on page 116).
Switching between TV and DVD
When the recorder is stopped or recording
you can choose whether to have the audio/
video from the built-in TV tuner (or external
input) play on your TV (‘DVD mode’), or
watch the channel that the TV is currently set
to (‘TV mode’).
During playback or when a menu is being
displayed on-screen, the sound and video is
always routed to your TV and is unaffected by
the
TV/DVD
mode setting.
Note that the recorder must be connected to
your TV using a SCART cable to be able to
use this feature.
•
Switch between TV mode and
DVD mode.
Setting the picture quality/
recording time
Before starting a recording, you will usually
want to set the picture quality/recording
time. There are six standard settings
available, which allow you to choose a
balance between picture quality and
recording time.
When Manual Recording is set to On (see
Manual Recording
on page 119), a further
option will be available (
MN1
to
MN32
,
LPCM
, or
XP+
(a super-high quality HDD
recording mode that features a transfer rate
of around 15 Mbps) depending on what you
set).
When recording to DVD,
MN32
is the
highest recording quality available. If you
select
XP+
, the recording mode will
automatically revert to
MN32
.
When recording to DVD+R/+RW,
SLP
is the
longest recording time available. If you
select
SEP
or
MN1
to
MN3
, the recording
mode will automatically revert to
SLP
.
•
Press repeatedly to select
the recording quality.
•
XP
– High quality setting, gives about
one hour of recording time on a DVD
disc.
NICAM
Regular
NICAM A
NICAM B
Regular
NICAM A+B
A (L)
B (R)
A + B (L+R)
L
R
L+R
TV/DVD
DVD (VR) DVD (Video) DVD+R DVD+RW DVD-RAM
HDD
SHIFT
+
REC MODE
DVR550H_WV_EN.book 51 ページ 2006年12月28日 木曜日 午後4時21分
Downloaded From Disc-Player.com Pioneer Manuals
53
En
06
4
Select the audio channel to
record.
See
Changing audio channels
on page 50 for
• When recording in VR mode, if a
broadcast is bilingual, both audio
channels are recorded, allowing you to
switch the audio channel on playback.
The only exception to this is when the
picture quality is set to
LPCM
, in which
case you do need to select the audio
channel before recording.
5
Start recording.
If you want to set a recording end time, press
the
REC
button repeatedly. The recording
time increases in 30 minute increments, up
to a maximum of six hours. The time the
recording will end is shown on-screen and in
the front panel display. When the recording
ends, the recorder automatically switches
into standby if no other operation is being
performed.
• To cancel the set recording time, press
REC
.
• If you want to pause recording at any
time
1
, press
PAUSE
. Press again to
restart the recording (If recording to the
HDD, DVD-RAM or in VR mode, a new
chapter is started after recording
restarts).
6
Press to stop recording.
• If you set the recording time in the
previous step, you can still stop the
recording anytime by pressing
STOP
REC
.
• Recording will stop automatically when
there is no more space on the HDD/
DVD, or after 12 hours of HDD recording
(whichever is sooner).
If VPS/PDC is active for two timer
programmes that are programmed to
start at the same time, then the
programme that actually starts first
takes priority.
Tip
• During recording you can turn on/off the
SCART loop through function. During
recording, press the front panel
CH +
button to switch to
SCART THRU
(loop
through on), or
CH –
to switch to
SCART
NORM
(loop through off). Loop through
is automatically reset to off after
recording has finished. Note that you
can’t switch loop through on if recording
from the
AV1 (RGB) -TV
connector.
Note
1 Except during Chase Play.
SHIFT
+
AUDIO
REC
STOP REC
DVR550H_WV_EN.book 53 ページ 2006年12月28日 木曜日 午後4時21分
Downloaded From Disc-Player.com Pioneer Manuals
55
En
06
Using Pause Live TV
1
Start recording the current TV
channel.
Recording continues with playback paused.
• Note that it may take up to 10 seconds
for recording to start.
2
Press to start playback.
You can also use the scan buttons (
/
), pause (
PAUSE
) and stop
(
STOP
) — all without affecting the
recording.
3
Press to stop the recording.
The operation is slightly different depending
on the viewing source. See the
Operation
table
below for details.
Tip
• When the
Pause Live TV
setting (see
page 123) is set to
TV’s Tuner
, you can
press
PAUSE LIVE TV
while the recorder
is in standby to switch on and
immediately start recording. When set to
Recorder’s Tuner
, it is not possible to
use the Pause Live TV feature from
standby.
• After pressing
PAUSE LIVE TV
, it will
take at least 10 seconds for the picture to
change (during this time, all controls
except the power button are inoperative).
(Note that startup from standby is not
possible if you have selected
Recorder’s
Tuner
in
Pause Live TV
on page 123.)
• Please note that you can’t record from
another component (VCR, etc.) that is
connected by a SCART cable to the
AV2
(INPUT 1/DECODER)
connector using
the Pause Live TV feature.
Operation table
*1
No Chase Play! Warning if you change input this will stop the recording.
PAUSE LIVE TV
PLAY
STOP REC
Viewing source
TV/DVD
mode of
DVR
DVR source
Pause Live TV
function button
Condition
TV built-in analog
tuner
TV
–
Pause Live TV
Preset channel of DVR and TV are
matched after downloading from TV.
Direct TV recording
*1
Preset channel of DVR and TV are NOT
matched after downloading from TV.
Record TV programme that you’re
watching.
TV built-in digital
tuner
TV
–
Direct TV recording
*1
Preset channel info. in D.TV cannot be
shared by DVR even after Download from
TV. Record TV programme that you’re
watching.
External input of TV
TV
–
Direct TV recording
*1
Record TV programme that you’re
watching.
DVR built-in analog
tuner
DVD
DVR built-in
analog tuner
Pause Live TV
DVR550H_WV_EN.book 55 ページ 2006年12月28日 木曜日 午後4時21分
Downloaded From Disc-Player.com Pioneer Manuals
57
En
06
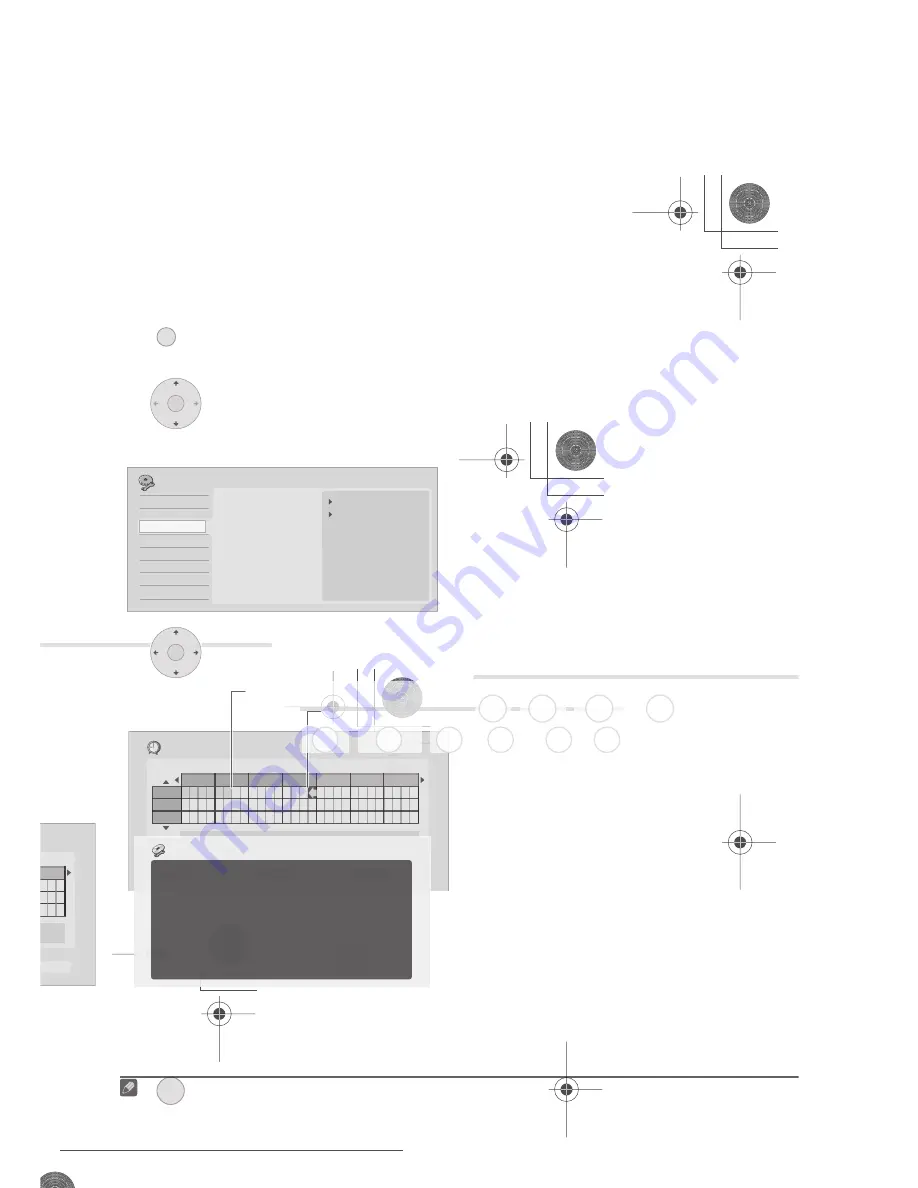
Easy Timer Recording
As the name suggests, Easy Timer
Recording makes setting up a timer
recording as simple as possible.
1
1
Select ‘Timer Recording’, then
‘Easy Timer’ from the Home Menu.
2
Set the TV channel to record.
3
Set the recording quality.
•
DVD recording:
The
AUTO
option
automatically sets the best recording
quality for the space available on the
disc loaded at the time of recording.
•
HDD recording:
The
AUTO
option
automatically sets the best recording
quality that would fit on to a blank DVD
disc.
4
Select the HDD or DVD for
recording.
5
Move the cursor to the
recording start date and time on the grid.
• You can move the cursor forward or back
an hour at a time using the
and
buttons.
Each row of the grid is one day (you can set
the timer recording for up to a month in
advance). Each column is a 15 minute
interval.
The darker area represents time that has
already passed and can’t therefore be
selected. The lighter area is time that’s
available.
6
Set the start time.
The start date and time is displayed in the
middle of the screen.
• You can go back and reset the start time
if you need to by pressing
RETURN
.
7
Move the cursor to the
recording end time on the grid.
Note
1 You can’t use VPS/PDC with Easy Timer Recording. Set a scheduled recording using the GUIDE Plus+ system
if you want to use VPS/PDC.
HOME MENU
PREV
NEXT
SHIFT
+
REC MODE
HDD/DVD
Current time
Recording start time
ENTER
Recording start time
Recording end time
DVR550H_WV_EN.book 57 ページ 2006年12月28日 木曜日 午後4時21分
Downloaded From Disc-Player.com Pioneer Manuals
59
En
06
finished. If two programmes have the
same times (but different channels, for
example), the programme set most
recently takes priority.
If VPS/PDC is active for two timer
programmes that are programmed to
start at the same time, then the
programme that actually starts first
takes priority.
Simultaneous recording and
playback (Chase Play)
Chase Play allows you to watch a recording
that is still in progress from the start, without
having to wait until the recording has
finished (i.e., playback is ‘chasing’ the
recording).
In fact, you’re not just limited to watching
the recording in progress. You can watch
anything else already on the HDD (or on a
DVD if you’re recording to the HDD) by
selecting it from the Disc Navigator screen
(see
Using the Disc Navigator with recordable
discs and the HDD
on page 67).
Chase Play is not possible when DV is the
recording input.
•
Press during recording to start
playback from the beginning of the
current recording
1
.
•
Press during recording to select
another title to play.
You can use all the usual playback controls,
such as pause, slow-motion play, scan and
skip.
• To stop playback, press
STOP
(recording will continue).
• To stop recording, press
STOP REC
(playback will continue).
• During recording or in timer recording
standby, you can’t play an HDD title,
DVD or Video CD/Super VCD disc if the
Input Line System setting doesn’t match
the TV line system of the disc/HDD title
(see also
Additional information about
the TV system settings
on page 124).
Also, during simultaneous recording
and playback, if the TV line system of the
playback track/title changes then
playback will automatically stop.
Recording from an external
component
You can record from an external component,
such as a camcorder or VCR, connected to
one of the recorder’s external inputs.
1
Make sure that the component you
want to record from is connected
properly to the HDD/DVD recorder.
See Chapter 2 (
Connecting up
) for
connection options.
2
Press repeatedly to select one of
the external inputs to record from.
The current input is shown on-screen and in
the front panel display:
•
AV2/L1
– Input 1
2
•
L2
– Input 2 (front panel)
•
L3
– Input 3
Check that the
Audio In
settings for
External Audio
and
Bilingual Recording
are as you want them (see
Audio In
on
page 116).
• If the aspect ratio is distorted (squashed
or stretched), adjust on the source
component or your TV before recording.
Note
1 You can’t start playback immediately after recording starts. Simultaneous playback and recording doesn’t work
while copying or backing up.
HDD
PLAY
DISC
NAVIGATOR
2 This cannot be selected if
AV2/L1 In
is set to
Decoder
(see
AV2/L1 In
on page 116).
DVD (VR) DVD (Video) DVD+R DVD+RW DVD-RAM HDD
INPUT SELECT
DVR550H_WV_EN.book 59 ページ 2006年12月28日 木曜日 午後4時21分
Downloaded From Disc-Player.com Pioneer Manuals
61
En
06
• DVD-R DL (Video mode) discs and
DVD+R DL discs must be finalized in
order to play in other recorders/players.
Note however that some recorders/
players will not play even finalized dual-
layer discs.
1
Load the disc you want to finalize.
Make sure that the recorder is stopped
before proceeding.
2
Select ‘Disc Setup’ from the
Home Menu.
3
Select ‘Finalize’ > ‘Finalize’ >
‘Next Screen’.
4
For DVD-R/-RW (Video mode)
and DVD+R/+RW discs only, select a title
menu style, then select ‘Yes’ to start
finalization or ‘No’ to cancel.
The menu you select will be the one that
appears when the ‘top menu’ (or ‘menu’ for
a DVD+R/+RW) is selected on any DVD
player.
• Discs recorded partially or fully on the
Pioneer DVR-7000 DVD recorder do not
support this feature. These discs will
have only a text title menu when finalized
on this recorder.
5
The recorder will now start finalizing
the disc.
During finalization:
• If the finalization process of a DVD-RW
or DVD+R/+RW disc is going to take
more than around four minutes, you can
press
ENTER
to cancel. Around four
minutes before completion, the option to
cancel disappears.
• You can’t cancel the finalization of a VR
mode DVD-R disc.
• How long finalization takes depends on
the type of disc, how much is recorded
on the disc and the number of titles on
the disc. A disc recorded in VR mode can
take up to one hour to finalize. DVD-R/-
RW (Video mode) and DVD+R/+RW
discs can take up to 20 minutes.
Initializing recordable DVD
discs
DVD-R/-RW discs can be initialized for either
Video mode recording or VR mode
recording.
1
When you first load a blank DVD-RW or
DVD+RW disc, the recorder initializes it for
recording automatically. By default, blank
DVD-RW discs are initialized for VR mode
recording. See
DVD-RW Auto Initialize
on
page 62 if you want to change the default to
Video mode.
DVD-R discs are ready for Video mode
recordings out of the box; if you want to use
a DVD-R for VR mode recording, you must
initialize it before recording anything on the
disc.
HOME MENU
ENTER
ENTER
Note
1 If a disc was previously finalized on an older DVD recorder, you may not be able to re-initialize and/or initialize
it for Video mode recording.
DVD-R DVD-RW DVD+RW DVD-RAM
DVR550H_WV_EN.book 61 ページ 2006年12月28日 木曜日 午後4時21分
Downloaded From Disc-Player.com Pioneer Manuals