background image


Additional information


127


En


16


Manual recording modes


The table below shows the approximate recording times for different DVD types in each 
manual recording mode, as well as the standard recording mode equivalents. For recording 
time on the HDD, see 


 on page 140.


MN1


MN3


MN6


*4 


XP+


MN32


Rec. time


Resolution


*1


Level


Single-Layer  
DVD:
DVD-R/-RW
DVD+R/+RW
DVD-RAM

Dual-Layer 
DVD:
DVD-R DL
DVD+R DL

Video mode Off (HDD)
VR mode (DVD-R/-RW)
DVD-RAM
VR mode (DVD-R DL)

Video mode On (HDD)
Video mode (DVD-R/-RW)
DVD+R/+RW
Video mode (DVD-R DL)
DVD+R DL


MN 1 


*2,3


802 mins.

1440 mins.

352 x 240 /

352 x 288

352 x 240 /

352 x 288

MN 2 


*2,3


720 mins.

1292 mins.

MN 3 


*2,3


SEP


600 mins.

1077 mins.

MN 4 


*3


SLP


480 mins.

861 mins.

MN 5 


*3


420 mins.

754 mins.

MN 6 


*3


EP


360 mins.

646 mins.

MN 7

300 mins.

538 mins.

352 x 480 /

352 x 576

352 x 480 /

352 x 576

MN 8

270 mins.

484 mins.

MN 9


LP


240 mins.

431 mins.

480 x 480 /

480 x 576

720 x 480 /

720 x 576

MN 10

230 mins.

413 mins.

MN 11

220 mins.

395 mins.

MN 12

210 mins.

377 mins.

544 x 480 /

544 x 576

MN 13

200 mins.

359 mins.

MN 14

190 mins.

341 mins.

MN 15

180 mins.

323 mins.

MN 16

170 mins.

305 mins.

720 x 480 /

720 x 576

MN 17

160 mins.

287 mins.

MN 18

150 mins.

269 mins.

MN 19

140 mins.

251 mins.

MN 20

130 mins.

233 mins.

MN 21


SP


120 mins.

215 mins.

MN 22

110 mins.

197 mins.

MN 23

105 mins.

188 mins.

MN 24

100 mins.

179 mins.

MN 25

95 mins.

170 mins.

MN 26

90 mins.

161 mins.

MN 27

85 mins.

153 mins.

MN 28

80 mins.

144 mins.

MN 29

75 mins.

135 mins.

MN 30

70 mins.

126 mins.

MN 31

65 mins.

117 mins.

MN 32


XP


61 mins.

111 mins.

LPCM

61 mins.

111 mins.

XP+


*4


--- mins.

--- mins.

DVR550H_WV_EN.book 127 ページ 2006年12月28日 木曜日 午後4時21分

Downloaded From Disc-Player.com Pioneer Manuals

129


En


16


All settings are reset


• If the recorder is unplugged (or there is a power failure) while the 
recorder is on, all the settings will be lost.
• Make sure that you switch the recorder into standby before 
unplugging the power cord.


Remote control does 
not work


• If you connected this recorder to another Pioneer product using the 


CONTROL


IN


 jack, point the remote control at the other component to 

use (page 14).
• Set the remote control to the same ID number as the recorder 
(page 122). (When the batteries run down, the remote mode is 
automatically reset to 


Recorder1


.)

• Use the remote within its operating range (page 6).
• Replace the batteries (page 6).


No sound or sound is 
distorted


• Make sure that the amp/receiver or TV is set to the correct input and 
the volume turned up.
• There is no sound when the picture is paused, or during scanning or 
slow motion play. Press 


PLAY


 to resume regular playback.

• DTS discs can only be played if this recorder is connected to a DTS 
decoder or DTS compatible amp/receiver. If you have connected a 
suitable decoder, also make sure that the 


Initial Setup > Audio Out > 

DTS Out


 setting is 


On


.

• Some 96 kHz discs do not output audio through the digital jack. In 
this case, switch the input of your amp/receiver to analog.
• Check the audio cable connections (page 14).
• If the sound is distorted, try cleaning the cable plugs.


The picture from the 
external input is 
distorted


• If the video signal from the external component is copy-protected, 
you cannot connect via this recorder. Connect the component directly 
to your TV.


The picture is distorted


• Change the Input Line System setting (page 124). (You can also 
change it by pressing the 


 STOP


 button and 


INPUT SELECT


 on the 

front panel simultaneously with the recorder stopped.)


Screen is stretched 
vertically or 
horizontally


• Make sure that the 


TV Screen Size


 setting (page 120) is correct for 

the kind of TV you have (see also page 137).
• If you have a widescreen TV, check its aspect ratio settings.
• This recorder’s input switches into wide mode automatically 
according to the input signal. When the unit connected is not 
compatible with VIDEO ID-1 (widescreen signalling), set the 
connected component to output 4:3 aspect ratio (standard) video.


Problem

Remedy

DVR550H_WV_EN.book 129 ページ 2006年12月28日 木曜日 午後4時21分

Downloaded From Disc-Player.com Pioneer Manuals

131


En


16


After briefly 
unplugging or after a 
power failure the front 
panel display shows 
‘--:--’


• A backup battery inside the recorder keeps the clock and other 
settings from being reset when there is no power to the recorder. After 
unplugging or a power failure, the battery keeps all settings for a 
period of several minutes. Reset the clock and other recorder settings 
to use the recorder again.


Front panel display 
shows ‘LOCKED’ when 
a button is pressed


• The Child Lock is on; turn off in order to use the recorder (page 58).


Can’t use One Touch 
Copy (HDD to DVD)


• Make sure that there is a recordable DVD-R/-RW loaded with some 
free space for recording and fewer than 99 titles already on the disc. 
Also make sure that for a DVD-R/-RW (Video mode) or a DVD+R, the 
disc isn’t finalized.
• Make sure there is a recordable DVD+R/+RW loaded with some 
free space for recording and fewer than 49 titles already on the disc.
• If you delete a title from a DVD+R/+RW disc, the number of 
remaining recordable titles may not decrease.
• Further recording is not possible on a finalized DVD+R. Check that 
there isn’t a disc menu on the disc you’re trying to use.
• If the title currently playing contains material that is copy-once 
protected, One Touch Copy will not work.
• If the currently playing HDD content was recorded in 


XP+


 mode, the 

One Touch Copy feature can’t be used.
• One Touch Copy can’t be used for titles over eight hours long when 
copying to DVD+R/+RW (though you can use a DVD+R DL).
• One Touch Copy can’t be used for 


MN1


 to 


MN6


SEP


SLP 


or 


EP


 titles 

when copying to DVD+R/+RW.
• One Touch Copy doesn’t work if the recorder is already recording to 
DVD.


Can’t use One Touch 
Copy (DVD to HDD)


• Make sure that there is space available on the HDD and that there 
are fewer than 999 titles on the HDD.
• One Touch Copy doesn’t work if the recorder is already recording to 
the HDD.


Problem

Remedy

DVR550H_WV_EN.book 131 ページ 2006年12月28日 木曜日 午後4時21分

Downloaded From Disc-Player.com Pioneer Manuals

133


En


16


On-screen displays


The table below shows a list of error messages that you may encounter when using the 
recorder and an explanation of their meaning.


Message

Explanation/Action

• Initializing disc. Please wait a 
moment.


When you load a blank DVD-RW or DVD+RW disc, 
the recorder automatically initializes it.


• Incompatible region number.


The disc loaded has an incompatible region 
number for the recorder and so will not play.


• Cannot record any more titles.
• No more space for file management 
data.


The disc control data limit has been reached, or 
the maximum number of chapters and/or titles 
has been reached. Erase titles/chapters or 
combine chapters.


• This disc cannot be recorded. Undo 
the finalization.


The disc was finalized on a non-Pioneer DVD 
recorder. Undo the finalization in order to 
recording/editing.


• Cannot play this disc.
• This disc cannot be recorded.
• Cannot read the CPRM information.
• Could not record the information to 
the disc.
• Cannot edit.
• Could not initialize disc.
• Could not complete finalization 
successfully.
• Could not undo finalization 
successfully.
• Could not successfully unlock the 
disc.


The disc may be dirty or damaged. Take out the 
disc, clean it and retry. If the error persists, use a 
new disc. If the error appears even with a new disc, 
please ask your nearest Pioneer-authorized service 
center or your dealer to carry out repairs.


• Incompatible or unreadable disc.


The disc loaded is a playback-only disc type. This 
display may also appear if the disc is dirty or 
damaged.


• Cannot record to a disc that is not 
CPRM compatible.
• Cannot record this content using 
Video mode recording.
• This video cannot be recorded to 
DVD+R/+RW.


The video source is copy-once protected. Use a VR 
mode DVD-R/-RW disc with CPRM for recording.


• This content is copy protected.


The video source is copy-protected and cannot be 
recorded.


• Incorrect CPRM information.


The recorder could not read the CPRM 
information. The recorder may be damaged — 
please ask your nearest Pioneer-authorized service 
center or your dealer to carry out repairs.

DVR550H_WV_EN.book 133 ページ 2006年12月28日 木曜日 午後4時21分

Downloaded From Disc-Player.com Pioneer Manuals

135


En


16


Front-panel displays


The table below shows a list of error messages that you may encounter when using the 
recorder and an explanation of their meaning.


• There is no DV input or the input 
signal is unrecordable.


No signal was detected at the 


DV IN


 jack. This may 

appear if a blank section of DV tape is playing in 
the connected camcorder.


• No DV camcorder connected.


The camcorder is not connected properly, or the 
camcorder is switched off.


• You cannot connect more than one 
DV camcorder at a time.


This recorder’s DV jack supports connection to 
just one camcorder.


• Cannot operate the DV camcorder.


This recorder cannot operate the DV camcorder. 
Try switching off the camcorder then turn it back 
on again.


• Could not operate the DV camcorder.


This recorder was not able to operate the DV 
camcorder.


• The DV camcorder is not set for 
playback. Please select playback mode 
on the DV camcorder.


The camcorder is in camera mode. Switch it to 
playback mode.


Message

Explanation/Action

• E01


The HDD may be damaged or broken. Please ask 
your nearest Pioneer-authorized service center or 
your dealer to carry out repairs.


• E02


As the HDD info cannot be properly read, no new 
recordings can be made. Reinitializing the HDD 
(page 109) may result in your being able to make 
recording again. Note that reinitializing the HDD 
will erase all recorded contents, including 
protected files.


HDCP ERR


Displayed when a device that is not HDCP-
compatible is connected to the HDMI terminal. 
Connect a device that is HDCP-compatible.


Message

Explanation/Action

DVR550H_WV_EN.book 135 ページ 2006年12月28日 木曜日 午後4時21分

Downloaded From Disc-Player.com Pioneer Manuals

137


En


16


Screen sizes and disc formats


When viewing on a standard TV or monitor

Screen format of disc Setting

Appearance

16:9

4:3 (Letter Box)


The programme is shown in widescreen with 
black bars at the top and bottom of the 
screen.


4:3 (Pan & Scan)


The sides of the programme are cropped so 
that the picture fills the whole screen.


4:3

4:3 (Letter Box)
4:3 (Pan & Scan)


The programme is presented correctly on 
either setting.


When viewing on a widescreen TV or monitor

Screen format of disc Setting

Appearance

16:9

16:9


The programme is presented in widescreen.


4:3

16:9


Your TV will determine how the picture is 
presented — check the manual that came 
with the TV for details.

DVR550H_WV_EN.book 137 ページ 2006年12月28日 木曜日 午後4時21分

Downloaded From Disc-Player.com Pioneer Manuals

139


En


16


Hints on installation


We want you to enjoy using this unit for 
years to come, so please bear in mind the 
following points when choosing a suitable 
location for it:


Do...


Use in a well-ventilated room.


Place on a solid, flat, level surface, such 

as a table, shelf or stereo rack.


Don’t...


Use in a place exposed to high 

temperatures or humidity, including near 
radiators and other heat-generating 
appliances.


Place on a window sill or other place 

where the recorder will be exposed to direct 
sunlight.


Use in a dusty or damp environment or 

in a room where it will be exposed to 
excessive cigarette smoke.


Place directly on top of an amplifier, or 

other component in your stereo system that 
becomes hot in use.


Use near a television or monitor as you 

may experience interference — especially if 
the television uses an indoor antenna.


Use in a kitchen or other room where the 

recorder may be exposed to smoke or steam.


Use on a thick rug or carpet, or cover 

with cloth — this may prevent proper cooling 
of the unit.


Place on an unstable surface, or one that 

is not large enough to support all four of the 
unit’s feet.


Moving the recorder


If you need to move the recorder, first 
remove the disc, if loaded, and close the disc 
tray. Next, press 


 STANDBY/ON


 to switch 

the power to standby, checking that the 


POWER OFF


 indication in the display goes 

off. Wait at least two minutes. Lastly, 
disconnect the power cord. Never lift or 
move the unit during playback or recording 
— discs rotate at a high speed and may be 
damaged.


Resetting the recorder


If you need to, you can reset the recorder to 
all its factory settings.


1

Make sure that the recorder is on.

2

Using the front panel controls, press 

and hold 


 STOP and press 


 STANDBY/

ON.


The recorder turns off with all settings reset.

DVR550H_WV_EN.book 139 ページ 2006年12月28日 木曜日 午後4時21分

Downloaded From Disc-Player.com Pioneer Manuals

141


En


16


Input/Output


VHF/UHF antenna input/output terminal

 . . . . . . . . . . . . . . . .VHF/UHF set 75 


 (IEC connector)

Video input

 . . . . . . . . . AV2 (Input 1), Input 2 (front), Input 3 (rear)

 Input level . . . . . . . . . . . . . . . . . . . . . . . . . 1 Vp-p (75 


)

 Jacks . . . . . . . . . . . . . . . . . . . . AV connector (Input 1), 

RCA jack (Input 2, Input 3)

Video output. . . . . . . . . . . . . . . . . . . . . . . . .AV1, Output
 Output level. . . . . . . . . . . . . . . . . . . . . . . . 1 Vp-p (75 


)

 Jacks . . . . . . . . . . . . . . . . . . . . . . .  AV connector (AV1)

RCA jack (Output)

S-Video input

 . . . . . . . . . AV2 (Input 1), Input 2 (front), Input 3 (rear)

 Y (luminance) - Input level . . . . . . . . . . . . 1 Vp-p (75 


)

 C (colour) - Input level . . . . . . . . . . . 300 mVp-p (75 


)

 Jacks . . . . . . . . . . . . . . . . . . . . AV connector (Input 1),

4 pin mini DIN (Input 2, Input 3)

S-Video output . . . . . . . . . . . . . . . . . . . . . . .AV1, Output
 Y (luminance) - Output level  . . . . . . . . . . 1 Vp-p (75 


)

 C (colour) - Output level. . . . . . . . . . 300 mVp-p (75 


)

 Jacks . . . . . . . . . . . . . . . . . . . . . . . AV connector (AV1),

4 pin mini DIN (Output)

Component video output
 Output level. . . . . . . . . . . . . . . . . . . .  Y: 1.0 Vp-p (75 


)

P


B


, P


R


: 0.7 Vp-p (75 


)

 Jacks . . . . . . . . . . . . . . . . . . . . . . . . . . . . . . . RCA jacks
RGB input  . . . . . . . . . . . . . . . . . . . . . . . . . AV2 (Input 1)
 Input level . . . . . . . . . . . . . . . . . . . . . . .  0.7 Vp-p (75


)

 Jacks . . . . . . . . . . . . . . . . . . . . .AV connector (Input 1)
RGB output  . . . . . . . . . . . . . . . . . . . . . . . . . . . . . . . .AV1
 Output level. . . . . . . . . . . . . . . . . . . . . .  0.7 Vp-p (75 


)

 Jacks . . . . . . . . . . . . . . . . . . . . . . .  AV connector (AV1)
Audio input

 . . . . . .AV2 (Input 1), Input 2 (front), Input 3 (rear) L/R

 Input level
 During audio input . . . . . . . . . . . . . . . . . . . . . .  2 V rms

(Input impedance: more than 22 k


)

 Jacks . . . . . . . . . . . . . . . . . . . . AV connector (Input 1),

RCA jacks (Input 2)

Audio output  . . . . . . . . . . . . . . . . . . . . . . . .AV1, Output
 During audio output. . . . . . . . . . . . . . . . . . . . .  2 V rms

(Output impedance: less than 1.5 k


)

 Jacks . . . . . . . . . . . . . . . . . . . . . . . AV connector (AV1),

RCA jacks (Output)

Control input . . . . . . . . . . . . . . . . . . . . . . . . . . Mini jack
Digital audio output  . . . . . . . . . . . . . . . . . . . . . . Coaxial
G-LINK™ . . . . . . . . . . . . . . . . . . . . . . . . . . . . . . Mini jack
DV input . . . . . . . . . . . . . . . . . . . . . . . . . . . . 4 pin (front)

(i.LINK/IEEE 1394 standard)

HDMI  . . . . . . . . . . . . . . . . . . . . . . . . . . . . . . . . . . . 19 pin


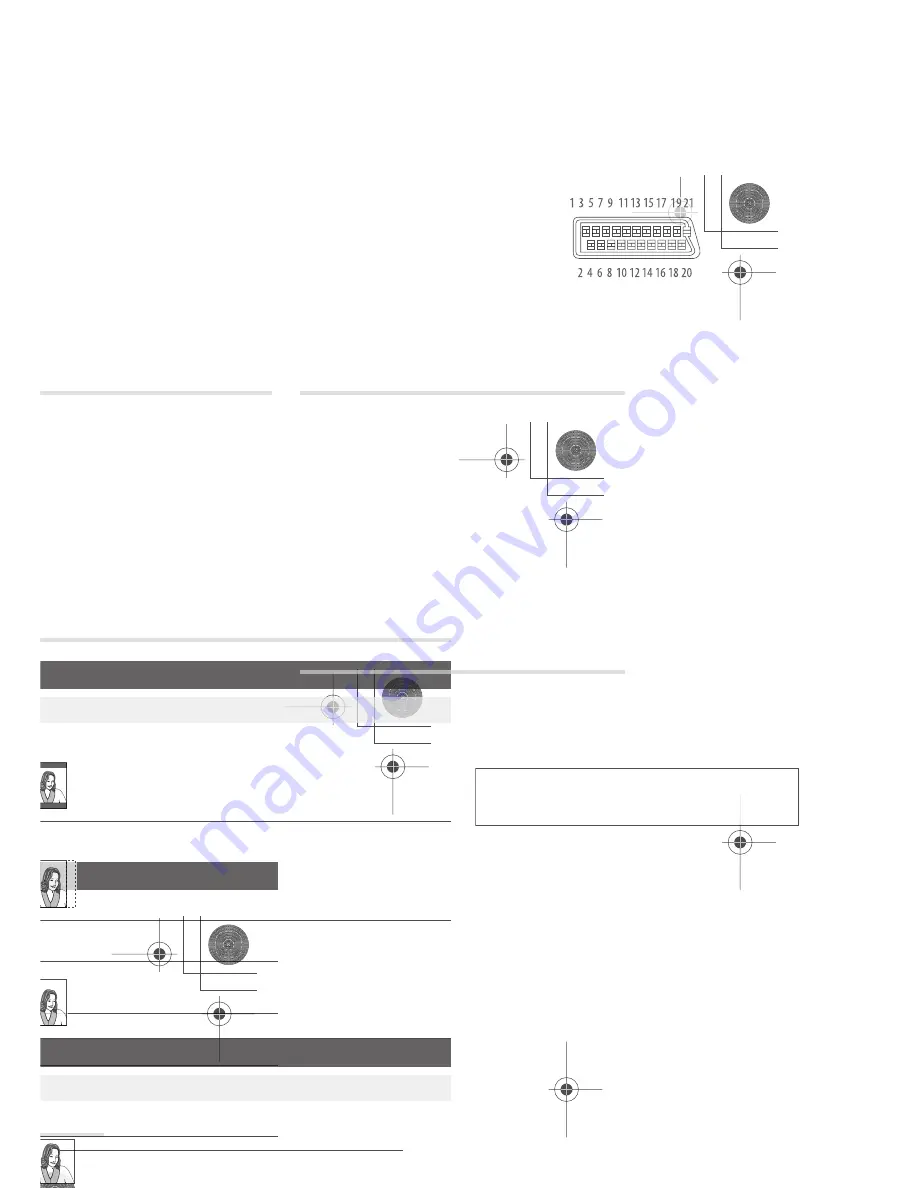
AV Connectors (21-pin connector assignment)


AV connector input/output . . . . . . . .  21-pin connector
This connector provides the video and audio signals 
for connection to a compatible colour TV or monitor.

PIN no.

AV1 (RGB)-TV / AV2 (INPUT 1/DECODER)

1. . . . . . . . . . . . . . . . . . . .Audio 2/R out / Audio 2/R out
2. . . . . . . . . . . . . . . . . . . . . . . . . . . . . . .  – / Audio 2/R in
11  . . . . . . . . . . . . . . . . . . . . . . . . . . . . . . . . . G out / G in
3. . . . . . . . . . . . . . . . . . . .  Audio 1/L out / Audio 1/L out
6. . . . . . . . . . . . . . . . . . . . . . . . . . . . . . .   – / Audio 1/L in
15  . . . . . . . . . . . . . . . . . . . . . . . . . R or C out / R or C in
4. . . . . . . . . . . . . . . . . . . . . . . . . . . . . . . . . . . . . . . . .GND
17. . . . . . . . . . . . . . . . . . . . . . . . . . . . . . . . . . . . . . . .GND
7  . . . . . . . . . . . . . . . . . . . . . . . . . . . . . . . . . . B out / B in
19. . . . . . . . . . . . . . . . . . . Video out or Y out / Video out
20. . . . . . . . . . . . . . . . . . . . . . . . . . . .  – / Video in or Y in
8. . . . . . . . . . . . . . . . . . . . . . . . . . . . . . . . . . . . . . . Status
21. . . . . . . . . . . . . . . . . . . . . . . . . . . . . . . . . . . . . . . .GND


Supplied accessories


Remote control  . . . . . . . . . . . . . . . . . . . . . . . . . . . . . . .1
Dry cell batteries (AA/R6P) . . . . . . . . . . . . . . . . . . . . . .2
Audio/Video cable (red/white/yellow)  . . . . . . . . . . . . .1
G-LINK™ cable . . . . . . . . . . . . . . . . . . . . . . . . . . . . . . . .1
RF antenna cable. . . . . . . . . . . . . . . . . . . . . . . . . . . . . .1
Power cable . . . . . . . . . . . . . . . . . . . . . . . . . . . . . . . . . .1
Operating Instructions
Warranty card  . . . . . . . . . . . . . . . . . . . . . . . . . . . . . . . .1

DVR550H_WV_EN.book 141 ページ 2006年12月28日 木曜日 午後4時21分

Downloaded From Disc-Player.com Pioneer Manuals

Содержание DVR-550H-S - Multi-System DVD Recorder

Страница 1: ...s Discover the benefits of registering your product online at http www pioneer co uk or http www pioneer eu DVR 550H S HDD DVD RECORDER HDD DVD RECORDER Operating Instructions Downloaded From Disc Player com Pioneer Manuals ...

Страница 2: ...he following caution label appears on your unit Location inside of the unit D3 4 2 1 8_B_En CAUTION ATTENTION CLASS 3B VISIBLE AND INVISIBLE LASER RADIATION WHEN OPEN AVOID EXPOSURE TO THE BEAM VRW2262 A RADIATIONS LASER VISIBLES ET INVISIBLES DECLASSE 3B QUAND OUVERT ÉVITEZ TOUT EXPOSITION AU FAISCEAU ADVARSEL KLASSE 3B SYNLIG OG USYNLIG LASERSTRÅLING VED ÅBNING UNDGÅ UDSÆTTELSEFOR STRÅLING VARNI...

Страница 3: ...ndle the power cord by the plug Do not pull out the plug by tugging the cord and never touch the power cord when your hands are wet as this could cause a short circuit or electric shock Do not place the unit a piece of furniture etc on the power cord or pinch the cord Never make a knot in the cord or tie it with other cords The power cords should be routed such that they are not likely to be stepp...

Страница 4: ...itching on and setting up 28 Setting up the GUIDE Plus system 30 05 Using the GUIDE Plus electronic programme guide The GUIDE Plus system 34 Using the GUIDE Plus system 34 Areas 36 GUIDE Plus FAQ and troubleshooting 45 06 Recording About DVD recording 48 About HDD recording 49 Recorded audio 49 Restrictions on video recording 50 Using the built in TV tuner 50 Setting the picture quality recording ...

Страница 5: ...r folders 103 Copying selected files to a DVD R RW 103 Editing files on the HDD 104 13 The Disc Setup menu Basic settings 107 Initialize settings 108 Finalize settings 108 Optimize HDD 108 Initialize HDD 109 14 The Video Adjust menu Setting the picture quality for TV and external inputs 110 Setting the picture quality for disc playback 111 15 The Initial Setup menu Using the Initial Setup menu 113...

Страница 6: ...able but some parts of the specification are not supported specifically Pro Lossless Voice and VBR DRM Digital Rights Management 1 file playback No File extensions mp3 wma these must be used for the recorder to recognize MP3 and WMA files do not use for other file types File structure Up to 99 folders 999 files if these limits are exceeded only files and folders up to these limits are playable WMA...

Страница 7: ...DL discs This logo indicates that the disc is a DVD R DL or DVD R DL disc Correct operation has been confirmed for DL discs DVD R DL ver 3 0 2x to 4x Mitsubishi Kagaku Media Verbatim DVD R DL ver 3 0 2x to 8x Mitsubishi Kagaku Media Verbatim That s JVC DVD R DL 2 4x Mitsubishi Kagaku Media Verbatim RICOH DVD R DL 2 4x to 8x Mitsubishi Kagaku Media Verbatim RICOH About DualDisc playback A DualDisc ...

Страница 8: ...able but some parts of the specification are not supported specifically Pro Lossless Voice and VBR DRM Digital Rights Management 1 file playback No File extensions mp3 wma these must be used for the recorder to recognize MP3 and WMA files do not use for other file types File structure Up to 99 folders 999 files if these limits are exceeded only files and folders up to these limits are playable WMA...

Страница 9: ...or DVD R DL disc Correct operation has been confirmed for DL discs DVD R DL ver 3 0 2x to 4x Mitsubishi Kagaku Media Verbatim DVD R DL ver 3 0 2x to 8x Mitsubishi Kagaku Media Verbatim That s JVC DVD R DL 2 4x Mitsubishi Kagaku Media Verbatim RICOH DVD R DL 2 4x to 8x Mitsubishi Kagaku Media Verbatim RICOH About DualDisc playback A DualDisc is a new two sided disc one side of which contains DVD co...

Страница 10: ... Pro Lossless Voice and VBR DRM Digital Rights Management 1 file playback No File extensions mp3 wma these must be used for the recorder to recognize MP3 and WMA files do not use for other file types File structure Up to 99 folders 999 files if these limits are exceeded only files and folders up to these limits are playable WMA Windows Media Audio compatibility This recorder can playback Windows M...

Страница 11: ...ze JPEG files do not use for other file types File structure The recorder can load up to 99 folders 999 files at one time if there are more files folders that this on the disc then more can be reloaded PC created disc compatibility Discs recorded using a personal computer may not be playable in this unit due to the setting of the application software used to create the disc In these particular ins...

Страница 12: ...g and changing the playback behavior of albums 1 Select Jukebox from the Home Menu 2 Select Listen to Music Edit 3 Select what you want to edit 4 Select an edit function from the command menu panel Erase Erase the selected track if all tracks in an album are selected the whole album is erased Edit Album name Enter a name of up to 64 characters for the album See page Title Name on page 81 for how t...

Страница 13: ... extensions jpg jpeg jpe jif jfif must be used for the recorder to recognize JPEG files do not use for other file types File structure The recorder can load up to 99 folders 999 files at one time PC created disc compatibility Discs recorded using a personal computer may not be playable in this unit due to the setting of the application software used to create the disc In these particular instances...

Страница 14: ... 2 Select Listen to Music Edit 3 Select what you want to edit 4 Select an edit function from the command menu panel Erase Erase the selected track if all tracks in an album are selected the whole album is erased Edit Album name Enter a name of up to 64 characters for the album See page Title Name on page 81 for how to enter names Track name NTER HOME MENU ENTER ENTER ENTER WV_EN book 98 ページ 2006年1...

Страница 15: ...iled instructions 3 Use a SCART cable to connect your VCR satellite receiver cable box to the AV2 INPUT 1 DECODER AV connector on this recorder 4 Use a SCART cable to connect the AV1 RGB TV AV connector to your TV WV_EN book 19 ページ 2006年12月28日 木曜日 午後4時21分 En 02 1 Connect RF antenna cables as shown This enables you to watch and record TV channels 2 Connect the DIGITAL OUT COAXIAL jack on this recor...

Страница 16: ... 2 Select Listen to Music Edit 3 Select what you want to edit 4 Select an edit function from the command menu panel Erase Erase the selected track if all tracks in an album are selected the whole album is erased Edit Album name Enter a name of up to 64 characters for the album See page Title Name on page 81 for how to enter names Track name NTER HOME MENU ENTER ENTER ENTER WV_EN book 98 ページ 2006年1...

Страница 17: ...CODER S VIDEO VIDEO AUDIO L R OUTPUT INPUT3 COMPONENTVIDEOOUT Y PB PR ANTENNA IN OUT TV Antenna cableTV walloutlet VCR Satellitereceiver Cablebox Decoder 1 2 3 4 From SCART AV connector To SCART AV connector SCART AV connection AV2 INPUT 1 DECODER AV1 RGB TV To antenna input WV_EN book 19 ページ 2006年12月28日 木曜日 午後4時21分 En 02 1 Connect RF antenna cables as shown This enables you to watch and record TV...

Страница 18: ...u 2 Select Listen to Music Edit 3 Select what you want to edit 4 Select an edit function from the command menu panel Erase Erase the selected track if all tracks in an album are selected the whole album is erased Edit Album name Enter a name of up to 64 characters for the album See page on page 81 for how to enter names Track name NTER HOME MENU ENTER ENTER ENTER WV_EN book 98 ページ 2006年12月28日 木曜日 ...

Страница 19: ...CODER S VIDEO VIDEO AUDIO L R OUTPUT INPUT3 COMPONENTVIDEOOUT Y PB PR ANTENNA IN OUT TV Antenna cableTV walloutlet VCR Satellitereceiver Cablebox Decoder 1 2 3 4 From SCART AV connector To SCART AV connector SCART AV connection AV2 INPUT 1 DECODER AV1 RGB TV To antenna input WV_EN book 19 ページ 2006年12月28日 木曜日 午後4時21分 En 02 1 Connect RF antenna cables as shown This enables you to watch and record TV...

Страница 20: ... 2 Select Listen to Music Edit 3 Select what you want to edit 4 Select an edit function from the command menu panel Erase Erase the selected track if all tracks in an album are selected the whole album is erased Edit Album name Enter a name of up to 64 characters for the album See page Title Name on page 81 for how to enter names Track name NTER HOME MENU ENTER ENTER ENTER WV_EN book 98 ページ 2006年1...

Страница 21: ...CODER S VIDEO VIDEO AUDIO L R OUTPUT INPUT3 COMPONENTVIDEOOUT Y PB PR ANTENNA IN OUT TV Antenna cableTV walloutlet VCR Satellitereceiver Cablebox Decoder 1 2 3 4 From SCART AV connector To SCART AV connector SCART AV connection AV2 INPUT 1 DECODER AV1 RGB TV To antenna input WV_EN book 19 ページ 2006年12月28日 木曜日 午後4時21分 En 02 1 Connect RF antenna cables as shown This enables you to watch and record TV...

Страница 22: ...Select Listen to Music Edit 3 Select what you want to edit 4 Select an edit function from the command menu panel Erase Erase the selected track if all tracks in an album are selected the whole album is erased Edit Album name Enter a name of up to 64 characters for the album See page Title Name on page 81 for how to enter names Track name NTER HOME MENU ENTER ENTER ENTER WV_EN book 98 ページ 2006年12月2...

Страница 23: ...This jack is for connection to DV equipment only It is not compatible with digital satellite receivers or D VHS video decks Use a DV cable not supplied to connect the DV jack of your DV camcorder to the front panel DV IN jack of this recorder Plugging in After checking all the connections plug in the recorder Use the supplied power cable to connect this recorder to a power outlet DVcamcorder HDD D...

Страница 24: ...g and changing the playback behavior of albums 1 Select Jukebox from the Home Menu 2 Select Listen to Music Edit 3 Select what you want to edit 4 Select an edit function from the command menu panel Erase Erase the selected track if all tracks in an album are selected the whole album is erased Edit Album name Enter a name of up to 64 characters for the album See page Title Name on page 81 for how t...

Страница 25: ...s to change the audio language or channel When the recorder is stopped press to change the tuner audio SUBTITLE page 71 Hold SHIFT and press to display change the subtitles included in multilingual DVD Video discs ANGLE page 73 Hold SHIFT and press to switch camera angles on discs with multi angle scenes PLAY MODE page 69 Hold SHIFT and press to change the play mode search repeat programme play et...

Страница 26: ... Select Listen to Music Edit 3 Select what you want to edit 4 Select an edit function from the command menu panel Erase Erase the selected track if all tracks in an album are selected the whole album is erased Edit Album name Enter a name of up to 64 characters for the album See page on page 81 for how to enter names Track name NTER HOME MENU ENTER ENTER ENTER WV_EN book 98 ページ 2006年12月28日 木曜日 午後4...

Страница 27: ...o change the audio language or channel When the recorder is stopped press to change the tuner audio SUBTITLE page 71 Hold SHIFT and press to display change the subtitles included in multilingual DVD Video discs ANGLE page 73 Hold SHIFT and press to switch camera angles on discs with multi angle scenes PLAY MODE page 69 Hold SHIFT and press to change the play mode search repeat programme play etc 1...

Страница 28: ...lanets Mars Venus Mercury Jup iter Saturn Uranus Nep classical Total 12 70 MB 10Albums Jukebox 0 G n Genres Play Erase Edit Play Mode Genre Name 3 10 0 03 58 4 Album2 5 Album3 6 Album4 7 Album5 8 Album6 9 Album7 10 Album8 3 Album1 ALL 1 2 3 4 5 6 7 t order re All Genres number By number By favourite Cancel By album HDD By number Album1 The Planets Mars Venus Mercury Jup iter Saturn Uranus Nep clas...

Страница 29: ...木曜日 午後4時21分 En 04 Even if you can t use the EPG functions where you live you can still set VIDEO Plus timer recordings and manual recordings see on page 56 The front panel display shows EPG when receiving data If you power on the recorder during an EPG download the download is cancelled EPG data may be received several times a day All updates are automatic When downloading EPG data the recorder ma...

Страница 30: ...bum1 The Planets Mars Venus Mercury Jup iter Saturn Uranus Nep classical Total 12 70 MB 10Albums Jukebox 0 G n Genres Play Erase Edit Play Mode Genre Name 3 10 0 03 58 4 Album2 5 Album3 6 Album4 7 Album5 8 Album6 9 Album7 10 Album8 3 Album1 ALL 1 2 3 4 5 6 7 t order re All Genres number By number By favourite Cancel By album HDD By number Album1 The Planets Mars Venus Mercury Jup iter Saturn Uranu...

Страница 31: ...s timer recordings and manual recordings see Setting a timer recording on page 56 The front panel display shows EPG when receiving data If you power on the recorder during an EPG download the download is cancelled EPG data may be received several times a day All updates are automatic When downloading EPG data the recorder may sound as though it is on This is normal Checking the downloaded data the...

Страница 32: ...g and changing the playback behavior of albums 1 Select Jukebox from the Home Menu 2 Select Listen to Music Edit 3 Select what you want to edit 4 Select an edit function from the command menu panel Erase Erase the selected track if all tracks in an album are selected the whole album is erased Edit Album name Enter a name of up to 64 characters for the album See page Title Name on page 81 for how t...

Страница 33: ...s timer recordings and manual recordings see Setting a timer recording on page 56 The front panel display shows EPG when receiving data If you power on the recorder during an EPG download the download is cancelled EPG data may be received several times a day All updates are automatic When downloading EPG data the recorder may sound as though it is on This is normal Checking the downloaded data the...

Страница 34: ...Select Listen to Music Edit 3 Select what you want to edit 4 Select an edit function from the command menu panel Erase Erase the selected track if all tracks in an album are selected the whole album is erased Edit Album name Enter a name of up to 64 characters for the album See page Title Name on page 81 for how to enter names Track name NTER HOME MENU ENTER ENTER ENTER WV_EN book 98 ページ 2006年12月2...

Страница 35: ...eiver on page 18 The code that is listed under your brand could be wrong Please try other codes for your brand under satellite cable or terrestrial Go to the Setup Area and choose one of the three options cable satellite or terrestrial that you have not already tried Follow the on screen prompts to make sure that the GUIDE Plus system can change channels on your external receiver If it does not wo...

Страница 36: ...g and changing the playback behavior of albums 1 Select Jukebox from the Home Menu 2 Select Listen to Music Edit 3 Select what you want to edit 4 Select an edit function from the command menu panel Erase Erase the selected track if all tracks in an album are selected the whole album is erased Edit Album name Enter a name of up to 64 characters for the album See page Title Name on page 81 for how t...

Страница 37: ...ew questions For a ete list please consult the GUIDE website at urope guideplus com FAQ IR receiver of your external receiver See on page 18 The code that is listed under your brand could be wrong Please try other codes for your brand under satellite cable or terrestrial Go to the Setup Area and choose one of the three options cable satellite or terrestrial that you have not already tried Follow t...

Страница 38: ... Select Listen to Music Edit 3 Select what you want to edit 4 Select an edit function from the command menu panel Erase Erase the selected track if all tracks in an album are selected the whole album is erased Edit Album name Enter a name of up to 64 characters for the album See page on page 81 for how to enter names Track name NTER HOME MENU ENTER ENTER ENTER WV_EN book 98 ページ 2006年12月28日 木曜日 午後4...

Страница 39: ...eiver on page 18 The code that is listed under your brand could be wrong Please try other codes for your brand under satellite cable or terrestrial Go to the Setup Area and choose one of the three options cable satellite or terrestrial that you have not already tried Follow the on screen prompts to make sure that the GUIDE Plus system can change channels on your external receiver If it does not wo...

Страница 40: ...ing and changing the playback behavior of albums 1 Select Jukebox from the Home Menu 2 Select Listen to Music Edit 3 Select what you want to edit 4 Select an edit function from the command menu panel Erase Erase the selected track if all tracks in an album are selected the whole album is erased Edit Album name Enter a name of up to 64 characters for the album See page on page 81 for how to enter n...

Страница 41: ...eiver on page 18 The code that is listed under your brand could be wrong Please try other codes for your brand under satellite cable or terrestrial Go to the Setup Area and choose one of the three options cable satellite or terrestrial that you have not already tried Follow the on screen prompts to make sure that the GUIDE Plus system can change channels on your external receiver If it does not wo...

Страница 42: ...ing and changing the playback behavior of albums 1 Select Jukebox from the Home Menu 2 Select Listen to Music Edit 3 Select what you want to edit 4 Select an edit function from the command menu panel Erase Erase the selected track if all tracks in an album are selected the whole album is erased Edit Album name Enter a name of up to 64 characters for the album See page on page 81 for how to enter n...

Страница 43: ...ew questions For a ete list please consult the GUIDE website at urope guideplus com FAQ IR receiver of your external receiver See on page 18 The code that is listed under your brand could be wrong Please try other codes for your brand under satellite cable or terrestrial Go to the Setup Area and choose one of the three options cable satellite or terrestrial that you have not already tried Follow t...

Страница 44: ...ing and changing the playback behavior of albums 1 Select Jukebox from the Home Menu 2 Select Listen to Music Edit 3 Select what you want to edit 4 Select an edit function from the command menu panel Erase Erase the selected track if all tracks in an album are selected the whole album is erased Edit Album name Enter a name of up to 64 characters for the album See page on page 81 for how to enter n...

Страница 45: ...eiver on page 18 The code that is listed under your brand could be wrong Please try other codes for your brand under satellite cable or terrestrial Go to the Setup Area and choose one of the three options cable satellite or terrestrial that you have not already tried Follow the on screen prompts to make sure that the GUIDE Plus system can change channels on your external receiver If it does not wo...

Страница 46: ...g and changing the playback behavior of albums 1 Select Jukebox from the Home Menu 2 Select Listen to Music Edit 3 Select what you want to edit 4 Select an edit function from the command menu panel Erase Erase the selected track if all tracks in an album are selected the whole album is erased Edit Album name Enter a name of up to 64 characters for the album See page Title Name on page 81 for how t...

Страница 47: ...eiver on page 18 The code that is listed under your brand could be wrong Please try other codes for your brand under satellite cable or terrestrial Go to the Setup Area and choose one of the three options cable satellite or terrestrial that you have not already tried Follow the on screen prompts to make sure that the GUIDE Plus system can change channels on your external receiver If it does not wo...

Страница 48: ...g and changing the playback behavior of albums 1 Select Jukebox from the Home Menu 2 Select Listen to Music Edit 3 Select what you want to edit 4 Select an edit function from the command menu panel Erase Erase the selected track if all tracks in an album are selected the whole album is erased Edit Album name Enter a name of up to 64 characters for the album See page Title Name on page 81 for how t...

Страница 49: ...omponent You can record from an external component such as a camcorder or VCR connected to one of the recorder s external inputs 1 Make sure that the component you want to record from is connected properly to the HDD DVD recorder See Chapter 2 Connecting up for connection options 2 Press repeatedly to select one of the external inputs to record from The current input is shown on screen and in the ...

Страница 50: ...Select Listen to Music Edit 3 Select what you want to edit 4 Select an edit function from the command menu panel Erase Erase the selected track if all tracks in an album are selected the whole album is erased Edit Album name Enter a name of up to 64 characters for the album See page Title Name on page 81 for how to enter names Track name NTER HOME MENU ENTER ENTER ENTER WV_EN book 98 ページ 2006年12月2...

Страница 51: ...ernal component such as a camcorder or VCR connected to one of the recorder s external inputs 1 Make sure that the component you want to record from is connected properly to the HDD DVD recorder See Chapter 2 Connecting up for connection options 2 Press repeatedly to select one of the external inputs to record from The current input is shown on screen and in the front panel display AV2 L1 Input 12...

Страница 52: ...Select Listen to Music Edit 3 Select what you want to edit 4 Select an edit function from the command menu panel Erase Erase the selected track if all tracks in an album are selected the whole album is erased Edit Album name Enter a name of up to 64 characters for the album See page Title Name on page 81 for how to enter names Track name NTER HOME MENU ENTER ENTER ENTER WV_EN book 98 ページ 2006年12月2...

Страница 53: ...ernal component such as a camcorder or VCR connected to one of the recorder s external inputs 1 Make sure that the component you want to record from is connected properly to the HDD DVD recorder See Chapter 2 Connecting up for connection options 2 Press repeatedly to select one of the external inputs to record from The current input is shown on screen and in the front panel display AV2 L1 Input 12...

Страница 54: ...Select Listen to Music Edit 3 Select what you want to edit 4 Select an edit function from the command menu panel Erase Erase the selected track if all tracks in an album are selected the whole album is erased Edit Album name Enter a name of up to 64 characters for the album See page Title Name on page 81 for how to enter names Track name NTER HOME MENU ENTER ENTER ENTER WV_EN book 98 ページ 2006年12月2...

Страница 55: ...ernal component such as a camcorder or VCR connected to one of the recorder s external inputs 1 Make sure that the component you want to record from is connected properly to the HDD DVD recorder See Chapter 2 Connecting up for connection options 2 Press repeatedly to select one of the external inputs to record from The current input is shown on screen and in the front panel display AV2 L1 Input 12...

Страница 56: ...Select Listen to Music Edit 3 Select what you want to edit 4 Select an edit function from the command menu panel Erase Erase the selected track if all tracks in an album are selected the whole album is erased Edit Album name Enter a name of up to 64 characters for the album See page Title Name on page 81 for how to enter names Track name NTER HOME MENU ENTER ENTER ENTER WV_EN book 98 ページ 2006年12月2...

Страница 57: ...ecord from an external component such as a camcorder or VCR connected to one of the recorder s external inputs 1 Make sure that the component you want to record from is connected properly to the HDD DVD recorder See Chapter 2 Connecting up for connection options 2 Press repeatedly to select one of the external inputs to record from The current input is shown on screen and in the front panel displa...

Страница 58: ...Select Listen to Music Edit 3 Select what you want to edit 4 Select an edit function from the command menu panel Erase Erase the selected track if all tracks in an album are selected the whole album is erased Edit Album name Enter a name of up to 64 characters for the album See page Title Name on page 81 for how to enter names Track name NTER HOME MENU ENTER ENTER ENTER WV_EN book 98 ページ 2006年12月2...

Страница 59: ...ernal component such as a camcorder or VCR connected to one of the recorder s external inputs 1 Make sure that the component you want to record from is connected properly to the HDD DVD recorder See Chapter 2 Connecting up for connection options 2 Press repeatedly to select one of the external inputs to record from The current input is shown on screen and in the front panel display AV2 L1 Input 12...

Страница 60: ...Select Listen to Music Edit 3 Select what you want to edit 4 Select an edit function from the command menu panel Erase Erase the selected track if all tracks in an album are selected the whole album is erased Edit Album name Enter a name of up to 64 characters for the album See page Title Name on page 81 for how to enter names Track name NTER HOME MENU ENTER ENTER ENTER WV_EN book 98 ページ 2006年12月2...

Страница 61: ...ecord from an external component such as a camcorder or VCR connected to one of the recorder s external inputs 1 Make sure that the component you want to record from is connected properly to the HDD DVD recorder See Chapter 2 Connecting up for connection options 2 Press repeatedly to select one of the external inputs to record from The current input is shown on screen and in the front panel displa...

Страница 62: ...lanets Mars Venus Mercury Jup iter Saturn Uranus Nep classical Total 12 70 MB 10Albums Jukebox 0 G n Genres Play Erase Edit Play Mode Genre Name 3 10 0 03 58 4 Album2 5 Album3 6 Album4 7 Album5 8 Album6 9 Album7 10 Album8 3 Album1 ALL 1 2 3 4 5 6 7 t order re All Genres number By number By favourite Cancel By album HDD By number Album1 The Planets Mars Venus Mercury Jup iter Saturn Uranus Nep clas...

Страница 63: ...Some discs feature Playback Control PBC for short menus These discs show PBC in the display when you load them and display a menu on screen from where you can select what to watch 2 Press to skip to previous next chapter title During playback you can also use the front panel CH buttons During playback enter a title number then press ENTER to skip directly to that title Press CLEAR to clear a numbe...

Страница 64: ...Select Listen to Music Edit 3 Select what you want to edit 4 Select an edit function from the command menu panel Erase Erase the selected track if all tracks in an album are selected the whole album is erased Edit Album name Enter a name of up to 64 characters for the album See page Title Name on page 81 for how to enter names Track name NTER HOME MENU ENTER ENTER ENTER WV_EN book 98 ページ 2006年12月2...

Страница 65: ... discs feature Playback Control PBC for short menus These discs show PBC in the display when you load them and display a menu on screen from where you can select what to watch 2 Press to skip to previous next chapter title During playback you can also use the front panel CH buttons During playback enter a title number then press ENTER to skip directly to that title Press CLEAR to clear a number en...

Страница 66: ...Select Listen to Music Edit 3 Select what you want to edit 4 Select an edit function from the command menu panel Erase Erase the selected track if all tracks in an album are selected the whole album is erased Edit Album name Enter a name of up to 64 characters for the album See page Title Name on page 81 for how to enter names Track name NTER HOME MENU ENTER ENTER ENTER WV_EN book 98 ページ 2006年12月2...

Страница 67: ...programme play Displaying and switching subtitles Some DVD and DivX discs have subtitles in one or more languages the disc box will usually tell you which subtitle languages are available You can switch subtitle language during playback 1 NTER ramme Title 01 03 Title 01 Title 02 Title 03 Chapter 001 015 Chapter 001 Chapter 002 Chapter 003 Chapter 004 Chapter 005 Chapter 006 Chapter 007 Chapter 008...

Страница 68: ...bum1 The Planets Mars Venus Mercury Jup iter Saturn Uranus Nep classical Total 12 70 MB 10Albums Jukebox 0 G n Genres Play Erase Edit Play Mode Genre Name 3 10 0 03 58 4 Album2 5 Album3 6 Album4 7 Album5 8 Album6 9 Album7 10 Album8 3 Album1 ALL 1 2 3 4 5 6 7 t order re All Genres number By number By favourite Cancel By album HDD By number Album1 The Planets Mars Venus Mercury Jup iter Saturn Uranu...

Страница 69: ...programme play Displaying and switching subtitles Some DVD and DivX discs have subtitles in one or more languages the disc box will usually tell you which subtitle languages are available You can switch subtitle language during playback 1 NTER ramme Title 01 03 Title 01 Title 02 Title 03 Chapter 001 015 Chapter 001 Chapter 002 Chapter 003 Chapter 004 Chapter 005 Chapter 006 Chapter 007 Chapter 008...

Страница 70: ...bum1 The Planets Mars Venus Mercury Jup iter Saturn Uranus Nep classical Total 12 70 MB 10Albums Jukebox 0 G n Genres Play Erase Edit Play Mode Genre Name 3 10 0 03 58 4 Album2 5 Album3 6 Album4 7 Album5 8 Album6 9 Album7 10 Album8 3 Album1 ALL 1 2 3 4 5 6 7 t order re All Genres number By number By favourite Cancel By album HDD By number Album1 The Planets Mars Venus Mercury Jup iter Saturn Uranu...

Страница 71: ...programme play Displaying and switching subtitles Some DVD and DivX discs have subtitles in one or more languages the disc box will usually tell you which subtitle languages are available You can switch subtitle language during playback 1 NTER ramme Title 01 03 Title 01 Title 02 Title 03 Chapter 001 015 Chapter 001 Chapter 002 Chapter 003 Chapter 004 Chapter 005 Chapter 006 Chapter 007 Chapter 008...

Страница 72: ...Select Listen to Music Edit 3 Select what you want to edit 4 Select an edit function from the command menu panel Erase Erase the selected track if all tracks in an album are selected the whole album is erased Edit Album name Enter a name of up to 64 characters for the album See page Title Name on page 81 for how to enter names Track name NTER HOME MENU ENTER ENTER ENTER WV_EN book 98 ページ 2006年12月2...

Страница 73: ... list and turns off programme play Displaying and switching subtitles Some DVD and DivX discs have subtitles in one or more languages the disc box will usually tell you which subtitle languages are available You can switch subtitle language during playback 1 NTER NTER DVD Video DivX WV_EN book 71 ページ 2006年12月28日 木曜日 午後4時21分 En 07 1 Stereo Soundtrack 1 Stereo default 1 L Soundtrack 1 Left channel 1...

Страница 74: ...g and changing the playback behavior of albums 1 Select Jukebox from the Home Menu 2 Select Listen to Music Edit 3 Select what you want to edit 4 Select an edit function from the command menu panel Erase Erase the selected track if all tracks in an album are selected the whole album is erased Edit Album name Enter a name of up to 64 characters for the album See page Title Name on page 81 for how t...

Страница 75: ...ancel the copying process press STOP REC for more than three seconds About automatic finalization If you use a DVD R RW Video mode or DVD R RW disc for copying it will automatically be finalized after copying is complete You can t customize the background for DVD R RW or DVD R RW disc finalization No title names are assigned If you want to give the disc a name please do so before you start the cop...

Страница 76: ...bum1 The Planets Mars Venus Mercury Jup iter Saturn Uranus Nep classical Total 12 70 MB 10Albums Jukebox 0 G n Genres Play Erase Edit Play Mode Genre Name 3 10 0 03 58 4 Album2 5 Album3 6 Album4 7 Album5 8 Album6 9 Album7 10 Album8 3 Album1 ALL 1 2 3 4 5 6 7 t order re All Genres number By number By favourite Cancel By album HDD By number Album1 The Planets Mars Venus Mercury Jup iter Saturn Uranu...

Страница 77: ...ancel the copying process press STOP REC for more than three seconds About automatic finalization If you use a DVD R RW Video mode or DVD R RW disc for copying it will automatically be finalized after copying is complete You can t customize the background for DVD R RW or DVD R RW disc finalization No title names are assigned If you want to give the disc a name please do so before you start the cop...

Страница 78: ...g and changing the playback behavior of albums 1 Select Jukebox from the Home Menu 2 Select Listen to Music Edit 3 Select what you want to edit 4 Select an edit function from the command menu panel Erase Erase the selected track if all tracks in an album are selected the whole album is erased Edit Album name Enter a name of up to 64 characters for the album See page Title Name on page 81 for how t...

Страница 79: ... All Genres 10Titles 30h30m Recent first HDD SP 9 8 7 10 20 00 FRI 3 12 Pr 9 SP 20 00 Fri 3 12 Pr 9 SP 2h00m 1 0G 22 00 THU 2 12 Pr 7 SP 22 00 Thu 2 12 Pr 7 SP 1h00m 1 0G 19 00 MON 29 11 Pr 2 SP 19 00 Mon 29 11 Pr 2 SP 1h00m 1 0G 23 00 FRI 3 12 Pr 4 SP 23 00 Fri 3 12 Pr 4 SP 2h00m 1 0G Play Erase Edit Multi Mode Genre Name Cancel Title name Erase Section Edit Chapter Cancel Set Thumbnail Set Genre...

Страница 80: ...bum1 The Planets Mars Venus Mercury Jup iter Saturn Uranus Nep classical Total 12 70 MB 10Albums Jukebox 0 G n Genres Play Erase Edit Play Mode Genre Name 3 10 0 03 58 4 Album2 5 Album3 6 Album4 7 Album5 8 Album6 9 Album7 10 Album8 3 Album1 ALL 1 2 3 4 5 6 7 t order re All Genres number By number By favourite Cancel By album HDD By number Album1 The Planets Mars Venus Mercury Jup iter Saturn Uranu...

Страница 81: ... All Genres 10Titles 30h30m Recent first HDD SP 9 8 7 10 20 00 FRI 3 12 Pr 9 SP 20 00 Fri 3 12 Pr 9 SP 2h00m 1 0G 22 00 THU 2 12 Pr 7 SP 22 00 Thu 2 12 Pr 7 SP 1h00m 1 0G 19 00 MON 29 11 Pr 2 SP 19 00 Mon 29 11 Pr 2 SP 1h00m 1 0G 23 00 FRI 3 12 Pr 4 SP 23 00 Fri 3 12 Pr 4 SP 2h00m 1 0G Play Erase Edit Multi Mode Genre Name Cancel Title name Erase Section Edit Chapter Cancel Set Thumbnail Set Genre...

Страница 82: ...e Planets Mars Venus Mercury Jup iter Saturn Uranus Nep classical Total 12 70 MB 10Albums Jukebox 0 G n Genres Play Erase Edit Play Mode Genre Name 3 10 0 03 58 4 Album2 5 Album3 6 Album4 7 Album5 8 Album6 9 Album7 10 Album8 3 Album1 ALL 1 2 3 4 5 6 7 t order re All Genres number By number By favourite Cancel By album HDD By number Album1 The Planets Mars Venus Mercury Jup iter Saturn Uranus Nep c...

Страница 83: ...es Remain All Genres 10Titles 30h30m Recent first HDD SP 9 8 7 10 20 00 FRI 3 12 Pr 9 SP 20 00 Fri 3 12 Pr 9 SP 2h00m 1 0G 22 00 THU 2 12 Pr 7 SP 22 00 Thu 2 12 Pr 7 SP 1h00m 1 0G 19 00 MON 29 11 Pr 2 SP 19 00 Mon 29 11 Pr 2 SP 1h00m 1 0G 23 00 FRI 3 12 Pr 4 SP 23 00 Fri 3 12 Pr 4 SP 2h00m 1 0G Play Erase Edit Multi Mode Genre Name Cancel Title name Erase Section Edit Chapter Cancel Set Thumbnail ...

Страница 84: ...bum1 The Planets Mars Venus Mercury Jup iter Saturn Uranus Nep classical Total 12 70 MB 10Albums Jukebox 0 G n Genres Play Erase Edit Play Mode Genre Name 3 10 0 03 58 4 Album2 5 Album3 6 Album4 7 Album5 8 Album6 9 Album7 10 Album8 3 Album1 ALL 1 2 3 4 5 6 7 t order re All Genres number By number By favourite Cancel By album HDD By number Album1 The Planets Mars Venus Mercury Jup iter Saturn Uranu...

Страница 85: ... All Genres 10Titles 30h30m Recent first HDD SP 9 8 7 10 20 00 FRI 3 12 Pr 9 SP 20 00 Fri 3 12 Pr 9 SP 2h00m 1 0G 22 00 THU 2 12 Pr 7 SP 22 00 Thu 2 12 Pr 7 SP 1h00m 1 0G 19 00 MON 29 11 Pr 2 SP 19 00 Mon 29 11 Pr 2 SP 1h00m 1 0G 23 00 FRI 3 12 Pr 4 SP 23 00 Fri 3 12 Pr 4 SP 2h00m 1 0G Play Erase Edit Multi Mode Genre Name Cancel Title name Erase Section Edit Chapter Cancel Set Thumbnail Set Genre...

Страница 86: ...bum1 The Planets Mars Venus Mercury Jup iter Saturn Uranus Nep classical Total 12 70 MB 10Albums Jukebox 0 G n Genres Play Erase Edit Play Mode Genre Name 3 10 0 03 58 4 Album2 5 Album3 6 Album4 7 Album5 8 Album6 9 Album7 10 Album8 3 Album1 ALL 1 2 3 4 5 6 7 t order re All Genres number By number By favourite Cancel By album HDD By number Album1 The Planets Mars Venus Mercury Jup iter Saturn Uranu...

Страница 87: ... All Genres 10Titles 30h30m Recent first HDD SP 9 8 7 10 20 00 FRI 3 12 Pr 9 SP 20 00 Fri 3 12 Pr 9 SP 2h00m 1 0G 22 00 THU 2 12 Pr 7 SP 22 00 Thu 2 12 Pr 7 SP 1h00m 1 0G 19 00 MON 29 11 Pr 2 SP 19 00 Mon 29 11 Pr 2 SP 1h00m 1 0G 23 00 FRI 3 12 Pr 4 SP 23 00 Fri 3 12 Pr 4 SP 2h00m 1 0G Play Erase Edit Multi Mode Genre Name Cancel Title name Erase Section Edit Chapter Cancel Set Thumbnail Set Genre...

Страница 88: ...bum1 The Planets Mars Venus Mercury Jup iter Saturn Uranus Nep classical Total 12 70 MB 10Albums Jukebox 0 G n Genres Play Erase Edit Play Mode Genre Name 3 10 0 03 58 4 Album2 5 Album3 6 Album4 7 Album5 8 Album6 9 Album7 10 Album8 3 Album1 ALL 1 2 3 4 5 6 7 t order re All Genres number By number By favourite Cancel By album HDD By number Album1 The Planets Mars Venus Mercury Jup iter Saturn Uranu...

Страница 89: ...DVD R RW or a DVD Video is loaded As long as the disc is not Copy Guard protected you can still use the One Touch Copy function however See One Touch Copy on page 89 The recorder can only store one Copy List at a time The Copy List will be erased if any of the titles on the DVD disc are erased or edited WV_EN book 93 ページ 2006年12月28日 木曜日 午後4時21分 En 10 Optimized1 2 The recording quality is automatic...

Страница 90: ... Select Listen to Music Edit 3 Select what you want to edit 4 Select an edit function from the command menu panel Erase Erase the selected track if all tracks in an album are selected the whole album is erased Edit Album name Enter a name of up to 64 characters for the album See page on page 81 for how to enter names Track name NTER HOME MENU ENTER ENTER ENTER WV_EN book 98 ページ 2006年12月28日 木曜日 午後4...

Страница 91: ... disc are erased or edited NTER Copy Edit 2 Title Copy List Total Current DVD Remain 1 2 20 00 Wed29 03 Pr 2 SP 20 00 Wed22 03 Pr 2 SP 4 3G 4 3G 1 2 3 Back Next 20 00 Wed29 03 Pr 2 SP 1h00m 2 0G HDD DVD Video mode ENTER Copy HDD DVD Video Mode Start Copy Copy Time 0h 16m Recording Mode Disc Name Finalize Back Recording Mode Input Disc Name Finalize Start Copy Copy List Total Current DVD Remain 4 3...

Страница 92: ... Album1 The Planets Mars Venus Mercury Jup iter Saturn Uranus Nep classical Total 12 70 MB 10Albums Jukebox 0 G n Genres Play Erase Edit Play Mode Genre Name 3 10 0 03 58 4 Album2 5 Album3 6 Album4 7 Album5 8 Album6 9 Album7 10 Album8 3 Album1 ALL 1 2 3 4 5 6 7 t order re All Genres number By number By favourite Cancel By album HDD By number Album1 The Planets Mars Venus Mercury Jup iter Saturn Ur...

Страница 93: ... disc are erased or edited NTER Copy Edit 2 Title Copy List Total Current DVD Remain 1 2 20 00 Wed29 03 Pr 2 SP 20 00 Wed22 03 Pr 2 SP 4 3G 4 3G 1 2 3 Back Next 20 00 Wed29 03 Pr 2 SP 1h00m 2 0G HDD DVD Video mode ENTER Copy HDD DVD Video Mode Start Copy Copy Time 0h 16m Recording Mode Disc Name Finalize Back Recording Mode Input Disc Name Finalize Start Copy Copy List Total Current DVD Remain 4 3...

Страница 94: ...Select Listen to Music Edit 3 Select what you want to edit 4 Select an edit function from the command menu panel Erase Erase the selected track if all tracks in an album are selected the whole album is erased Edit Album name Enter a name of up to 64 characters for the album See page Title Name on page 81 for how to enter names Track name NTER HOME MENU ENTER ENTER ENTER WV_EN book 98 ページ 2006年12月2...

Страница 95: ...he DVD disc are erased or edited NTER Copy Edit 2 Title Copy List Total Current DVD Remain 1 2 20 00 Wed29 03 Pr 2 SP 20 00 Wed22 03 Pr 2 SP 4 3G 4 3G Back Next 20 00 Wed29 03 Pr 2 SP 1h00m 2 0G HDD DVD Video mode ENTER Copy HDD DVD Video Mode Start Copy Copy Time 0h 16m Recording Mode Disc Name Finalize Back Recording Mode Input Disc Name Finalize Start Copy Copy List Total Current DVD Remain 4 3...

Страница 96: ...cordable DVD discs on page 61 7 After the recorder has finished recording the backup disc you can select whether to make another backup of the same data or exit Select Start to make another backup copy or Cancel to finish If you want to make another backup copy return to step 6 above 8 If you don t need to keep the backup data on the HDD you can delete it now Select Yes to delete the data from the...

Страница 97: ...s on the CD or all WMA MP3 files on the DVD are copied to the HDD You can also start copying by starting playback of the CD DVD and then pressing ONE TOUCH COPY To cancel copying press ENTER If the CD loaded contains both CD audio tracks and WMA MP3 files the part currently selected will play Playing music from the Jukebox You can select albums or individual tracks from the Jukebox to play 1 Selec...

Страница 98: ...bum1 The Planets Mars Venus Mercury Jup iter Saturn Uranus Nep classical Total 12 70 MB 10Albums Jukebox 0 G n Genres Play Erase Edit Play Mode Genre Name 3 10 0 03 58 4 Album2 5 Album3 6 Album4 7 Album5 8 Album6 9 Album7 10 Album8 3 Album1 ALL 1 2 3 4 5 6 7 t order re All Genres number By number By favourite Cancel By album HDD By number Album1 The Planets Mars Venus Mercury Jup iter Saturn Uranu...

Страница 99: ...tected CDs may not copy ccessfully 3 Select DVD CD to HDD On pressing ENTER all tracks or files on the CD or all WMA MP3 files on the DVD are copied to the HDD You can also start copying by starting playback of the CD DVD and then pressing ONE TOUCH COPY To cancel copying press ENTER If the CD loaded contains both CD audio tracks and WMA MP3 files the part currently selected will play Playing musi...

Страница 100: ...bum1 The Planets Mars Venus Mercury Jup iter Saturn Uranus Nep classical Total 12 70 MB 10Albums Jukebox 0 G n Genres Play Erase Edit Play Mode Genre Name 3 10 0 03 58 4 Album2 5 Album3 6 Album4 7 Album5 8 Album6 9 Album7 10 Album8 3 Album1 ALL 1 2 3 4 5 6 7 t order re All Genres number By number By favourite Cancel By album HDD By number Album1 The Planets Mars Venus Mercury Jup iter Saturn Uranu...

Страница 101: ...New Folder Folder Options Copy to DVD Multi Mode NTER HDD Folder 002 Folder2 Files 999 Folder 999 MB 100 0 G Remain 1 3 PhotoViewer HDD 002 Folder2 003 Folder3 004 Folder4 005 Folder5 006 Folder6 007 Folder7 008 Folder8 001 Folder1 Select Folder FOLDER MENU Multi Mode ENTER WV_EN book 103 ページ 2006年12月28日 木曜日 午後4時21分 En 12 2 Display the command menu 3 Select File Options or Folder Options 4 Select ...

Страница 102: ...f shaped discs is not recommended for this product Pioneer disclaims all liability arising in connection with the use of shaped discs Cleaning the pickup lens The HDD DVD recorder s lens should not become dirty in normal use but if for some reason it should malfunction due to dust or dirt consult your nearest Pioneer authorized service center Although lens cleaners are commercially available we do...

Страница 103: ... New Folder Folder Options Copy to DVD Multi Mode NTER HDD Folder 002 Folder2 Files 999 Folder 999 MB 100 0 G Remain 1 3 PhotoViewer HDD 002 Folder2 003 Folder3 004 Folder4 005 Folder5 006 Folder6 007 Folder7 008 Folder8 001 Folder1 Select Folder FOLDER MENU Multi Mode ENTER WV_EN book 103 ページ 2006年12月28日 木曜日 午後4時21分 En 12 2 Display the command menu 3 Select File Options or Folder Options 4 Select...

Страница 104: ...f shaped discs is not recommended for this product Pioneer disclaims all liability arising in connection with the use of shaped discs Cleaning the pickup lens The HDD DVD recorder s lens should not become dirty in normal use but if for some reason it should malfunction due to dust or dirt consult your nearest Pioneer authorized service center Although lens cleaners are commercially available we do...

Страница 105: ...New Folder Folder Options Copy to DVD Multi Mode NTER HDD Folder 002 Folder2 Files 999 Folder 999 MB 100 0 G Remain 1 3 PhotoViewer HDD 002 Folder2 003 Folder3 004 Folder4 005 Folder5 006 Folder6 007 Folder7 008 Folder8 001 Folder1 Select Folder FOLDER MENU Multi Mode ENTER WV_EN book 103 ページ 2006年12月28日 木曜日 午後4時21分 En 12 2 Display the command menu 3 Select File Options or Folder Options 4 Select ...

Страница 106: ...f shaped discs is not recommended for this product Pioneer disclaims all liability arising in connection with the use of shaped discs Cleaning the pickup lens The HDD DVD recorder s lens should not become dirty in normal use but if for some reason it should malfunction due to dust or dirt consult your nearest Pioneer authorized service center Although lens cleaners are commercially available we do...

Страница 107: ... DVD RW DVD RAM ENU NTER lize ze mize HDD Disc Setup Input Disc Name Lock Disc DVD RW Auto Init Input Disc Name Next Screen Input Disc Name DVD VR DVD RAM HOME MENU ENTER Basic Initialize Finalize Optimize HDD Disc Setup Input Disc Name Lock Disc DVD RW Auto Init Basic On Off Lock Disc DVD RW WV_EN book 107 ページ 2006年12月28日 木曜日 午後4時21分 En 13 1 Select Disc Setup from the Home Menu 2 Select Optimize ...

Страница 108: ...f shaped discs is not recommended for this product Pioneer disclaims all liability arising in connection with the use of shaped discs Cleaning the pickup lens The HDD DVD recorder s lens should not become dirty in normal use but if for some reason it should malfunction due to dust or dirt consult your nearest Pioneer authorized service center Although lens cleaners are commercially available we do...

Страница 109: ... DVD RW DVD RAM ENU NTER lize ze mize HDD Disc Setup Input Disc Name Lock Disc DVD RW Auto Init Input Disc Name Next Screen Input Disc Name DVD VR DVD RAM HOME MENU ENTER Basic Initialize Finalize Optimize HDD Disc Setup Input Disc Name Lock Disc DVD RW Auto Init Basic On Off Lock Disc DVD RW WV_EN book 107 ページ 2006年12月28日 木曜日 午後4時21分 En 13 1 Select Disc Setup from the Home Menu 2 Select Optimize ...

Страница 110: ...f shaped discs is not recommended for this product Pioneer disclaims all liability arising in connection with the use of shaped discs Cleaning the pickup lens The HDD DVD recorder s lens should not become dirty in normal use but if for some reason it should malfunction due to dust or dirt consult your nearest Pioneer authorized service center Although lens cleaners are commercially available we do...

Страница 111: ...djust different settings press ENTER after selecting the setting you want to adjust Setting the picture quality for disc playback This setting determines how the picture will look when playing discs Choosing a preset 1 With a disc playing or paused press to display the Home Menu 2 Select Video Adjust 3 Select a setting There are six presets available TV suitable for LCD and cathode ray tube TVs PD...

Страница 112: ...r discs only Use of shaped discs is not recommended for this product Pioneer disclaims all liability arising in connection with the use of shaped discs Cleaning the pickup lens The HDD DVD recorder s lens should not become dirty in normal use but if for some reason it should malfunction due to dust or dirt consult your nearest Pioneer authorized service center Although lens cleaners are commercial...

Страница 113: ...EPG data is not passed through et to Pass Through make sure to set Power Save page 113 to Off VOD Registration Code Use to display the recorder s DivX registration code See DivX video compatibility on page 10 and DivX VOD content on page 11 eview only Quick Preview When in the Disc Navigator the thumbnail video plays short excerpts from throughout the selected title Note that edited titles that wi...

Страница 114: ...r discs only Use of shaped discs is not recommended for this product Pioneer disclaims all liability arising in connection with the use of shaped discs Cleaning the pickup lens The HDD DVD recorder s lens should not become dirty in normal use but if for some reason it should malfunction due to dust or dirt consult your nearest Pioneer authorized service center Although lens cleaners are commercial...

Страница 115: ...EPG data is not passed through et to Pass Through make sure to set Power Save page 113 to Off VOD Registration Code Use to display the recorder s DivX registration code See DivX video compatibility on page 10 and DivX VOD content on page 11 eview only Quick Preview When in the Disc Navigator the thumbnail video plays short excerpts from throughout the selected title Note that edited titles that wi...

Страница 116: ...f shaped discs is not recommended for this product Pioneer disclaims all liability arising in connection with the use of shaped discs Cleaning the pickup lens The HDD DVD recorder s lens should not become dirty in normal use but if for some reason it should malfunction due to dust or dirt consult your nearest Pioneer authorized service center Although lens cleaners are commercially available we do...

Страница 117: ...EPG data is not passed through et to Pass Through make sure to set Power Save page 113 to Off VOD Registration Code Use to display the recorder s DivX registration code See DivX video compatibility on page 10 and DivX VOD content on page 11 eview only Quick Preview When in the Disc Navigator the thumbnail video plays short excerpts from throughout the selected title Note that edited titles that wi...

Страница 118: ...f shaped discs is not recommended for this product Pioneer disclaims all liability arising in connection with the use of shaped discs Cleaning the pickup lens The HDD DVD recorder s lens should not become dirty in normal use but if for some reason it should malfunction due to dust or dirt consult your nearest Pioneer authorized service center Although lens cleaners are commercially available we do...

Страница 119: ...EPG data is not passed through et to Pass Through make sure to set Power Save page 113 to Off VOD Registration Code Use to display the recorder s DivX registration code See DivX video compatibility on page 10 and DivX VOD content on page 11 eview only Quick Preview When in the Disc Navigator the thumbnail video plays short excerpts from throughout the selected title Note that edited titles that wi...

Страница 120: ...f shaped discs is not recommended for this product Pioneer disclaims all liability arising in connection with the use of shaped discs Cleaning the pickup lens The HDD DVD recorder s lens should not become dirty in normal use but if for some reason it should malfunction due to dust or dirt consult your nearest Pioneer authorized service center Although lens cleaners are commercially available we do...

Страница 121: ...EPG data is not passed through et to Pass Through make sure to set Power Save page 113 to Off VOD Registration Code Use to display the recorder s DivX registration code See DivX video compatibility on page 10 and DivX VOD content on page 11 eview only Quick Preview When in the Disc Navigator the thumbnail video plays short excerpts from throughout the selected title Note that edited titles that wi...

Страница 122: ...f shaped discs is not recommended for this product Pioneer disclaims all liability arising in connection with the use of shaped discs Cleaning the pickup lens The HDD DVD recorder s lens should not become dirty in normal use but if for some reason it should malfunction due to dust or dirt consult your nearest Pioneer authorized service center Although lens cleaners are commercially available we do...

Страница 123: ...EPG data is not passed through et to Pass Through make sure to set Power Save page 113 to Off VOD Registration Code Use to display the recorder s DivX registration code See DivX video compatibility on page 10 and DivX VOD content on page 11 eview only Quick Preview When in the Disc Navigator the thumbnail video plays short excerpts from throughout the selected title Note that edited titles that wi...

Страница 124: ...f shaped discs is not recommended for this product Pioneer disclaims all liability arising in connection with the use of shaped discs Cleaning the pickup lens The HDD DVD recorder s lens should not become dirty in normal use but if for some reason it should malfunction due to dust or dirt consult your nearest Pioneer authorized service center Although lens cleaners are commercially available we do...

Страница 125: ...the recorder s DivX registration code See DivX video compatibility on page 10 and DivX VOD content on page 11 eview only Quick Preview When in the Disc Navigator the thumbnail video plays short excerpts from throughout the selected title Note that edited titles that will play normally from the beginning Normal The thumbnail video plays from the beginning of the title ns 2 Live TV TV s Tuner Allows...

Страница 126: ...f shaped discs is not recommended for this product Pioneer disclaims all liability arising in connection with the use of shaped discs Cleaning the pickup lens The HDD DVD recorder s lens should not become dirty in normal use but if for some reason it should malfunction due to dust or dirt consult your nearest Pioneer authorized service center Although lens cleaners are commercially available we do...

Страница 127: ...der is on 2 Using the front panel controls press and hold STOP and press STANDBY ON The recorder turns off with all settings reset WV_EN book 139 ページ 2006年12月28日 木曜日 午後4時21分 En 16 Input Output VHF UHF antenna input output terminal VHF UHF set 75 IEC connector Video input AV2 Input 1 Input 2 front Input 3 rear Input level 1 Vp p 75 Jacks AV connector Input 1 RCA jack Input 2 Input 3 Video output AV...

Страница 128: ...f shaped discs is not recommended for this product Pioneer disclaims all liability arising in connection with the use of shaped discs Cleaning the pickup lens The HDD DVD recorder s lens should not become dirty in normal use but if for some reason it should malfunction due to dust or dirt consult your nearest Pioneer authorized service center Although lens cleaners are commercially available we do...

Страница 129: ...tting the recorder If you need to you can reset the recorder to all its factory settings 1 Make sure that the recorder is on 2 Using the front panel controls press and hold STOP and press STANDBY ON The recorder turns off with all settings reset WV_EN book 139 ページ 2006年12月28日 木曜日 午後4時21分 En 16 Input Output VHF UHF antenna input output terminal VHF UHF set 75 IEC connector Video input AV2 Input 1 I...

Страница 130: ...f shaped discs is not recommended for this product Pioneer disclaims all liability arising in connection with the use of shaped discs Cleaning the pickup lens The HDD DVD recorder s lens should not become dirty in normal use but if for some reason it should malfunction due to dust or dirt consult your nearest Pioneer authorized service center Although lens cleaners are commercially available we do...

Страница 131: ...tting the recorder If you need to you can reset the recorder to all its factory settings 1 Make sure that the recorder is on 2 Using the front panel controls press and hold STOP and press STANDBY ON The recorder turns off with all settings reset WV_EN book 139 ページ 2006年12月28日 木曜日 午後4時21分 En 16 Input Output VHF UHF antenna input output terminal VHF UHF set 75 IEC connector Video input AV2 Input 1 I...

Страница 132: ...izing recordable DVD discs on page 61 7 After the recorder has finished recording the backup disc you can select whether to make another backup of the same data or exit Select Start to make another backup copy or Cancel to finish If you want to make another backup copy return to step 6 above 8 If you donÕt need to keep the backup data on the HDD you can delete it now Select Yes to delete the data ...

Страница 133: ...tting the recorder If you need to you can reset the recorder to all its factory settings 1 Make sure that the recorder is on 2 Using the front panel controls press and hold STOP and press STANDBY ON The recorder turns off with all settings reset WV_EN book 139 ページ 2006年12月28日 木曜日 午後4時21分 En 16 Input Output VHF UHF antenna input output terminal VHF UHF set 75 IEC connector Video input AV2 Input 1 I...

Страница 134: ...r discs only Use of shaped discs is not recommended for this product Pioneer disclaims all liability arising in connection with the use of shaped discs Cleaning the pickup lens The HDD DVD recorder s lens should not become dirty in normal use but if for some reason it should malfunction due to dust or dirt consult your nearest Pioneer authorized service center Although lens cleaners are commercial...

Страница 135: ...tting the recorder If you need to you can reset the recorder to all its factory settings 1 Make sure that the recorder is on 2 Using the front panel controls press and hold STOP and press STANDBY ON The recorder turns off with all settings reset WV_EN book 139 ページ 2006年12月28日 木曜日 午後4時21分 En 16 Input Output VHF UHF antenna input output terminal VHF UHF set 75 IEC connector Video input AV2 Input 1 I...

Страница 136: ...r discs only Use of shaped discs is not recommended for this product Pioneer disclaims all liability arising in connection with the use of shaped discs Cleaning the pickup lens The HDD DVD recorder s lens should not become dirty in normal use but if for some reason it should malfunction due to dust or dirt consult your nearest Pioneer authorized service center Although lens cleaners are commercial...

Страница 137: ...tting the recorder If you need to you can reset the recorder to all its factory settings 1 Make sure that the recorder is on 2 Using the front panel controls press and hold STOP and press STANDBY ON The recorder turns off with all settings reset WV_EN book 139 ページ 2006年12月28日 木曜日 午後4時21分 En 16 Input Output VHF UHF antenna input output terminal VHF UHF set 75 IEC connector Video input AV2 Input 1 I...

Страница 138: ...this product Pioneer disclaims all liability arising in connection with the use of shaped discs Cleaning the pickup lens The HDD DVD recorder s lens should not become dirty in normal use but if for some reason it should malfunction due to dust or dirt consult your nearest Pioneer authorized service center Although lens cleaners are commercially available we do not recommend using them since some m...

Страница 139: ...tting the recorder If you need to you can reset the recorder to all its factory settings 1 Make sure that the recorder is on 2 Using the front panel controls press and hold STOP and press STANDBY ON The recorder turns off with all settings reset WV_EN book 139 ページ 2006年12月28日 木曜日 午後4時21分 En 16 Input Output VHF UHF antenna input output terminal VHF UHF set 75 IEC connector Video input AV2 Input 1 I...

Страница 140: ...f shaped discs is not recommended for this product Pioneer disclaims all liability arising in connection with the use of shaped discs Cleaning the pickup lens The HDD DVD recorder s lens should not become dirty in normal use but if for some reason it should malfunction due to dust or dirt consult your nearest Pioneer authorized service center Although lens cleaners are commercially available we do...

Страница 141: ...Using the front panel controls press and hold STOP and press STANDBY ON The recorder turns off with all settings reset WV_EN book 139 ページ 2006年12月28日 木曜日 午後4時21分 En 16 Input Output VHF UHF antenna input output terminal VHF UHF set 75 Ω IEC connector Video input AV2 Input 1 Input 2 front Input 3 rear Input level 1 Vp p 75 Ω Jacks AV connector Input 1 RCA jack Input 2 Input 3 Video output AV1 Output...

Страница 142: ...F CANADA INC 300 Allstate Parkway Markham Ontario L3R 0P2 Canada TEL 1 877 283 5901 905 479 4411 PIONEER EUROPE NV Haven 1087 Keetberglaan 1 B 9120 Melsele Belgium TEL 03 570 05 11 PIONEER ELECTRONICS ASIACENTRE PTE LTD 253 Alexandra Road 04 01 Singapore 159936 TEL 65 6472 7555 PIONEER ELECTRONICS AUSTRALIA PTY LTD 178 184 Boundary Road Braeside Victoria 3195 Australia TEL 03 9586 6300 PIONEER ELE...

Отзывы: