background image


Connections


15


En


02


Front panel connections


On the front panel there is a flip-down cover 
that hides more connections.


Left side:


12 DV IN


A DV input i.LINK connector, suitable for 
connecting a DV camcorder.


Right side:


13 INPUT 2


Audio/video input (stereo analog audio; 
composite and S-video), especially suitable 
for camcorders, game consoles, portable 
audio, etc.

12

13

DVR550H_WV_EN.book 15 ページ 2006年12月28日 木曜日 午後4時21分

Downloaded From Disc-Player.com Pioneer Manuals

17


En


02

Using other types of audio/


video output


If you can’t use the SCART AV connector to 
connect your TV to this recorder, there are 
standard audio/video output jacks, as well as 
an S-video and component video output.


Using the supplied audio/video 
cable


1

Connect the VIDEO OUTPUT jack to a 

video input on your TV.


Use the yellow jack of the supplied audio/
video cable for the video connection.


2

Connect the AUDIO OUTPUT jacks to 

the corresponding audio inputs on your 
TV.


Use the red and white jacks of the supplied 
audio/video cable for the audio connection. 
Make sure you match up the left and right 
outputs with their corresponding inputs for 
correct stereo sound.


Using the S-video or component 
video output


1

Connect the S-video or component 

video output to a similar input on your 
TV.


For an S-video connection, use an S-video 
cable (not supplied) to connect the 


S-VIDEO 

OUTPUT


 jack to an S-video input on your TV.

For a component video connection, use a 
component video cable (not supplied) to 
connect the 


COMPONENT VIDEO OUT


jacks to a component video input on your TV.

See also 


Component Video Out


 on page 115 

for how to set up the component video 
output for use with a progressive scan-
compatible TV. 


2

Connect the AUDIO OUTPUT jacks to 

the corresponding audio inputs on your 
TV.


You can use the supplied audio/video cable, 
leaving the yellow video plug disconnected. 
Make sure you match up the left and right 
outputs with their corresponding inputs for 
correct stereo sound.

TV

AC  IN

DIGITAL

AUDIO OUT

COAXIAL

HDMI OUT

CONTROL

G-LINK

IN

AV 1 (RGB) – TV

AV 2 (INPUT 1/DECODER) 

S-VIDEO

VIDEO

AUDIO

L

R

OUTPUT

INPUT 3

COMPONENT VIDEO OUT

Y

PB

PR

ANTENNA

IN

OUT

VIDEO

OUTPUT

AUDIO

OUTPUT

To audio input

To video input

1

2

TV

AC  IN

DIGITAL

AUDIO OUT

COAXIAL

HDMI OUT

CONTROL

G-LINK

IN

AV 1 (RGB) – TV

AV 2 (INPUT 1/DECODER) 

S-VIDEO

VIDEO

AUDIO

L

R

OUTPUT

INPUT 3

COMPONENT VIDEO OUT

Y

PB

PR

ANTENNA

IN

OUT

COMPONENT

VIDEO OUT

1

2

S-VIDEO
OUTPUT

AUDIO

OUTPUT

To audio input

To component video input

To video input

DVR550H_WV_EN.book 17 ページ 2006年12月28日 木曜日 午後4時21分

Downloaded From Disc-Player.com Pioneer Manuals

19


En


02


Position the IR transmitter end of the G-
LINK™ cable so that the IR receiver on your 
cable/satellite/digital terrestrial receiver will 
pick up the control signals (see diagram).

See the manual that came with your cable/
satellite/digital terrestrial receiver if you’re 
not sure where the IR receiver is on the front 
panel. Alternatively, experiment with the 
remote control, operating it from very close 
range until you find the place where the 
receiver responds.


 Tip


• This recorder has a ‘through’ function 

which allows you to record a TV 
programme from the built-in TV tuner in 
this recorder while watching a video 
playing on your VCR (To use this feature 
when the recorder is in standby, 


Power 

Save


 must be set to 


Off 


— see 


Power 

Save


 on page 113).


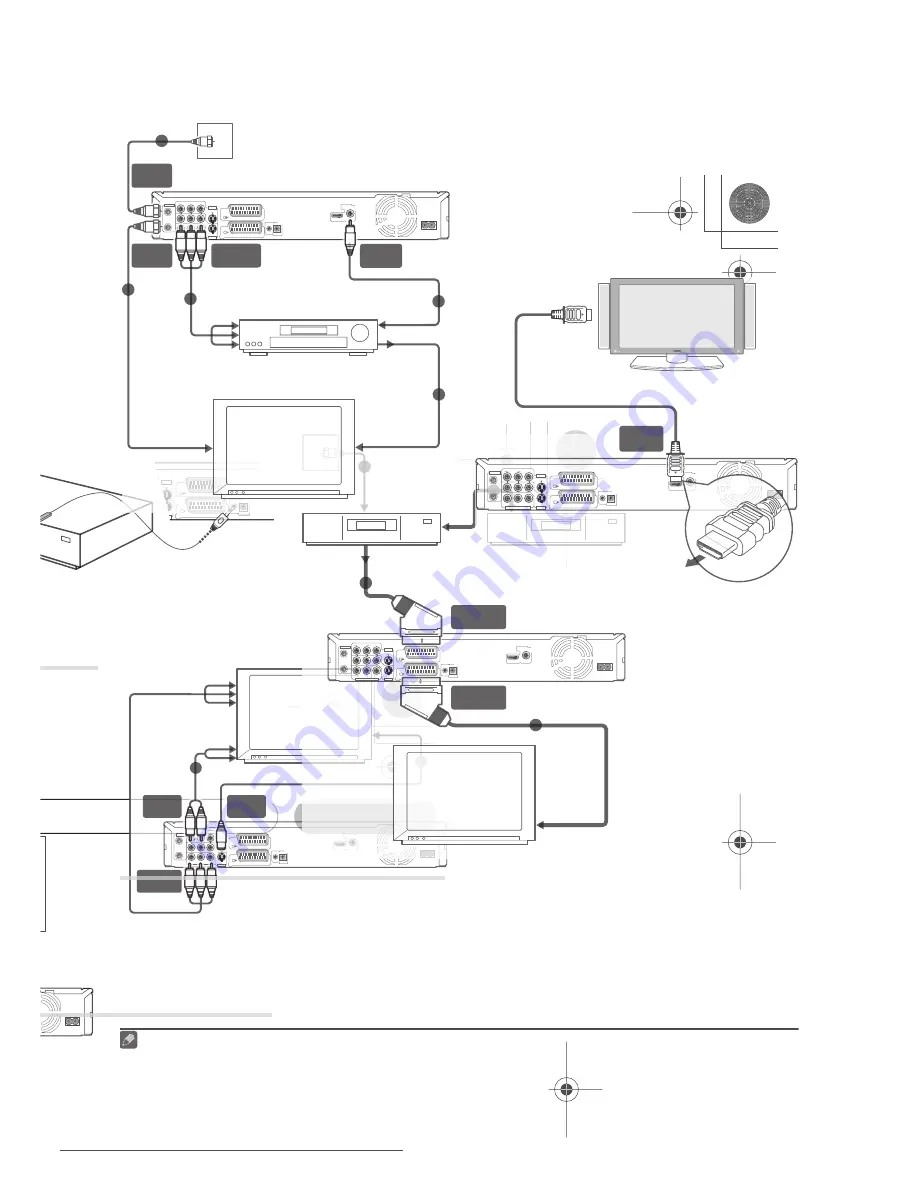
Connecting an external 


decoder box (1)


If you have an external, dedicated decoder 
box for your satellite or cable TV system, use 
the setup described on this page. See above 
for how to connect the G-LINK™ cable.


 Important


• Do not connect your decoder box directly 

to this recorder.

• Information from the decoder (for 

example, relating to pay TV services), is 
only viewable when this recorder is off 
(in standby).

• For timer recording to work properly on 

this recorder, the VCR/satellite receiver/
cable box must also be switched on 
during recording.

• It is not possible to watch one TV 

programme and record another using 
this setup.


1

Connect the cable from the antenna/

cable TV outlet to the antenna input on 
your VCR/satellite receiver/cable box.
2

Use a SCART cable (not supplied) to 

connect your decoder to your VCR/
satellite receiver/cable box.


See the manual for your decoder box for 
more detailed instructions.


3

Use a SCART cable to connect your 

VCR/satellite receiver/cable box to the 
AV2 (INPUT 1/DECODER) AV connector 
on this recorder.
4

Use a SCART cable to connect the AV1 

(RGB)-TV AV connector to your TV.

CONTROL

G-LINK

IN

AV 1 (RGB) – TV

AV 2 (INPUT 1/DECODER) 

S-VIDEO

O

OUTPUT

INPUT 3

G-LINK cable

AC  IN

DIGITAL

AUDIO OUT

COAXIAL

HDMI OUT

CONTROL

G-LINK

IN

AV 1 (RGB) – TV

AV 2 (INPUT 1/DECODER) 

S-VIDEO

VIDEO

AUDIO

L

R

OUTPUT

INPUT 3

COMPONENT VIDEO OUT

Y

PB

PR

ANTENNA

IN

OUT

TV

Antenna/cable TV
wall outlet

VCR/Satellite receiver
/Cable box

Decoder

1

2

3

4

From SCART AV

connector

To SCART AV

connector

SCART AV

connection

AV2 (INPUT 1/

DECODER)

AV1 (RGB) - TV

To antenna input

DVR550H_WV_EN.book 19 ページ 2006年12月28日 木曜日 午後4時21分

Downloaded From Disc-Player.com Pioneer Manuals

21


En


02


1

Connect RF antenna cables as shown.


This enables you to watch and record TV 
channels.


2

Connect the


DIGITAL OUT COAXIAL


jack on this recorder to a coaxial digital 
input on your AV amplifier/receiver.


This enables you to listen to multichannel 
surround sound.


3

Connect the analog AUDIO OUTPUT 

and VIDEO OUTPUT jacks on this recorder 
to an analog audio and video input on 
your AV amplifier/receiver.
4

Connect the AV amplifier/receiver’s 

video output to a video input on your TV.


Connecting using HDMI


If you have an HDMI or DVI-equipped


1


monitor or display


2


, you can connect it to 

this recorder using an HDMI cable (not 
supplied).

The HDMI connector outputs 
uncompressed digital video, as well as 
almost every kind of digital audio.


1

Use an HDMI cable to connect the 

HDMI OUT connector on this recorder to 
an HDMI connector on an HDMI-compat-
ible monitor.


• The arrow on the cable connector body 

should be face down for correct 
alignment with the connector on the 
recorder.

When connected to an HDMI component or 
HDCP-compatible DVI component, the 
HDMI indicator lights.

HDMI setup is generally automatic. There 
are however settings you can change if you 
need to. See 


HDMI Output (only available 

when an HDMI device is connected)


 on 

page 121 for more information. Note that the 
HDMI settings remain in effect until you 
change them, or connect a new HDMI 
component.

Note


1 Depending on the component you have connected, using a DVI connection may result in unreliable signal 

transfers.

2 The pixel resolution of this recorder’s HDMI video output is (according to TV format): NTSC (720 x 480i/p, 1280 

x 720p, 1920 x 1080i/p) and PAL (720 x 576i/p, 1280 x 720p, 1920 x 1080i/p). If your display is not compatible with 
these resolutions the picture may not be correctly reproduced.

AC  IN

DIGITAL

AUDIO OUT

COAXIAL

HDMI OUT

CONTROL

G-LINK

IN

AV 1 (RGB) – TV

AV 2 (INPUT 1/DECODER) 

S-VIDEO

VIDEO

AUDIO

L

R

OUTPUT

INPUT 3

COMPONENT VIDEO OUT

Y

PB

PR

ANTENNA

IN

OUT

TV

Antenna/cable TV
wall outlet

AV amp/
receiver

ANTENNA
IN (RF IN)

ANTENNA

OUT

1

1

AUDIO/VIDEO

OUTPUT

3

DIGITAL

AUDIO OUT

2

4

To antenna input

To audio/video input

To digital input

To video input

From video 

output

AC  IN

DIGITAL

AUDIO OUT

COAXIAL

HDMI OUT

CONTROL

G-LINK

IN

AV 1 (RGB) – TV

AV 2 (INPUT 1/DECODER) 

S-VIDEO

VIDEO

AUDIO

L

R

OUTPUT

INPUT 3

COMPONENT VIDEO OUT

Y

P

B

P

R

ANTENNA

IN

OUT

HDMI

OUT

To HDMI

input

HDMI-compatible display

DVR550H_WV_EN.book 21 ページ 2006年12月28日 木曜日 午後4時21分

Downloaded From Disc-Player.com Pioneer Manuals

Содержание DVR-550H-S - Multi-System DVD Recorder

Страница 1: ...s Discover the benefits of registering your product online at http www pioneer co uk or http www pioneer eu DVR 550H S HDD DVD RECORDER HDD DVD RECORDER Operating Instructions Downloaded From Disc Player com Pioneer Manuals ...

Страница 2: ...he following caution label appears on your unit Location inside of the unit D3 4 2 1 8_B_En CAUTION ATTENTION CLASS 3B VISIBLE AND INVISIBLE LASER RADIATION WHEN OPEN AVOID EXPOSURE TO THE BEAM VRW2262 A RADIATIONS LASER VISIBLES ET INVISIBLES DECLASSE 3B QUAND OUVERT ÉVITEZ TOUT EXPOSITION AU FAISCEAU ADVARSEL KLASSE 3B SYNLIG OG USYNLIG LASERSTRÅLING VED ÅBNING UNDGÅ UDSÆTTELSEFOR STRÅLING VARNI...

Страница 3: ...ndle the power cord by the plug Do not pull out the plug by tugging the cord and never touch the power cord when your hands are wet as this could cause a short circuit or electric shock Do not place the unit a piece of furniture etc on the power cord or pinch the cord Never make a knot in the cord or tie it with other cords The power cords should be routed such that they are not likely to be stepp...

Страница 4: ...itching on and setting up 28 Setting up the GUIDE Plus system 30 05 Using the GUIDE Plus electronic programme guide The GUIDE Plus system 34 Using the GUIDE Plus system 34 Areas 36 GUIDE Plus FAQ and troubleshooting 45 06 Recording About DVD recording 48 About HDD recording 49 Recorded audio 49 Restrictions on video recording 50 Using the built in TV tuner 50 Setting the picture quality recording ...

Страница 5: ...r folders 103 Copying selected files to a DVD R RW 103 Editing files on the HDD 104 13 The Disc Setup menu Basic settings 107 Initialize settings 108 Finalize settings 108 Optimize HDD 108 Initialize HDD 109 14 The Video Adjust menu Setting the picture quality for TV and external inputs 110 Setting the picture quality for disc playback 111 15 The Initial Setup menu Using the Initial Setup menu 113...

Страница 6: ...able but some parts of the specification are not supported specifically Pro Lossless Voice and VBR DRM Digital Rights Management 1 file playback No File extensions mp3 wma these must be used for the recorder to recognize MP3 and WMA files do not use for other file types File structure Up to 99 folders 999 files if these limits are exceeded only files and folders up to these limits are playable WMA...

Страница 7: ...DL discs This logo indicates that the disc is a DVD R DL or DVD R DL disc Correct operation has been confirmed for DL discs DVD R DL ver 3 0 2x to 4x Mitsubishi Kagaku Media Verbatim DVD R DL ver 3 0 2x to 8x Mitsubishi Kagaku Media Verbatim That s JVC DVD R DL 2 4x Mitsubishi Kagaku Media Verbatim RICOH DVD R DL 2 4x to 8x Mitsubishi Kagaku Media Verbatim RICOH About DualDisc playback A DualDisc ...

Страница 8: ...able but some parts of the specification are not supported specifically Pro Lossless Voice and VBR DRM Digital Rights Management 1 file playback No File extensions mp3 wma these must be used for the recorder to recognize MP3 and WMA files do not use for other file types File structure Up to 99 folders 999 files if these limits are exceeded only files and folders up to these limits are playable WMA...

Страница 9: ...or DVD R DL disc Correct operation has been confirmed for DL discs DVD R DL ver 3 0 2x to 4x Mitsubishi Kagaku Media Verbatim DVD R DL ver 3 0 2x to 8x Mitsubishi Kagaku Media Verbatim That s JVC DVD R DL 2 4x Mitsubishi Kagaku Media Verbatim RICOH DVD R DL 2 4x to 8x Mitsubishi Kagaku Media Verbatim RICOH About DualDisc playback A DualDisc is a new two sided disc one side of which contains DVD co...

Страница 10: ... Pro Lossless Voice and VBR DRM Digital Rights Management 1 file playback No File extensions mp3 wma these must be used for the recorder to recognize MP3 and WMA files do not use for other file types File structure Up to 99 folders 999 files if these limits are exceeded only files and folders up to these limits are playable WMA Windows Media Audio compatibility This recorder can playback Windows M...

Страница 11: ...ze JPEG files do not use for other file types File structure The recorder can load up to 99 folders 999 files at one time if there are more files folders that this on the disc then more can be reloaded PC created disc compatibility Discs recorded using a personal computer may not be playable in this unit due to the setting of the application software used to create the disc In these particular ins...

Страница 12: ...g and changing the playback behavior of albums 1 Select Jukebox from the Home Menu 2 Select Listen to Music Edit 3 Select what you want to edit 4 Select an edit function from the command menu panel Erase Erase the selected track if all tracks in an album are selected the whole album is erased Edit Album name Enter a name of up to 64 characters for the album See page Title Name on page 81 for how t...

Страница 13: ... extensions jpg jpeg jpe jif jfif must be used for the recorder to recognize JPEG files do not use for other file types File structure The recorder can load up to 99 folders 999 files at one time PC created disc compatibility Discs recorded using a personal computer may not be playable in this unit due to the setting of the application software used to create the disc In these particular instances...

Страница 14: ... 2 Select Listen to Music Edit 3 Select what you want to edit 4 Select an edit function from the command menu panel Erase Erase the selected track if all tracks in an album are selected the whole album is erased Edit Album name Enter a name of up to 64 characters for the album See page Title Name on page 81 for how to enter names Track name NTER HOME MENU ENTER ENTER ENTER WV_EN book 98 ページ 2006年1...

Страница 15: ...iled instructions 3 Use a SCART cable to connect your VCR satellite receiver cable box to the AV2 INPUT 1 DECODER AV connector on this recorder 4 Use a SCART cable to connect the AV1 RGB TV AV connector to your TV WV_EN book 19 ページ 2006年12月28日 木曜日 午後4時21分 En 02 1 Connect RF antenna cables as shown This enables you to watch and record TV channels 2 Connect the DIGITAL OUT COAXIAL jack on this recor...

Страница 16: ... 2 Select Listen to Music Edit 3 Select what you want to edit 4 Select an edit function from the command menu panel Erase Erase the selected track if all tracks in an album are selected the whole album is erased Edit Album name Enter a name of up to 64 characters for the album See page Title Name on page 81 for how to enter names Track name NTER HOME MENU ENTER ENTER ENTER WV_EN book 98 ページ 2006年1...

Страница 17: ...CODER S VIDEO VIDEO AUDIO L R OUTPUT INPUT3 COMPONENTVIDEOOUT Y PB PR ANTENNA IN OUT TV Antenna cableTV walloutlet VCR Satellitereceiver Cablebox Decoder 1 2 3 4 From SCART AV connector To SCART AV connector SCART AV connection AV2 INPUT 1 DECODER AV1 RGB TV To antenna input WV_EN book 19 ページ 2006年12月28日 木曜日 午後4時21分 En 02 1 Connect RF antenna cables as shown This enables you to watch and record TV...

Страница 18: ...u 2 Select Listen to Music Edit 3 Select what you want to edit 4 Select an edit function from the command menu panel Erase Erase the selected track if all tracks in an album are selected the whole album is erased Edit Album name Enter a name of up to 64 characters for the album See page on page 81 for how to enter names Track name NTER HOME MENU ENTER ENTER ENTER WV_EN book 98 ページ 2006年12月28日 木曜日 ...

Страница 19: ...CODER S VIDEO VIDEO AUDIO L R OUTPUT INPUT3 COMPONENTVIDEOOUT Y PB PR ANTENNA IN OUT TV Antenna cableTV walloutlet VCR Satellitereceiver Cablebox Decoder 1 2 3 4 From SCART AV connector To SCART AV connector SCART AV connection AV2 INPUT 1 DECODER AV1 RGB TV To antenna input WV_EN book 19 ページ 2006年12月28日 木曜日 午後4時21分 En 02 1 Connect RF antenna cables as shown This enables you to watch and record TV...

Страница 20: ... 2 Select Listen to Music Edit 3 Select what you want to edit 4 Select an edit function from the command menu panel Erase Erase the selected track if all tracks in an album are selected the whole album is erased Edit Album name Enter a name of up to 64 characters for the album See page Title Name on page 81 for how to enter names Track name NTER HOME MENU ENTER ENTER ENTER WV_EN book 98 ページ 2006年1...

Страница 21: ...CODER S VIDEO VIDEO AUDIO L R OUTPUT INPUT3 COMPONENTVIDEOOUT Y PB PR ANTENNA IN OUT TV Antenna cableTV walloutlet VCR Satellitereceiver Cablebox Decoder 1 2 3 4 From SCART AV connector To SCART AV connector SCART AV connection AV2 INPUT 1 DECODER AV1 RGB TV To antenna input WV_EN book 19 ページ 2006年12月28日 木曜日 午後4時21分 En 02 1 Connect RF antenna cables as shown This enables you to watch and record TV...

Страница 22: ...Select Listen to Music Edit 3 Select what you want to edit 4 Select an edit function from the command menu panel Erase Erase the selected track if all tracks in an album are selected the whole album is erased Edit Album name Enter a name of up to 64 characters for the album See page Title Name on page 81 for how to enter names Track name NTER HOME MENU ENTER ENTER ENTER WV_EN book 98 ページ 2006年12月2...

Страница 23: ...This jack is for connection to DV equipment only It is not compatible with digital satellite receivers or D VHS video decks Use a DV cable not supplied to connect the DV jack of your DV camcorder to the front panel DV IN jack of this recorder Plugging in After checking all the connections plug in the recorder Use the supplied power cable to connect this recorder to a power outlet DVcamcorder HDD D...

Страница 24: ...g and changing the playback behavior of albums 1 Select Jukebox from the Home Menu 2 Select Listen to Music Edit 3 Select what you want to edit 4 Select an edit function from the command menu panel Erase Erase the selected track if all tracks in an album are selected the whole album is erased Edit Album name Enter a name of up to 64 characters for the album See page Title Name on page 81 for how t...

Страница 25: ...s to change the audio language or channel When the recorder is stopped press to change the tuner audio SUBTITLE page 71 Hold SHIFT and press to display change the subtitles included in multilingual DVD Video discs ANGLE page 73 Hold SHIFT and press to switch camera angles on discs with multi angle scenes PLAY MODE page 69 Hold SHIFT and press to change the play mode search repeat programme play et...

Страница 26: ... Select Listen to Music Edit 3 Select what you want to edit 4 Select an edit function from the command menu panel Erase Erase the selected track if all tracks in an album are selected the whole album is erased Edit Album name Enter a name of up to 64 characters for the album See page on page 81 for how to enter names Track name NTER HOME MENU ENTER ENTER ENTER WV_EN book 98 ページ 2006年12月28日 木曜日 午後4...

Страница 27: ...o change the audio language or channel When the recorder is stopped press to change the tuner audio SUBTITLE page 71 Hold SHIFT and press to display change the subtitles included in multilingual DVD Video discs ANGLE page 73 Hold SHIFT and press to switch camera angles on discs with multi angle scenes PLAY MODE page 69 Hold SHIFT and press to change the play mode search repeat programme play etc 1...

Страница 28: ...lanets Mars Venus Mercury Jup iter Saturn Uranus Nep classical Total 12 70 MB 10Albums Jukebox 0 G n Genres Play Erase Edit Play Mode Genre Name 3 10 0 03 58 4 Album2 5 Album3 6 Album4 7 Album5 8 Album6 9 Album7 10 Album8 3 Album1 ALL 1 2 3 4 5 6 7 t order re All Genres number By number By favourite Cancel By album HDD By number Album1 The Planets Mars Venus Mercury Jup iter Saturn Uranus Nep clas...

Страница 29: ...木曜日 午後4時21分 En 04 Even if you can t use the EPG functions where you live you can still set VIDEO Plus timer recordings and manual recordings see on page 56 The front panel display shows EPG when receiving data If you power on the recorder during an EPG download the download is cancelled EPG data may be received several times a day All updates are automatic When downloading EPG data the recorder ma...

Страница 30: ...bum1 The Planets Mars Venus Mercury Jup iter Saturn Uranus Nep classical Total 12 70 MB 10Albums Jukebox 0 G n Genres Play Erase Edit Play Mode Genre Name 3 10 0 03 58 4 Album2 5 Album3 6 Album4 7 Album5 8 Album6 9 Album7 10 Album8 3 Album1 ALL 1 2 3 4 5 6 7 t order re All Genres number By number By favourite Cancel By album HDD By number Album1 The Planets Mars Venus Mercury Jup iter Saturn Uranu...

Страница 31: ...s timer recordings and manual recordings see Setting a timer recording on page 56 The front panel display shows EPG when receiving data If you power on the recorder during an EPG download the download is cancelled EPG data may be received several times a day All updates are automatic When downloading EPG data the recorder may sound as though it is on This is normal Checking the downloaded data the...

Страница 32: ...g and changing the playback behavior of albums 1 Select Jukebox from the Home Menu 2 Select Listen to Music Edit 3 Select what you want to edit 4 Select an edit function from the command menu panel Erase Erase the selected track if all tracks in an album are selected the whole album is erased Edit Album name Enter a name of up to 64 characters for the album See page Title Name on page 81 for how t...

Страница 33: ...s timer recordings and manual recordings see Setting a timer recording on page 56 The front panel display shows EPG when receiving data If you power on the recorder during an EPG download the download is cancelled EPG data may be received several times a day All updates are automatic When downloading EPG data the recorder may sound as though it is on This is normal Checking the downloaded data the...

Страница 34: ...Select Listen to Music Edit 3 Select what you want to edit 4 Select an edit function from the command menu panel Erase Erase the selected track if all tracks in an album are selected the whole album is erased Edit Album name Enter a name of up to 64 characters for the album See page Title Name on page 81 for how to enter names Track name NTER HOME MENU ENTER ENTER ENTER WV_EN book 98 ページ 2006年12月2...

Страница 35: ...eiver on page 18 The code that is listed under your brand could be wrong Please try other codes for your brand under satellite cable or terrestrial Go to the Setup Area and choose one of the three options cable satellite or terrestrial that you have not already tried Follow the on screen prompts to make sure that the GUIDE Plus system can change channels on your external receiver If it does not wo...

Страница 36: ...g and changing the playback behavior of albums 1 Select Jukebox from the Home Menu 2 Select Listen to Music Edit 3 Select what you want to edit 4 Select an edit function from the command menu panel Erase Erase the selected track if all tracks in an album are selected the whole album is erased Edit Album name Enter a name of up to 64 characters for the album See page Title Name on page 81 for how t...

Страница 37: ...ew questions For a ete list please consult the GUIDE website at urope guideplus com FAQ IR receiver of your external receiver See on page 18 The code that is listed under your brand could be wrong Please try other codes for your brand under satellite cable or terrestrial Go to the Setup Area and choose one of the three options cable satellite or terrestrial that you have not already tried Follow t...

Страница 38: ... Select Listen to Music Edit 3 Select what you want to edit 4 Select an edit function from the command menu panel Erase Erase the selected track if all tracks in an album are selected the whole album is erased Edit Album name Enter a name of up to 64 characters for the album See page on page 81 for how to enter names Track name NTER HOME MENU ENTER ENTER ENTER WV_EN book 98 ページ 2006年12月28日 木曜日 午後4...

Страница 39: ...eiver on page 18 The code that is listed under your brand could be wrong Please try other codes for your brand under satellite cable or terrestrial Go to the Setup Area and choose one of the three options cable satellite or terrestrial that you have not already tried Follow the on screen prompts to make sure that the GUIDE Plus system can change channels on your external receiver If it does not wo...

Страница 40: ...ing and changing the playback behavior of albums 1 Select Jukebox from the Home Menu 2 Select Listen to Music Edit 3 Select what you want to edit 4 Select an edit function from the command menu panel Erase Erase the selected track if all tracks in an album are selected the whole album is erased Edit Album name Enter a name of up to 64 characters for the album See page on page 81 for how to enter n...

Страница 41: ...eiver on page 18 The code that is listed under your brand could be wrong Please try other codes for your brand under satellite cable or terrestrial Go to the Setup Area and choose one of the three options cable satellite or terrestrial that you have not already tried Follow the on screen prompts to make sure that the GUIDE Plus system can change channels on your external receiver If it does not wo...

Страница 42: ...ing and changing the playback behavior of albums 1 Select Jukebox from the Home Menu 2 Select Listen to Music Edit 3 Select what you want to edit 4 Select an edit function from the command menu panel Erase Erase the selected track if all tracks in an album are selected the whole album is erased Edit Album name Enter a name of up to 64 characters for the album See page on page 81 for how to enter n...

Страница 43: ...ew questions For a ete list please consult the GUIDE website at urope guideplus com FAQ IR receiver of your external receiver See on page 18 The code that is listed under your brand could be wrong Please try other codes for your brand under satellite cable or terrestrial Go to the Setup Area and choose one of the three options cable satellite or terrestrial that you have not already tried Follow t...

Страница 44: ...ing and changing the playback behavior of albums 1 Select Jukebox from the Home Menu 2 Select Listen to Music Edit 3 Select what you want to edit 4 Select an edit function from the command menu panel Erase Erase the selected track if all tracks in an album are selected the whole album is erased Edit Album name Enter a name of up to 64 characters for the album See page on page 81 for how to enter n...

Страница 45: ...eiver on page 18 The code that is listed under your brand could be wrong Please try other codes for your brand under satellite cable or terrestrial Go to the Setup Area and choose one of the three options cable satellite or terrestrial that you have not already tried Follow the on screen prompts to make sure that the GUIDE Plus system can change channels on your external receiver If it does not wo...

Страница 46: ...g and changing the playback behavior of albums 1 Select Jukebox from the Home Menu 2 Select Listen to Music Edit 3 Select what you want to edit 4 Select an edit function from the command menu panel Erase Erase the selected track if all tracks in an album are selected the whole album is erased Edit Album name Enter a name of up to 64 characters for the album See page Title Name on page 81 for how t...

Страница 47: ...eiver on page 18 The code that is listed under your brand could be wrong Please try other codes for your brand under satellite cable or terrestrial Go to the Setup Area and choose one of the three options cable satellite or terrestrial that you have not already tried Follow the on screen prompts to make sure that the GUIDE Plus system can change channels on your external receiver If it does not wo...

Страница 48: ...g and changing the playback behavior of albums 1 Select Jukebox from the Home Menu 2 Select Listen to Music Edit 3 Select what you want to edit 4 Select an edit function from the command menu panel Erase Erase the selected track if all tracks in an album are selected the whole album is erased Edit Album name Enter a name of up to 64 characters for the album See page Title Name on page 81 for how t...

Страница 49: ...omponent You can record from an external component such as a camcorder or VCR connected to one of the recorder s external inputs 1 Make sure that the component you want to record from is connected properly to the HDD DVD recorder See Chapter 2 Connecting up for connection options 2 Press repeatedly to select one of the external inputs to record from The current input is shown on screen and in the ...

Страница 50: ...Select Listen to Music Edit 3 Select what you want to edit 4 Select an edit function from the command menu panel Erase Erase the selected track if all tracks in an album are selected the whole album is erased Edit Album name Enter a name of up to 64 characters for the album See page Title Name on page 81 for how to enter names Track name NTER HOME MENU ENTER ENTER ENTER WV_EN book 98 ページ 2006年12月2...

Страница 51: ...ernal component such as a camcorder or VCR connected to one of the recorder s external inputs 1 Make sure that the component you want to record from is connected properly to the HDD DVD recorder See Chapter 2 Connecting up for connection options 2 Press repeatedly to select one of the external inputs to record from The current input is shown on screen and in the front panel display AV2 L1 Input 12...

Страница 52: ...Select Listen to Music Edit 3 Select what you want to edit 4 Select an edit function from the command menu panel Erase Erase the selected track if all tracks in an album are selected the whole album is erased Edit Album name Enter a name of up to 64 characters for the album See page Title Name on page 81 for how to enter names Track name NTER HOME MENU ENTER ENTER ENTER WV_EN book 98 ページ 2006年12月2...

Страница 53: ...ernal component such as a camcorder or VCR connected to one of the recorder s external inputs 1 Make sure that the component you want to record from is connected properly to the HDD DVD recorder See Chapter 2 Connecting up for connection options 2 Press repeatedly to select one of the external inputs to record from The current input is shown on screen and in the front panel display AV2 L1 Input 12...

Страница 54: ...Select Listen to Music Edit 3 Select what you want to edit 4 Select an edit function from the command menu panel Erase Erase the selected track if all tracks in an album are selected the whole album is erased Edit Album name Enter a name of up to 64 characters for the album See page Title Name on page 81 for how to enter names Track name NTER HOME MENU ENTER ENTER ENTER WV_EN book 98 ページ 2006年12月2...

Страница 55: ...ernal component such as a camcorder or VCR connected to one of the recorder s external inputs 1 Make sure that the component you want to record from is connected properly to the HDD DVD recorder See Chapter 2 Connecting up for connection options 2 Press repeatedly to select one of the external inputs to record from The current input is shown on screen and in the front panel display AV2 L1 Input 12...

Страница 56: ...Select Listen to Music Edit 3 Select what you want to edit 4 Select an edit function from the command menu panel Erase Erase the selected track if all tracks in an album are selected the whole album is erased Edit Album name Enter a name of up to 64 characters for the album See page Title Name on page 81 for how to enter names Track name NTER HOME MENU ENTER ENTER ENTER WV_EN book 98 ページ 2006年12月2...

Страница 57: ...ecord from an external component such as a camcorder or VCR connected to one of the recorder s external inputs 1 Make sure that the component you want to record from is connected properly to the HDD DVD recorder See Chapter 2 Connecting up for connection options 2 Press repeatedly to select one of the external inputs to record from The current input is shown on screen and in the front panel displa...

Страница 58: ...Select Listen to Music Edit 3 Select what you want to edit 4 Select an edit function from the command menu panel Erase Erase the selected track if all tracks in an album are selected the whole album is erased Edit Album name Enter a name of up to 64 characters for the album See page Title Name on page 81 for how to enter names Track name NTER HOME MENU ENTER ENTER ENTER WV_EN book 98 ページ 2006年12月2...

Страница 59: ...ernal component such as a camcorder or VCR connected to one of the recorder s external inputs 1 Make sure that the component you want to record from is connected properly to the HDD DVD recorder See Chapter 2 Connecting up for connection options 2 Press repeatedly to select one of the external inputs to record from The current input is shown on screen and in the front panel display AV2 L1 Input 12...

Страница 60: ...Select Listen to Music Edit 3 Select what you want to edit 4 Select an edit function from the command menu panel Erase Erase the selected track if all tracks in an album are selected the whole album is erased Edit Album name Enter a name of up to 64 characters for the album See page Title Name on page 81 for how to enter names Track name NTER HOME MENU ENTER ENTER ENTER WV_EN book 98 ページ 2006年12月2...

Страница 61: ...ecord from an external component such as a camcorder or VCR connected to one of the recorder s external inputs 1 Make sure that the component you want to record from is connected properly to the HDD DVD recorder See Chapter 2 Connecting up for connection options 2 Press repeatedly to select one of the external inputs to record from The current input is shown on screen and in the front panel displa...

Страница 62: ...lanets Mars Venus Mercury Jup iter Saturn Uranus Nep classical Total 12 70 MB 10Albums Jukebox 0 G n Genres Play Erase Edit Play Mode Genre Name 3 10 0 03 58 4 Album2 5 Album3 6 Album4 7 Album5 8 Album6 9 Album7 10 Album8 3 Album1 ALL 1 2 3 4 5 6 7 t order re All Genres number By number By favourite Cancel By album HDD By number Album1 The Planets Mars Venus Mercury Jup iter Saturn Uranus Nep clas...

Страница 63: ...Some discs feature Playback Control PBC for short menus These discs show PBC in the display when you load them and display a menu on screen from where you can select what to watch 2 Press to skip to previous next chapter title During playback you can also use the front panel CH buttons During playback enter a title number then press ENTER to skip directly to that title Press CLEAR to clear a numbe...

Страница 64: ...Select Listen to Music Edit 3 Select what you want to edit 4 Select an edit function from the command menu panel Erase Erase the selected track if all tracks in an album are selected the whole album is erased Edit Album name Enter a name of up to 64 characters for the album See page Title Name on page 81 for how to enter names Track name NTER HOME MENU ENTER ENTER ENTER WV_EN book 98 ページ 2006年12月2...

Страница 65: ... discs feature Playback Control PBC for short menus These discs show PBC in the display when you load them and display a menu on screen from where you can select what to watch 2 Press to skip to previous next chapter title During playback you can also use the front panel CH buttons During playback enter a title number then press ENTER to skip directly to that title Press CLEAR to clear a number en...

Страница 66: ...Select Listen to Music Edit 3 Select what you want to edit 4 Select an edit function from the command menu panel Erase Erase the selected track if all tracks in an album are selected the whole album is erased Edit Album name Enter a name of up to 64 characters for the album See page Title Name on page 81 for how to enter names Track name NTER HOME MENU ENTER ENTER ENTER WV_EN book 98 ページ 2006年12月2...

Страница 67: ...programme play Displaying and switching subtitles Some DVD and DivX discs have subtitles in one or more languages the disc box will usually tell you which subtitle languages are available You can switch subtitle language during playback 1 NTER ramme Title 01 03 Title 01 Title 02 Title 03 Chapter 001 015 Chapter 001 Chapter 002 Chapter 003 Chapter 004 Chapter 005 Chapter 006 Chapter 007 Chapter 008...

Страница 68: ...bum1 The Planets Mars Venus Mercury Jup iter Saturn Uranus Nep classical Total 12 70 MB 10Albums Jukebox 0 G n Genres Play Erase Edit Play Mode Genre Name 3 10 0 03 58 4 Album2 5 Album3 6 Album4 7 Album5 8 Album6 9 Album7 10 Album8 3 Album1 ALL 1 2 3 4 5 6 7 t order re All Genres number By number By favourite Cancel By album HDD By number Album1 The Planets Mars Venus Mercury Jup iter Saturn Uranu...

Страница 69: ...programme play Displaying and switching subtitles Some DVD and DivX discs have subtitles in one or more languages the disc box will usually tell you which subtitle languages are available You can switch subtitle language during playback 1 NTER ramme Title 01 03 Title 01 Title 02 Title 03 Chapter 001 015 Chapter 001 Chapter 002 Chapter 003 Chapter 004 Chapter 005 Chapter 006 Chapter 007 Chapter 008...

Страница 70: ...bum1 The Planets Mars Venus Mercury Jup iter Saturn Uranus Nep classical Total 12 70 MB 10Albums Jukebox 0 G n Genres Play Erase Edit Play Mode Genre Name 3 10 0 03 58 4 Album2 5 Album3 6 Album4 7 Album5 8 Album6 9 Album7 10 Album8 3 Album1 ALL 1 2 3 4 5 6 7 t order re All Genres number By number By favourite Cancel By album HDD By number Album1 The Planets Mars Venus Mercury Jup iter Saturn Uranu...

Страница 71: ...programme play Displaying and switching subtitles Some DVD and DivX discs have subtitles in one or more languages the disc box will usually tell you which subtitle languages are available You can switch subtitle language during playback 1 NTER ramme Title 01 03 Title 01 Title 02 Title 03 Chapter 001 015 Chapter 001 Chapter 002 Chapter 003 Chapter 004 Chapter 005 Chapter 006 Chapter 007 Chapter 008...

Страница 72: ...Select Listen to Music Edit 3 Select what you want to edit 4 Select an edit function from the command menu panel Erase Erase the selected track if all tracks in an album are selected the whole album is erased Edit Album name Enter a name of up to 64 characters for the album See page Title Name on page 81 for how to enter names Track name NTER HOME MENU ENTER ENTER ENTER WV_EN book 98 ページ 2006年12月2...

Страница 73: ... list and turns off programme play Displaying and switching subtitles Some DVD and DivX discs have subtitles in one or more languages the disc box will usually tell you which subtitle languages are available You can switch subtitle language during playback 1 NTER NTER DVD Video DivX WV_EN book 71 ページ 2006年12月28日 木曜日 午後4時21分 En 07 1 Stereo Soundtrack 1 Stereo default 1 L Soundtrack 1 Left channel 1...

Страница 74: ...g and changing the playback behavior of albums 1 Select Jukebox from the Home Menu 2 Select Listen to Music Edit 3 Select what you want to edit 4 Select an edit function from the command menu panel Erase Erase the selected track if all tracks in an album are selected the whole album is erased Edit Album name Enter a name of up to 64 characters for the album See page Title Name on page 81 for how t...

Страница 75: ...ancel the copying process press STOP REC for more than three seconds About automatic finalization If you use a DVD R RW Video mode or DVD R RW disc for copying it will automatically be finalized after copying is complete You can t customize the background for DVD R RW or DVD R RW disc finalization No title names are assigned If you want to give the disc a name please do so before you start the cop...

Страница 76: ...bum1 The Planets Mars Venus Mercury Jup iter Saturn Uranus Nep classical Total 12 70 MB 10Albums Jukebox 0 G n Genres Play Erase Edit Play Mode Genre Name 3 10 0 03 58 4 Album2 5 Album3 6 Album4 7 Album5 8 Album6 9 Album7 10 Album8 3 Album1 ALL 1 2 3 4 5 6 7 t order re All Genres number By number By favourite Cancel By album HDD By number Album1 The Planets Mars Venus Mercury Jup iter Saturn Uranu...

Страница 77: ...ancel the copying process press STOP REC for more than three seconds About automatic finalization If you use a DVD R RW Video mode or DVD R RW disc for copying it will automatically be finalized after copying is complete You can t customize the background for DVD R RW or DVD R RW disc finalization No title names are assigned If you want to give the disc a name please do so before you start the cop...

Страница 78: ...g and changing the playback behavior of albums 1 Select Jukebox from the Home Menu 2 Select Listen to Music Edit 3 Select what you want to edit 4 Select an edit function from the command menu panel Erase Erase the selected track if all tracks in an album are selected the whole album is erased Edit Album name Enter a name of up to 64 characters for the album See page Title Name on page 81 for how t...

Страница 79: ... All Genres 10Titles 30h30m Recent first HDD SP 9 8 7 10 20 00 FRI 3 12 Pr 9 SP 20 00 Fri 3 12 Pr 9 SP 2h00m 1 0G 22 00 THU 2 12 Pr 7 SP 22 00 Thu 2 12 Pr 7 SP 1h00m 1 0G 19 00 MON 29 11 Pr 2 SP 19 00 Mon 29 11 Pr 2 SP 1h00m 1 0G 23 00 FRI 3 12 Pr 4 SP 23 00 Fri 3 12 Pr 4 SP 2h00m 1 0G Play Erase Edit Multi Mode Genre Name Cancel Title name Erase Section Edit Chapter Cancel Set Thumbnail Set Genre...

Страница 80: ...bum1 The Planets Mars Venus Mercury Jup iter Saturn Uranus Nep classical Total 12 70 MB 10Albums Jukebox 0 G n Genres Play Erase Edit Play Mode Genre Name 3 10 0 03 58 4 Album2 5 Album3 6 Album4 7 Album5 8 Album6 9 Album7 10 Album8 3 Album1 ALL 1 2 3 4 5 6 7 t order re All Genres number By number By favourite Cancel By album HDD By number Album1 The Planets Mars Venus Mercury Jup iter Saturn Uranu...

Страница 81: ... All Genres 10Titles 30h30m Recent first HDD SP 9 8 7 10 20 00 FRI 3 12 Pr 9 SP 20 00 Fri 3 12 Pr 9 SP 2h00m 1 0G 22 00 THU 2 12 Pr 7 SP 22 00 Thu 2 12 Pr 7 SP 1h00m 1 0G 19 00 MON 29 11 Pr 2 SP 19 00 Mon 29 11 Pr 2 SP 1h00m 1 0G 23 00 FRI 3 12 Pr 4 SP 23 00 Fri 3 12 Pr 4 SP 2h00m 1 0G Play Erase Edit Multi Mode Genre Name Cancel Title name Erase Section Edit Chapter Cancel Set Thumbnail Set Genre...

Страница 82: ...e Planets Mars Venus Mercury Jup iter Saturn Uranus Nep classical Total 12 70 MB 10Albums Jukebox 0 G n Genres Play Erase Edit Play Mode Genre Name 3 10 0 03 58 4 Album2 5 Album3 6 Album4 7 Album5 8 Album6 9 Album7 10 Album8 3 Album1 ALL 1 2 3 4 5 6 7 t order re All Genres number By number By favourite Cancel By album HDD By number Album1 The Planets Mars Venus Mercury Jup iter Saturn Uranus Nep c...

Страница 83: ...es Remain All Genres 10Titles 30h30m Recent first HDD SP 9 8 7 10 20 00 FRI 3 12 Pr 9 SP 20 00 Fri 3 12 Pr 9 SP 2h00m 1 0G 22 00 THU 2 12 Pr 7 SP 22 00 Thu 2 12 Pr 7 SP 1h00m 1 0G 19 00 MON 29 11 Pr 2 SP 19 00 Mon 29 11 Pr 2 SP 1h00m 1 0G 23 00 FRI 3 12 Pr 4 SP 23 00 Fri 3 12 Pr 4 SP 2h00m 1 0G Play Erase Edit Multi Mode Genre Name Cancel Title name Erase Section Edit Chapter Cancel Set Thumbnail ...

Страница 84: ...bum1 The Planets Mars Venus Mercury Jup iter Saturn Uranus Nep classical Total 12 70 MB 10Albums Jukebox 0 G n Genres Play Erase Edit Play Mode Genre Name 3 10 0 03 58 4 Album2 5 Album3 6 Album4 7 Album5 8 Album6 9 Album7 10 Album8 3 Album1 ALL 1 2 3 4 5 6 7 t order re All Genres number By number By favourite Cancel By album HDD By number Album1 The Planets Mars Venus Mercury Jup iter Saturn Uranu...

Страница 85: ... All Genres 10Titles 30h30m Recent first HDD SP 9 8 7 10 20 00 FRI 3 12 Pr 9 SP 20 00 Fri 3 12 Pr 9 SP 2h00m 1 0G 22 00 THU 2 12 Pr 7 SP 22 00 Thu 2 12 Pr 7 SP 1h00m 1 0G 19 00 MON 29 11 Pr 2 SP 19 00 Mon 29 11 Pr 2 SP 1h00m 1 0G 23 00 FRI 3 12 Pr 4 SP 23 00 Fri 3 12 Pr 4 SP 2h00m 1 0G Play Erase Edit Multi Mode Genre Name Cancel Title name Erase Section Edit Chapter Cancel Set Thumbnail Set Genre...

Страница 86: ...bum1 The Planets Mars Venus Mercury Jup iter Saturn Uranus Nep classical Total 12 70 MB 10Albums Jukebox 0 G n Genres Play Erase Edit Play Mode Genre Name 3 10 0 03 58 4 Album2 5 Album3 6 Album4 7 Album5 8 Album6 9 Album7 10 Album8 3 Album1 ALL 1 2 3 4 5 6 7 t order re All Genres number By number By favourite Cancel By album HDD By number Album1 The Planets Mars Venus Mercury Jup iter Saturn Uranu...

Страница 87: ... All Genres 10Titles 30h30m Recent first HDD SP 9 8 7 10 20 00 FRI 3 12 Pr 9 SP 20 00 Fri 3 12 Pr 9 SP 2h00m 1 0G 22 00 THU 2 12 Pr 7 SP 22 00 Thu 2 12 Pr 7 SP 1h00m 1 0G 19 00 MON 29 11 Pr 2 SP 19 00 Mon 29 11 Pr 2 SP 1h00m 1 0G 23 00 FRI 3 12 Pr 4 SP 23 00 Fri 3 12 Pr 4 SP 2h00m 1 0G Play Erase Edit Multi Mode Genre Name Cancel Title name Erase Section Edit Chapter Cancel Set Thumbnail Set Genre...

Страница 88: ...bum1 The Planets Mars Venus Mercury Jup iter Saturn Uranus Nep classical Total 12 70 MB 10Albums Jukebox 0 G n Genres Play Erase Edit Play Mode Genre Name 3 10 0 03 58 4 Album2 5 Album3 6 Album4 7 Album5 8 Album6 9 Album7 10 Album8 3 Album1 ALL 1 2 3 4 5 6 7 t order re All Genres number By number By favourite Cancel By album HDD By number Album1 The Planets Mars Venus Mercury Jup iter Saturn Uranu...

Страница 89: ...DVD R RW or a DVD Video is loaded As long as the disc is not Copy Guard protected you can still use the One Touch Copy function however See One Touch Copy on page 89 The recorder can only store one Copy List at a time The Copy List will be erased if any of the titles on the DVD disc are erased or edited WV_EN book 93 ページ 2006年12月28日 木曜日 午後4時21分 En 10 Optimized1 2 The recording quality is automatic...

Страница 90: ... Select Listen to Music Edit 3 Select what you want to edit 4 Select an edit function from the command menu panel Erase Erase the selected track if all tracks in an album are selected the whole album is erased Edit Album name Enter a name of up to 64 characters for the album See page on page 81 for how to enter names Track name NTER HOME MENU ENTER ENTER ENTER WV_EN book 98 ページ 2006年12月28日 木曜日 午後4...

Страница 91: ... disc are erased or edited NTER Copy Edit 2 Title Copy List Total Current DVD Remain 1 2 20 00 Wed29 03 Pr 2 SP 20 00 Wed22 03 Pr 2 SP 4 3G 4 3G 1 2 3 Back Next 20 00 Wed29 03 Pr 2 SP 1h00m 2 0G HDD DVD Video mode ENTER Copy HDD DVD Video Mode Start Copy Copy Time 0h 16m Recording Mode Disc Name Finalize Back Recording Mode Input Disc Name Finalize Start Copy Copy List Total Current DVD Remain 4 3...

Страница 92: ... Album1 The Planets Mars Venus Mercury Jup iter Saturn Uranus Nep classical Total 12 70 MB 10Albums Jukebox 0 G n Genres Play Erase Edit Play Mode Genre Name 3 10 0 03 58 4 Album2 5 Album3 6 Album4 7 Album5 8 Album6 9 Album7 10 Album8 3 Album1 ALL 1 2 3 4 5 6 7 t order re All Genres number By number By favourite Cancel By album HDD By number Album1 The Planets Mars Venus Mercury Jup iter Saturn Ur...

Страница 93: ... disc are erased or edited NTER Copy Edit 2 Title Copy List Total Current DVD Remain 1 2 20 00 Wed29 03 Pr 2 SP 20 00 Wed22 03 Pr 2 SP 4 3G 4 3G 1 2 3 Back Next 20 00 Wed29 03 Pr 2 SP 1h00m 2 0G HDD DVD Video mode ENTER Copy HDD DVD Video Mode Start Copy Copy Time 0h 16m Recording Mode Disc Name Finalize Back Recording Mode Input Disc Name Finalize Start Copy Copy List Total Current DVD Remain 4 3...

Страница 94: ...Select Listen to Music Edit 3 Select what you want to edit 4 Select an edit function from the command menu panel Erase Erase the selected track if all tracks in an album are selected the whole album is erased Edit Album name Enter a name of up to 64 characters for the album See page Title Name on page 81 for how to enter names Track name NTER HOME MENU ENTER ENTER ENTER WV_EN book 98 ページ 2006年12月2...

Страница 95: ...he DVD disc are erased or edited NTER Copy Edit 2 Title Copy List Total Current DVD Remain 1 2 20 00 Wed29 03 Pr 2 SP 20 00 Wed22 03 Pr 2 SP 4 3G 4 3G Back Next 20 00 Wed29 03 Pr 2 SP 1h00m 2 0G HDD DVD Video mode ENTER Copy HDD DVD Video Mode Start Copy Copy Time 0h 16m Recording Mode Disc Name Finalize Back Recording Mode Input Disc Name Finalize Start Copy Copy List Total Current DVD Remain 4 3...

Страница 96: ...cordable DVD discs on page 61 7 After the recorder has finished recording the backup disc you can select whether to make another backup of the same data or exit Select Start to make another backup copy or Cancel to finish If you want to make another backup copy return to step 6 above 8 If you don t need to keep the backup data on the HDD you can delete it now Select Yes to delete the data from the...

Страница 97: ...s on the CD or all WMA MP3 files on the DVD are copied to the HDD You can also start copying by starting playback of the CD DVD and then pressing ONE TOUCH COPY To cancel copying press ENTER If the CD loaded contains both CD audio tracks and WMA MP3 files the part currently selected will play Playing music from the Jukebox You can select albums or individual tracks from the Jukebox to play 1 Selec...

Страница 98: ...bum1 The Planets Mars Venus Mercury Jup iter Saturn Uranus Nep classical Total 12 70 MB 10Albums Jukebox 0 G n Genres Play Erase Edit Play Mode Genre Name 3 10 0 03 58 4 Album2 5 Album3 6 Album4 7 Album5 8 Album6 9 Album7 10 Album8 3 Album1 ALL 1 2 3 4 5 6 7 t order re All Genres number By number By favourite Cancel By album HDD By number Album1 The Planets Mars Venus Mercury Jup iter Saturn Uranu...

Страница 99: ...tected CDs may not copy ccessfully 3 Select DVD CD to HDD On pressing ENTER all tracks or files on the CD or all WMA MP3 files on the DVD are copied to the HDD You can also start copying by starting playback of the CD DVD and then pressing ONE TOUCH COPY To cancel copying press ENTER If the CD loaded contains both CD audio tracks and WMA MP3 files the part currently selected will play Playing musi...

Страница 100: ...bum1 The Planets Mars Venus Mercury Jup iter Saturn Uranus Nep classical Total 12 70 MB 10Albums Jukebox 0 G n Genres Play Erase Edit Play Mode Genre Name 3 10 0 03 58 4 Album2 5 Album3 6 Album4 7 Album5 8 Album6 9 Album7 10 Album8 3 Album1 ALL 1 2 3 4 5 6 7 t order re All Genres number By number By favourite Cancel By album HDD By number Album1 The Planets Mars Venus Mercury Jup iter Saturn Uranu...

Страница 101: ...New Folder Folder Options Copy to DVD Multi Mode NTER HDD Folder 002 Folder2 Files 999 Folder 999 MB 100 0 G Remain 1 3 PhotoViewer HDD 002 Folder2 003 Folder3 004 Folder4 005 Folder5 006 Folder6 007 Folder7 008 Folder8 001 Folder1 Select Folder FOLDER MENU Multi Mode ENTER WV_EN book 103 ページ 2006年12月28日 木曜日 午後4時21分 En 12 2 Display the command menu 3 Select File Options or Folder Options 4 Select ...

Страница 102: ...f shaped discs is not recommended for this product Pioneer disclaims all liability arising in connection with the use of shaped discs Cleaning the pickup lens The HDD DVD recorder s lens should not become dirty in normal use but if for some reason it should malfunction due to dust or dirt consult your nearest Pioneer authorized service center Although lens cleaners are commercially available we do...

Страница 103: ... New Folder Folder Options Copy to DVD Multi Mode NTER HDD Folder 002 Folder2 Files 999 Folder 999 MB 100 0 G Remain 1 3 PhotoViewer HDD 002 Folder2 003 Folder3 004 Folder4 005 Folder5 006 Folder6 007 Folder7 008 Folder8 001 Folder1 Select Folder FOLDER MENU Multi Mode ENTER WV_EN book 103 ページ 2006年12月28日 木曜日 午後4時21分 En 12 2 Display the command menu 3 Select File Options or Folder Options 4 Select...

Страница 104: ...f shaped discs is not recommended for this product Pioneer disclaims all liability arising in connection with the use of shaped discs Cleaning the pickup lens The HDD DVD recorder s lens should not become dirty in normal use but if for some reason it should malfunction due to dust or dirt consult your nearest Pioneer authorized service center Although lens cleaners are commercially available we do...

Страница 105: ...New Folder Folder Options Copy to DVD Multi Mode NTER HDD Folder 002 Folder2 Files 999 Folder 999 MB 100 0 G Remain 1 3 PhotoViewer HDD 002 Folder2 003 Folder3 004 Folder4 005 Folder5 006 Folder6 007 Folder7 008 Folder8 001 Folder1 Select Folder FOLDER MENU Multi Mode ENTER WV_EN book 103 ページ 2006年12月28日 木曜日 午後4時21分 En 12 2 Display the command menu 3 Select File Options or Folder Options 4 Select ...

Страница 106: ...f shaped discs is not recommended for this product Pioneer disclaims all liability arising in connection with the use of shaped discs Cleaning the pickup lens The HDD DVD recorder s lens should not become dirty in normal use but if for some reason it should malfunction due to dust or dirt consult your nearest Pioneer authorized service center Although lens cleaners are commercially available we do...

Страница 107: ... DVD RW DVD RAM ENU NTER lize ze mize HDD Disc Setup Input Disc Name Lock Disc DVD RW Auto Init Input Disc Name Next Screen Input Disc Name DVD VR DVD RAM HOME MENU ENTER Basic Initialize Finalize Optimize HDD Disc Setup Input Disc Name Lock Disc DVD RW Auto Init Basic On Off Lock Disc DVD RW WV_EN book 107 ページ 2006年12月28日 木曜日 午後4時21分 En 13 1 Select Disc Setup from the Home Menu 2 Select Optimize ...

Страница 108: ...f shaped discs is not recommended for this product Pioneer disclaims all liability arising in connection with the use of shaped discs Cleaning the pickup lens The HDD DVD recorder s lens should not become dirty in normal use but if for some reason it should malfunction due to dust or dirt consult your nearest Pioneer authorized service center Although lens cleaners are commercially available we do...

Страница 109: ... DVD RW DVD RAM ENU NTER lize ze mize HDD Disc Setup Input Disc Name Lock Disc DVD RW Auto Init Input Disc Name Next Screen Input Disc Name DVD VR DVD RAM HOME MENU ENTER Basic Initialize Finalize Optimize HDD Disc Setup Input Disc Name Lock Disc DVD RW Auto Init Basic On Off Lock Disc DVD RW WV_EN book 107 ページ 2006年12月28日 木曜日 午後4時21分 En 13 1 Select Disc Setup from the Home Menu 2 Select Optimize ...

Страница 110: ...f shaped discs is not recommended for this product Pioneer disclaims all liability arising in connection with the use of shaped discs Cleaning the pickup lens The HDD DVD recorder s lens should not become dirty in normal use but if for some reason it should malfunction due to dust or dirt consult your nearest Pioneer authorized service center Although lens cleaners are commercially available we do...

Страница 111: ...djust different settings press ENTER after selecting the setting you want to adjust Setting the picture quality for disc playback This setting determines how the picture will look when playing discs Choosing a preset 1 With a disc playing or paused press to display the Home Menu 2 Select Video Adjust 3 Select a setting There are six presets available TV suitable for LCD and cathode ray tube TVs PD...

Страница 112: ...r discs only Use of shaped discs is not recommended for this product Pioneer disclaims all liability arising in connection with the use of shaped discs Cleaning the pickup lens The HDD DVD recorder s lens should not become dirty in normal use but if for some reason it should malfunction due to dust or dirt consult your nearest Pioneer authorized service center Although lens cleaners are commercial...

Страница 113: ...EPG data is not passed through et to Pass Through make sure to set Power Save page 113 to Off VOD Registration Code Use to display the recorder s DivX registration code See DivX video compatibility on page 10 and DivX VOD content on page 11 eview only Quick Preview When in the Disc Navigator the thumbnail video plays short excerpts from throughout the selected title Note that edited titles that wi...

Страница 114: ...r discs only Use of shaped discs is not recommended for this product Pioneer disclaims all liability arising in connection with the use of shaped discs Cleaning the pickup lens The HDD DVD recorder s lens should not become dirty in normal use but if for some reason it should malfunction due to dust or dirt consult your nearest Pioneer authorized service center Although lens cleaners are commercial...

Страница 115: ...EPG data is not passed through et to Pass Through make sure to set Power Save page 113 to Off VOD Registration Code Use to display the recorder s DivX registration code See DivX video compatibility on page 10 and DivX VOD content on page 11 eview only Quick Preview When in the Disc Navigator the thumbnail video plays short excerpts from throughout the selected title Note that edited titles that wi...

Страница 116: ...f shaped discs is not recommended for this product Pioneer disclaims all liability arising in connection with the use of shaped discs Cleaning the pickup lens The HDD DVD recorder s lens should not become dirty in normal use but if for some reason it should malfunction due to dust or dirt consult your nearest Pioneer authorized service center Although lens cleaners are commercially available we do...

Страница 117: ...EPG data is not passed through et to Pass Through make sure to set Power Save page 113 to Off VOD Registration Code Use to display the recorder s DivX registration code See DivX video compatibility on page 10 and DivX VOD content on page 11 eview only Quick Preview When in the Disc Navigator the thumbnail video plays short excerpts from throughout the selected title Note that edited titles that wi...

Страница 118: ...f shaped discs is not recommended for this product Pioneer disclaims all liability arising in connection with the use of shaped discs Cleaning the pickup lens The HDD DVD recorder s lens should not become dirty in normal use but if for some reason it should malfunction due to dust or dirt consult your nearest Pioneer authorized service center Although lens cleaners are commercially available we do...

Страница 119: ...EPG data is not passed through et to Pass Through make sure to set Power Save page 113 to Off VOD Registration Code Use to display the recorder s DivX registration code See DivX video compatibility on page 10 and DivX VOD content on page 11 eview only Quick Preview When in the Disc Navigator the thumbnail video plays short excerpts from throughout the selected title Note that edited titles that wi...

Страница 120: ...f shaped discs is not recommended for this product Pioneer disclaims all liability arising in connection with the use of shaped discs Cleaning the pickup lens The HDD DVD recorder s lens should not become dirty in normal use but if for some reason it should malfunction due to dust or dirt consult your nearest Pioneer authorized service center Although lens cleaners are commercially available we do...

Страница 121: ...EPG data is not passed through et to Pass Through make sure to set Power Save page 113 to Off VOD Registration Code Use to display the recorder s DivX registration code See DivX video compatibility on page 10 and DivX VOD content on page 11 eview only Quick Preview When in the Disc Navigator the thumbnail video plays short excerpts from throughout the selected title Note that edited titles that wi...

Страница 122: ...f shaped discs is not recommended for this product Pioneer disclaims all liability arising in connection with the use of shaped discs Cleaning the pickup lens The HDD DVD recorder s lens should not become dirty in normal use but if for some reason it should malfunction due to dust or dirt consult your nearest Pioneer authorized service center Although lens cleaners are commercially available we do...

Страница 123: ...EPG data is not passed through et to Pass Through make sure to set Power Save page 113 to Off VOD Registration Code Use to display the recorder s DivX registration code See DivX video compatibility on page 10 and DivX VOD content on page 11 eview only Quick Preview When in the Disc Navigator the thumbnail video plays short excerpts from throughout the selected title Note that edited titles that wi...

Страница 124: ...f shaped discs is not recommended for this product Pioneer disclaims all liability arising in connection with the use of shaped discs Cleaning the pickup lens The HDD DVD recorder s lens should not become dirty in normal use but if for some reason it should malfunction due to dust or dirt consult your nearest Pioneer authorized service center Although lens cleaners are commercially available we do...

Страница 125: ...the recorder s DivX registration code See DivX video compatibility on page 10 and DivX VOD content on page 11 eview only Quick Preview When in the Disc Navigator the thumbnail video plays short excerpts from throughout the selected title Note that edited titles that will play normally from the beginning Normal The thumbnail video plays from the beginning of the title ns 2 Live TV TV s Tuner Allows...

Страница 126: ...f shaped discs is not recommended for this product Pioneer disclaims all liability arising in connection with the use of shaped discs Cleaning the pickup lens The HDD DVD recorder s lens should not become dirty in normal use but if for some reason it should malfunction due to dust or dirt consult your nearest Pioneer authorized service center Although lens cleaners are commercially available we do...

Страница 127: ...der is on 2 Using the front panel controls press and hold STOP and press STANDBY ON The recorder turns off with all settings reset WV_EN book 139 ページ 2006年12月28日 木曜日 午後4時21分 En 16 Input Output VHF UHF antenna input output terminal VHF UHF set 75 IEC connector Video input AV2 Input 1 Input 2 front Input 3 rear Input level 1 Vp p 75 Jacks AV connector Input 1 RCA jack Input 2 Input 3 Video output AV...

Страница 128: ...f shaped discs is not recommended for this product Pioneer disclaims all liability arising in connection with the use of shaped discs Cleaning the pickup lens The HDD DVD recorder s lens should not become dirty in normal use but if for some reason it should malfunction due to dust or dirt consult your nearest Pioneer authorized service center Although lens cleaners are commercially available we do...

Страница 129: ...tting the recorder If you need to you can reset the recorder to all its factory settings 1 Make sure that the recorder is on 2 Using the front panel controls press and hold STOP and press STANDBY ON The recorder turns off with all settings reset WV_EN book 139 ページ 2006年12月28日 木曜日 午後4時21分 En 16 Input Output VHF UHF antenna input output terminal VHF UHF set 75 IEC connector Video input AV2 Input 1 I...

Страница 130: ...f shaped discs is not recommended for this product Pioneer disclaims all liability arising in connection with the use of shaped discs Cleaning the pickup lens The HDD DVD recorder s lens should not become dirty in normal use but if for some reason it should malfunction due to dust or dirt consult your nearest Pioneer authorized service center Although lens cleaners are commercially available we do...

Страница 131: ...tting the recorder If you need to you can reset the recorder to all its factory settings 1 Make sure that the recorder is on 2 Using the front panel controls press and hold STOP and press STANDBY ON The recorder turns off with all settings reset WV_EN book 139 ページ 2006年12月28日 木曜日 午後4時21分 En 16 Input Output VHF UHF antenna input output terminal VHF UHF set 75 IEC connector Video input AV2 Input 1 I...

Страница 132: ...izing recordable DVD discs on page 61 7 After the recorder has finished recording the backup disc you can select whether to make another backup of the same data or exit Select Start to make another backup copy or Cancel to finish If you want to make another backup copy return to step 6 above 8 If you donÕt need to keep the backup data on the HDD you can delete it now Select Yes to delete the data ...

Страница 133: ...tting the recorder If you need to you can reset the recorder to all its factory settings 1 Make sure that the recorder is on 2 Using the front panel controls press and hold STOP and press STANDBY ON The recorder turns off with all settings reset WV_EN book 139 ページ 2006年12月28日 木曜日 午後4時21分 En 16 Input Output VHF UHF antenna input output terminal VHF UHF set 75 IEC connector Video input AV2 Input 1 I...

Страница 134: ...r discs only Use of shaped discs is not recommended for this product Pioneer disclaims all liability arising in connection with the use of shaped discs Cleaning the pickup lens The HDD DVD recorder s lens should not become dirty in normal use but if for some reason it should malfunction due to dust or dirt consult your nearest Pioneer authorized service center Although lens cleaners are commercial...

Страница 135: ...tting the recorder If you need to you can reset the recorder to all its factory settings 1 Make sure that the recorder is on 2 Using the front panel controls press and hold STOP and press STANDBY ON The recorder turns off with all settings reset WV_EN book 139 ページ 2006年12月28日 木曜日 午後4時21分 En 16 Input Output VHF UHF antenna input output terminal VHF UHF set 75 IEC connector Video input AV2 Input 1 I...

Страница 136: ...r discs only Use of shaped discs is not recommended for this product Pioneer disclaims all liability arising in connection with the use of shaped discs Cleaning the pickup lens The HDD DVD recorder s lens should not become dirty in normal use but if for some reason it should malfunction due to dust or dirt consult your nearest Pioneer authorized service center Although lens cleaners are commercial...

Страница 137: ...tting the recorder If you need to you can reset the recorder to all its factory settings 1 Make sure that the recorder is on 2 Using the front panel controls press and hold STOP and press STANDBY ON The recorder turns off with all settings reset WV_EN book 139 ページ 2006年12月28日 木曜日 午後4時21分 En 16 Input Output VHF UHF antenna input output terminal VHF UHF set 75 IEC connector Video input AV2 Input 1 I...

Страница 138: ...this product Pioneer disclaims all liability arising in connection with the use of shaped discs Cleaning the pickup lens The HDD DVD recorder s lens should not become dirty in normal use but if for some reason it should malfunction due to dust or dirt consult your nearest Pioneer authorized service center Although lens cleaners are commercially available we do not recommend using them since some m...

Страница 139: ...tting the recorder If you need to you can reset the recorder to all its factory settings 1 Make sure that the recorder is on 2 Using the front panel controls press and hold STOP and press STANDBY ON The recorder turns off with all settings reset WV_EN book 139 ページ 2006年12月28日 木曜日 午後4時21分 En 16 Input Output VHF UHF antenna input output terminal VHF UHF set 75 IEC connector Video input AV2 Input 1 I...

Страница 140: ...f shaped discs is not recommended for this product Pioneer disclaims all liability arising in connection with the use of shaped discs Cleaning the pickup lens The HDD DVD recorder s lens should not become dirty in normal use but if for some reason it should malfunction due to dust or dirt consult your nearest Pioneer authorized service center Although lens cleaners are commercially available we do...

Страница 141: ...Using the front panel controls press and hold STOP and press STANDBY ON The recorder turns off with all settings reset WV_EN book 139 ページ 2006年12月28日 木曜日 午後4時21分 En 16 Input Output VHF UHF antenna input output terminal VHF UHF set 75 Ω IEC connector Video input AV2 Input 1 Input 2 front Input 3 rear Input level 1 Vp p 75 Ω Jacks AV connector Input 1 RCA jack Input 2 Input 3 Video output AV1 Output...

Страница 142: ...F CANADA INC 300 Allstate Parkway Markham Ontario L3R 0P2 Canada TEL 1 877 283 5901 905 479 4411 PIONEER EUROPE NV Haven 1087 Keetberglaan 1 B 9120 Melsele Belgium TEL 03 570 05 11 PIONEER ELECTRONICS ASIACENTRE PTE LTD 253 Alexandra Road 04 01 Singapore 159936 TEL 65 6472 7555 PIONEER ELECTRONICS AUSTRALIA PTY LTD 178 184 Boundary Road Braeside Victoria 3195 Australia TEL 03 9586 6300 PIONEER ELE...

Отзывы: