


FASTCAM-APX RS Hardware Manual
-100-
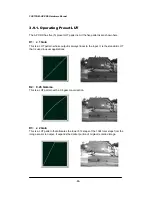
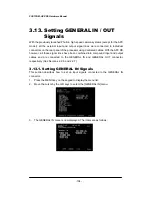
Camera Setup
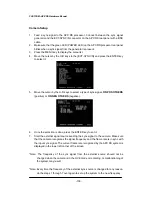
1. Feed a sync signal to the APX RS processor. Connect between the sync signal
generator and the EXT-SYNC IN connector on the APX RS rear panel with a BNC
cable.
2. Make sure that the green LED (POWER LED) on the APX RS processor rear panel
blinks when a sync signal from the generator is present.
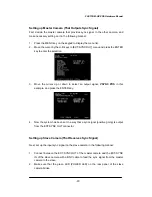
3. Press the MENU key to display the menu list.
4. Move the cursor by the U-D keys to the [EXT-SYNC IN] and press the ENTER key
to select it.
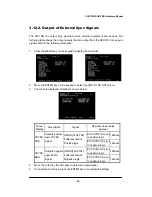
5. Move the cursor by the U-D keys to select a type of sync signal,
ON POS OTHERS
(positive) or
ON NEG OTHERS
(negative)
.
6. Once the selection is done, press the ENTER key to set it.
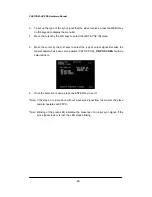
7. Start the external signal source sending the sync signal to the camera. Make sure
that the camera recognizes the signal frequency and the frame rate is in sync with
the input sync signal. The current frame rate recognized by the APX RS system is
displayed in the lower left corner of the screen.
*Note: The frequency of the sync signal from the external source should not be
changed when the camera is in the LIVE mode or recording, or malfunctioning of
the system may result.
*Note: Every time the frequency of the external sync source is changed for any reason,
do the steps 1 through 7 over again to set up the system to the new frequency.
Содержание FASTCAM-APX RS
Страница 1: ...FASTCAM APX RS Hardware Manual Rev 1 05 PHOTRON LIMITED MAR 2006...
Страница 2: ......
Страница 8: ...FASTCAM APX RS Hardware Manual 6 Memo...
Страница 16: ...FASTCAM APX RS Hardware Manual 14 Memo...
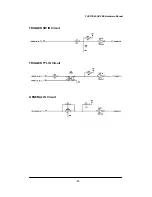
Страница 93: ...FASTCAM APX RS Hardware Manual 91 TRIGGER SW IN Circuit TRIGGER TTL IN Circuit GENERAL IN Circuit...