18
5
DÉSA SYSTEM SETUP OPTIONS
5.1
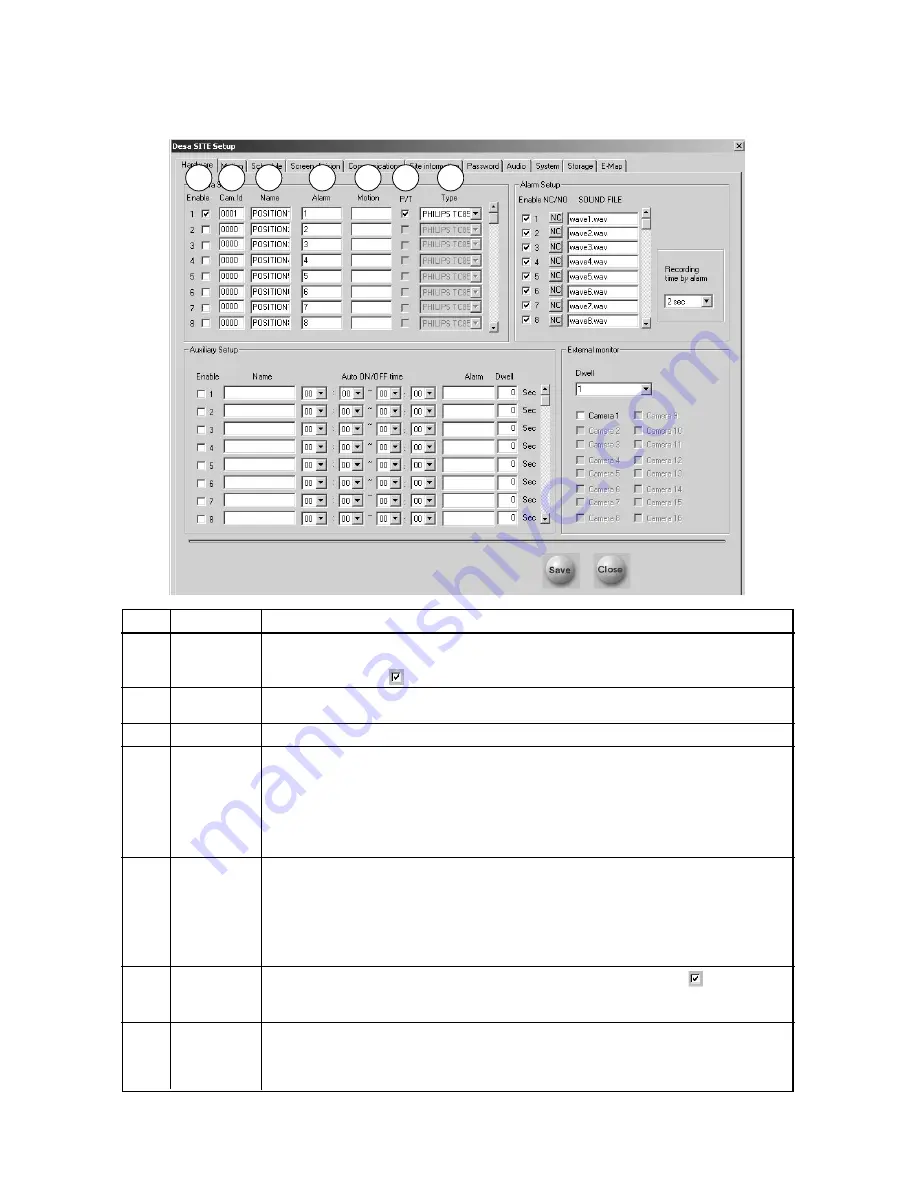
Hardware Setup
5.1.1
Camera Setup
Ref
Name
Description
1
Enable
Camera inputs connected before initial start up must be configured, then enabled by a check
mark in the Enable box.To add a camera after initial startup, click on the empty
Enable box to put a
next to the camera input.
2
Camera ID
Field is for entry of any 4-digit number as a logical camera number (used with Matrix Switch).
Default is 0001–0016.
3
Name
Field for entering a custom camera name, up to 14 characters in length.
4
Alarm
DÉSA has the capability to attach up to 16 external alarm inputs. If the external alarm input
is activated, recording starts for the associated camera input(s). Use the
Alarm
field to
associate Alarm inputs to Camera inputs. Multiple Alarm inputs can be associated with the
Camera input by separating the alarm numbers with a comma.
Example:
To store an image from camera 1 while external alarms 2 and 3 are activated,
enter
2,3
in the
Alarm
field for camera input 1.
5
Motion
When video motion is detected in a camera input (scene), the DÉSA can record additional
camera input(s) associated with the detected motion camera. Use the
Motion
field to enter
the camera number(s) to be associated to the camera that detects motion.When motion is
detected, these associated camera inputs will simultaneously be recorded.
Example:
When camera 1 detects motion, you also want cameras 2 and 3 to record. In the
Motion
field, enter
2,3
.
6
P/T
If the camera input is a Pan/Tilt Zoom, place a check in the corresponding
.When a
camera is selected as Pan/Tilt,
PAN/TILT
is displayed at the top of the camera’s video in
green text.
7
Type
Other manufacturers’ Receiver/Driver and Dome-type cameras are supported by the DÉSA
system. From the drop down box, select the model identical to the one connected to the
DÉSA system.
PHILIPS TC8540
is the default.
1
2
3
4
5
6
7
Содержание Desa DR16124
Страница 1: ...Digital Video Recorders Philips Communication Security Imaging Installation Instructions Eng ...
Страница 2: ...2 ...
Страница 10: ...10 ...
Страница 63: ...63 3 File Copy Status Screen 4 Setup Finish Screen When the install process is complete click Finish ...
Страница 84: ...84 For details on Audio Setup see Part A of this manual Section 6 TIP Check Mute to record but not hear Audio ...
Страница 87: ...87 ...


