39
10
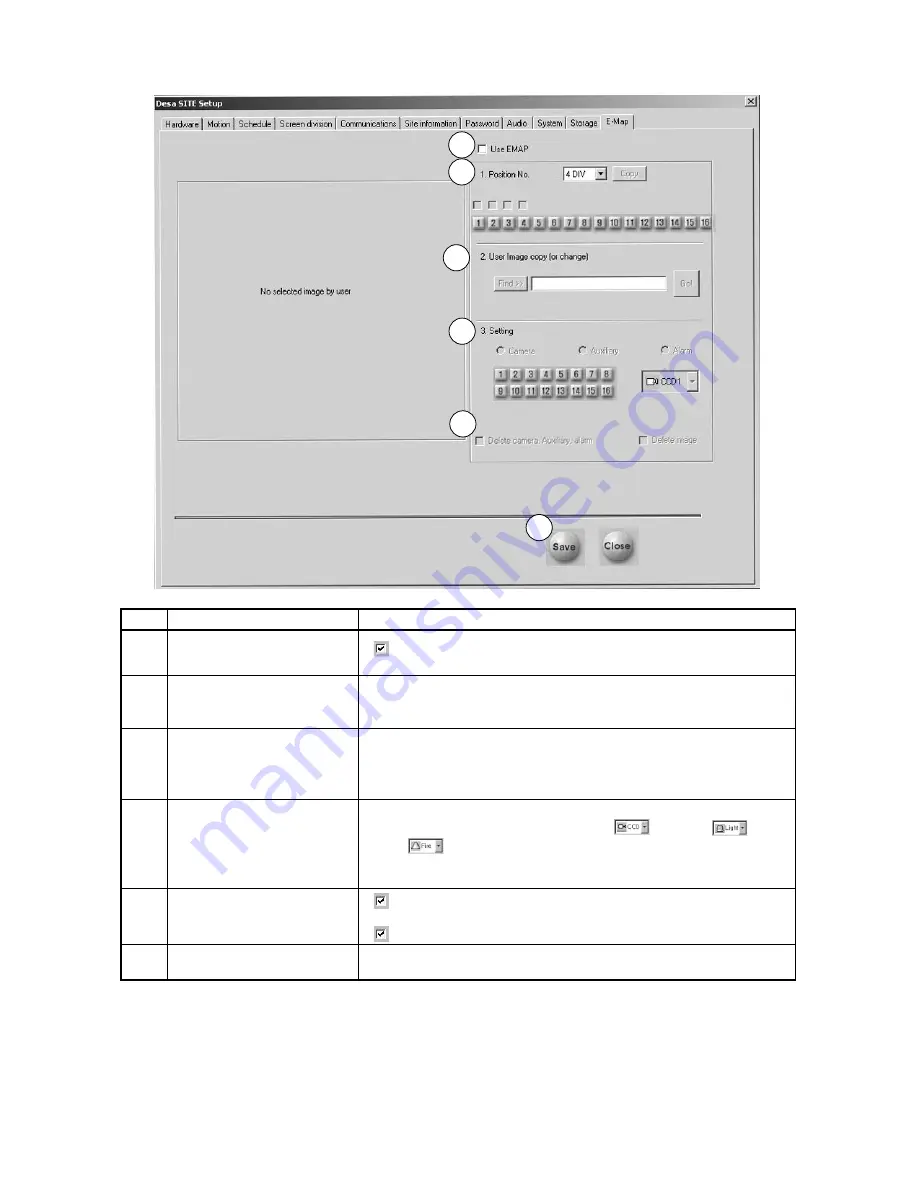
E-MAP SETUP
Ref
Name
Description
1
Use E-Map
Activates
Use E-Map
, an actual graphical representation of the security
site, for control of the site map, including cameras, auxiliaries, and alarms.
2
Position No.
Allows selection of the split screen location for display of the E-Map image.
The E-Map can be located in any cameo of the 4, 6, 9, 10, 13, and 16 split
screen displays.
3
User Image copy (or change)
DÉSA provides an E-Map.bmp picture file. Camera, auxiliary, and alarms are
set up to change the actual plan of the E-Map image.To switch the display to
a new image, click
Find
.When the selected filename appears in the text
box, click
Go
.
4
Setting
Camera/Auxiliary/Alarm positions camera, auxiliary, and alarm icons on the
E-Map. Select the appropriate icon (camera
, auxiliary
, or
alarm
).The icon pull down list changes accordingly; the icon of the
camera would be
CCD
,
Pinhole
,
AutoDome
®
,
etc
. Click the mouse on the
E-Map image where the icon should be placed.
5
Delete
Activate
Delete camera
,
Auxiliary
,
Alarm
to effect only the
selected
Camera
,
Auxiliary
, or
Alarm
, in the order selected.
Activate
Delete image
to delete the current E-Map background image.
6
Save
Click
Save
to save the configuration information for camera, auxiliary, and
alarm. Click
Close
to exit.
1
2
3
4
5
6
Содержание Desa DR16124
Страница 1: ...Digital Video Recorders Philips Communication Security Imaging Installation Instructions Eng ...
Страница 2: ...2 ...
Страница 10: ...10 ...
Страница 63: ...63 3 File Copy Status Screen 4 Setup Finish Screen When the install process is complete click Finish ...
Страница 84: ...84 For details on Audio Setup see Part A of this manual Section 6 TIP Check Mute to record but not hear Audio ...
Страница 87: ...87 ...


