background image


18  

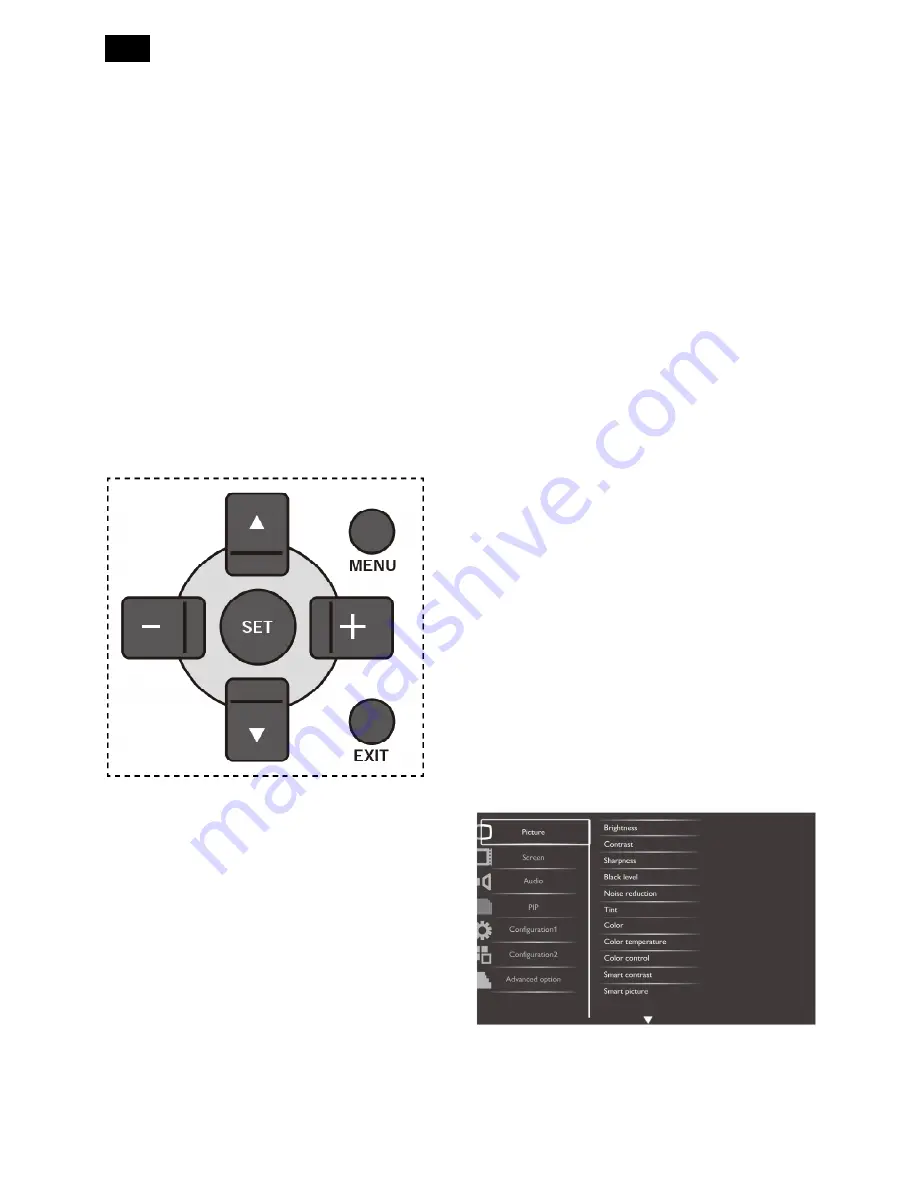
13. [BRIGHTNESS]  Button 

Press to toggle Brightness Menu. Press the [+] or [-] 

button to adjust the value. Press [MENU] button to 

confirm and exit. 

14. [

] Button 

 Press to move the selection up in OSD menu. 

 Press to move the sub picture up in PIP mode. 

15. [MENU]  Button 

Press to turn the OSD menu on/off 

16. [+]  Button 

 Press to move the selection right in OSD menu. 

 Press to increase the value in OSD menu. 

 Press to move the sub picture right in PIP mode 

17. [EXIT]  Button 

Press to turn back to the previous OSD menu. 

18. [

] Button 

 Press to move the selection down in OSD menu. 

 Press to move the sub picture down in PIP mode. 

19. [VOL UP] Button 

Press to increase the audio output level. 

20. [VOL DOWN] Button 

Press to decrease the audio output level

3.4 OSD Men

3.4.1 Navigating the OSD Menu   

Using the remote control 


1.  Press [MENU] button on the remote control to 

display the OSD menu. 

2. Press [

] or [

] button to choose the item you 

want to adjust. 

3.  Press [SET] or [+] button to enter the submenu. 

4.  In the submenu, press [

] or [

] button to toggle 

among items, press [+] or [-] button to adjust 

settings. If there is a submenu, press [SET] or [+] 

button to enter the submenu. 

5.  Press [EXIT] button to return to the previous menu, 

or press [MENU] button to exit the OSD menu 

Using the display’s control button 

1.  Press [MENU] button to display the OSD menu. 

2.  Press [+] or [-] button to choose the item you want 

to adjust. 

3.  Press [SOURCE] or [+] button to enter the 

submenu. 

4.  In the submenu, press [

] or [

] button to toggle 

among items, press [+] or [-] button to adjust 

settings. If there is a submenu, press [SOURCE] or 

[+] button to enter the submenu. 

5.  Press [MENU] button to return to the previous 

menu, or press [MENU] button several time to exit 

the OSD menu. 


3.4.2 OSD Menu Overview 
Picture Menu 


Brightness


Adjust the overall image brightness by changing the 

intensity of the LCD panel’s backlight. 

Содержание BDL4245E/00

Страница 1: ...onnector 28 4 2 Factory Preset Display Modes 30 4 3 Pixel Defect Policy 21 4 4 Failure Mode of Panel 34 5 Block Diagram 35 5 1 Scaler Board 35 5 2 Power Board 36 6 Schematic Diagram 37 6 1 Scaler Board 37 6 2 Power Board 53 6 3 Connection Board 61 6 4 IR Board 63 6 5 Key Board 64 6 6 CNPC Board 64 7 PCB Layout 65 7 1 Scaler Board 65 7 2 Power Board 66 7 3 Connection Board 70 7 4 IR Board 71 7 5 Ke...

Страница 2: ...2 Revision List Version Release Date Revision History A00 Nov 11 2011 Initial release Draft Version A01 Nov 23 2011 Add CTN models BDL3245E 00 and BDL4645E 00 ...

Страница 3: ... modifications to this equipment may void the user s authority to operate it CAUTION To prevent electric shock match the wide blade of plug to the wide slot and fully insert the plug IMPORTANT One Federal Court has held that unauthorized recording of copyrighted TV programs is an infringement of U S copyright laws Certain Canadian programs may also be copyrighted and any unauthorized recording in ...

Страница 4: ...n CE Declaration of Conformity MMD declare under our responsibility that the product is in conformity with the following standards EN60950 1 2001 Safety requirement of Information Technology Equipment EN55022 2006 Radio Disturbance requirement of Information Technology Equipment EN55024 1998 A 2001 A2 2003 Immunity requirement of Information Technology Equipment EN61000 3 2 2006 Limits for Harmoni...

Страница 5: ...e n plug fitted in contains a fu he fuse at the d a possible s a plug mains lead a AL N L OW EART AND YELLO s marked with GREEN YE ire must be c colored BLAC N wire must b colored RED the plug cov lead not si when conne o not expose EMENTS OF Operation is d including in must be earth th an approv ollows fuse d be a BS 13 e for your so n its place use this sho e distribution shock hazard are colore...

Страница 6: ...tention users in European Union private households This marking on the product or on its packaging illustrates that under European Directive 2002 96 EG governing used electrical and electronic appliances this product may not be disposed of with normal household waste You are responsible for disposal of this equipment through a designated waste electrical and electronic equipment collection To dete...

Страница 7: ...ck x 2 9 pin TXD RXD 1 1 RJ 45 RJ 45 Jack x 1 8 pin 10 100 LAN Port HDMI Input HDMI Jack x 1 Type A 18 pin Digital RGB TMDS Video Audio MAX Video 720p 1080p 1920 x 1080 60 Hz WUXGA Audio 48 KHz 2 Channel L R Supports LPCM only DVI D Input DVI D jack Digital RGB TMDS Video VGA Input D Sub Jack x 1 15 pin Analog RGB 0 7V p p 75Ω H CS V TTL 2 2kΩ SOG 1V p p 75Ω MAX 720p 1080p 1920 x 1080 60 Hz WUXGA ...

Страница 8: ... 14 Kg Weight Without Stand 12 8 Kg Gross Weight 17 Kg Environmental Condition Item Specifications Temperature Operational 0 40 C Storage 20 60 C Humidity Operational 20 80 RH No condensation Storage 5 95 RH No condensation Altitude Operational 0 3 000 m Storage Shipment 0 9 000 m Internal Speaker Item Specifications Type 1 Way 1 Speaker Input 10 W RMS Impedance 8Ω Output Sound Pressure 82 dB W M ...

Страница 9: ...TXD RXD 1 1 RJ 45 RJ 45 Jack x 1 8 pin 10 100 LAN Port HDMI Input HDMI Jack x 1 Type A 18 pin Digital RGB TMDS Video Audio MAX Video 720p 1080p 1920 x 1080 60 Hz WUXGA Audio 48 KHz 2 Channel L R Supports LPCM only DVI D Input DVI D jack Digital RGB TMDS Video VGA Input D Sub Jack x 1 15 pin Analog RGB 0 7V p p 75Ω H CS V TTL 2 2kΩ SOG 1V p p 75Ω MAX 720p 1080p 1920 x 1080 60 Hz WUXGA VGA Output D ...

Страница 10: ...t With Stand 23 6 Kg Weight Without Stand 22 Kg Gross Weight 27 5 Kg Environmental Condition Item Specifications Temperature Operational 0 40 C Storage 20 60 C Humidity Operational 20 80 RH No condensation Storage 5 95 RH No condensation Altitude Operational 0 3 000 m Internal Speaker Item Specifications Type 1 Way 1 Speaker Input 10 W RMS Impedance 8Ω Output Sound Pressure 82 dB W M Frequency Res...

Страница 11: ... TXD RXD 1 1 RJ 45 RJ 45 Jack x 1 8 pin 10 100 LAN Port HDMI Input HDMI Jack x 1 Type A 18 pin Digital RGB TMDS Video Audio MAX Video 720p 1080p 1920 x 1080 60 Hz WUXGA Audio 48 KHz 2 Channel L R Supports LPCM only DVI D Input DVI D jack Digital RGB TMDS Video VGA Input D Sub Jack x 1 15 pin Analog RGB 0 7V p p 75Ω H CS V TTL 2 2kΩ SOG 1V p p 75Ω MAX 720p 1080p 1920 x 1080 60 Hz WUXGA VGA Output D...

Страница 12: ...ght With Stand 26 3 Kg Weight Without Stand 24 6 Kg Gross Weight 31 Kg Environmental Condition Item Specifications Temperature Operational 0 40 C Storage 20 60 C Humidity Operational 20 80 RH No condensation Storage 5 95 RH No condensation Altitude Operational 0 3 000 m Internal Speaker Item Specifications Type 1 Way 1 Speaker Input 10 W RMS Impedance 8Ω Output Sound Pressure 82 dB W M Frequency R...

Страница 13: ...control logic brightness control logic and DDC The power board will provide AC to DC Inverter voltage to drive the backlight of panel and the scaler board chips each voltage Flat Wide Monitor Block Diagram AC IN 90V 264V Power Board Flat Panel and CCFL backlight Scaler Board RS232 Connector For white balance adjustment in factory mode CCFL Drive Key Board HOST Computer IR Board CNPC Boards ...

Страница 14: ...ic brightness control logic and DDC The power board will provide AC to DC Inverter voltage to drive the backlight of panel and the scaler board chips each voltage Flat Wide Monitor Block Diagram AC IN 90V 264V Power Board Flat Panel and CCFL backlight Scaler Board RS232 Connector For white balance adjustment in factory mode CCFL Drive Key Board HOST Computer IR Board CNPC Board Connection Board ...

Страница 15: ...to adjustment the selected item while OSD menu is on 8 MENU Button Return to previous menu while OSD menu is on or to activate the OSD menu when the OSD menu is off Note Keyboard Control Lock Mode This function completely disables the access to all Keyboard Control functions To enable or disable the keyboard control lock press both and buttons and hold down continuously for more than 3 seconds 9 R...

Страница 16: ...g a DVI HDMI cable 8 VGA IN D SUB Connect the computer VGA output 9 COMPONENT IN BNC Connect the component YPbPr output from external AV device 10 AUDIO IN 1 2 3 Connect audio input from external AV device AUDIO IN 1 3 5mm stereo phone jack AUDIO IN 2 3 RCA phone jack 11 VIDEIO IN OUT S VIDEO IN Mini DIN 4 pin Connect the S VIDEO Y C separate signal input VIDEO IN BNC Connect the composite video s...

Страница 17: ... display on the upper right corner of the screen 6 Button Press to move the selection left in OSD menu Press to decrease the value in OSD menu Press to move the sub picture left in PIP mode 7 SET Button Press to activate the setting inside the OSD menu 8 AUTO ADJUST Button Press to run the Auto Adjust function Note this button is functional for VGA input only 9 MUTE Button Press to turn the mute f...

Страница 18: ...NU button on the remote control to display the OSD menu 2 Press or button to choose the item you want to adjust 3 Press SET or button to enter the submenu 4 In the submenu press or button to toggle among items press or button to adjust settings If there is a submenu press SET or button to enter the submenu 5 Press EXIT button to return to the previous menu or press MENU button to exit the OSD menu...

Страница 19: ...e a reddish tint whilst a higher color temperature gives off a more bluish tint The options are 3000K 4000K 5000K 6500K 7500K 9300K 10000K Native User Color control With this function you can adjust the color tones of the image precisely by changing the R Red G Green and B Blue settings independently NOTE This item is functional only when Color temperature is set to User Smart contrast When turned...

Страница 20: ...stom Choose to apply the custom zoom settings in the Custom Zoom submenu Real This mode displays the image pixel by pixel on screen without scaling the original image size 21 9The picture is enlarged to 16 9 format This mode is recommended when displaying pictures that have black bands at the top and bottom letterbox format Custom zoom You can use this function to further customize the zoom settin...

Страница 21: ...to factory preset values PIP Menu PIP Select the PIP Picture in Picture mode The options are Off PIP POP PBP aspect PBP full PIP input Select the input signal for the sub picture PIP change Enlarges the smaller picture to become the main picture and vice versa O PIP function available X PIP function unavailable By pressing the PIP ON OFF button on the remote control you can change the mode in the ...

Страница 22: ...e cooling fan all the time Select Auto to turn on off the cooling fan according to the display s temperature NOTES The default Auto option will start running the cooling fan if the temperature of 65 C 152 F is reached and will keep running for 30 minutes after cooling down to the temperature of 62 C 144 F A temperature warning message will be shown on the screen once the temperature reaches 79 C 1...

Страница 23: ...hen press SET button to do the reset Configuration2 Menu OSD turn off Set the period of time the OSD menu stays on the screen The options are 5 120 seconds Information OSD Set the period of time the information OSD displayed on the upper right corner of the screen The information OSD will display when input signal is changed The information OSD will remain on the screen with Off selection The opti...

Страница 24: ...rogressive conversion function Progressive Enable the IP conversion function recommended Once enabled the interlace input signal will be converted to progressive format for better display quality Interlace Disable the IP function This mode is suitable for displaying motion pictures but it increases the chance of image retention Film mode Choose to turn on or off the film mode frame conversion func...

Страница 25: ...e comp Choose to turn the frame compensation function on or off If turned on the display will adjust the image to compensate for the width of the display bezels in order to accurately display the image Frame comp off Frame comp on Enable Choose to enable or disable the Tiling function If enabled the display will apply the settings in H monitors V monitors Position and Frame comp Switch on delay Se...

Страница 26: ...using this function 1 Press SET or button to enter the submenu 2 Press or button to select a schedule item item number 1 7 and then press button to mark it the item number 3 Press or button to select the schedule 1 Power on schedule Press or button to set the hour and minute for the display to turn on 2 Power off schedule Press or button to set the hour and minute for the display to turn off Selec...

Страница 27: ... connected DDC CI Choose to turn on or off the DDC CI communication function Select On for normal use Smart power Set the display to reduce the power consumption automatically The options are Off Medium High Auto signal detection Choose to let the display detect and display available signal sources automatically On Set the display to display the image automatically once a signal is connected Off O...

Страница 28: ...hield 4 N A 5 N A 6 DDC clock 7 DDC data 8 N A 9 TMDS Data1 10 TMDS Data1 11 TMDS Data1 3 Shield 12 N A 13 N A 14 5V 15 GND 16 Hot plug 17 TMDS Data0 18 TMDS Data0 19 TMDS Data0 5 Shield 20 N A 21 N A 22 TMDS clock shield 23 TMDS clock 24 TMDS clock 3 HDMI Input Pin No Name Pin No Name 1 TMDS Data2 2 TMDS Data2 Shield 3 TMDS Data2 4 TMDS Data1 5 TMDS Data1 Shield 6 TMDS Data1 7 TMDS Data0 8 TMDS D...

Страница 29: ...DTE to DCE Request To Send 5 8 DCE to DTE Clear To Send 6 6 DCE to DTE Data Set Ready 7 5 x Signal Ground 8 1 DCE to DTE Received Line Signal Detector Carrier Detect 20 4 DTE to DCE Data Terminal Ready 22 9 DCE to DTE Ring Indicator 5 RJ 45 Input Pin Signal Assignment Pin Signal Assignment 1 Transmit 2 Transmit 3 Receive 4 N A 5 N A 6 Receiver 7 N A 8 N A ...

Страница 30: ... 60 108 5 4 Super XGA WXGA 1360 768 60 85 5 16 9 Wide XGA WXGA 1366 768 60 85 5 16 9 Wide XGA UXGA 1600 1200 60 162 4 3 Ultra XGA HD1080 1920 1080 60 148 5 16 9 HD1080 SDTV Resolution Standard Resolution Active Resolution Refresh Rate Hz Pixel Rate MHz Aspect Ratio Stand for Mode H pixels V Lines 480i 720 480 29 97 13 5 4 3 Modified NTSC Standard 480p 59 94 27 576i 720 480 25 13 5 4 3 Modified PAL...

Страница 31: ...control However pixel or sub pixel defects on the PDP TFT panels used in Plasma LCD displays are sometimes unavoidable No manufacturer can guarantee that all panels will be free from pixel defects but Philips guarantees that any Plasma LCD displays with an unacceptable number of defects will be repaired during the warranty period in line with your local guarantee conditions This notice explains th...

Страница 32: ...els which can be dark or lit One dot one pixel consists of three sub pixel of Red Green and Blue Bright Dot Defects Bright dot defects appear as pixels or sub pixels that are always lit or on There are the examples of bright dot defects One lit red green or blue sub pixel Two adjacent lit sub pixels Red Blue Purple Red Green Yellow Green Blue Cyan Light Blue Three adjacent lit sub pixels one white...

Страница 33: ...gular pattern or area in which uneven screen uniformity appears under certain conditions Mura is a result of the deterioration of the liquid crystal alignment layer and is most commonly caused by long term operation under high ambient temperatures It is an industry wide phenomenon and Mura is not repairable It is also not covered by our warranty terms Mura has been around since the introduction of...

Страница 34: ...has bubbles Foreign material inside polarizer It shows liner or dot shape Concentric circle formed Bottom back light of LCD is brighter than normal Back light un uniformity Backlight has foreign material Black or white color liner or circular type Quick reference for failure mode of LCD panel this page presents problems that could be made by LCD panel It is not necessary to repair circuit board Si...

Страница 35: ...35 5 Block Diagram 5 1 Scaler Board ...

Страница 36: ...Converter A6069H Main Power SSC9512S PS_ON 24V To Backlight and audio amplifier 12V To LVDS 5V To MCU and Scaler Board Vcc EMI Filter PFC Converter ICE2PCS02H AC Input Bridge Rectifier D15XB80 AUX Converter A6069H Main Power L6599DTR PS_ON 24V To Backlight and audio amplifier 12V To LVDS 5V To MCU and Scaler Board Vcc ...

Страница 37: ..._RX1P R131 75R 1 10W 1 HIN_RX1M HIN_RX0P R130 75R 1 10W 1 VGA_VS VGA_HS HIN_RX0M HIN_RXCP R129 75R 1 10W 1 HIN_RXCM WP_EDID HIN_SCL HIN_SDA 1A 1 1Y 2 2A 3 2Y 4 3A 5 3Y 6 GND 7 4Y 8 4A 9 5Y 10 5A 11 6Y 12 6A 13 VCC 14 U104 74HC14D R125 NC 30Kohm 1 16W 5 A RED A GREEN C113 NC 5PF 50V HDMI_5V HDMI_HP 1 2 FB101 430 OHM R504 100R 1 16W 5 Q501 MMBT3904 HDMI_HTD0 R505 100K 1 16W 5 HDMI_DET 9 R503 1K 1 10...

Страница 38: ...1 TX0 32 TX0 33 TX0 5 SHLD 34 TX5 35 TX5 36 TXC SHLD 37 TXC 38 TXC 39 D1 1 D2 2 D3 3 D4 4 D5 5 D6 6 D7 7 D8 8 D9 9 D10 10 D11 11 D12 12 D13 13 D14 14 D15 15 SHELL2 41 SHELL3 42 SHELL4 43 CN502 DVI D SUB C6102 100N 16V 1 2 ZD106 RLZ5 6B R514 4K7 1 16W 5 1 2 ZD104 RLZ5 6B MSTR0_SCL 9 1 2 ZD103 RLZ5 6B 1 2 ZD105 RLZ5 6B DIN_HP_CTRL 4 DIN_RX2M DSUB_BLUE 2 7 RGB_OUT_VS 2 DIN_RX2P C163 100UF 16V C164 10...

Страница 39: ... 3 CLK _3 4 CLK _3 5 VCC 6 D0 _3 7 D0 _3 8 GND 9 D1 _3 10 D1 _3 11 VCC 12 D2 _3 13 D2 _3 14 GND 15 VSadj 16 D2 _SINK 17 D2 _SINK 18 VCC 19 D1 _SINK 20 D1 _SINK 21 GND 22 D0 _SINK 23 D0 _SINK 24 VCC 25 CLK _SINK 26 CLK _SINK 27 GND 28 SCL_SINK 29 SDA_SINK 30 HPD_SINK 31 S1 SCL 32 S2 SDA 33 I2C_SEL 34 HPD1 35 SDA1 36 SCL1 37 CLK _1 38 CLK _1 39 VCC 40 D0 _1 41 D0 _1 42 GND 43 D1 _1 44 D1 _1 45 VCC 4...

Страница 40: ... 0R05 1 16W 5V 2 3 6 9 10 15 5V C503 100N 16V 1 3 5 2 4 6 7 8 9 10 11 12 CN406 BNC C186 5PF 50V C185 5PF 50V C553 5PF 50V R760 1K 1 16W 5 C184 5PF 50V R765 270K 1 10W 5 R759 1K 1 16W 5 D128 LL4148 BNC_G_Y BNC_G_Y BNC_R_Pr 1 2 FB109 60 OHM 1 2 FB105 60 OHM 1 2 FB107 60 OHM FB197 300OHM YPbPr IN G Y C545 100N 16V I O1 1 GND 2 I O2 3 I O3 4 VDD 5 I O4 6 U119 AOZ8105CI 1OUT 1 1IN 2 1IN 3 GND 4 2IN 5 2...

Страница 41: ...rce 56G1133918 OPS_PWR_ON WP_EDID 2 3 OPS_AUD_L OPS_HDMI_CEC 1 2 3 4 5 6 7 8 9 10 11 12 13 14 15 16 17 18 19 20 21 22 23 24 25 26 27 28 29 30 60 59 58 57 56 55 54 53 52 51 50 49 48 47 46 45 44 43 42 41 40 39 38 37 36 35 34 33 32 31 61 62 CN104 CONN OPS_AUD_R Q512 MMBT3904 R4556 10K 1 16W 5 OPS_TX0P OPS_TX2M OPS_5V OPS_TX1M OPS_TX2P OPS_TXCKP OPS_TXCKM OPS_TX1P OPS_TX0M R4558 10K 1 16W 5 R4557 1K 1...

Страница 42: ...rs_VGA_SCL C190 100N 16V C451 68pF 50V TP2 C549 100N 16V R471 75R 1 10W 1 R472 75R 1 10W 1 C4250 470PF C551 1N50V R763 1K 1 16W 5 ACVBS_IN 1 2 ZD134 VPORT0603100KV05 DOWN IN C554 5PF 50V SV1P K2 A1P L5 B1P K3 C1P J1 AN1 J4 SV2P J2 A2P H2 B2P J3 C2P H1 BN1 K4 SV3P G2 A3P H4 B3P F1 C3P G3 CN1 K1 SV4P G4 A4P E1 B4P F3 C4P G5 SN H3 VOUT_1 M4 AHS N1 AVS N2 VGA_SCL N3 VGA_SDA N4 AN2 G1 BN2 F2 CN2 E2 VOU...

Страница 43: ...S C3 HDMI_VSS C5 HDMI_VSS C7 HDMI_VSS D4 HDMI_VSS D5 Mars HDMI Input Port U401D STDP8028 AB DPRX_3N B18 DPRX_3P A18 DPRX_2N B19 DPRX_2P A19 DPRX_1N B20 DPRX_1P A20 DPRX_0N B21 DPRX_0P A21 DPRX_AUXN B23 DPRX_AUXP A23 DPRXI_REXT A22 DPRX_VDD12 C18 DPRX_VSS C19 DPRX_VDD12 C20 DPRX_VDD12 C22 DPRX_VSS C21 DPRX_VSS B22 DPRX_VSS C23 Mars Display Port Input U401C STDP8028 AB 3 3V_HDMI 15 1 2V_HDMI 15 C420...

Страница 44: ...1 16W 5 TP9 R770 33R 1 16W 5 R769 33R 1 16W 5 COMP_Dect 5 SV_Dect 7 SV_Dect COMP_Dect R595 33R 1 16W 5 R594 33R 1 16W 5 UDI_LPM R778 33R 1 16W 5 UDO_LPM CPLD_RESET 16 R4241 NC R4242 NC Q110 MMBT3906 3 3V_I O 3 3V_LBADC SCL SDA 3 3V_I O I2SB_WS_OUT Q111 MMBT3906 R4247 10K 1 16W 5 TP14 TP67 R723 NC 10K 1 16W 5 HDMI_DET 2 3 3V_I O MSCL_MARS 16 R4402 NC 10K Bootstrap Config CPLD_RESET TP3 TP4 WT_HDMI_...

Страница 45: ...W R4309 3K9 5 1 16W OPS_AUD_L 6 OPS_AUD_R 6 AUD_GND C4275 470PF C4274 470PF 1 2 ZD137 VPORT0603100KV05 1 2 ZD136 VPORT0603100KV05 C4253 22pF 50V C4232 22pF 50V C4233 22pF 50V AUD_OUT_R AAUDOUT_R DGND DGND DGND DGND AUD_OUT_R AUD_OUT_L R6128 22K 1 AUD_OUT_L I2SA_WS_OUT 14 I2SA_WS_OUT AMP_RESET 14 I2SA_CLK_OUT SPDIF_OUT I2SA_DOUT0 I2SA_CLK_OUT 14 I2SA_DOUT0 14 I2SA_MCLK 14 I2SA_MCLK AUD_L1_IN R2 AUD...

Страница 46: ...2 DDR_VSSO AB19 DDR_VSSO AB22 DDR_CK_N M23 DLL_Vaa2 T19 DDR_CK L23 DDR_VREF1 N19 DDR_VREF2 V20 DDR_VREF0 F21 DDR_CAL R19 DDR_iVDD2 AA19 DDR_iVDD1 F19 Mars Frame Store DDR Interface U401A STDP8028 AB DDR_D13 DDR_D11 C4329 2U2 16V C428 1uF 25V DDR_D12 DDR_DQS1 C429 2U2 16V DDR_D16 C439 100N 16V 1 8V_DDR DDR_DM1 C438 100N 16V DDR_D14 DDR_D18 1 2 3 4 8 7 6 5 RP417 22R DDR_DQS1 DDR_M_D15 C4296 100N 16V...

Страница 47: ...0V Min 3 3v Max 3 3v Max Connect NC 3 3V_LVDS DIMMING R4350 NC 0V Min OFF 0 0 8V LOW DISABLE 1 2 FB136 120 OHM V422 ON 5V Q128 NC MMBT3904 V551 ON 2 4 5 5V LVDS FORMAT SEL_LVDS 32 LTI320AA02 3 3V_LVDS CONNECTOR for PANEL TCON PNL_VDD LOW JEIDA MODEL PNL_VDD LVDS_FORMAT 9 All V series R568 Connect to GND R498 R6043 R6045 HIGH JEIDA HIGH VESA ON 2 4 5 5V DGND 42 LD420WXN OFF 0 0 8V V651 C4336 100N 1...

Страница 48: ...01N STDP8028 AB C4366 33P50V C4367 33P50V SYS_RESET 16 R4343 NC 0R05 1 16W TEST_EN0 AB2 TEST_EN1 AC2 RESETn AC7 Mars Test U401G STDP8028 AB R4352 3KOHM 5 1 16W 3 3V_LPM 1 2V_LPM C4358 100N 16V C4359 100N 16V C4360 100N 16V C4361 100N 16V C4362 100N 16V 3 3V_LPM 3 3V_LPM 3 3V_I O 6 9 15 C4343 100N 16V C4344 100N 16V C4345 100N 16V C4346 100N 16V C4347 100N 16V C4348 100N 16V C4349 100N 16V C4350 10...

Страница 49: ...B LOUTB C6014 330pF 50V C6015 330pF 50V R6013 47R 1 16W 5 C6028 100N 16V C6001 0 1UF50V LOUT LOUT ROUT ROUT C6033 470PF C6031 4700P 50V R6038 NC C6029 680P 50V R6039 NC R6040 NC R6041 NC C6034 470PF C6035 470PF ROUT LOUTA LOUTA L6005 22UH DGND C6019 0 47UF 50V DGND DGND DGND DGND 24V 9 15 16 24V DGND DGND DGND DGND DGND DGND DGND R6007 20R 1 DGND 3 3V_AUD_AMP 15 DGND DGND R6008 20R 1 DGND DGND C60...

Страница 50: ...M C4564 1N50V C446 100N 16V BKLT_ADJ FB152 300OHM MCU5V D121 LL4148 LAN_PWR_En 16 5V 1 8V DDRII Power FB175 300OHM 4A PWR_SEN_E 16 PWR_SEN_BC 16 FB176 300OHM Q112 MMBT3904 FB155 300OHM TO 252 VCC3 3 for Memory FB145 300OHM C112 100N 16V 3 3V_MEM 11 TR_E 5V GND FB149 300OHM MCU3V3 6 9 16 R401 0R05 1 16W VCC3 3 for CORE Analog GND Q114 MMBT3904 C517 100N 16V FB150 300OHM Wire Color R403 0R05 1 16W 1...

Страница 51: ...2 V 6 U431 HIN232CBZ TS016 LAN0_TXD R4332 10K 1 16W 5 1 2 3 4 5 6 CN415 CONN R4334 10K 1 16W 5 R4345 10K 1 16W 5 R4335 10K 1 16W 5 MCU3V3 5 9 4 8 3 7 2 6 1 10 11 DOWN CN403A D SUB 16 20 15 19 14 18 13 17 12 21 22 DOWN CN403B D SUB LAN0_RXD N232_TX R4430 1K 1 16W 5 R4394 12K 1 10W 1 I2C_BOOT_DIS BURN_FLASH_EN LAN_PWR_En C415 100N 16V MCU_TX TDO TCK R4586 NC 33R 1 16W 5 TMS TDI 1 2 3 4 CN414 CONN WT...

Страница 52: ...3V R6070 47K 1 16W 5 R6071 47K 1 16W 5 R6072 47K 1 16W 5 R6159 33R 1 16W 5 R6160 33R 1 16W 5 R6073 47K 1 16W 5 UART2_RXD UART2_TXD BURN_FLASH_921K LB_MOD SPD_LED SYS_CLK_SEL1 TXON C6050 100N 16V SYNC_BUS C6049 22UF 16V UART1_TXD SPI_SCLK LB_CLK I2C_BOOT_DIS1 FUX_LED BURN_FLASH_EN1 RSET_BG SPI_MOSI RXIN TEST_SPEEDUP UART0_TXD 25MXTLN SPI_MISO SPI_SS0 EXT_WKUP SPI_SS1 UART1_RXD TXOP RXIP 25MXTLP DVD...

Страница 53: ...250V C992 220pF 250V RV902 Varistor R902 390K 1 4W R901 390K 1 4W C991 220pF 250V 2 1 3 4 BD901 D15XB80 SG901 NC SG902 NC F902 NC 1 4 2 3 L903 2 0MH C9901 220pF 250V C994 0 47uF NC 1 D1 2 D1 3 NC 4 NC 5 D2 6 D2 7 NC 8 IC911 CAP004DG F901 6 3A 250V 1 4 2 3 L902 20 0MH 1 4 2 3 L901 20 0MH RV901 C993 0 47uF BO R 1 2 3 4 CN901 CONN ...

Страница 54: ...993 NC 22 OHM 1 8W R994 NC 2R2 5 1 8W D920 NC LL4148 D908 LL4148 C930 1uF25V C924 1uF 450V 1 2 D926 NC 1 2 11 12 L908 600uH 5 R951 1 2K C925 1000pF Q905 2N3904S RTK PS Q904 KTD1691 P C926 470pF 250V L906 Pin9 R9801 100K 1 8W Q9803 PMBTA45 R9802 1MOHM 5 1 4W R9803 1MOHM 5 1 4W R9804 1MOHM 5 1 4W R9805 33K 1 4W D922 1N5408 E Short pin R949 20K 1 8W R997 10 OHM 5W C933 470pF 250V 5V 1 2 FB905 BEAD 1 ...

Страница 55: ... 2OHM2W C947 22uF 50V 1 2 3 5 4 7 6 9 10 T902 POWER X FMR 5V R986 NC 10KOHM 5 1 8W R988 NC 51KOHM 5 1 8W VCC1 Q907 NC Q908 NC 2N3904S RTK PS R975 NC 10KOHM 5 1 8W R981 NC R974 NC 10KOHM 5 1 4W 1 2 3 4 IC908 NC C940 10NF R985 NC C939 2 2NF C941 2 2NF 24V 12V C998 1000uF 25V 1 2 HS2 Heat sink Q90T0097A01 R976 1KR 1 4W 1 1 2 HS3 Heat sink 90G6084 1 1 2 HS4 Heat sink Q90T6064 1 1 2 HS5 Heat sink Q90T0...

Страница 56: ...VG 11 Vcc 12 N C 13 OUT 14 HVG 15 VBOOT 16 IC901 L6599DTR F903 3 15A 250V 1 2 3 4 IC902 TLP781F 24V R914 22 OHM 1 8W R917 22 OHM 1 8W R916 51K 1 8W R913 51K 1 8W 12V C905 100N 50V R911 2M 1 4W R910 2M 1 4W R912 2M 1 4W R919 43KOHM 1 1 8W C911 1N 50V C904 470UF35V R918 24KOHM 1 1 8W R933 2KOHM 1 1 8W R920 1KR 1 4W 1 C912 1N 50V R931 56KOHM 1 1 8W 24V 1 2 D927 NC C921 NC 470pF 250V 1 2 D928 NC R925 ...

Страница 57: ... 4 BD902 D15XB60 2 1 3 4 BD901 D15XB60 BD_OUT 1 2 4 3 L9901 10MH 1 2 4 3 L9903 10MH 1 2 4 3 L9902 2mH SG9901 NC 3 4 1 2 SW9901 SDT S 112DMR C9901 220pF 10 C9902 220pF 10 R9901 390K 5 1 4W R9902 390K 5 1 4W AC_N L 1 N 2 CN901 CONN 1 2 t TH9901 NTCR C9904 220pF 10 C9905 220pF 10 RV9901 F901 FUSE 8A 250V NC 1 D1 2 D1 3 NC 4 NC 5 D2 6 D2 7 NC 8 IC9901 CAP014DG L9904 3 5uH L9905 3 5uH ...

Страница 58: ... 11 L9801 175uH C9816 10NF C9808 NC C9806 0 1uF 50V R9809 510K 1 8W B R9827 NC VCC R9825 1 MOHM 1 1 4W R9824 1 MOHM 1 1 4W R9826 1 MOHM 1 1 4W R9823 33KOHM 1 1 8W BD_OUT R9807 1K 1 8W R9810 510K 1 8W BD_OUT C9811 4N7 50V C9810 4N7 50V VCC R9802 10 OHM 1 8W ZCD M 1 ZCD S 2 SS 3 VREF 4 RT 5 RAMP 6 COMP1 7 COMP2 8 FB 9 TL 10 OCP S 11 OCP M 12 GD S 13 GND 14 GD M 15 VCC 16 IC9801 R2A20117CSP VCC 8 7 1...

Страница 59: ... 220 OHM 1 8W C9303 1NF R9326 1K OHM 1 4W C9314 1000uF 16V R9306 1R2 5 2W C9315 1000uF 16V R9322 NC R9324 2 49KOHM 1 1 8W Q9301 KTD1691 P R9320 3 3KOHM 1 1 8W C9317 NC S OCP 1 BR 2 GND 3 FB OLP 4 VCC 5 D ST 7 D ST 8 IC9301 A6069H C9306 100N 50V C9308 22uF 50V C9318 100N 50V 1 2 ZD9301 NC D9301 1N4007 E3 73 1 2 ZD9302 MTZJ3V6B D9303 RGP10M R9301 0 47 OHM 5 1W C9316 470uF 16V D9302 RGP10M R9325 3K 1...

Страница 60: ...112 4 7uF 50V Q9108 2N3906S RTK PS VCC C9131 1000UF 35V R9109 10K 1 8W R9112 10K 1 8W R9110 2R2 5 1 8W R9120 5 1KOHM 1 1 8W R9111 22 OHM 1 8W R9108 22 OHM 1 8W BO_DC R9126 24K 1 8W 1 B R9125 27K 1 8W 1 1 2 3 4 5 CN904 CONN 1 2 3 4 5 6 CN905 CONN R9124 100K 1 8W 1 IC9103 KIA431A AT P C9125 470uF 25V C9127 470uF 25V C9124 470uF 25V C9132 47NF Q9101 TK15A60U 2 4 6 8 10 12 14 1 3 5 7 9 11 13 CN902 CON...

Страница 61: ...42 41 40 39 38 37 36 35 34 33 32 31 61 62 CN1001 CONN USB_PN0 MCU5V HT2_CTL 1 2 3 4 5 6 CN1006 CONN R1027 10K 1 16W 5 RC MCU5V OPS_HDMI_CEC 1 2 3 CN1007 CONN SYS_FAN SYS_FAN F_OPS_TX2M F_OPS_TX0P F_OPS_TX1M F_OPS_TX2P F_OPS_TXCKP F_OPS_TX0M F_OPS_TXCKM F_OPS_TX1P OPS_AUD_L OPS_AUD_R PWR_TH_CON PWR_TH_CON R1029 10K 1 16W 5 S 1 S 2 S 3 G 4 D 8 D 7 D 6 D 5 U1006 AO4419 1 6 2 7 3 8 4 9 5 11 12 13 14 1...

Страница 62: ...7 FB 6 GND 3 U1001 G5207P11U C1007 330UF 35V R1008 10 OHM 1 8W R1007 0R05OHM1 8W IF_5V R1002 15KOHM 1 10W R1012 51 OHM 1 4W Q1001 MMBT3904 Q1002 MMBT3904 C1018 1uF 50V shut IF_5V R1001 10OHM1 16W R1017 4 7K 1 4W U1004 P1004BD IF_5V 24V C1001 1uF 25V C1005 1uF 50V U1005 P1004BD C1006 1NF 50V R1005 10OHM1 16W R1016 4 7K 1 10W 20101103 change tpye 20101103 change tpye C1009 1uF 25V R1006 4 7K 1 10W R...

Страница 63: ...searched by using FIND function in PDF C202 4 7uF 10V C201 4 7uF 10V VCC 1 VOUT 2 GND 3 GND 4 U201 KSM 403M 2 4 1 3 LED201 LED R201 10K R202 100R 1 10W 1 VMCU_IR ZD201 RLZ5 6B ZD202 RLZ5 6B VMCU_IR LEDR LEDG LEDR LEDG IR_OUT VMCU_IR IR_OUT 1 2 3 4 5 6 7 8 CN201 CONN ...

Страница 64: ...rts position can be searched by using FIND function in PDF KEY_PWR R001 330R 1 1 10W KEY_ADC2 KEY_ADC1 PWR EXIT UP DOWN INPUT RESET R002 680R 1 10W 1 R003 2Kohm 1 10W 1 R004 330R 1 1 10W R005 680R 1 10W 1 R006 2Kohm 1 10W 1 SW008 SW SW007 SW SW006 SW SW005 SW SW004 SW SW003 SW SW002 SW SW001 SW 1 2 3 4 6 5 CN001 CONN 1 2 CN701 CONN Q701 PMBS3906 ...

Страница 65: ...8 R4542 R4543 R4553 R4557 R4558 R4559 R456 R4560 R4562 R4564 R4567 R4568 R4569 R457 R4570 R4571 R4572 R464 R465 R458 R4586 R459 R460 R4605 R461 R462 R463 R468 R466 R6161 R481 R467 R497 R510 R511 R539 R6022 R6037 R6138 R6139 R6142 R6143 R6144 R6149 R6150 R701 R733 R776 R112 R113 R114 R115 R144 R4192 R4248 R4253 R4431 R4446 R503 R6110 R703 R704 FB106 FB108 FB110 FB201 FB401 FB402 FB403 FB405 FB406 F...

Страница 66: ...905 IC907 C902 C903 C915 C922 C923 C937 C942 C943 C944 C947 C950 HS3 HS4 HS6 IC906 L901 L902 L904 Q904 R976 RV901 T902 HS1 J912 J913 T901 F901 C971 J906 J905 J908 J907 J923 J915 F902 J902 FB902 FB903 J918 J926 J927 C927 HS2 J928 RV902 R997 J931 C998 L909 C924 C909 C925 C936 C940 Q901 CN902 CN903 CN901 L903 Q909 Q903 D907 D903 D901 D905 D911 FB905 FB904 FB909 FB910 BD901 D914 GND2 GND4 L906 J934 L9...

Страница 67: ...R933 R935 R937 R938 R939 R940 R941 R942 R943 R944 R945 R946 R947 R948 R949 R950 R951 R952 R953 R955 R956 R957 R958 R959 R960 R961 R962 R963 R964 R965 R966 R967 R969 R972 R973 R974 R975 R977 R978 R979 R980 R981 R982 R983 R984 R985 R986 R987 R988 R989 R990 C973 R991 R992 R993 R994 R995 R996 C996 C995 R998 R999 R968 R1000 C954 C975 IC911 R9801 R9802 R9803 R9804 R9805 Q907 Q9802 Q905 Q906 Q908 Q912 Q9...

Страница 68: ... J937 J936 R9101 ZD9308 J939 J940 J941 J910 J942 C9323 IC9302 IC9102 IC9304 BD901 BD902 C9120 C9121 C9122 C9131 C9301 C9303 C9304 C9308 C9310 C9312 C9313 C9813 C9814 C9815 C9816 C9901 C9902 C9904 C9905 D9805 D9806 F901 F9101 FB9301 FB9302 FB9801 FB9802 IC9301 L9801 L9802 L9901 L9903 Q9301 R9326 RV9901 SG9901 SG9902 SW9901 T9101 T9102 TH9901 ZD9101 ZD9302 ZD9303 ZD9304 HS5 HS8 HS10 HS14 HS15 HS16 D...

Страница 69: ...9144 R9145 R9146 R9147 R9148 R9302 R9303 R9304 R9305 R9307 R9308 R9309 R9310 R9311 R9312 R9313 R9314 R9315 R9317 R9316 R9318 R9319 R9320 R9321 R9322 R9323 R9324 R9325 R9327 R9328 R9801 R9802 R9803 R9804 R9805 R9806 R9807 R9809 R9810 R9811 R9812 R9813 R9814 R9815 R9816 R9817 R9818 R9819 R9822 R9823 R9824 R9825 R9826 R9827 R9828 R9829 R9830 R9831 R9832 R9901 R9902 JR901 JR900 IC9801 JR903 JR902 C910...

Страница 70: ...C1005 R1002 R1003 R1004 R1012 C1018 R1017 R1006 R1015 R1016 F1001 R1007 R1008 C1025 CN1001 C1006 R1001 R1005 R1014 U1001 C1003 C1004 L1001 CN1002 U1003 U1004 U1005 R1018 R1019 R1020 R1021 R1022 R1023 R1024 R1025 R1026 CN1005 CN1006 Q1001 Q1002 ZD1002 CN1003 ZD1001 C1026 CN1007 C1007 C1008 D1001 C1010 C1011 R1027 R1028 R1029 U1006 Q1003 ...

Страница 71: ...y using FIND function in PDF 7 5 Key Board 715G4719K01000004K Remark parts position can be searched by using FIND function in PDF C201 C202 CN201 LED201 R201 R202 U201 ZD201 ZD202 R001 R002 R003 R004 R005 R006 SW9 SW10 SW001 SW002 SW003 SW004 SW005 SW006 SW007 SW008 CN001 ...

Страница 72: ...5 CN414 CN415 CN6011 CN4208 CN420 U401 Scaler Board OUT IN OUT Pr Pb Y IN OUT 1 3 2 CN001 CN201 Power Board CN901 N L CN901 CN902 1 15 1 14 1 1 2 1 39 40 1 12 1 8 10 4 SPK L SPK R FAN FAN Panel Panel CN701 CN701 CNPC Board CNPC Board Key Board IR Board ...

Страница 73: ...6 CN405 CN414 CN415 CN6011 CN901 CN907 CN905 CN904 CN906 CN908 CN902 CN4208 CN420 U401 CN1001 CN1002 CN1005 NC NC CN1006 CN201 CN001 CN701 Power Board Scaler Board IR Board Key Board Connection Board CNPC Board FAN 1 1 8 10 60 1 2 1 39 40 1 12 1 4 1 14 N L Panel ...

Страница 74: ...74 9 Scaler Board Overview Scaler IC DDR MCU VGA IN COMPONENT IN AUDIO IN SPK SWITCH Audio AMP RS232C OUT IN VGA OUT FFC Connector CPLD LAN RJ 45 DVI D IN HDMI IN VIDEO IN OUT AUDIO OUT AUDIO IN SPK OUT ...

Страница 75: ...75 10 Mechanical Instructions BDL3245E Carefully place the TV monitor face down on a smooth surface 1 Remove all the screws to remove the REAR_COVER Back ...

Страница 76: ...2 76 76 Remove all 1 Remove 2 Remove l the screws e the BEZEL e the BEZEL s to remove TOP BEZEL BOTTOM an the bezel L RIGHT and nd BRACKET d BEZEL LEF T_CHASS_W FT WALLMOUNT ...

Страница 77: ...e the key board from the BEZEL BOTTOM 3 Remove the boards speakers and FAN from the main frame 1 Remove the key board 2 Disconnect all the connectors as follow The reverse of the main frame The front of the panel ...

Страница 78: ...78 78 3 Remove all the screws as follow ...

Страница 79: ...79 4 Remove the main frame from the panel ...

Страница 80: ... 80 BDL4645E Note the way of the BLD4245E disassembly is almost the same as the BDL4645E Carefully place the TV monitor face down on a smooth surface 1 Remove all the screws to remove the REAR_COVER Back ...

Страница 81: ...81 2 Remove all the screws to remove the bezel 1 Remove the BEZEL TOP BEZEL RIGHT and BEZEL LEFT 2 Remove the BEZEL BOTTOM and BRACKET CHASS_WALLMOUNT ...

Страница 82: ...82 82 3 Remove the key board from the BEZELBOTTOM 3 Remove the boards speakers and FAN from the main frame 1 Remove the key board 2 Disconnect all the connectors as follow The front of the panel ...

Страница 83: ...83 3 Remove all the screws as follow ...

Страница 84: ...84 84 4 Remove the main frame from the panel ...

Страница 85: ...urce to see if it is beyond the range of the display Please verify its specifications with this display s specification section Display image doesn t fill up the full size of the screen The zoom mode is not correctly set Use the Zoom mode or Custom zoom function in the Screen menu to fine tune display geometry and time frequency parameter Can hear sound but no picture Improperly connected source s...

Страница 86: ...ill pictures include logos video games computer images and images displayed in 4 3 normal mode A still picture is displayed for an over extended period of time Do not allow a still image to be displayed for an extended period of time as this can cause a permanent after image to remain on the display ...

Страница 87: ... s 12 1 Mars software upgrade 1 Tool and Cable 1 An i486 or above personal computer or compatible 2 Microsoft operation system Windows 95 98 2000 XP 3 GProbe 5 8 0 1 exe program 4 RS232C cablex1 5 Philips PD 2 Connecting the monitor to the PC 3 Prepare the F W files 1 Copy below three F W files to one folder such as batch ...

Страница 88: ..._V0 306_checksum txt modify the isp_spi_ext hex and MMD_BDL4645E hex path to correct 4 Install the ISP program GProbe 5 8 0 1 to the PC 5 Firmware Upgrade Instruction 1 Double click the ISP software 2 Select Options Connection Setting ...

Страница 89: ...89 3 Set the parameters as below figure ...

Страница 90: ... 90 4 Type in forcesa 10 and click Execute 5 When the state column becomes gray AC on the Philips PD right now It will pop up the Command Successful message When it becomes gray switch on the power supply ...

Страница 91: ...91 6 Click Commands batch to load the file isp_psi_ext txt ...

Страница 92: ...92 92 7 During the process which last about 4minutes please don t disconnect the cable and power 8 Update successfully The Burn in mode is turned on after F W update ...

Страница 93: ...93 6 Check the version 1 Press MENU key Configuration2 Monitor information version 2 Factory reset 3 Usually F W upgrade will turn on Burn in mode while factory reset will turn off it ...

Страница 94: ...ard into stand alone mode error a The way to cure it is to AC off the PD and type in forcesa 10 then click Execute AC on the PD during the state column is gray b Maybe you connect cross RS232 cable to the serials output port Please change it to the serials input port c You must choose the cross RS232 not the parallel RS232 cable 3 Check Device Manager setting ...

Страница 95: ...95 ...

Страница 96: ...XP 3 USB Driver and ISP tool MCU_ISP_SETUP_0 92 exe program 4 USB cablex1 VGA cablex1 5 ISP Board 715GT183 A 6 Philips PD 2 Connecting the monitor to the PC 3 Installation of USB board driver 1 Connect the PC tool and PD 2 When the ISP tool connected to PC first time it will pop up hardware installation wizard to instruct USB Cable 715GT183 A ...

Страница 97: ...97 ...

Страница 98: ... of ISP tool 1 Open the MCU_ISP_SETUP_0 92 folder click Setup exe file to install 2 After the installation of ISP tool and USB driver restart the PC 5 MCU F W upgrade steps 1 Open the ISP tool and click ok as below figures ...

Страница 99: ...99 2 Click to open the new window to set the relevant parameters 3 Click Exit Save after setting parameters 4 Load correct software ...

Страница 100: ...100 100 5 Click Auto to upgrade 6 Update processing ...

Страница 101: ...101 7 Upgrade successfully 6 Troubleshooting Not connected error The way to cure it by select correct ISP Target ...

Страница 102: ... DDC Disp ded Display onal comput tem Windows A20110512_ 34 B x1 e x 1 power oard as follo NT EXE an PORT95NT for example are DDC whic o be re prog ROM with So he DDC data play Data Ch Identification ter or compa s 95 98 2000 _NDSCDT2 0 cord x 2 12 ow nd restart th has been sp e the BDL3 ch store all fa rammed oftware DDC a does not ne annel may b n Data EDID tible 0 XP 0 exe TPV V DC power he com...

Страница 103: ... 13 3 The process of the DDC writing as follow Take the BDL4645E s for example Note EDID files have been putted in DDC folder DDC and EDID tool should be putted together 1 Double click the appear as follow ...

Страница 104: ...104 104 2 Tick the Analog DVI and click Loadfile to set the parameters 3 Select the EDID folder ...

Страница 105: ...105 4 Load EDID successful In the EDID tool you can know the EDID information 5 Tick the Only connect VGA and type in the 14 digit S N which must be the same as the SN in barcode of set and date ...

Страница 106: ...nable in factory mode Turn on the PD and enter factory mode by pressing SET MEU keys in remote control Don t exit factory mode during EDID writing 7 Start writing Click Program to start writing When the green PASS appears the process is finished ...

Страница 107: ...low few ways to cure can t write errors 1 Turn off the EDID write protect enable in factory mode 2 AC on the monitor and turn on it Restart the monitor 3 Set the Burn in on to try again 4 Change the EDID tool 5 Take apart the monitor and connect the 7pin of EEPROM to GND to diable write protection then write EDID one by one ...

Страница 108: ... 33 32 34 35 45 0A 00 00 00 FD 70 00 30 55 1F 5C 11 00 0A 20 20 20 20 20 20 00 DD EDID Structure Version Revision 01 03 Vendor Product Identification ID Manufacturer Name PHL ID Product Code D211 ID Serial Number No Use Week of Manufacture 33 Year of Manufacture 2011 Basic Display Parameters Features Video i p definition Analog Max H Image Size 70cm Max V Image Size 39cm Display Gamma 2 2 Color Ch...

Страница 109: ...ac II Standard Timing Identification 1280 x 800 60Hz 1280 x 1024 60Hz 1920 x 1080 60Hz 1600 x 1200 60Hz Detailed Timing Descriptions FC Monitor Name PHL BDL3245E FD Monitor Limits Min V rate 48 Hz Max V rate 85 Hz Min H rate 31 KHz Max H rate 92 KHz Max P Clock 170 MHz Detailed Timing 1920x1080 60Hz Detailed Timing 1360x768 60Hz Extension Flag 00 Block0 Checksum DD ...

Страница 110: ... FD 70 00 30 55 1C 5C 11 00 0A 20 20 20 20 20 20 00 AC EDID Structure Version Revision 01 03 Vendor Product Identification ID Manufacturer Name PHL ID Product Code D211 ID Serial Number No Use Week of Manufacture 36 Year of Manufacture 2011 Basic Display Parameters Features Video i p definition Digital Max H Image Size 70cm Max V Image Size 39cm Display Gamma 2 2 Color Characteristics Rx 0 642 Gx ...

Страница 111: ...Hz Detailed Timing 1920x1080 60Hz Detailed Timing 1360x768 60Hz Extension Flag 00 Block0 Checksum AC HDMI 00 01 02 03 04 05 06 07 08 09 0A 0B 0C 0D 0E 0F Block 0 00 00 FF FF FF FF FF FF 00 41 0C 11 D2 01 01 01 01 10 21 15 01 03 80 46 27 78 2A 6E 4B A4 55 4A 9B 25 20 0F 47 4A B5 28 80 81 00 81 80 D1 C0 01 01 01 01 30 01 01 01 01 01 01 02 3A 80 18 71 38 2D 40 58 2C 40 45 00 BA 89 21 00 00 1E 66 21 5...

Страница 112: ...ck 0 EDID Structure Version Revision 01 03 Vendor Product Identification ID Manufacturer Name PHL ID Product Code D211 ID Serial Number No Use Week of Manufacture 33 Year of Manufacture 2011 Basic Display Parameters Features Video i p definition Digital Max H Image Size 70cm Max V Image Size 39cm Display Gamma 2 2 Color Characteristics Rx 0 642 Gx 0 291 Bx 0 146 Wx 0 279 Ry 0 334 Gy 0 607 By 0 059...

Страница 113: ...8 60Hz FC Monitor Name PHL BDL3245E FD Monitor Limits Min V rate 48 Hz Max V rate 85 Hz Min H rate 28 KHz Max H rate 92 KHz Max P Clock 170 MHz Extension Flag 01 Block0 Checksum AE Block 1 Extended Block Type CEA 861B Detailed Timing Blocks start at Byte 22 DTV Underscan YES DTV Basic Audio YES YCbCr 4 4 4 YES YCbCr 4 2 2 YES Video Short Block Description 1920 x 1080 P 59 94 60Hz 16 9 1920 x 1080 ...

Страница 114: ...Hz Audio Bit Rate 24bit 20bit 16bit Speaker Allocation Speaker Allocation FL FR Detailed Timing Descriptions Detailed Timing Descriptions 1920x1080 60Hz H Image Size 698 mm V Image Size 393 mm Pixel Clock 148 Hz Refreshed Mode Non Interlaced Detailed Timing Descriptions 720x480 60Hz H Image Size 698 mm V Image Size 393 mm Pixel Clock 27 Hz Refreshed Mode Non Interlaced Detailed Timing Descriptions...

Страница 115: ... 45 0A 00 00 00 FD 70 00 30 55 1F 5C 11 00 0A 20 20 20 20 20 20 00 F7 EDID Structure Version Revision 01 03 Vendor Product Identification ID Manufacturer Name PHL ID Product Code D212 ID Serial Number No Use Week of Manufacture 36 Year of Manufacture 2011 Basic Display Parameters Features Video i p definition Analog Max H Image Size 93cm Max V Image Size 52cm Display Gamma 2 2 Color Characteristic...

Страница 116: ...andard Timing Identification 1280 x 800 60Hz 1280 x 1024 60Hz 1920 x 1080 60Hz 1600 x 1200 60Hz Detailed Timing Descriptions FC Monitor Name PHL BDL4245E FD Monitor Limits Min V rate 48 Hz Max V rate 85 Hz Min H rate 31 KHz Max H rate 92 KHz Max P Clock 170 MHz Detailed Timing 1920x1080 60Hz Detailed Timing 1360x768 60Hz Extension Flag 00 Block0 Checksum F7 ...

Страница 117: ...D 70 00 30 55 1C 5C 11 00 0A 20 20 20 20 20 20 00 C9 EDID Structure Version Revision 01 03 Vendor Product Identification ID Manufacturer Name PHL ID Product Code D212 ID Serial Number No Use Week of Manufacture 36 Year of Manufacture 2011 Basic Display Parameters Features Video i p definition Digital Max H Image Size 93cm Max V Image Size 52cm Display Gamma 2 2 Color Characteristics Rx 0 640 Gx 0 ...

Страница 118: ... 170 MHz Detailed Timing 1920x1080 60Hz Detailed Timing 1360x768 60Hz Extension Flag 00 Block0 Checksum C9 HDMI 00 01 02 03 04 05 06 07 08 09 0A 0B 0C 0D 0E 0F Block 0 00 00 FF FF FF FF FF FF 00 41 0C 12 D2 01 01 01 01 10 24 15 01 03 80 5D 34 78 2A E6 9D A3 54 4A 99 26 20 0F 47 4A B5 28 80 81 00 81 80 D1 C0 01 01 01 01 30 01 01 01 01 01 01 02 3A 80 18 71 38 2D 40 58 2C 40 45 00 A2 0B 32 00 00 1E 6...

Страница 119: ... 00 00 00 C9 Block 0 EDID Structure Version Revision 01 03 Vendor Product Identification ID Manufacturer Name PHL ID Product Code D212 ID Serial Number No Use Week of Manufacture 36 Year of Manufacture 2011 Basic Display Parameters Features Video i p definition Digital Max H Image Size 93cm Max V Image Size 52cm Display Gamma 2 2 Color Characteristics Rx 0 640 Gx 0 289 Bx 0 150 Wx 0 279 Ry 0 330 G...

Страница 120: ...0 60Hz Detailed Timing 1360x768 60Hz FC Monitor Name PHL BDL4245E FD Monitor Limits Min V rate 48 Hz Max V rate 85 Hz Min H rate 28 KHz Max H rate 92 KHz Max P Clock 170 MHz Extension Flag 01 Block0 Checksum C8 Block 1 Extended Block Type CEA 861B Detailed Timing Blocks start at Byte 22 DTV Underscan YES DTV Basic Audio YES YCbCr 4 4 4 YES YCbCr 4 2 2 YES Video Short Block Description 1920 x 1080 ...

Страница 121: ...z 44KHz 32 KHz Audio Bit Rate 24bit 20bit 16bit Speaker Allocation Speaker Allocation FL FR Detailed Timing Descriptions Detailed Timing Descriptions 1920x1080 60Hz H Image Size 930 mm V Image Size 523 mm Pixel Clock 148 Hz Refreshed Mode Non Interlaced Detailed Timing Descriptions 720x480 60Hz H Image Size 930 mm V Image Size 523 mm Pixel Clock 27 Hz Refreshed Mode Non Interlaced Detailed Timing ...

Страница 122: ... 23 09 07 07 83 01 00 00 65 03 0C 00 20 10 00 02 3A 80 18 71 38 2D 40 58 2C 45 00 A2 0B 30 32 00 00 1E 8C 0A D0 8A 20 E0 2D 10 10 3E 96 00 40 A2 0B 32 00 00 18 01 1D 00 72 51 D0 1E 20 6E 28 50 55 00 A2 0B 32 00 00 1E 8C 0A D0 90 20 40 31 20 60 0C 40 55 00 A2 0B 32 00 00 18 00 00 00 00 00 00 70 00 00 00 00 00 00 00 00 00 00 00 00 00 00 00 C9 Block 0 EDID Structure Version Revision 01 03 Vendor Prod...

Страница 123: ... Standard Timing Identification 1280 x 800 60Hz 1280 x 1024 60Hz 1920 x 1080 60Hz Detailed Timing Descriptions Detailed Timing 1920x1080 60Hz Detailed Timing 1360x768 60Hz FC Monitor Name PHL BDL4245E FD Monitor Limits Min V rate 48 Hz Max V rate 85 Hz Min H rate 28 KHz Max H rate 92 KHz Max P Clock 170 MHz Extension Flag 01 Block0 Checksum C8 Block 1 Extended Block Type CEA 861B Detailed Timing B...

Страница 124: ...ock Description Numbers of Audio Channels 2 Audio Format Description Linear PCM Audio Supported 48KHz 44KHz 32 KHz Audio Bit Rate 24bit 20bit 16bit Speaker Allocation Speaker Allocation FL FR Detailed Timing Descriptions Detailed Timing Descriptions 1920x1080 60Hz H Image Size 930 mm V Image Size 523 mm Pixel Clock 148 Hz Refreshed Mode Non Interlaced Detailed Timing Descriptions 720x480 60Hz H Im...

Страница 125: ... 3D 32 00 00 1E 66 21 50 B0 51 00 1B 30 50 40 70 36 00 FA 3D 32 00 00 1E 00 00 00 FC 00 50 60 48 4C 20 42 44 4C 34 36 34 35 45 0A 00 00 00 FD 70 00 30 55 1F 5C 11 00 0A 20 20 20 20 20 20 00 1C EDID Structure Version Revision 01 03 Vendor Product Identification ID Manufacturer Name PHL ID Product Code D213 ID Serial Number No Use Week of Manufacture 36 Year of Manufacture 2011 Basic Display Paramet...

Страница 126: ...768 60Hz VESA Established Timings 3 80 1152 x 870 75Hz Apple Mac II Standard Timing Identification 1280 x 800 60Hz 1280 x 1024 60Hz 1920 x 1080 60Hz 1600 x 1200 60Hz Detailed Timing Descriptions FC Monitor Name PHL BDL4645E FD Monitor Limits Min V rate 48 Hz Max V rate 85 Hz Min H rate 31 KHz Max H rate 92 KHz Max P Clock 170 MHz Detailed Timing 1920x1080 60Hz Detailed Timing 1360x768 60Hz Extensi...

Страница 127: ...D 70 00 30 55 1C 5C 11 00 0A 20 20 20 20 20 20 00 F7 EDID Structure Version Revision 01 03 Vendor Product Identification ID Manufacturer Name PHL ID Product Code D213 ID Serial Number No Use Week of Manufacture 27 Year of Manufacture 2011 Basic Display Parameters Features Video i p definition Digital Max H Image Size 102cm Max V Image Size 57cm Display Gamma 2 2 Color Characteristics Rx 0 645 Gx 0...

Страница 128: ...ndard Timing Identification 1280 x 800 60Hz 1280 x 1024 60Hz 1920 x 1080 60Hz Detailed Timing Descriptions FC Monitor Name PHL BDL4645E FD Monitor Limits Min V rate 48 Hz Max V rate 85 Hz Min H rate 28 KHz Max H rate 92 KHz Max P Clock 170 MHz Detailed Timing 1920x1080 60Hz Detailed Timing 1360x768 60Hz Extension Flag 00 Block0 Checksum F7 ...

Страница 129: ...10 06 07 15 16 23 09 07 07 83 01 00 00 65 03 0C 00 20 10 00 02 3A 80 18 71 38 2D 40 58 2C 45 00 FA 3D 30 32 00 00 1E 8C 0A D0 8A 20 E0 2D 10 10 3E 96 00 40 FA 3D 32 00 00 18 01 1D 00 72 51 D0 1E 20 6E 28 50 55 00 FA 3D 32 00 00 1E 8C 0A D0 90 20 40 31 20 60 0C 40 55 00 FA 3D 32 00 00 18 00 00 00 00 00 00 70 00 00 00 00 00 00 00 00 00 00 00 00 00 00 00 A1 Block 0 EDID Structure Version Revision 01 ...

Страница 130: ...z Apple Mac II 1024 x 768 60Hz VESA Established Timings 3 80 1152 x 870 75Hz Apple Mac II Standard Timing Identification 1280 x 800 60Hz 1280 x 1024 60Hz 1920 x 1080 60Hz Detailed Timing Descriptions Detailed Timing 1920x1080 60Hz Detailed Timing 1360x768 60Hz FC Monitor Name PHL BDL4645E FD Monitor Limits Min V rate 48 Hz Max V rate 85 Hz Min H rate 28 KHz Max H rate 92 KHz Max P Clock 170 MHz Ex...

Страница 131: ...20 x 576 P 50Hz 16 9 1920 x 1080 I 50Hz 16 9 720 1440 x 480 I 59 94 60Hz 4 3 720 1440 x 480 I 59 94 60Hz 16 9 720 1440 x 576 I 50Hz 4 3 720 1440 x 576 I 50Hz 16 9 Audio Short Block Description Numbers of Audio Channels 2 Audio Format Description Linear PCM Audio Supported 48KHz 44KHz 32 KHz Audio Bit Rate 24bit 20bit 16bit Speaker Allocation Speaker Allocation FL FR Detailed Timing Descriptions De...

Страница 132: ... 18 71 38 2D 40 58 2C 40 45 00 FA 3D 32 00 00 1E 66 21 50 B0 51 00 1B 30 50 40 70 36 00 FA 3D 32 00 00 1E 00 00 00 FC 00 50 60 48 4C 20 42 44 4C 34 36 34 35 45 0A 00 00 00 FD 70 00 30 55 1C 5C 11 00 0A 20 20 20 20 20 20 01 ED Block 1 00 02 03 22 F1 4F 10 05 01 02 03 04 1F 13 11 12 14 10 06 07 15 16 23 09 07 07 83 01 00 00 65 03 0C 00 20 10 00 02 3A 80 18 71 38 2D 40 58 2C 45 00 FA 3D 30 32 00 00 1...

Страница 133: ...blished Timings 1 B5 720 x 400 70Hz VGA IBM 640 x 480 60Hz VGA IBM 640 x 480 67Hz Apple Mac II 640 x 480 75Hz VESA 800 x 600 60Hz VESA Established Timings 2 28 832 x 624 75Hz Apple Mac II 1024 x 768 60Hz VESA Established Timings 3 80 1152 x 870 75Hz Apple Mac II Standard Timing Identification 1280 x 800 60Hz 1280 x 1024 60Hz 1920 x 1080 60Hz Detailed Timing Descriptions Detailed Timing 1920x1080 6...

Страница 134: ... x 1080 I 59 94 60Hz 16 9 640 x 480 P 59 94 60Hz 4 3 720 x 480 P 59 94 60Hz 4 3 720 x 480 P 59 94 60Hz 16 9 1280 x 720 P 59 94 60Hz 16 9 1920 x 1080 P 50Hz 16 9 1280 x 720 P 50Hz 16 9 720 x 576 P 50Hz 4 3 720 x 576 P 50Hz 16 9 1920 x 1080 I 50Hz 16 9 720 1440 x 480 I 59 94 60Hz 4 3 720 1440 x 480 I 59 94 60Hz 16 9 720 1440 x 576 I 50Hz 4 3 720 1440 x 576 I 50Hz 16 9 Audio Short Block Description N...

Страница 135: ...Detailed Timing Descriptions 720x480 60Hz H Image Size 1018 mm V Image Size 573 mm Pixel Clock 27 Hz Refreshed Mode Non Interlaced Detailed Timing Descriptions 1280x720 60Hz H Image Size 1018 mm V Image Size 573 mm Pixel Clock 74 Hz Refreshed Mode Non Interlaced Detailed Timing Descriptions 720x576 50Hz H Image Size 1018 mm V Image Size 573 mm Pixel Clock 27 Hz Refreshed Mode Non Interlaced Block1...

Страница 136: ...ore than half an hour b Make sure that the tools are connected right and drive programs have been installed OK c Connect the signal cable barcode reader and connected card Adjustment processes a Press the power of CA 210 shut off the lens press 0 Cal and open the lens after analyzer reset b Open white balance adjustment program select the right parameter according with the program and click OK c M...

Страница 137: ...137 ...

Страница 138: ...138 138 15 Monitor Exploded View ...

Страница 139: ...139 ...

Страница 140: ...140 140 ...

Страница 141: ...BOARD ASSY 12 FQ017 CTPCXQA1 CONNECTION BOARD ASSY 13 FQ003 ADPCB2435QBH POWER BOARD ASSY 14 FQ002 756JQBCB PH004 00 SCALER BOARD ASSY CBPCXS2PHQ2 15 FQ004 KEPCXQA1 KEY BOARD ASSY 16 FQ413 A33J1247 TW 1T0100 KEY_FUNCTION ECN4108 095G176J 6M02 FFC CABLE 6P 665mm P0 5 JB2061R110979 ECN104 095G176J 60N01 FFC CABLE 60P 275mm P0 5 JB2601R111119 ECN6011 095G8013 4RM06 HARNESS 4P 2P 2P 780 20mm TG 110706...

Страница 142: ...rSSO36 U419 056G 615112 DRAM W9751G6JB 25 512 WBGA 84 U404 056G 623 43 Switch TMDS361BPAGR TQFP 64 U431 056G 645 1 Others HIN232CBZ TS016 U502 056G 662 21 IC AOZ8804DI DFN 10 U506 056G 662500 IC ESD AZ1045 04QU U508 056G 662505 ESD PROTECT AOZ8105CI SOT 23 6 U430 056G 665 5 Others PCF 8563T SO 8 U429 056G 665 81 IC F75387SG SOP 16 U612 056G 665170 Others THS7373IPWR TSSOP 14 U401 056G1126 68 1 IC ...

Страница 143: ...379165 AC DC CONVERTER R2A20117CSP SOP16 IC9101 056G 379176 IC SSC9512S TL SOP 18 IC9901 056G 665532 Capacitor Discharge CAP014DG TL SOP 8 Service Kit Description Part No Picture ISP tool 715GT183 A DDC TOOL 715GT034 B ...

Страница 144: ...144 144 17 General Product Specification Please refer to the Product Specification the next page ...

Страница 145: ...om the proprietors NAME 2838 100 05424 TY CHECK SUPERS DATE Property of PHILIPS ELECTRONICS INDUSTRIES TAIWAN LTD C E 10 A4 0 9 BDL3245E BDL4245E BDL4645E 32 42 46 FHD LCD PUBLIC DISPLAY 2011 07 01 PHILIPS Page 1 of 38 MMD Confidential Issued by Technical Marketing Manager Larry Yang Product Identification 32 42 46 BDL LCD DISPLAY BDLxx45E 00 ...

Страница 146: ...tandby 9 2 6 USER CONTROL INTERFACE 11 2 6 1 Hidden controls 11 2 6 2 Front controls 12 2 6 3 OSD MENU 15 2 6 4 I O Connectors 16 3 VISUAL PERFORMANCE 18 3 1 LCD MODULE CHARACTERISTICS 18 3 2 FRONT OF SCREEN PERFORMANCE 20 4 FUNCTIONAL REQUIREMENTS 21 4 1 POWER 21 4 2 PICTURE 21 4 2 1 Wide Screen Signalling Bit WSSB picture size 21 4 2 2 Picture format 21 4 2 3 Picture in Graphics 22 4 3 AUDIO 22 ...

Страница 147: ...1 Transportation packages 30 7 16 2 Transportation test procedures 30 7 17 PALLET CONTAINER LOADING 31 8 RELIABILITY ENVIRONMENT 31 8 1 MTBF PREDICTION 31 8 2 DEMONSTRATION MTBF 31 8 3 TEMPERATURE 31 8 4 HUMIDITY 32 8 5 ALTITUDE 32 8 6 AIR PRESSURE 32 8 7 ENVIRONMENTAL TEST 32 9 REGULATORY COMPLIANCE 32 9 1 WORLDWIDE REGULATORY 32 9 2 EMC REQUIREMENTS 34 9 3 ROHS 34 9 4 WEEE 34 9 5 ONGOING REGULAT...

Страница 148: ...tors for multiple video format inputs Product Name PHL BDLxx45E in EDID respectively Manufacturer ID PHL in EDID Product ID As below in EDID D211 BDL3245E PHILIPS BDL3245E D212 BDL4245E PHILIPS BDL4245E D213 BDL4645E PHILIPS BDL4645E EDID BDL3245E PHL BDL3245E Analog EDID doc PHL BDL3245E Digital EDID doc PHL BDL3245E HDMI EDID doc BDL4245E PHL BDL4245E Analog EDID doc PHL BDL4245E Digital EDID do...

Страница 149: ...dio included meet EIA 861B standard User friendly and family look OSD menu follow Philips OneUX design User friendly and professional look remote controller DPM power management for PC mode VESA standard wall mount Portrait mounting extra ventilation slots have to be considered Tiled matrix up to 5x5 Software upgrade should be done easily Network controllability through RS 232 RJ 45 and HDMI Smart...

Страница 150: ...2kΩ impedance Video pixel rate 13 5 MHz to 165 MHz z HDMI input TMDS channel Carries video data Signaling method According to DVI 1 0 specification Single link Type A HDMI Video pixel rate 25 MHz to 165 MHz Type A DDC channel Allows source to interrogate capabilities of sink I C signaling with 100 kHz clock E EDID data structure according to EIA CEA 861B and VESA Enhanced EDID HDMI hot plug test P...

Страница 151: ...e less than 26dB at the 100cm distance from monitor front For the pop sound noise from internal and external speaker when power on off etc shall not be audible or less than 30db at the 100cm distance from monitor front 2 2 2 AV input signal requirements z CVBS input 1000mVpp including 300 mV sync level terminated with input impedance of 75Ω z S Video input Y 1000mVpp C 300mVpp terminated with inpu...

Страница 152: ...finition Content Protection HDCP Specification 1 10 z Audio input Sensitivity 500mVrms the amplifier outputs full power when the input level reaches 500mVrms terminated with input impedance of 10kΩ z Speaker output Back firing speakers 2 x 10 Wrms 8 ohm with T H D 10 1khz z No signal input While no signal at external inputs screen will display warning message 2 3 DDC channel E EDID data structure ...

Страница 153: ...current 0 5mA at 240Vac Power factor correction According to EN61000 3 2 2 5 2 Power consumption Normal on 32 140W typical 160W max 42 210W typical 260W max 46 220W typical 270W max When Lan turn off power consumption spec Power saving LAN off 1W Power saving schedule ON 2W Power saving 2W Switch off DC off or standby 0 5W remote off Switch off AC mains No power consumption Recovery times 15sec fo...

Страница 154: ...nds z Standby RC Keypad switch off z Recovery from Standby RC Keypad switch on 2 5 4 SURGE IMMUNITY 1 Surge immunity for power line 1 1 Purpose The purpose of this test is to make sure the power circuit can protect lighting surge when the noise occurred 1 2 Test Equipment 1 NOISEKEN LSS 5S LSS 15SC or equivalent Variable range of voltage 6KV Surge waveform Voltage surge 1 2 50µs 2 AC power supply ...

Страница 155: ...rating Test 1 There must not be failure deterioration of performance and function 2 In the case that abnormal phenomenon happened user must be able to recover that easily by themselves 3 Insulation Resistance Dielectric Strength Test 2 must be OK Test2 Power Line Surge 2 SAFETY test 1 There must not be failure for safety such as fire smoke electric shock 2 Insulation Resistance Dielectric Strength...

Страница 156: ...isconnection device Main disconnection shall be accomplished by physically removing the power cord from the display 2 6 2 Front controls LED indicator LED Status Power Status LED behavior LED Active Normal ON Green Sleeping Green blue RC command Blinking Schedule off Green blinking red If ON TIME is the Green is not blinking Standby DC power off Red LED Not active Switch off Blank RC sensor Receiv...

Страница 157: ...whatever is not permitted without written authority from the proprietors NAME 2838 100 05424 TY CHECK SUPERS DATE Property of PHILIPS ELECTRONICS INDUSTRIES TAIWAN LTD C E 10 A4 0 9 BDL3245E BDL4245E BDL4645E 32 42 46 FHD LCD PUBLIC DISPLAY 2011 07 01 PHILIPS Page 13 of 38 MMD Confidential ...

Страница 158: ...mation displayed on the right up corner of the screen NOTE The display time is INFORMATION OSD value If INFORMATION OSD is OFF the information didn t auto disappear button To decrease the adjustment with OSD menu To move the sub picture left when in PIP mode SET button To activate the setting with OSD menu AUTO ADJUST button To execute the AUTO ADJUST function MUTE button Mutes or restores audio o...

Страница 159: ...e refer to the latest Philips designs and templates RC key definition Remote Key Key Name Data Code POWER 0x03 VIDEO SOURCE 0x01 AUDIO SOURCE 0x1E SMART 0x1D SIZE 0x29 PIP ON OFF 0x24 PIP INPUT 0x25 PIP CHANGE 0x26 CONTRAST 0x27 BRIGHTNESS 0x28 MENU 0x20 UP 0x15 DOWN 0x14 SET 0x23 PLUS 0x22 MINUS 0x21 EXIT 0x1F DISPLAY 0x19 AUTO ADJUST 0x1C MUTE 0x1B VOL UP 0x17 VOL DOWN 0x16 All RC buttons genera...

Страница 160: ...ub 15 pins VGA D Sub Female connector with lime green 3 5mm Mini jack audio stereo connector VGA D Sub connector pin assignment Pi n Signal Assignment Pin Signal Assignment 1 Red video 2 Green video 3 Blue video 4 GND 5 GND 6 Red GND 7 Green GND 8 Blue GND 9 5V Supply from PC for DDC circuit 10 Sync GND 11 GND 12 DDC serial data 13 H sync 14 V sync 15 DDC serial clock b DVI D input Digital input i...

Страница 161: ...TMDS Data1 Shield 6 TMDS Data1 7 TMDS Data0 8 TMDS Data0 Shield 9 TMDS Data0 10 TMDS Clock 11 TMDS Clock Shield 12 TMDS Clock 13 CEC 14 Reserved N C on device 15 SCL 16 SDA 17 DDC CEC Ground 18 5V Power 19 Hot Plug Detect VGA D Sub Out For daisy chain purpose Optional Slot For the related Intel OPS devices plug in out AV Out VIDEO and R L Cinch audio out Stereo audio output 10W at 8ohm cinch audio...

Страница 162: ...rements whole part No Cd No Hg No Cr6 No PBB and PBDE and No Pb on external pins Durability 3 000 Insertions at least Mating Force 5 lbs 2 268 kgs Operating temperature range 10 to 50 Storage temperature range 25 to 125 Note HDMI DVI VGA CVBS S Video cable length 1 8M RS 232 cable length 30M LAN cable length 80M 3 VISUAL PERFORMANCE 3 1 LCD Module Characteristics 32 Vendor First Panel Second Panel...

Страница 163: ...tripe Display Operating Mode Normally Black Color Depth 16 7M Gamut color saturation 72 type Luminance cd m 2 450 type 380 min Response Time 6 5ms type Contrast Ratio 4000 type 3200 min View Angle CR 10 up down 89 type Power Consumption 115W type Module Weight 10Kg Typ 46 Vendor First Panel Second Panel Panel Type Number AUO P460HW03 Module Dimensions mm 46inch 1168 4mm Display Area H x V 1018 08 ...

Страница 164: ...n3 Lon4 Lon5 1 8 Where Lon1 to Lon5 are the luminance with all pixels displaying white at 5 locations z Display video color Picture at full white pattern brightness at 70 and contrast at 50 The color temperature at the screen center should be CCT 10000º K 9300 º K 7500 º K 6500 º K 5000 º K 4000 º K 3000 º K x 0 279 0 030 0 283 0 030 0 299 0 030 0 313 0 030 0 346 0 03 0 0 382 0 03 0 0 440 0 03 0 y...

Страница 165: ...ON ON Display goes to On state when mains is applied When POWER ON LAST STATUS Display goes to Last status ON or STANDBY depending of the previous state of Display before power off 4 2 Picture Picture control handles the initialization of the video parameters and the recall of the video personal preferences Some video parameters can also be changed via the picture sub menu 4 2 1 Wide Screen Signal...

Страница 166: ...x VGA x x x x o o x HDMI x x x x o o x YPbPr x x x x o o x S Video o o o o x x o Video o o o o x x o Card OPS x x x x o o x 4 3 Audio Audio control handles the initialization of the audio parameters and the recall of the audio last status 4 3 1 Sound related requirements Volume control Should be gradual change of sound level from zero to maximum output Soft mute A short and gradual increase of the...

Страница 167: ...t of the LCD screen is set to a as low as possible level but such that the picture performance is still acceptable Settings should behave as following Condition pattern white pattern resolution 1920 1080 Burn in 45 分鐘 1 Initial setting Brightness a 70 in the range from 0 100 b Power consumption 70 of maximum power consumption 2 Smart Power condition a brightness 70 at VGA port b without OPS Audio ...

Страница 168: ... on below priority DVI D VGA HDMI Component S Video Composite Card OPS When this feature enables press VIDEO SOURCE or MENU button on remote control can pause this feature in order to do the next setting 4 10 Intel OPS Behavior 1 There is one POWER button for Signage and OPS module on remote control 2 When Signage is powered on by RC or RS232 command or web browser under OPS input source the OPS m...

Страница 169: ... source is selected Check OPS status and show it in OSD A OFF i Show Card OPS is Turned Off in OSD ii Turn on OPS automatically then show Card OPS is Turned On in OSD B ON Show Card OPS is Turned On in OSD 2 Press Power key to turn off PD Check OPS status A OFF Turn Off normally B ON Show Card OPS is Turned On in OSD OPS must turned off by user first 3 Current source is OPS and turn it off After f...

Страница 170: ...s for HDMI input when the Display wakes from standby or power on with DC switch or cold start The first time AC On power status is in Standby mode 5 2 Default Reset Control Values The default reset values out of box setting of the various controls are listed I O Switch Default Position AC Power Switch ON Speaker Switch Internal speaker Startup OSD Menu and PQ Values PICTURE DAC V1 0_201101011B xl ...

Страница 171: ...e 27 of 38 MMD Confidential 6 ACCESSORIES 6 1 Cables z Power cord EU UK NA China Length 1 8 M 50 mm z VGA Interface Cable Length 1 8 M 50 mm z BNC to RCA adapter 3 z RCA to BNC adapter x 2 6 2 Remote Control Remote Control Type number EURT57B093 Batteries included Type number R03 B500 01S 6 3 DFU CD ROM EDFU and SICP DFU English German Spanish French Italian Russian Polish Turkish Simplified Chine...

Страница 172: ...ic Philips ID 7 2 Mechanical Data Files Provide mechanical drawings with key dimensions 7 3 Location of Philips Logo 7 4 Location of Icons 7 5 Color for Resin Paint Black 30 gloss front Silver brush gloss decoration part Stealth Black in mould back cover 7 6 Resins RoHS requirements WEEE requirements PC ABS China Rohs required sales in China only 7 7 Paint Used RoHS requirements WEEE requirements ...

Страница 173: ...nd texture no should follow Philips make up sheet The exterior surfaces shall have a uniform texture Philips must approve the mold texturing Detail document for texture refer to UN D249 The gloss value of texture area 20 gloss units 7 11 Base Tilt Swivel Range Tilt N A per commercial spec request Swivel Range 0 Base detach Should be directly disassembled from main body so as for easy install the D...

Страница 174: ...thout stand 24 6 kg Gross weight 31 kg 7 16 Transportation Packaging and wrapping shall be sufficient to protect the product against damage or loss during shipment from the supplier to the destination specified in the purchase order All packaging materials are subject to test and evaluation per XTN 0009 UAN D636 Packaging unit should be protected by corner protector on 4 corners don t use surround...

Страница 175: ... IEC 60068 2 6 test Fc Vibration test screen size 56cm only for China India GB 9384 97 7 17 Pallet Container Loading Air shipment Sea container 20 pallet slip sheet Sea container 40 pallet slip sheet Sea container 40 High Cube pallet slip sheet Container loading Quantity CONTAINER SIZE 40 20 40 High Cube W Pallet W Pallet W Pallet Yes No Yes No No Layers Sets Layer Sets Block Blocks Container Tota...

Страница 176: ...300 to 1013 mbar 8 7 Environmental test Cold and Hot start test 25 degree 168 hours Stress Life test 40 degree 95 RH 120hours Temperature and Humidity test 70 degree 144 hours 9 REGULATORY COMPLIANCE 9 1 Worldwide Regulatory REGION RSO COUNTRY NSO DOMAIN SAFETY EMC ERGONOMICS STANDARDS DOCUMENTS REFERENCE LOGO APPLICANT Mandatory World wide World wide Sa IEC60950 1 2001 Group and national differen...

Страница 177: ...cate Yes O Directive 1995 519 EC Standard EN62311 2007 EMF report Yes RUSSIA Sa GOST R 50377 1992 GOST certificate BZ02 Supplier Yes All EU O WEEE WEEE report and declaration Supplier Yes AP CHINA Sa GB4943 2001 IEC60950 1 CCC certificate Supplier Yes E GB9254 2008 CISPR22 GB17625 1 2003 IEC61000 3 2 CCC certificate Supplier Yes O GB21520 2008 CECP certificate 中國節能專案 Supplier Yes AUSTRALIA NEW ZEA...

Страница 178: ...MI test result must be submitted again prior to PVT samples delivery Which also has to meet Philips immunity testing specification 9 3 RoHS Restriction on the use of certain hazardous substances Lead Cadmium Mercury Hexavalent Chromium Polybrominated Bipheny1 PBB and Polybrominated Bipheny1 Ether PBDE flame retardant 9 4 WEEE Producer Philips responsible for retailer take back schemes and recyclin...

Страница 179: ...roduct specification shall be initiated by MMD and supported by concerned engineering department such as E M S Safety Approbation Group and DQE before RFQ It must be updated in each product creation milestone DQE engineers will be responsible to make product quality and reliability definition based on the product characteristics and requirements 10 3 Design quality evaluation capability qualificat...

Страница 180: ...dor and MMD will do more verify and acceptance based on CRS CRS For TPV 2011 Projects FHD_201103 in development stage z Functionality and Performance Test z EDID Test z Pictures Motion Test z RS232 SCIP and Control Test Command Code Communication Control 0x00 Platform and version labels 0xA2 Power state get 0x19 Power state set 0x18 User Input Control get 0x1D User Input Control set 0x1C Power sta...

Страница 181: ...oping milestone to DQE for review This is not limited to three times Intensive and comprehensive design reviews are recommended whenever required 10 5 3 General Review Procedure 1 Review DQE pending items of previous review meetings 2 Check the current status of all tests and evaluations which should be done and provided by supplier before the meeting 3 Discuss the design quality and reliability b...

Страница 182: ...tion All design changes after product release shall follow the engineering change notes ECN procedures Before Product release that all design changes follow design quality and reliability review procedure 1 5 4 For design quality improvement and lesson learnt of product creation experiences the Deliverables list will be updated with these new experiences 10 8 Design quality improvement 10 8 1 Cust...

Страница 183: ...hat HV and HV regulation are always checked as a standard servicing procedure and the reason for this prudent routine is clearly understood by everyone It is important to use an accurate and reliable HV meter It is recommended that the HV recorded on each customer s invoice which will demonstrate a proper concern for the customer s safety 5 When troubleshooting and making test measurements in a re...

Отзывы: