background image

35 


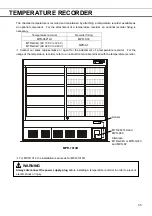
   TEMPERATURE RECORDER


The chamber temperature is recorded and maintained by attaching a temperature recorder available as 
an optional component.  For the attachment of a temperature recorder, an optional recorder fixing is 
necessary. 

Temperature recorder 

Recorder fixing 

MTR-0621LH MPR-S30 

MTR-G04A (AC 100 V to 120 V) 

MTR-G04C (AC 220 V to 240 V) 

MPR-S7 

 Contact our sales representative or agent for the attachment of a temperature recorder.  For the 

usage of the temperature recorder, refer to an instruction manual enclosed with the temperature recorder. 


 For MPR-1014, the installation is same as for MPR-1014R. 


 WARNING


Always disconnect the power supply plug

 before installing a temperature recorder in order to prevent 

electric shock or injury. 


MPR-1014R 

Sensor 

MTR-0621LH and 
MPR-S30 

Alternate: 
MTR-G04A or MTR-G04C   
and MPR-S7 

Содержание MPR-1014 Series

Страница 1: ...ies Please read the operating instructions carefully before using this product and keep the operating instructions for future use See page 44 for all model numbers Operating Instructions Pharmaceutical Refrigerator MPR 1014R ...

Страница 2: ......
Страница 3: ...ZER 21 OPERATION CHECK AFTER RECOVERY 21 REMOTE ALARM TERMINAL 22 ALARM FUNCTIONS 23 Air circulation alarm 23 SAFETY FUNCTIONS 23 SELF DIAGNOSTIC FUNCTIONS 24 ROUTINE MAINTENANCE Cleaning of exterior interior and accessories 25 Replacement of fluorescent lamp 26 Replacement of glow starter 26 Cleaning of evaporating tray 27 Cleaning of filter 28 TROUBLESHOOTING 29 DISPOSAL OF UNIT 30 Decontaminati...

Страница 4: ...ment of performance or functions Contact our sales representative or agent if any page of the operating instructions is lost or page order is incorrect Contact our sales representative or agent if any point in the operating instructions is unclear or if there are any inaccuracies No part of the operating instructions may be reproduced in any form without the expressed written permission of PHC Cor...

Страница 5: ...ons in a place accessible to users of this unit Label on the unit This mark is labeled on the cover in which the electrical components of high voltage are enclosed to prevent the electric shock The cover should be removed by a qualified engineer or service personnel only USA Only This product has a fluorescent lamp that contains mercury Disposal may be regulated in your community due to environmen...

Страница 6: ...ower supply outlet is not grounded it will be necessary to install a ground by qualified engineers Never ground the unit through a gas pipe water main telephone line or lightning rod Such grounding may cause electric shock in the case of an incomplete circuit Connect the unit to a power source as indicated on the rating label attached to the unit Use of any other voltage or frequency other than th...

Страница 7: ... shock or fire When removing the power supply plug from the power supply outlet grip the power supply plug not the cord Pulling the power supply cord may result in electric shock or fire by short circuit Disconnect the power supply plug before moving the unit Take care not to damage the power supply cord A damaged power supply cord may cause electric shock or fire Disconnect the power supply plug ...

Страница 8: ... may cause a heat or ignition Never store corrosive substances such as acids or alkalis in the unit except in a sealed container These may be detrimental to health and may cause corrosion of internal components cooling circuit or electrical components Check the setting when starting up of operation after power failure or turning off of power switch The stored items may be damaged due to the change...

Страница 9: ... C Maximum relative humidity 80 for temperature up to 31 o C decreasing linearly to 50 relative humidity at 40 o C Mains supply voltage fluctuations up to 10 of the nominal voltage Transient overvoltages up to the levels of OVERVOLTAGE CATEGORY II Temporary OVERVOLTAGES occurring on the mains supply Applicable pollution degree of the intended environment POLLUTION DEGREE 2 in most cases ...

Страница 10: ...NENTS Refrigerator unit 14 Circuit breaker switch 15 Remote alarm terminal page 22 10 1 MPR 1014R 5 6 4 7 9 11 12 3 2 13 3 8 Light switch Space for temperature recorder page 35 Glow starter page 26 Fluorescent lamp page 26 ...

Страница 11: ...Do not block this vent Blocking this vent may cause unstable chamber temperature Do not insert fingers or similar articles into the vent 8 Filter Clean the filter once a month Refer to page 28 9 Evaporating tray Defrost water from the evaporator accumulates in the tray and evaporates into the atmosphere See page 27 for cleaning 10 Leveling foot front 3 locations These are used for install the unit...

Страница 12: ... 5 Scroll key At temperature display mode pressing this key for more than 5 seconds leads setting of lock function page 16 At setting mode moves the operator through digit on the display page 15 to page 21 6 Set key SET At temperature display mode pressing this key leads chamber temperature setting mode At setting mode stores the value into computer memory 7 Alarm buzzer stop key BUZZER Mutes the ...

Страница 13: ...nstall the unit on a sturdy and level floor withstanding the total weight of the unit The uneven floor or tilted installation may cause failure or injury Unstable condition may cause vibration or noise A location not prone to high humidity Install the unit in the ambient of 80 R H or less humidity Installation under high humidity may cause current leakage or electric shock CAUTION The unit may col...

Страница 14: ...t to level the unit The unit is installed firmly by separating the casters from the floor The unit may be moved at the time of opening closing the door if the casters contact with floor 3 Fixing the unit Fix the unit to the wall by using 2 back spacers Fig 2 and a rope or chain The back spacers which are also used to prevent the unit from toppling over have a dual purpose To provide a clearance be...

Страница 15: ...4 The third hole under the third screw from the bottom 5 The second hole under the first screw from the bottom bottom screw Important Never put the stored item on the bottom of the chamber Always put them on the shelf or in the drawer in the case of MPR 1014R 6 Turn on the circuit breaker switch This unit is equipped with a circuit breaker on the back Make sure to turn on the circuit breaker switc...

Страница 16: ...ates when the door is opened for more than 2 minutes The alarm buzzer is canceled when the door is closed 3 Allow the chamber temperature to fall to 5 o C The chamber temperature is set to 5 o C at the factory Check the chamber temperature on the temperature display Allow the chamber temperature to fall to the set temperature when the start up after cleaning maintenance or moving 4 Switch on the l...

Страница 17: ...ation 1 Connect the power supply plug to the dedicated outlet only when start up of unit The current chamber temperature is displayed 2 Press set key SET The current setting 005 is displayed and the first digit blinks 3 Press up arrow key and scroll the figure to 4 The display is changed to 004 from 005 4 Press set key SET Set temperature is memorized and the current chamber temperature is display...

Страница 18: ...Example Change the lock to ON from OFF factory setting Description of operation Key operated Indication after operation The current chamber temperature is displayed 1 Press scroll key for 5 seconds The current setting L 0 is displayed and the first digit blinks 2 Press up arrow key once The display is changed to L 1 from L 0 3 Press set key SET Lock status is memorized and the current chamber temp...

Страница 19: ...ng stored inside the chamber there is a possibility that cycle defrost may not be enough to remove all of the frost on the evaporator In this case a forced defrost cycle can be initiated When the unit is operating under a forced defrost cycle the current chamber temperature and dF are displayed alternately on the temperature display Once the forced defrost cycle is completed normal operation resum...

Страница 20: ... of use Description of operation Key operated Indication after operation 1 The current chamber temperature is displayed 2 Press up arrow key for 5 seconds F00 is displayed and the first digit blinks 3 Press up arrow key once The display is changed to F01 from F00 4 Press set key SET The current setting 005 is displayed and the first digit blinks 5 Press up arrow key and scroll the figure to 3 The ...

Страница 21: ...e condition of use Description of operation Key operated Indication after operation 1 The current chamber temperature is displayed 2 Press up arrow key for 5 seconds F00 is displayed and the first digit blinks 3 Press up arrow key twice The display is changed to F02 from F00 4 Press set key SET The current setting 05 is displayed and the first digit blinks 5 Press up arrow key and scroll the figur...

Страница 22: ...a sample setting Set the desired delay time according to the condition of use Description of operation Key operated Indication after operation 1 The current chamber temperature is displayed 2 Press up arrow key for 5 seconds F00 is displayed and the first digit blinks 3 Press up arrow key 4 times The display is changed to F04 from F00 4 Press set key SET The current setting 002 is displayed and th...

Страница 23: ...nds F00 is displayed and the first digit blinks 3 Press up arrow key 5 times The display is changed to F05 from F00 4 Press scroll key once The second digit blinks 5 Press up arrow key twice The display is changed to F25 from F05 6 Press set key SET The current setting 030 is displayed and the second digit blinks 7 Press up arrow key and scroll the figure to 2 The display is changed to 020 from 03...

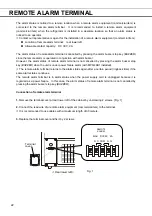
Страница 24: ...mote alarm terminal is not cancelled by pressing the alarm buzzer stop key BUZZER when the unit is under power failure alarm with MPR 48B1 installed The remote alarm terminal returns to the alarm status again after a certain period ringback time if the same alarm status continues The remote alarm terminal is in alarm status when the power supply cord is unplugged because it is regarded as a power ...

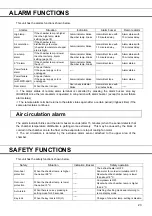
Страница 25: ... status of remote alarm terminal is cancelled by pressing the alarm buzzer stop key BUZZER since the remote alarm is operated in conjunction with alarm buzzer except for power failure alarm status The remote alarm terminal returns to the alarm status again after a certain period ringback time if the same alarm status continues Air circulation alarm The alarm indicator blinks and the alarm buzzer s...

Страница 26: ...displayed alternately If the exclusive alarm sensor is disconnected Alarm indicator blinks E13 and chamber temp are displayed alternately If the exclusive alarm sensor is short circuited Alarm indicator blinks E14 and chamber temp are displayed alternately Condenser temp abnormality In the event of failure of fan motor for cooling the compressor When the ambient temperature exceeds the usable envi...

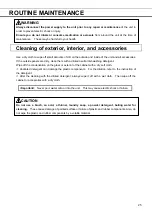
Страница 27: ...ed neutral dishwashing detergent Wipe off the condensation on the glass or exterior of the cabinet with a dry soft cloth Undiluted detergent can damage the plastic components For the dilution refer to the instruction of the detergent After the cleaning with the diluted detergent always wipe it off with a wet cloth Then wipe off the cabinet or accessories with a dry cloth Important Never pour water...

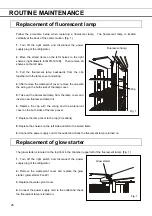
Страница 28: ...escent lamp from the lamp cover and insert a new fluorescent lamp in it 6 Replace the cap with the wiring and the water proof cover on the both sides of the lamp cover 7 Replace the lamp cover to the clip 2 locations 8 Replace the shelves on the left side and return the stored items 9 Connect the power supply cord to the outlet and check the fluorescent lamp is turned on Replacement of glow starte...

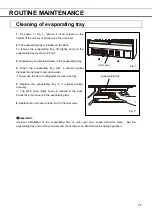
Страница 29: ... tray with a diluted neutral dishwashing detergent and clean water Never use the hot or boiling water to clean the tray 5 Replace the evaporating tray in it original position securely The drain hose black hose is located in the back Check the drain hose is in the evaporating tray 6 Replace the unit cover and fix it with 2 hand screws Important Improper installation of the evaporating tray or unit ...

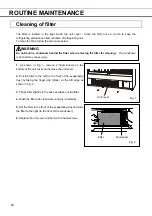
Страница 30: ...e injury 1 As shown in Fig 1 remove 2 hand screws on the bottom of the unit cover and remove the unit cover 2 Pull the filter to the left to the front of the evaporating tray by taking the finger grip black on the left edge as shown in Fig 2 3 Tilt the filter slightly to the back and take out the filter 4 Wash the filter with clean water and dry it naturally 5 Set the filter in the front of the ev...

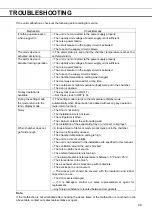
Страница 31: ...lay mode The setting mode returns to the temperature display mode automatically when 90 seconds has passed without any key operation auto return function Noisy The floor is not sturdy The installation site is not level The refrigerator is tilted The cabinet contacts the surrounding wall The installation of the evaporating tray or unit cover is improper When chamber does not get cold enough A large...

Страница 32: ...ldren do not have access and doors cannot be closed completely The disposal of the unit should be accomplished by appropriate personnel Always remove doors to prevent accidents such as suffocation Decontamination of unit Before disposal of unit with biohazardous danger decontaminate the unit to the extent possible by the user ...

Страница 33: ...εν πρέπει να απορριφθούν μαζί με οικιακά απορρίμματα Προκειμένου να πραγματοποιηθεί η κατάλληλη επεξεργασία και ανακύκλωση αποσύρετε αυτά τα προϊόντα σε ανάλογα σημεία περισυλλογής όπου θα γίνουν δεκτά χωρίς χρέωσή σας Εναλλακτικά σε ορισμένες χώρες μπορείτε να επιστρέψετε τα προϊόντα σε τοπικά καταστήματα με σκοπό την αγορά ανάλογου νέου προϊόντος Η ορθή απόρριψη αυτού του προϊόντος βοηθάει στην ...

Страница 34: ... pertenecientes a la Unión Europea Este símbolo sólo es válido en la Unión Europea Si desea desechar este producto póngase en contacto con las autoridades locales o con su distribuidor para que le informen sobre el método correcto de eliminación Informacja dla użytkowników o pozbywaniu się urządzeń elektrycznych i elektronicznych dotyczy gospodarstw domowych Przedstawiony symbol umieszczony na pro...

Страница 35: ...aardevolle hulpbronnen en voorkomt u potentiële negatieve gevolgen voor de volksgezondheid en het milieu die anders kunnen ontstaan door een onjuiste verwerking van afval Neem contact op met uw gemeente voor meer informatie over het dichtstbijzijnde inzamelingspunt of raadpleeg www nvmp nl www ictoffice nl of www stibat nl Voor zakelijke gebruikers in de Europese Unie Neem voor het weggooien van e...

Страница 36: ... produkt Hvis du kasserer dette produktet på riktig måte bidrar til du til å bevare verdifulle ressurser og til å motvirke de negative virkningene på miljøet og den menneskelige helse som kan forårsakes av feilaktig avfallsbehandling Ta kontakt med de lokale myndigheter hvis du ønsker ytterligere informasjon om ditt nærmeste innsamlingspunkt Feilaktig kassering av dette utstyret kan kanskje bøtele...

Страница 37: ... 120 V MTR G04C AC 220 V to 240 V MPR S7 Contact our sales representative or agent for the attachment of a temperature recorder For the usage of the temperature recorder refer to an instruction manual enclosed with the temperature recorder For MPR 1014 the installation is same as for MPR 1014R WARNING Always disconnect the power supply plug before installing a temperature recorder in order to prev...

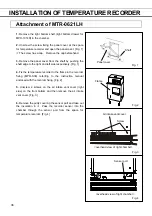
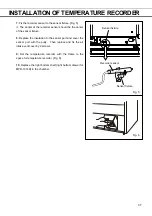
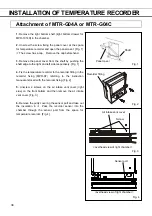
Страница 38: ...4 Fix the temperature recorder to the frame in the recorder fixing MPR S30 referring to the instruction manual enclosed with the recorder fixing Fig 2 5 Unscrew 2 screws on the air intake vent cover right side on the front bottom and then remove the air intake vent cover Fig 3 6 Remove the putty covering the sensor port and take out the insulation in it Pass the recorder sensor into the chamber th...

Страница 39: ... Replace the insulation to the sensor port and cover the sensor port with the putty Then replace and fix the air intake vent cover by 2 screws 9 Set the temperature recorder with the frame to the space for temperature recorder Fig 6 10 Replace the right bottom shelf right bottom drawer for MPR 1014R in the chamber Recorder sensor Fig 5 Fig 6 Sensor fixture Sensor fixture ...

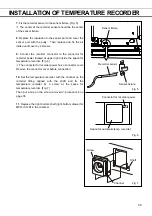
Страница 40: ... the temperature recorder to the recorder fitting in the recorder fixing MPR S7 referring to the instruction manual enclosed with the recorder fixing Fig 2 5 Unscrew 2 screws on the air intake vent cover right side on the front bottom and then remove the air intake vent cover Fig 3 6 Remove the putty covering the sensor port and take out the insulation in it Pass the recorder sensor into the chamb...

Страница 41: ...the space for temperature recorder Fig 6 The connector for recorder power has a connector cover Remove the connector cover before connection 10 Set the temperature recorder with the channel on the recorder fitting aligned with the shaft and fix the temperature recorder by a screw at the space for temperature recorder Fig 7 Then put a cap on the screw removed in procedure 2 on page 38 11 Replace th...

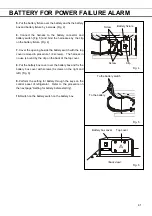
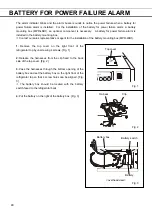
Страница 42: ...ion of the battery mounting box MPR 48B1 1 Remove the top cover on the right front of the refrigerator top by unscrewing 4 screws Fig 1 2 Release the harnesses from the clip fixed to the back side of the top cover Fig 2 3 Pass the harnesses through the bottom opening of the battery box and set the battery box on the right front of the refrigerator top so that 4 screw holes can be aligned Fig 3 The...

Страница 43: ...edure 1 4 screws The harness in no use is bound by the clip on the back of the top cover 8 Put the battery box cover over the battery box and fix the battery box cover with screws 3 screws on the right and left Fig 6 9 Perform the setting for battery through the keys on the control panel of refrigerator Refer to the procedure on the next page Setting for battery before starting 10 Switch on the ba...

Страница 44: ...42 SETTING FOR BATTERY BEFORE STARTING After installing the optional battery mounting box MPR 48B1 setting on the main unit is required Contact our sales representative or agent for setting ...

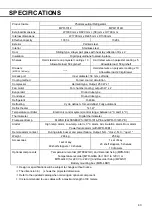
Страница 45: ...t R 404A Defrosting Cycle defrost forced defrost Fully automatic Defrost heater 141 W Temperature controller Electronic control system control range between 2 o C and 14 o C Thermometer Digital thermometer Fluorescent lamp FL40SD FL40SSECW for MPR 1014 PE and MPR 1014R PE Alarms High temp alarm Low temp alarm 0 o C alarm Air circulation alarm Door alarm Power failure alarm with MPR 48B1 Remote ala...

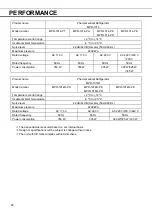
Страница 46: ... 350 W 350 W 335 W 320 W 325 W 335 W Product name Pharmaceutical Refrigerator MPR 1014R Model number MPR 1014R PA MPR 1014R PK MPR 1014R PR MPR 1014R PE Temperature control range 2 o C to 14 o C Usable ambient temperature 5 o C to 35 o C Noise level 42 dB 44 dB A scale 50 Hz 60 Hz Maximum pressure 2239 kPa Rated voltage AC 115 V AC 220 V AC 220 V 230 V 240 V Rated frequency 60 Hz 60 Hz 50 Hz Power...

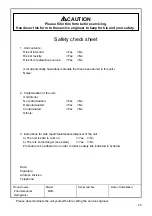
Страница 47: ...Contamination of the unit Unit interior No contamination Yes No Decontaminated Yes No Contaminated Yes No Others 3 Instructions for safe repair maintenance disposal of the unit a The unit is safe to work on Yes No b There is some danger see below Yes No Procedure to be adhered to in order to reduce safety risk indicated in b below Date Signature Address Division Telephone Product name Pharmaceutic...

Страница 48: ...Printed in Japan LDCL035900 1 S0418 11118 1 1 1 Sakada Oizumi machi Ora gun Gunma 370 0596 Japan PHC Corporation 2018 ...

Отзывы: