


Customer Care Center 1-800-732-2677
24
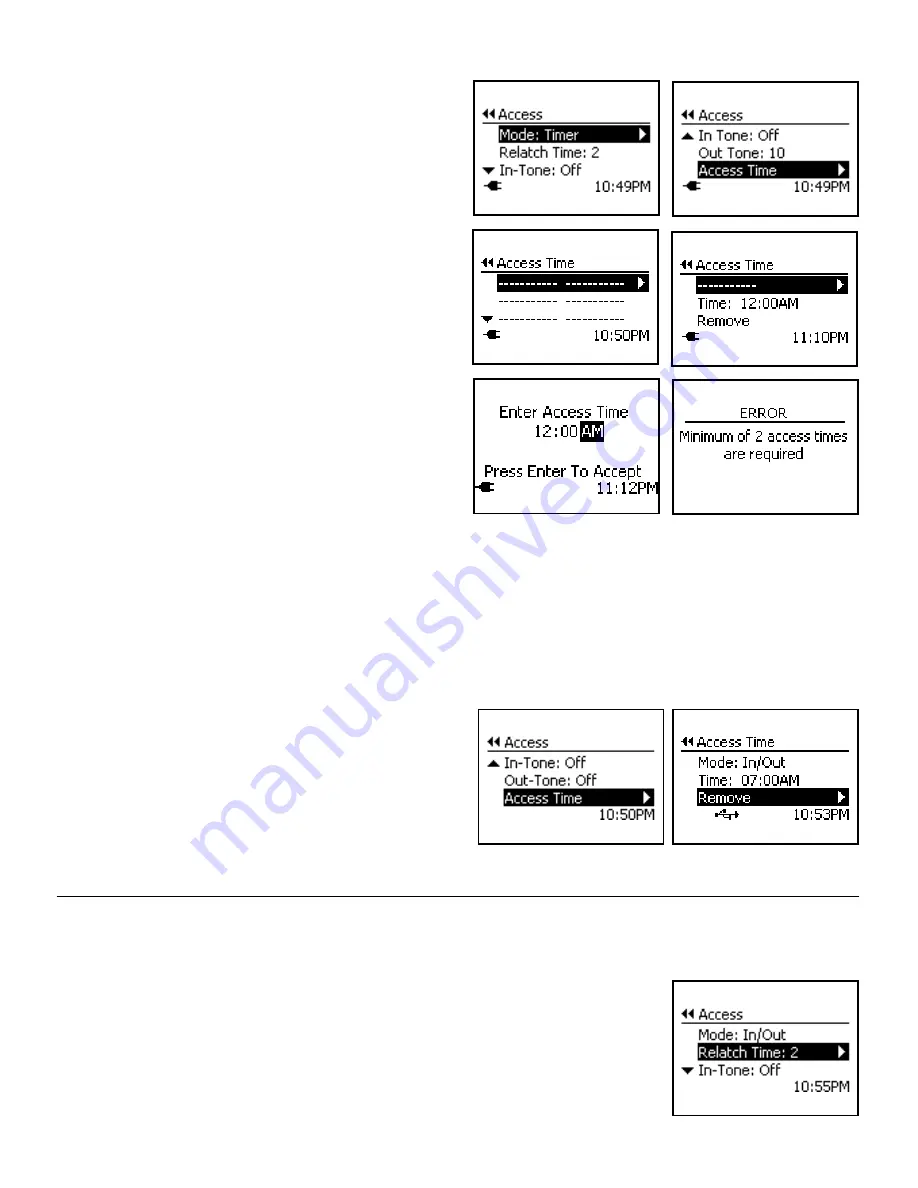
To Set Timer Mode:
1. From
Main Menu
select
Setup
>
Pet Settings
>
Access
>
Mode
.
2. Press right arrow key to scroll to
Timer
option to select.
3. Once Timer Mode has been selected,
Access Time
will
appear at bottom of Access menu list. Use down arrow key to
highlight
Access Time
then right arrow key to select.
4. The Access Time screen will list four available time slots. Press
right arrow key to select first time slot.
5. The first line listed on Access Time menu is to select the pet
Access Mode. Use right arrow key to scroll through and select
desired pet Access Mode:
In/Out, In-Only or Out-
Only
.
6. Use down arrow key to highlight
Time
. Press right arrow key
to enter specific time for your pet(s) to have the access you just
selected in step 5. After you use arrow keys to enter desired
time, press enter key to accept. Press left arrow/back key to
return to Access Time menu screen.
7. Use down arrow key to highlight second time slot. Press right
arrow key to select. Repeat steps 5 & 6 to select pet access
mode and scheduled time for the access. Repeat steps for up
to 4 times.
Remember a minimum of 2 programmed
times are required
. After you select and enter desired
access options and scheduled times, review the Access Time
menu screen to make sure what you entered is correct.
If 2 time slots have not been programmed, you will receive an error screen. The Access Mode will then
default back to In/Out Mode.
To Remove Timer Mode:
Note:
Timer Mode can be disabled by setting a different Access Mode while keeping the programmed Timer Mode settings. This
might be useful if you want to use Timer Mode during the week and a different Access Mode on the weekend.
1. From
Main Menu
select
Setup
>
Pet Settings
>
Access
>
Mode
2. Press right arrow key to scroll to
Timer
option to select.
3. Once Timer has been selected, Access Time will appear at
bottom of Access Menu list. Use down arrow key to highlight
Access Time
then right arrow key to select.
4. Use up and down arrow keys to highlight which Access Time
slot you wish to remove. Press right arrow key to select.
5. Use down arrow key to highlight
Remove
and right arrow key
to select. The time slot on the Access Time Menu should now
be removed.
You must have a minimum of two programmed Access Times for Timer Mode to work.
Re-latch Time
The Re-latch Time is the amount of time it takes the pet door flap to relock after the SmartDoor
™
Plus Key is no longer detected. The
factory default Re-latch Time is set to 2 seconds, but can be changed from 1 second to 60 seconds. A longer Re-latch Time may be
needed if you have older or slower pets.
To Change Re-latch Time:
1. From
Main Menu
select
Setup
>
Pet Settings
>
Access
. Use right arrow key to select.
2. Use down arrow key to highlight
Relatch Time
then use the right arrow key to scroll through to
find desired Re-latch Time. Press left arrow/back key to return to Main Menu.


