Petsafe PPA00-15930 Скачать руководство пользователя страница 10

Customer Care Center   1-800-732-2677

10

Prepare, Setup and Test

Install Clock Battery and Power Source 

The SmartDoor Plus pet door is shipped with the clock battery not installed. This is to prevent loss of 
battery life before purchase and use. The 3-V Lithium coin cell battery (size CR2032) needs to be 
installed before proceeding with setup, testing and installation. The battery is required to keep the 
clock’s time during any power loss. Typical clock battery life is about 1 year with normal use and 
operating power from power adapter or rechargeable lithium-ion battery. With no operating 
power, expected clock battery life is about 10 weeks. If you will not be using the pet door or have 
no operating power for an extended period of time, it is recommended to remove the clock battery 
to prevent loss of battery life. When the clock battery needs replaced, if the battery has not been 
installed or it has been installed incorrectly, you will receive an alert on the LCD Screen.
Choose your power source for your SmartDoor Plus pet door 
to operate. A power adapter and a rechargeable lithium-ion 
battery are included. The rechargeable lithium-ion battery can 
be used for full operation of the pet door or as a battery back-
up option for the power adapter in case of a power loss.

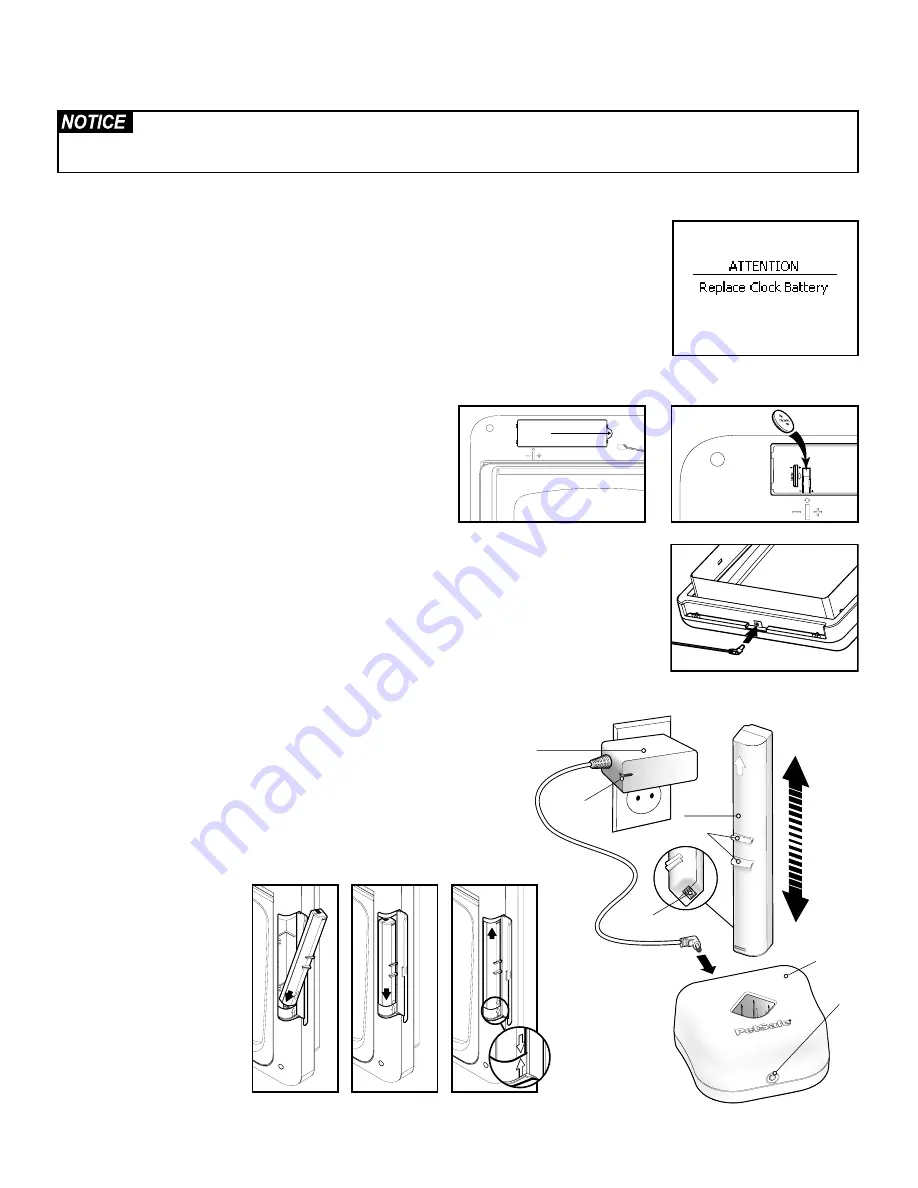
To Install Clock Battery:

 Remove clock battery cover from 

back of interior frame. Battery slot is located on left side of 
circuit board. Insert battery with positive (+) side facing the right side of the battery slot. Make sure 
battery is fully inserted. Reinsert battery cover and push to snap into place.

To Install Power Adapter:

 The SmartDoor Plus comes supplied with a low-voltage AC adapter 

for power. Insert power adapter into concealed power connection located underneath bottom of 
interior frame.

To Install Rechargeable Battery: 

1.  For safety reasons, the lithium-ion battery is shipped not fully charged. 

The battery will need to be fully charged before use. To charge battery 
connect supplied power adapter to charging station and plug adapter 
into a standard household 120 volt AC circuit outlet. Insert lithium-ion 
battery into charging station with battery contacts facing down. The 
charging station LED will remain illuminated with a red light until the 
battery is fully charged. After battery is fully charged, unplug power 
adapter and disconnect from charging station. Remove battery.

2.  Open battery compartment cover. With battery contacts pointed 

up and arrow on battery pointed down, insert bottom of battery into 
battery compartment.

3.  Using the battery grips, 

push battery down to 
compress spring inside 
bottom of battery 
compartment and insert 
top of battery.

4.  Release grips until 

arrow on battery and 
arrow inside battery 
compartment are aligned. 
Close battery cover. 

Read this entire guide prior to cutting or modifying an opening in your door or wall. Do not proceed with cut-out 
or installation until your SmartDoor

 Plus is assembled, powered up, programmed for your pet and all steps under 

“Prepare, Setup and Test” have been completed.

Pull and lift

here

Power Adapter

Lithium-ion

Battery

Charging 

Station

Battery

Contacts

Power 

Adapter 

LED

LED

Indicator

Battery Grips

Содержание PPA00-15930

Страница 1: ...PPA00 15930 PPA00 15931 SmartDoor Plus Please read this entire guide before installing Installation and Operating Guide...

Страница 2: ...eates Power tools can cause severe injury Follow all safety instructions for your power tools Be sure to always wear your safety goggles and other proper safety equipment Ensure the power adapter is u...

Страница 3: ...amaged plug or use charger if damaged in any way The user prior to installation must become familiar with all building codes that may affect the installation of the pet door and determine along with a...

Страница 4: ...y When applying the cutting template there should be a minimum of 3 inches between the bottom and sides of the door and the outer edge of the template to maintain the structural integrity of the door...

Страница 5: ...Indicators 7 Key Definitions 7 Pet Door Icon Definitions 9 Pet Door LED Indicator 9 Prepare Setup and Test 10 Install Clock Battery and Power Source 10 Rechargeable Battery LED Indicator and Specifica...

Страница 6: ...ay Programming is easy using the LCD screen and keypad The SmartDoor Plus is programmable for up to 20 pets SmartDoor Plus Key Worn on your pet s collar the SmartDoor Plus Key uses RFID technology by...

Страница 7: ...your pet s key Clock Battery The 3 V lithium coin cell battery size CR2032 which keeps the clock s time during any power loss Clock Battery Cover Covers and protects 3 V lithium coin cell clock batte...

Страница 8: ...ow If the battery dies the default factory setting is off for the beep and locked for the flap An alert ATTENTION screen will appear on the LCD screen and LED will blink red twice every 6 seconds when...

Страница 9: ...es required Door operational mode must be set to Smart Mode for Timer Mode to work Volume Turns speaker On or Off Default factory setting is On Pet Door Icon Definitions Pet Door LED Indicator Icon Fu...

Страница 10: ...battery slot Make sure battery is fully inserted Reinsert battery cover and push to snap into place To Install Power Adapter The SmartDoor Plus comes supplied with a low voltage AC adapter for power I...

Страница 11: ...nce Prior to installation it is recommended to setup program and test the SmartDoor Plus pet door in the intended installation location to check for possible radio frequency interferences These interf...

Страница 12: ...erent location to install the pet door Also avoid installing the pet door in a narrow hallway The SmartDoor Plus may be unable to read the SmartDoor Plus Key if your pet approaches at a sharp angle Ke...

Страница 13: ...your pet s key is successfully programmed you will hear three beeps The Rename Pet screen will appear Pet 1 will be listed at the bottom of the screen You can leave pet name as Pet 1 or rename 4 To r...

Страница 14: ...s programmed SmartDoor Plus Key 8 to 10 inches away and parallel to flap Slowly move the key toward the flap until the pet door reads the key and flap system unlocks Push through flap with your hand...

Страница 15: ...rammed to the pet door Each programmed SmartDoor Plus Key has been tested in the installation location on both interior and exterior side with the pet door reading each key If installing in a door no...

Страница 16: ...ful Tip Clamp down or weight the door to prevent it from moving The Pet Door can be installed with the door hanging based on your skill level 2C Match the marked lines on the door with the shoulder an...

Страница 17: ...me frame with flap inside the cut out and check the fit Then place the exterior frame into the underside of the cut out to check the fit If the frames do not easily fit inside the opening you may need...

Страница 18: ...e wire guide excess wire into space between top edge of door cut out and tunnel on exterior frame Align interior frame into cut out View both sides of door to ensure the exterior and interior telescop...

Страница 19: ...t might be helpful to lock the exterior U flap so it does not move and scare your pet To lock exterior U flap make sure interior U flap and main flap are securely taped open while in Open Mode Next ch...

Страница 20: ...o work for you and your pet Programming the pet door can be done by using the door control panel Main Menu This is the default screen If navigating a lower level menu the screen will time out and retu...

Страница 21: ...buttons to be disabled by setting a 4 digit PIN This is helpful to prevent a child from changing the door or pet settings To Lock Keypad 1 From Main Menu select Setup Door Settings and use down arrow...

Страница 22: ...flap in Smart Mode the pet door will change to a preset traditional mode This can be set to either Open or Locked for the shutdown position An alert will appear on the LCD screen when the pet door ent...

Страница 23: ...it This is useful if you want to take your pet to the vet or if you want to keep your pet inside at nighttime Out Only Mode Allows any pet wearing a programmed SmartDoor Plus Key to exit through the p...

Страница 24: ...rammed you will receive an error screen The Access Mode will then default back to In Out Mode To Remove Timer Mode Note Timer Mode can be disabled by setting a different Access Mode while keeping the...

Страница 25: ...f the pet door could prevent it from programming properly To Add Pet 1 Go to Main Menu Setup Pet Settings Add Pet The 30 second countdown screen will appear 2 Hold the SmartDoor Plus Key 5 inches to 6...

Страница 26: ...ly read key when worn by your pet 3 When your pet s SmartDoor Plus Key is successfully relearned you will hear three beeps and the LCD screen will return to Pet n menu screen Press left arrow back key...

Страница 27: ...for pet Check re latch time is set to 1 or 2 seconds see Re latch Time page 24 May have an error or ATTENTION screen Check LCD screen for message In Tone or Out Tone is not working Check to make sure...

Страница 28: ...another power adapter if one is available pet door uses same adapter ATTENTION screen Low Battery Mode Recharge battery Reset Button If a problem continues or if you still have issues after turning of...

Страница 29: ...e it was purchased in order that it can be placed in our recycling system If this is not possible please contact the Customer Care Center for further information Battery Disposal Separate collection o...

Страница 30: ...first year of ownership after the first year a service or upgrade charge will apply relative to replacement of the Product with new or refurbished items at Radio Systems sole discretion The limited wa...

Страница 31: ...d to a replacement or refund for a major failure and for compensation for any other reasonably foreseeable loss or damage You are also entitled to have the goods repaired or replaced if the goods fail...

Страница 32: ...Radio Systems Corporation 10427 PetSafe Way Knoxville TN 37932 1 800 732 2677 www petsafe net 400 2052 2016 Radio Systems Corporation...

Отзывы: