Petsafe PPA00-15930 Скачать руководство пользователя страница 14

Customer Care Center   1-800-732-2677

14

Test SmartDoor

 Plus Key 

Once your pet’s SmartDoor Plus Key has been programmed, it is important to test to make sure it is working properly and can be read 
by the pet door in your planned installation location.  Testing should be done on both the interior and exterior side of the location for 
each programmed key.

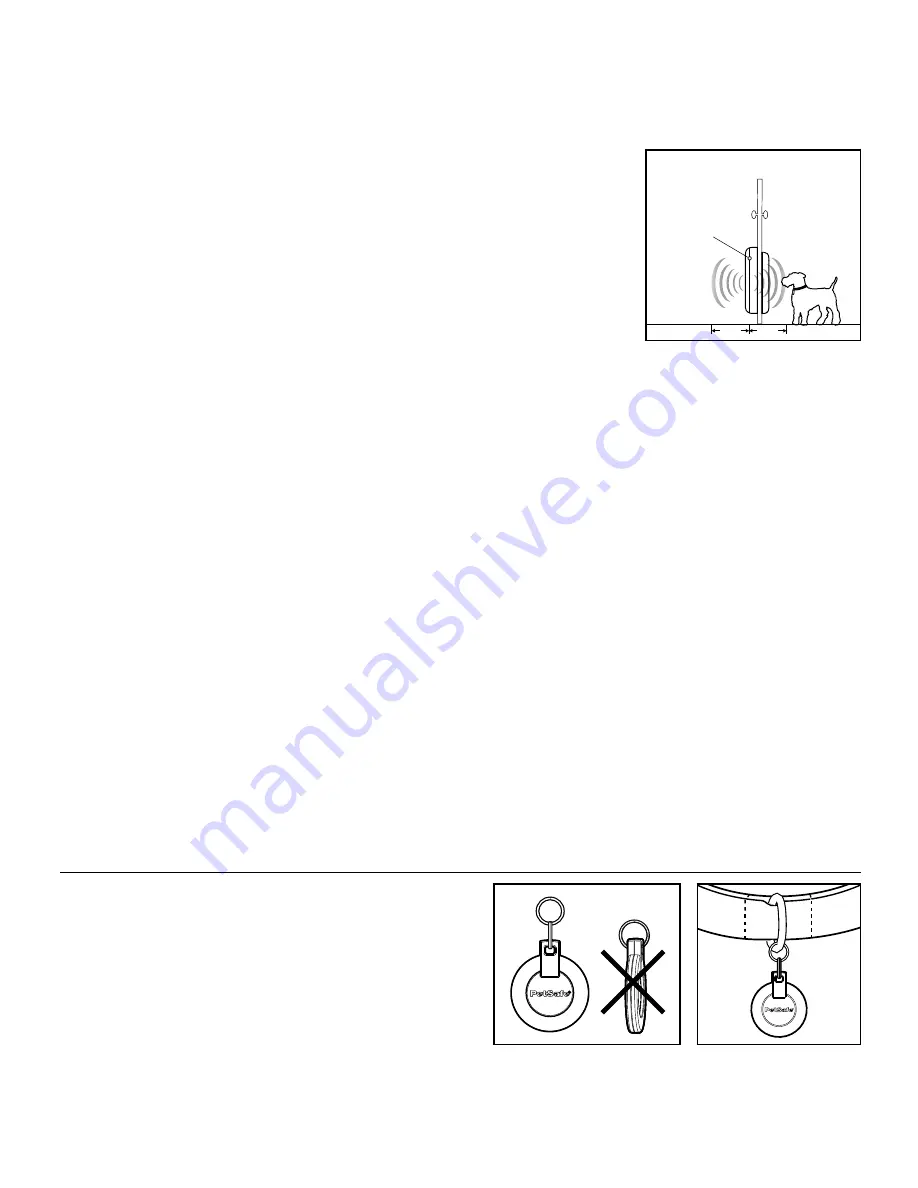
Understanding Read Range

Prior to testing the SmartDoor Plus Key, it is important to understand the Read Range of the 
pet door.  Read Range is the distance between the SmartDoor Plus Key and the SmartDoor 
Plus pet door when it first detects the key and triggers the flap system to unlock or operate 
as programmed for your pet.  The Read Range can be up to 10 inches or it may be less 
depending on the location and application in which the pet door is installed.  The mechanism 
which detects and reads the key is located within the interior pet door frame.  Due to this, you 
may see slight differences between the Read Range on the inside and outside of the pet door. 

Note:

 To test the SmartDoor Plus Key, the Door Operational Mode must be set to Smart 

Mode (which is default factory setting).  Check to make sure the pet door is in Smart Mode 
prior to testing (see “Door Operational Modes” page 21).

To Test Key:

1.  Place the SmartDoor Plus pet door directly in front of interior side of installation location in the upright position.  It is very important 

the pet door is vertical and not leaning so the flap system will operate properly and not jam.  

2.  Stand to side of pet door out of view of interior motion sensor.  Do not stand in front of pet door or this could cause the motion 

sensor to not operate correctly. 

3.  While standing to side, wave your hand back and forth in front of motion sensor to activate.  Next, hold your pet’s programmed 

SmartDoor Plus Key 8 to 10 inches away and parallel to flap. Slowly move the key toward the flap until the pet door reads the key 
and flap system unlocks.  Push through flap with your hand to check pet door flap unlocked on interior side.  

4.  After testing from interior side, go to exterior side of your installation location.  Turn the pet door around where exterior frame is 

facing you. 

5.  Again, stand to side of pet door.  Repeat waving your hand back and forth to activate motion sensor and test if the pet door is 

reading the key.  Make sure to push through flap with your hand to check flap unlocked on exterior side.

6.  If you have multiple pets, repeat this test for each programmed SmartDoor Plus Key.

If the SmartDoor Plus pet door does not read your pet’s key after several testing attempts, you may need to reprogram the key (see 
“Relearn Pet” page 26). Make sure you reprogram the SmatDoor Plus Key at 5 to 6 inches away from the flap, then test the key again. 
If the pet door still does not read the key, select and move to a different installation location and follow key testing steps once more.  
If the “To Test Key” steps continue to be unsuccessful, contact our Customer Care Center for additional help. 

 DO NOT PROCEED 

WITH INSTALLATION.

If the SmartDoor Plus is reading your pet’s programmed SmartDoor Plus Key and 

ALL

 steps under “Prepare, Setup and Test” were 

successful, you can proceed with preparing your pet’s key and pet door installation. 
If ANY STEPS UNDER “PREPARE, SETUP AND TEST” WERE UNSUCCESSFUL,

 DO NOT PROCEED WITH INSTALLATION.


Contact our Customer Care Center for assistance at 1-800-732-2677.

Prepare SmartDoor Plus Key

Attach the SmartDoor Plus Key to your pet’s collar using the included 
split key rings.  For best results, attach the key to the front of your pet’s 
collar.  The key should hang under your pet’s neck and parallel to the 
flap so the pet door can properly read the key. 

10 in.

10 in.

READ RANGE

Main Flap 

with Reader

OUTSIDE

INSIDE

Содержание PPA00-15930

Страница 1: ...PPA00 15930 PPA00 15931 SmartDoor Plus Please read this entire guide before installing Installation and Operating Guide...

Страница 2: ...eates Power tools can cause severe injury Follow all safety instructions for your power tools Be sure to always wear your safety goggles and other proper safety equipment Ensure the power adapter is u...

Страница 3: ...amaged plug or use charger if damaged in any way The user prior to installation must become familiar with all building codes that may affect the installation of the pet door and determine along with a...

Страница 4: ...y When applying the cutting template there should be a minimum of 3 inches between the bottom and sides of the door and the outer edge of the template to maintain the structural integrity of the door...

Страница 5: ...Indicators 7 Key Definitions 7 Pet Door Icon Definitions 9 Pet Door LED Indicator 9 Prepare Setup and Test 10 Install Clock Battery and Power Source 10 Rechargeable Battery LED Indicator and Specifica...

Страница 6: ...ay Programming is easy using the LCD screen and keypad The SmartDoor Plus is programmable for up to 20 pets SmartDoor Plus Key Worn on your pet s collar the SmartDoor Plus Key uses RFID technology by...

Страница 7: ...your pet s key Clock Battery The 3 V lithium coin cell battery size CR2032 which keeps the clock s time during any power loss Clock Battery Cover Covers and protects 3 V lithium coin cell clock batte...

Страница 8: ...ow If the battery dies the default factory setting is off for the beep and locked for the flap An alert ATTENTION screen will appear on the LCD screen and LED will blink red twice every 6 seconds when...

Страница 9: ...es required Door operational mode must be set to Smart Mode for Timer Mode to work Volume Turns speaker On or Off Default factory setting is On Pet Door Icon Definitions Pet Door LED Indicator Icon Fu...

Страница 10: ...battery slot Make sure battery is fully inserted Reinsert battery cover and push to snap into place To Install Power Adapter The SmartDoor Plus comes supplied with a low voltage AC adapter for power I...

Страница 11: ...nce Prior to installation it is recommended to setup program and test the SmartDoor Plus pet door in the intended installation location to check for possible radio frequency interferences These interf...

Страница 12: ...erent location to install the pet door Also avoid installing the pet door in a narrow hallway The SmartDoor Plus may be unable to read the SmartDoor Plus Key if your pet approaches at a sharp angle Ke...

Страница 13: ...your pet s key is successfully programmed you will hear three beeps The Rename Pet screen will appear Pet 1 will be listed at the bottom of the screen You can leave pet name as Pet 1 or rename 4 To r...

Страница 14: ...s programmed SmartDoor Plus Key 8 to 10 inches away and parallel to flap Slowly move the key toward the flap until the pet door reads the key and flap system unlocks Push through flap with your hand...

Страница 15: ...rammed to the pet door Each programmed SmartDoor Plus Key has been tested in the installation location on both interior and exterior side with the pet door reading each key If installing in a door no...

Страница 16: ...ful Tip Clamp down or weight the door to prevent it from moving The Pet Door can be installed with the door hanging based on your skill level 2C Match the marked lines on the door with the shoulder an...

Страница 17: ...me frame with flap inside the cut out and check the fit Then place the exterior frame into the underside of the cut out to check the fit If the frames do not easily fit inside the opening you may need...

Страница 18: ...e wire guide excess wire into space between top edge of door cut out and tunnel on exterior frame Align interior frame into cut out View both sides of door to ensure the exterior and interior telescop...

Страница 19: ...t might be helpful to lock the exterior U flap so it does not move and scare your pet To lock exterior U flap make sure interior U flap and main flap are securely taped open while in Open Mode Next ch...

Страница 20: ...o work for you and your pet Programming the pet door can be done by using the door control panel Main Menu This is the default screen If navigating a lower level menu the screen will time out and retu...

Страница 21: ...buttons to be disabled by setting a 4 digit PIN This is helpful to prevent a child from changing the door or pet settings To Lock Keypad 1 From Main Menu select Setup Door Settings and use down arrow...

Страница 22: ...flap in Smart Mode the pet door will change to a preset traditional mode This can be set to either Open or Locked for the shutdown position An alert will appear on the LCD screen when the pet door ent...

Страница 23: ...it This is useful if you want to take your pet to the vet or if you want to keep your pet inside at nighttime Out Only Mode Allows any pet wearing a programmed SmartDoor Plus Key to exit through the p...

Страница 24: ...rammed you will receive an error screen The Access Mode will then default back to In Out Mode To Remove Timer Mode Note Timer Mode can be disabled by setting a different Access Mode while keeping the...

Страница 25: ...f the pet door could prevent it from programming properly To Add Pet 1 Go to Main Menu Setup Pet Settings Add Pet The 30 second countdown screen will appear 2 Hold the SmartDoor Plus Key 5 inches to 6...

Страница 26: ...ly read key when worn by your pet 3 When your pet s SmartDoor Plus Key is successfully relearned you will hear three beeps and the LCD screen will return to Pet n menu screen Press left arrow back key...

Страница 27: ...for pet Check re latch time is set to 1 or 2 seconds see Re latch Time page 24 May have an error or ATTENTION screen Check LCD screen for message In Tone or Out Tone is not working Check to make sure...

Страница 28: ...another power adapter if one is available pet door uses same adapter ATTENTION screen Low Battery Mode Recharge battery Reset Button If a problem continues or if you still have issues after turning of...

Страница 29: ...e it was purchased in order that it can be placed in our recycling system If this is not possible please contact the Customer Care Center for further information Battery Disposal Separate collection o...

Страница 30: ...first year of ownership after the first year a service or upgrade charge will apply relative to replacement of the Product with new or refurbished items at Radio Systems sole discretion The limited wa...

Страница 31: ...d to a replacement or refund for a major failure and for compensation for any other reasonably foreseeable loss or damage You are also entitled to have the goods repaired or replaced if the goods fail...

Страница 32: ...Radio Systems Corporation 10427 PetSafe Way Knoxville TN 37932 1 800 732 2677 www petsafe net 400 2052 2016 Radio Systems Corporation...

Отзывы: