6
NOTE: in these instructions the following convention is used:
permanently
alight
blinking
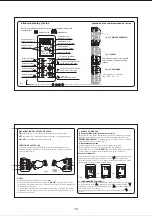
Legend of display and operanting buttons
fig. 3
"CONFIRM"
buttons
"RESET"
buttons
"FIRST USE"
buttons
Key to button combinations
- programming and confirming :
YEAR - MONTH - DAY - ±1h - HOUR
ON
OFF
P
60’
45’
30’
15’
1 2 3 4 5 6 7
P
R
Y
M
Ch
P
Manual mode activation
Program activation
indication
Relay status
indication
Display of quarter hours
activated
Days of the week
1st quarter hour
activation button
2nd quarter hour
activation button
3rd quarter hour
activation button
4th quarter hour
activation button
Hours and
minutes display
Operation
programming button
Minutes, hours, days, months
and years increase button
Minutes, hours, days, months
and years decrease button
Manual override button
N.B.
deactivated
In a set program, the relative quarter hour is
by pressing
Not active when the appliance is in
manual override status
RESET
"RESET
Two types of reset are possible:
- Pressing the
" buttons simultaneously, all data in the memory is
cleared, both date and time settings and relay activation program data.
- In the event of a power supply failure the accumulator will run down and the
appliance resets by clearing day and time settings but maintaining on/off time
settings.
PRESSING THE BUTTONS
When the switch is mounted to a DIN rail alongside other components,
operate the buttons with the finger placed at the centre of the appliance,
pressing outwards (fig. 4)
P
R
Y
M
Ch
P
R
Y
M
Ch
X
OK
fig. 4
RELAY STATUS DISPLAY
ON
OFF
ON
OFF
permanently alight = operation in program mode with relay activated
permanently alight = operation in program mode with relay
deactivated
and
blinking indicates power supply failure
System test
Before starting to enter the date it is possible to select the status of the relay
manually, by pressing
momentarily. The ON or OFF status will appear
in the display. After data has been entered for the first time, the relay returns
to normal status automatically.
5 - MANUAL FORCING
With the appliance in "operating status", the status of the switching relay can
be selected manually (forced) by pressing and holding
for 5 seconds
(the
symbol will appear in the display); thereafter, each time
is
pressed the relay status will change (from ON to OFF and vice versa).
Press and hold
for 5 seconds to return to operating status.
4 - PUTTING INTO OPERATION
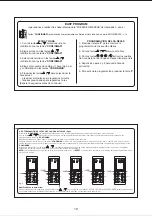
a) Powering up (switching on) for the first time
"FIRST USE"
b) Powering up subsequent to first use.
"RESET
When the clock is powered up for the first time, the display will appear
blank; activate by pressing the
buttons simultaneously. The
appliance will run a self-test routine, following which the date can be
entered.(fig. 5)
The clock will come into operation with the display activated.
To set the clock again, press the
" buttons simultaneously (General
reset). The appliance will run a self-test routine following which the date can
be entered (fig. 5)
Fig.5


