8
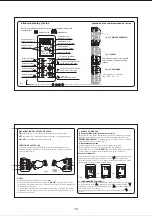
Display indication
Ch0
Ch1
Ch2
Ch3
Ch4
Ch5
7 - STANDARD/DAYLIGHT SAVING TIME ADJUSTMENT SETTING
"CONFIRM"
Press
and
to select one of the automatic adjustment programs available (see following chart) according to the time zone.
Selecting Ch5 and pressing the
buttons simultaneously, the standard/daylight saving time adjustment can be set according to a preferred
calendar.
Note:
Time-out: in the event that programming operations are interrupted or programs changed, the appliance will revert automatically to "operating status" once 2
minutes have lapsed with no buttons being pressed; only programs completed and confirmed will be stored.
After returning to operating status, at least 5 seconds must elapse before the
button becomes active.
P
Time zones
European Union
Great Britain
North America
European Union
Summer adjustment
+ 1 hour (daylight saving)
None
Last Sunday
of March
First Sunday
of April
Free setting
Last Sunday
of March
Last Sunday
of March
Winter adjustment
- 1 hour
ast Sunday
of September
Fourth Sunday
Of October
ast Sunday
of October
ast Sunday
of October
Free setting
None
L
L
L
N.B.
h2
The product is
factory set on the
C
automatic
adjustment program,
which, if acceptable,
needs only to be
confirmed
.
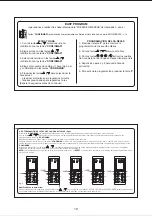
Standard/daylight saving time adjustment setting according to preferred calendar
"CONFIRM
"CONFIRM"
"CONFIRM"
Press
and
to select the month for +1h change to daylight saving time
. Press the
" buttons simultaneously to confirm, then
proceed to set the day for +1h.
Press
and
again to select the day for +1h
, confirm by pressing the
buttons, then proceed to set the month for -1h
change back to standard time
.
Proceed as described above to set the month and day for -1h
; then press the
buttons to return to operating status.
To be accepted by the appliance, the set adjustment program must include:
month +1h
day +1h
month -1h
day -1h
(display:
)
(display:
)
(display:
)
(display:
)
Reading and changing set programs
With the appliance in operating status, press
to access the relay programming function. There are two ways of displaying set programs:
1 - press
and
to scroll through the hours until a programmed hour is displayed, and the quarter hour settings will appear.
2 - pressing and holding
for a few seconds, the first program of the day will appear in the display. Pressing
again for a few seconds, the successive
programs of the day (if any) will appear, otherwise the previous program will appear again. To quit display mode or change the programs proceed as described
in chapter 7: RELAY ACTIVATION PROGRAMS.
8 - RELAY ACTIVATION PROGRAMS
To access the programming function, press
; the symbol P will appear on the display (blinking if there are no other programs set). Now press
and
select the relay activation time (e.g. from 6:30 to 8:00): 06 will appear on the display; pressing
the relay will be activated from 6:30 to 6:45; pressing
the
relay will be activated from 6:45 to 7:00.
Pressing
, 07 will appear in the display in the hour field; then, pressing
,
,
,
in sequence, the relay will be activated from 7:00 to 8:00 (the
programmed quarter hours will appear in the display).
To program activation at other times, select the desired time by pressing
and proceed as described above.
To quit the programming function, press
; this will return the appliance to operating status (the product will become active when one further minute has
elapsed).
P
P
P
P
P
The manufacturer reserves the right to make all technical and manufacturing modifications deemed necessary without prior notice
.
Relay deactivation:
Reading and
changing set programs
- Access the program to be
changed (see
)
- deselect the active quarter
hours by pressing the relative
buttons
- exit the programming
OFF
3
P
R
Y
M
Ch
ß
ß
ß
ß
ß
OFF
P
OFF
OFF
P
OFF
P
P
60’
45’
30’
15’
OFF
P
60’
45’
P
R
Y
M
Ch
P
R
Y
M
Ch
P
R
Y
M
Ch
P
R
Y
M
Ch
P
R
Y
M
Ch


