background image

7

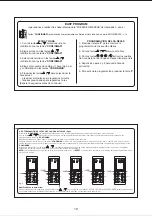
EASY PROGRAM

(operations to be carried out after "PUTTING INTO OPERATION" - chap.4)

DATE AND TIME

1- Press

and

to select the year; press the

buttons to confirm

2- Press

and

to select the month; press the

buttons to confirm

3- Press

and

to select the day; press the

buttons to confirm

4- Select the ±1hour change program (from 0 to 5);
press the

" buttons to confirm

5- Press

and

to select the current time;

- to adjust the minutes, press momentarily
- to adjust the hours, press and hold
(Wait for 5 seconds, then proceed)

"CONFIRM"

"CONFIRM"

"CONFIRM"

"CONFIRM

RELAY OPERATIONS

1-To access programming of daily switching
operations, press

2- To select the time of the switching operation,
press

and

3- To activate the quarter hours of the hour the
switching operation is to take place, press tappets

,

,

and

4- Repeat steps 2 and 3 for each hour of activation

5- To quit the programming function, press

P

P

"CONFIRM"

data entered

buttons: pressing these simultaneously will confirm YEAR-MONTH-DAY

6 - SETTING CURRENT DATE AND TIME

"CONFIRM"

"CONFIRM"

"CONFIRM"

"CONFIRM

(fig.6)

Pressing the

buttons simultaneously, the current date and time setting program will be activated.

Press

or

to select the current year (only the last two digits will appear on the display). Press the

buttons again simultaneously to confirm.

Repeat this same procedure above to set the month and then the day.
After confirming the current day with the

buttons, Ch will appear on the display, followed by a number from 0 to 5, indicating the automatic

adjustment program piloting the changeover from standard time to daylight saving time and vice versa (see relative chapter); select the program desired and
confirm by pressing the

" buttons again.

Now set the current time by pressing

and

; to scroll through the hours press and hold; to scroll through the minutes press momentarily. Once 5 seconds

have elapsed after the last button has been pressed, the appliance reverts to operating status.
NOTE: after resetting, the display will appear as in fig.6; if the settings have been changed, then the current year, month, etc. will appear on the display.

Change current time

With the appliance in operating status, press

and

as indicated in step 5 (DATE AND TIME) of EASY PROGRAM (display blinking). Once 5 seconds have

elapsed after making the change, the appliance reverts to operating status (display permanently on).

fig. 6

1

ß

ß

ß

P

R

Y

M

Ch

P

R

Y

M

Ch

ß

P

R

Y

M

Ch

P

R

Y

M

Ch

P

R

Y

M

Ch

Содержание 1IO 1070

Страница 1: ...isolamento Grado di protezione Polluzione antenimento dei dati in mancanza di rete Precisione dell orologio direttive 73 23 CEE e 89 336 CEE PC DEIONN012 09 00 Dimensioni Schema dei morsetti 2 INSTAL...

Страница 2: ...DEI TASTI In caso di installazione su barra DIN a fianco di altri dispositivi si consiglia di premere i tasti posizionandosi con il dito al centro del dispositivo premendo verso l esterno fig 4 P R Y...

Страница 3: ...l impostazione della data e dell ora attuali Con i tasti o selezionare l anno in corso sul display appaiono solo le ultime due cifre Confermare premendo ancora e contemporaneamente i tasti Si passa co...

Страница 4: ...modifica programmi inseriti Dallo stato operativo premere il tasto per accedere all impostazione programmi rel Per visualizzare i programmi inseriti esistono due possibilit 1 premendo i tasti e far s...

Страница 5: ...device Type of output Maximum wire section at terminals Insulation Protection degree Operating temperature limits Storing temperature limits Dimensions Terminal diagram 2 INSTALLATION 3 ELECTRICAL CON...

Страница 6: ...rate the buttons with the finger placed at the centre of the appliance pressing outwards fig 4 P R Y M Ch P R Y M Ch X OK fig 4 RELAY STATUS DISPLAY ON OFF ON OFF permanently alight operation in progr...

Страница 7: ...setting program will be activated Press or to select the current year only the last two digits will appear on the display Press the buttons again simultaneously to confirm Repeat this same procedure...

Страница 8: ...nt program must include month 1h day 1h month 1h day 1h display display display display Reading and changing set programs With the appliance in operating status press to access the relay programming f...

Страница 9: ...ppareil Type de sortie Section maximum des fils aux bornes Classe d isolation Degr de protection Pollution Normes de r f rence pour marquage CE PC DEIONN012 09 00 Dimensions Sch ma des bornes 2 INSTAL...

Страница 10: ...il conserve la programmation des p riodes de marche ENFONCEMENT DES TOUCHES En cas d installation sur rail DIN c t d autres dispositifs il est conseill d appuyer sur les touches en mettant le doigt a...

Страница 11: ...S JOUR 1h CONFIRMER 6 REGLAGE DE LA DATE ET DE L HEURE COURANTES CONFIRMER CONFIRMER CONFIRMER CONFIRMER fig 6 En appuyant en m me temps sur les touches on ouvre le programme d introduction de la date...

Страница 12: ...rogrammes ins r s De l tat de marche appuyer sur la touche pour acc der au r glage des programmes du relais Il existe deux mani res de visualiser les programmes ins r s 1 en appuyant sur les touches e...

Страница 13: ...Lagerungstemperatur Referenznormen f r CE Zeichen Richtlinien 73 23 CEE 89 336 CEE PC DEIONN012 09 00 Abmessungen Schema der Klemmen 2 INSTALLATION 3 ELEKTRISCHE ANSCHL SSE An der Wand mit separat ge...

Страница 14: ...DRUCK AUF DIE TASTEN Bei der Montage auf einer DIN Schiene neben anderen Ger ten empfiehlt es sich die Tasten mit dem Finger in der Mitte nach au en zu dr cken Abb 4 P R Y M Ch P R Y M Ch X OK Abb 4 A...
Страница 15: ...en Druck auf die Tasten wird der Eingabemodus f r das aktuelle Datum und die aktuelle Uhrzeit gestartet Mit den Tasten oder das aktuelle Jahr ausw hlen auf der Anzeige erscheinen nur die letzten beide...

Страница 16: ...Programme k nnen auf zwei Arten angezeigt werden 1 durch Druck auf die Tasten und laufen die Stunden weiter Wenn eine Stunde erreicht wird die ein Schaltprogramm enth lt erscheinen die programmierten...

Страница 17: ...temperatura de almacenaje n desconexi n y aparato Installaci n Normativas de referencia para marca CE directivas 73 23 CEE 89 336 CEE PC DEIONN012 09 00 Dimensiones Esquema de los bornes 2 INSTALACIO...

Страница 18: ...E LAS TECLAS Si el reloj se instala en una barra DIN al lado de otros dispositivos se aconseja apoyar el dedo en el centro del dispositivo y hacer presi n hacia el lado externo fig 4 P R Y M Ch P R Y...

Страница 19: ...resionan simult neamente se activa el programa que permite determinar la fecha y la hora actuales Con las teclas o seleccionar el a o en curso en el display aparecen solo las ltimas dos cifras Confirm...

Страница 20: ...y que presionar la tecla para acceder a la programaci n de los rel s Para visualizar los programas ingresados existen dos posibilidades 1 presionar las teclas y para que corran las horas cuando se lle...

Отзывы: