background image

Recording

36

DVQX1761 (ENG) 

3

Press the shutter button fully to start 
recording.

• The focus point changes automatically while recording. 

When the icon (

B

) disappears, recording automatically 

ends.

• A motion picture will be recorded with [Rec Format] set to [MP4]. (Audio will not be recorded.)
• When [Auto Review] is enabled, a screen that lets you select the desired focus area will 

be displayed. (P36)

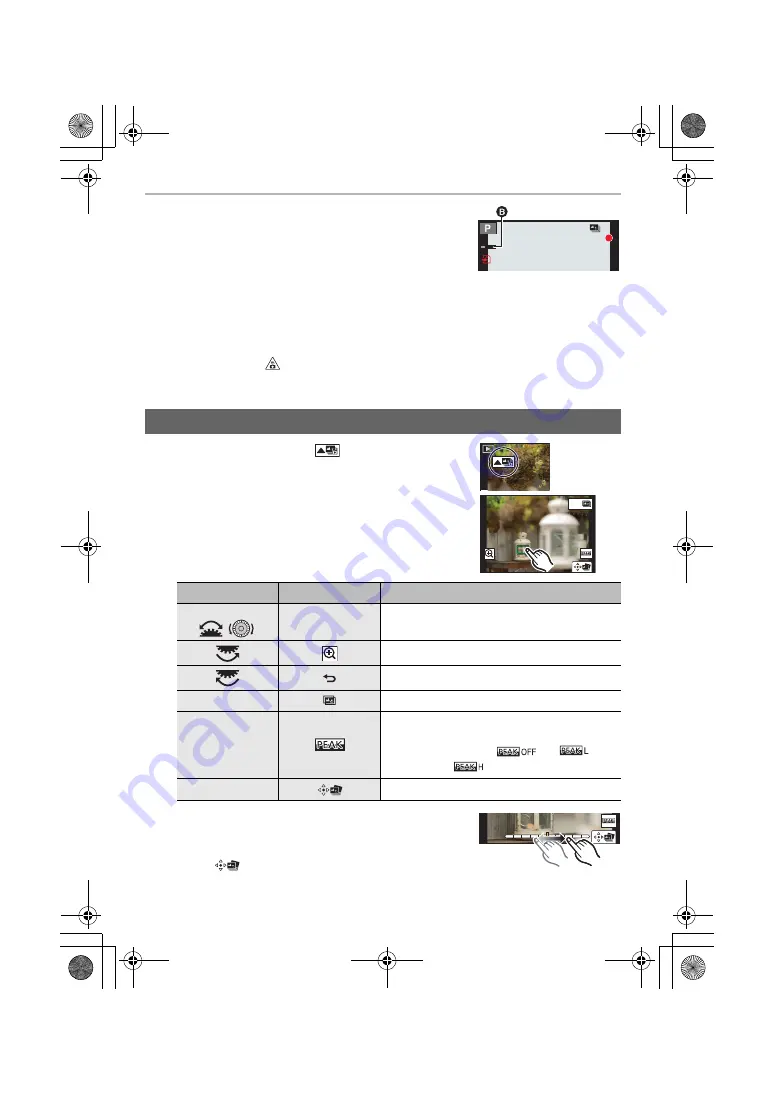
1

Select an image with the [

] icon on the playback 

screen, and press 

3

.

2

Touch the desired focus area.

• If a picture that is in focus is not available for the selected 

area, a red frame will be displayed. You cannot save a 
picture in this case.

• You cannot select the edges of the screen.

• You can fine-adjust the focus by dragging the slide bar 

during enlarged display. (You can also perform the same 
operation by pressing 

2

/

1

.)

3

Touch [

] to save the picture.

• The picture will be saved in JPEG format.

¥

When the ambient temperature is high or Post Focus recording is performed continuously, the 
camera may display [

] and recording may stop. Wait until the camera cools down.

¥

During recording, the angle of view will be narrower.

Selecting the Focus Position for the Picture to Save

Button operation

Touch operation

Description of operation

3

/

4

/

2

/

1

/

/

Touching

Selects a focus area.
• It cannot be selected during enlarged display.

Enlarges the display.

Reduces the display (during enlarged display).

Fn1

Switches to the Focus Stacking function. (P37)

s

In-focus portions are highlighted with colour. 
([Peaking])
• Switches in order of [

]

>

[

([LOW]) 

>

 [

] ([HIGH]).

[MENU/SET]

Saves the picture.

Fn1

DC-G90-G91EB-DVQX1761_eng.book  36 ページ  2019年4月2日 火曜日 午後4時59分

Содержание LUXIM DC-G90

Страница 1: ...se read these instructions carefully before using this product and save this manual for future use More detailed operating instructions are available in Operating Instructions for advanced features PDF format To read it download it from the website P90 DVQX1761ZA F0419MH0 until 2019 05 15 DC G90 G91EB DVQX1761_eng book 1 ページ 2019年4月2日 火曜日 午後4時59分 ...

Страница 2: ...adcast material for purposes other than your own private use may infringe copyright laws Even for the purpose of private use recording of certain material may be restricted Information for Your Safety Product identification marking WARNING To reduce the risk of fire electric shock or product damage Do not expose this unit to rain moisture dripping or splashing Use the recommended accessories Do no...

Страница 3: ...supplied The AC adaptor is in the standby condition when the mains plug is connected The primary circuit is always live as long as the mains plug is connected to an electrical outlet Type of wireless Frequency band central frequency Maximum power dBm e i r p WLAN 2412 2462 MHz 13 dBm Bluetooth 2402 2480 MHz 10 dBm CAUTION Danger of explosion if battery is incorrectly replaced Replace only with the...

Страница 4: ...t may be disrupted by electromagnetic wave radiation Do not use this unit near cell phones because doing so may result in noise adversely affecting the pictures and or sound Recorded data may be damaged or pictures may be distorted by strong magnetic fields created by speakers or large motors Electromagnetic wave radiation may adversely affect this unit disturbing the pictures and or sound If this...

Страница 5: ... We recommend storing important data on a PC etc Do not format the card on your PC or other equipment Format it on the camera only to ensure proper operation The battery is not charged when the camera is shipped Charge the battery before use The battery is a rechargeable lithium ion battery If the temperature is too high or too low the operating time of the battery will become shorter The battery ...

Страница 6: ...ecording 35 Bracket Recording 38 Live View Composite Recording 40 Image Stabiliser 41 Recording Motion Pictures 43 Creative Video Mode 46 Playback Playing Back Pictures 49 Playing Back Motion Pictures 49 Deleting Images 50 Menu Guide Menu Guide 51 Wi Fi Bluetooth What you can do with the Wi Fi Bluetooth function 62 Connecting to a Smartphone 64 Operating the Camera with a Smartphone 69 Others Impo...

Страница 7: ...ust Splash Resistant does not guarantee that damage will not occur if this camera is subjected to direct contact with water In order to minimise the possibility of damage please be sure the following precautions are taken Splash Resistant works in conjunction with the lenses that were specifically designed to support this feature Securely close the doors socket caps contact points cover flash etc ...

Страница 8: ...arger 5 This is attached to the camera body at the time of purchase 1 Interchangeable Lens 1 2 2 Lens Hood 3 Lens Cap 3 4 Lens Rear Cap 3 5 Battery Pack Indicated as battery pack or battery in the text Charge the battery before use 6 Battery Charger 4 Indicated as battery charger or charger in the text 7 AC Adaptor This is used for charging and power supply 8 USB Connection Cable 9 Shoulder Strap ...

Страница 9: ...lowing ratings of the SD Speed Class or UHS Speed Class Please confirm the latest information on the following website https panasonic jp support global cs dsc This Site is English only Keep the memory card out of reach of children to prevent swallowing SD Memory Card 512 MB to 2 GB This unit is compatible with UHS I UHS II UHS Speed Class 3 standard SDHC SDXC memory cards Operation of the cards o...

Страница 10: ... check the firmware version of the interchangeable lens attach it to the camera body and select Version Disp in the Setup menu To view the latest information on the firmware or to download the firmware visit the support site below https panasonic jp support global cs dsc This Site is English only Lens Mount adaptor Four Thirds mount specification lens Mount Adaptor DMW MA1 optional Leica M Mount i...

Страница 11: ...tion picture button P43 14 Mode dial P24 15 Flash 16 Hot shoe Hot shoe cover P13 Keep the hot shoe cover out of reach of children to prevent swallowing 17 Stereo microphone Be careful not to cover the microphone with your finger Doing so may make sound difficult to record 18 Flash open lever The flash opens and recording with the flash becomes possible 19 Dioptre adjustment dial P20 20 MIC socket ...

Страница 12: ...ton P27 Delete button P50 Cancel button P26 46 DISP button 47 Battery door P15 48 DC coupler cover When using an AC adaptor ensure that the Panasonic DC coupler DMW DCC8 optional and AC adaptor DMW AC10E optional are used Always use a genuine Panasonic AC adaptor DMW AC10E optional When using an AC adaptor optional use the AC Mains Lead supplied with the AC adaptor optional 49 Release lever P15 50...

Страница 13: ... direction indicated by arrow 1 Quick Start Guide Check that the camera is turned off Attach the shoulder strap when using the camera to prevent it from dropping H FS12060 H FSA14140 1 Lens surface 2 Tele 3 Focus ring 4 Zoom ring 5 Wide 6 Lens fitting mark P18 7 Contact points 8 Lens mount rubber 9 O I S switch Attaching the Shoulder Strap 2 4 3 5 7 8 1 6 1 3 2 4 9 8 6 7 5 DC G90 G91EB DVQX1761_en...

Страница 14: ...ding on how the battery has been used The charging time for the battery in hot cold environments or a battery that has not been used for a long time may be longer than normal 1 Connect the battery charger supplied and the AC adaptor supplied with the USB connection cable supplied Check the direction of the terminals and plug in out straight holding onto the plug It may result in malfunction by the...

Страница 15: ...l about the battery orientation insert all the way until you hear a locking sound and then check that it is locked by lever A To remove Push the lever A in the direction of the arrow to remove Turn the camera off and wait for the LUMIX display on the monitor to clear before removing the battery Remove the battery after use Do not use any other USB connection cables except the supplied one Do not u...

Страница 16: ... AC adaptor supplied into the power outlet Charge the battery using the camera Charging time Approx 180 min Use the products supplied with the camera for charging The battery inserted in the Battery Grip optional cannot be charged A Connect the USB connection cable supplied to the USB CHARGE socket Place the camera in an upright position and find the terminal at the top Check the direction of the ...

Страница 17: ...wer saving You can also charge the battery by connecting a USB device PC etc and the camera with the USB connection cable supplied In that case charging may take a while Do not use any other USB connection cables except the supplied one Do not use any other AC adaptors except the supplied one The AC adaptor supplied and USB connection cable supplied are for this camera only Do not use them with ot...

Страница 18: ...rn the camera off and wait for the LUMIX display on the monitor to clear before removing the card Change lenses where there is not a lot of dirt or dust Do not press the lens release button A when you attach a lens Remove a lens 1 Attach the lens cap 2 While pressing on the lens release button B rotate the lens toward the arrow until it stops and then remove Inserting the Card Optional Attaching a...

Страница 19: ... hour minute and press 3 4 to set 4 Press MENU SET to set 5 When The clock setting has been completed is displayed press MENU SET 6 When Please set the home area is displayed press MENU SET 7 Press 2 1 to select the home area and then press MENU SET Changing the Monitor Position When rotating the monitor be careful not to apply too much force Doing so may cause damage When not using the monitor it...

Страница 20: ...2 Hold the camera gently with both hands keep your arms still at your side and stand with your feet slightly apart Do not cover the flash A AF Assist lamp B microphone C or speaker D with your fingers or other objects Make sure your footing is stable and there is no danger of colliding with another person or object in the vicinity while taking pictures Formatting the card initialisation Setup Form...

Страница 21: ...ess the shutter button fully push it in further and take the picture Free angle shooting The monitor can be rotated to suit your needs This is convenient as it allows you to take pictures from various angles by adjusting the monitor Make sure that the camera does not move at the moment the shutter button is pressed Pictures cannot be taken until focus is achieved when Focus Release Priority is set...

Страница 22: ...ting Selects an item or numeric value This is expressed as follows in this document When rotating the control dial to the left or right Rotating Selects an item or numeric value These operating instructions describe operations of the front dial rear dial as follows Cursor buttons MENU SET button Control Dial Front Dial Rear Dial e g When rotating the front dial to the left or right e g When rotati...

Страница 23: ...ide is displayed 4 Press MENU SET and set You can also complete this step by performing either of the operations below Press the shutter button halfway Press the Fn button Mode dial Front dial Rear Dial Programme Shift Programme Shift Aperture value Aperture value Shutter speed Shutter speed Aperture value Shutter speed You can set the following settings in Dial Set of the Custom Operation menu Op...

Страница 24: ...speed is automatically determined by the aperture value you set Shutter Priority AE Mode The aperture value is automatically determined by the shutter speed you set Manual Exposure Mode The exposure is adjusted by the aperture value and the shutter speed which are manually adjusted Creative Video Mode P46 Custom Mode Use this mode to take pictures with previously registered settings Scene Guide Mo...

Страница 25: ...t Power Save LVF Shooting in Economy Touch To touch and release the touch screen Drag A movement without releasing the touch screen Pinch enlarge reduce On the touch screen spread pinch out two fingers to zoom in and narrow pinch in them to zoom out LVF button Switching the Monitor Viewfinder When Eye Sensor AF is set to ON in the Custom Focus Release Shutter menu looking through the viewfinder wi...

Страница 26: ...by rotating the rear dial 6 Press 3 4 of the cursor button to select the setting and press MENU SET Depending on the menu item its setting may not appear or it may be displayed in a different way You can also rotate the control dial to select the menu selector icon menu item or setting Close the menu Press or press the shutter button halfway Press DISP to display the menu description Menu items th...

Страница 27: ...ngs select Restore to Default Select Off when not setting a function in the Fn button Fn button settings at the time of purchase Custom Operation Fn Button Set Setting in REC mode Setting in PLAY mode Setting in REC mode Fn1 Dial Operation Switch Fn2 Q MENU Fn3 LVF Monitor Switch Fn4 Wi Fi Fn5 Preview Fn6 Level Gauge Fn7 Histogram Fn8 I S Lock Video Fn9 to Fn11 No function is set by default Settin...

Страница 28: ...ET Intelligent Auto menu Intelligent Auto Intelligent Auto Mode allows you to adjust some settings such as the brightness and colour tone while also using for other settings so that you can record pictures more suited to your preferences At the time of purchase the mode is set to Intelligent Auto Plus Mode Intelligent Auto iHandheld Night Shot When iHandheld Night Shot is set to ON and is detected...

Страница 29: ... the blurriness setting screen Setting brightness 1 Press 2 Rotate the rear dial to adjust brightness In the Custom Operation menu Exposure Comp Disp Setting you can change the functions to be set on the exposure compensation screen To return to the recording screen press again Record Using MF Applicable modes MF Manual Focus refers to manual focusing Use this function when you want to fix the foc...

Страница 30: ...ton halfway The recording screen will be displayed Button operation Touch operation Description of operation 3 4 2 1 Dragging Moves the enlarged area Pinching out in Enlarges reduces the screen in small steps s Enlarges reduces the screen Switches the enlarged display windowed full screen DISP Reset First time The position of the enlarged area is reset to the centre Second time The size is reset t...

Страница 31: ...e dial to P31 2 Select the recording method Single When the shutter button is pressed only one picture is recorded Burst Recordings are made in succession while the shutter button is pressed 4K PHOTO P31 When the shutter button is pressed a 4K photo is recorded Post Focus P35 When the shutter button is pressed Post Focus recording is performed Time Lapse Shot Stop Motion Animation Pictures are rec...

Страница 32: ...ressed and held Press the button fully slightly in advance Recording starts approximately 0 5 seconds after it has been pressed fully A Press and hold B Recording is performed 4K Burst S S S S is an abbreviation of Start Stop For capturing unpredictable photo opportunities Burst recording starts when the shutter button is pressed and stops when pressed again C Start First D Stop Second E Recording...

Страница 33: ... and press 3 If the image was recorded with 4K Pre Burst proceed to step 3 2 Drag the slide bar to make a rough selection of scenes Touching allows you to switch to the marker operation screen Rec 4K PHOTO Pre Burst Recording ON Rec 4K PHOTO Loop Recording 4K PHOTO ON If the surrounding temperature is high or 4K photos are recorded continuously may be displayed and recording may be stopped halfway...

Страница 34: ... be set by the Auto Marking function depending on the recording conditions and the status of subjects The camera is moving because of panning or jitter The movement of a subject is slow small The subject is small A face is not facing front Switches a marker to be displayed Touch Settings Auto Face Priority Motion Priority Off 2 2 Displays manually set markers only Marker White marker This is manua...

Страница 35: ... take 4K burst pictures while shifting the focus to different areas After taking these pictures you can select the desired focus area This function is suited for recording still objects Use a UHS Speed Class 3 card We recommend that you use a tripod when recording images to be used for Focus Stacking 1 Set the drive mode dial to P31 2 Decide on the composition and press the shutter button halfway ...

Страница 36: ...focus by dragging the slide bar during enlarged display You can also perform the same operation by pressing 2 1 3 Touch to save the picture The picture will be saved in JPEG format When the ambient temperature is high or Post Focus recording is performed continuously the camera may display and recording may stop Wait until the camera cools down During recording the angle of view will be narrower S...

Страница 37: ... Automatically selects pictures that are suited to be merged and merges them into a single picture Priority will be given to pictures with closer focus Perform the focus stacking and save the picture Range Merging Merges pictures with specified focus areas into a single picture Specify at least two areas In focus parts between the selected two points are indicated Parts that cannot be selected are...

Страница 38: ...tly narrower when pictures are merged Pictures may be merged into an unnatural picture in the following cases When the subject moves during recording When the distance between subjects is great When pictures are too defocused If you take pictures with a larger aperture value the resulting picture may look less unnatural Focus Stacking may not be available for images recorded with other than this c...

Страница 39: ...al of 1 EV Sequence Sets the order in which pictures are taken Single Shot Setting 1 Takes one picture each time you press the shutter button Takes all the pictures set to be taken when you press the shutter button once When taking pictures using Exposure Bracket after setting the Exposure Compensation value the pictures taken are based on the selected Exposure Compensation value Aperture Bracket ...

Страница 40: ...the mode dial to M 2 Rotate the rear dial to set the shutter speed to LC 3 Select the menu 4 Select the exposure time per frame shutter speed This can be set in a range of 1 2 SEC to 60 SEC Press the shutter button halfway to return to the recording screen 5 Press the shutter button fully to obtain an image with reduced noise A countdown screen is displayed Wait until this step completes 6 Press t...

Страница 41: ...e icon for the currently activated image stabiliser is displayed on the recording screen We recommend using a tripod or the Shutter Remote Control DMW RS2 optional for Live View Composite recording We recommend that you use a sufficiently charged battery or an AC adaptor optional and DC coupler optional When the shutter button is pressed fully to stop recording the last image may not be included i...

Страница 42: ...function requires that the focal length be set to match the attached lens Set the focal length in accordance as prompted by the message This can also be set using the menu P43 Applicable modes Set the image stabiliser movement to match the recording situation Lenses without the image stabiliser function Based on the Micro Four Thirds System standard Four Thirds System standard Body When using a Le...

Страница 43: ... become narrower I S Lock Video Allows you to enhance the image stabilisation effect during motion picture recording ON OFF This effect works only during recording is displayed on the recording screen To change the composition during recording set the effect to OFF first and then move the camera Use the Fn button to switch between ON OFF during recording P27 I S Lock Video is not available when us...

Страница 44: ...cture button again Continuous motion picture recordable times AVCHD motion pictures You can continue recording without interruption even if the file size exceeds 4 GB but the motion picture file will be divided MP4 motion pictures with a Rec Quality size of FHD or HD You can continue recording without interruption even if the continuous recording time exceeds 30 minutes or the file size exceeds 4 ...

Страница 45: ...k2160 30p 30 frames second 100 Mbps 4K 100M 25p 2 3840k2160 25p 25 frames second 100 Mbps 4K 100M 24p 2 3840k2160 24p 24 frames second 100 Mbps FHD 28M 60p 1920k1080 60p 60 frames second 28 Mbps FHD 28M 50p 1920k1080 50p 50 frames second 28 Mbps FHD 20M 30p 1920k1080 30p 30 frames second 20 Mbps FHD 20M 25p 1920k1080 25p 25 frames second 20 Mbps HD 10M 30p 1280k720 30p 30 frames second 10 Mbps HD ...

Страница 46: ...allows silent operation while recording motion pictures When using an interchangeable lens that supports power zoom electronic zoom 4 Press the motion picture button or shutter button again to stop recording Records slow motion pictures of MP4 format by performing ultra high speed recording Use a UHS Speed Class 3 card 1 Set the mode dial to 2 Select the menu Creative Video Exposure Mode P A S M 1...

Страница 47: ...me rate for recording Rec Quality for storage Slow motion effect 120fps FHD 120 frames second FHD 20M 30p Approx 1 4k 100fps FHD 100 frames second FHD 20M 25p Approx 1 4k 90fps FHD 90 frames second FHD 20M 30p Approx 1 3k 75fps FHD 75 frames second FHD 20M 25p Approx 1 3k 60fps FHD 60 frames second FHD 20M 30p Approx 1 2k 50fps FHD 50 frames second FHD 20M 25p Approx 1 2k OFF In the following case...

Страница 48: ...and size of a crop frame Press 2 while the recording screen is displayed and perform steps 3 and 4 To cancel 4K Live Cropping recording Set to OFF in 4K Live Cropping in step 2 Button operation Touch operation Description of operation 3 4 2 1 Touching Moves the frame Enlarges reduces the frame in small steps The range of settings allowed is from 1920k1080 to 3840k2160 Pinching out in Enlarges redu...

Страница 49: ...tion Pictures This unit was designed to play motion pictures using the AVCHD and MP4 formats Select an icon indicated with and then press 3 to play it back A Motion picture recording time Touching in the middle of the screen allows you to play back motion pictures 2 Play back the previous picture 1 Play back the next picture 1 98 1 98 1 98 1 98 12s 12s 12s 12s DC G90 G91EB DVQX1761_eng book 49 ページ...

Страница 50: ...ti or Delete All and then press MENU SET After selecting Delete All if you select Delete All Non rating you can delete all pictures except for those with ratings When Delete Multi is selected 3 Press 3 4 2 1 to select the picture and then press MENU SET to set Repeat this step appears on the selected pictures If MENU SET is pressed again the setting is cancelled 4 Press DISP to execute Button oper...

Страница 51: ...h Speed Video P46 4K Live Cropping P47 Custom Mode Scene Guide Scene Switch Creative Control Filter Effect Simultaneous Record w o Filter Rec Aspect Ratio P53 Flash Self Timer Picture Size P54 Red Eye Removal Time Lapse Animation Quality P54 ISO Sensitivity photo Live View Composite P40 AFS AFF Min Shtr Speed Panorama Settings AF Sensitivity Photo Long Shtr NR Silent Mode Photo Style P55 Shading C...

Страница 52: ... Exposure Comp Reset ISO Displayed Setting MF Guide Exposure Comp Disp Setting LVF Monitor Disp Set Focus Release Shutter Q MENU Monitor Info Disp AF AE Lock Dial Set Rec Area AF AE Lock Hold Operation Lock Setting Remaining Disp Shutter AF Focus Ring Lock Menu Guide Half Press Release Video Button Quick AF Video Rec Button Remote Lens Others Eye Sensor AF Touch Settings Lens Position Resume Pinpo...

Страница 53: ...Connection Lamp USB Power Supply Demo Mode Beep TV Connection Format P20 Headphone Volume Language Economy Version Disp My Menu My Menu Setting Playback Slide Show 4K PHOTO Bulk Saving P35 Rotate Playback Mode Light Composition Video Divide Protect Sequence Composition Time Lapse Video Rating Clear Retouch Stop Motion Video Title Edit Text Stamp Rotate Disp Face Rec Edit Resize Picture Sort RAW Pr...

Страница 54: ...5184k2920 M 10M 3712k2784 M 8M 3840k2160 S 5M 2624k1968 S 2M 1920k1080 3 2 L 17M 5184k3456 1 1 L 14 5M 3888k3888 M 9M 3712k2480 M 7 5M 2784k2784 S 4 5M 2624k1752 S 3 5M 1968k1968 Quality Rec Quality Settings File format Description of settings A JPEG A JPEG image in which image quality was given priority A standard image quality JPEG image RAWiJPEG You can record a RAW image and a JPEG image A or ...

Страница 55: ... effect that creates a dynamic impression with enhanced highlights and shadows Scenery An effect appropriate for sceneries with vivid blue skies and greens Portrait An effect appropriate for portraits with a healthy and beautiful skin tone Custom Use the setting registered in advance Cinelike D Gives priority to the dynamic range by using a gamma curve designed to create film like images Suited fo...

Страница 56: ...n the picture Sharpness r The picture is sharply defined s The picture is softly focused Noise Reduction r The noise reduction effect is enhanced Picture resolution may deteriorate slightly s The noise reduction effect is reduced You can obtain pictures with higher resolution Saturation 1 2 r The colours in the picture become vivid s The colours in the picture become natural Color Tone 3 r Adds a ...

Страница 57: ...erson in spotlight on stage backlighting Silent Mode Rec Silent Mode Audio from the speaker will be muted and the flash and the AF Assist lamp will be disabled The following settings are fixed Flash Mode Œ forced flash off Shutter Type ESHTR AF Assist Lamp OFF Beep Volume s OFF E Shutter Vol OFF Even when ON is set the following lamp light up flash WIRELESS connection lamp Self timer indicator Sou...

Страница 58: ...ttings 0 255 16 255 This will be fixed at 16 255 when the Rec Format is AVCHD The setting is fixed at 0 255 in the following cases When taking pictures including picture taking during motion picture recording When Photo Style is set to V Log L Shutter Type Rec Shutter Type Mechanical Shutter Electronic Front Curtain Electronic Shutter Description The camera starts and ends an exposure with the mec...

Страница 59: ...W Processing White Balance Highlight Noise Reduction Brightness correction Shadow i Resolution Photo Style Saturation Color Tone Sharpness i Dynamic Filter Effect More Settings P60 Contrast Grain Effect Button operation Touch operation Description of operation 2 1 Dragging Selects a setting 3 WB K Set Displays the screen that lets you set the colour temperature when White Balance is set to 4 Adjus...

Страница 60: ...stments Returns the settings to the ones you used during the recording Color Space Allows you to select a Color Space setting from sRGB or Adobe RGB Picture Size Allows you to select the size in which the image will be saved in JPEG format Select multiple frames from a 4K burst file to create a sequence composition of a moving subject into one picture 1 Press 2 1 to select the 4K photo burst files...

Страница 61: ... combining Reselect Discards the frame selected immediately before and lets you select a different image 3 Repeat steps 1 and 2 to select more frames to combine You can select 3 to 40 frames 4 Press 3 4 to select Save and then press MENU SET Pictures are saved in JPEG format Recording information Exif information of the first frame such as shutter speed aperture and ISO sensitivity are also regist...

Страница 62: ...o as the Wi Fi button By default Wi Fi is assigned to Fn4 when the camera is in Recording Mode while it is assigned to Fn1 when the camera is in Playback Mode For information about the Fn button refer to P27 Remote shooting P70 Playing back saving images stored on the camera or uploading them on social media sites P71 Editing motion pictures recorded with Snap Movie Connect to a smartphone that su...

Страница 63: ...eived via radio waves may be intercepted by a third party Do not use the camera in areas with magnetic fields static electricity or interference Do not use the camera in areas with magnetic fields static electricity or interference such as near microwave ovens These may cause the interruption of the radio waves Using the camera near devices such as microwave ovens or cordless telephones that use t...

Страница 64: ... being used Refer to the support site below for details about the Image App https panasonic jp support global cs dsc This Site is English only When downloading the app on a mobile network high packet communication fees may be incurred depending on the details of your contract Read the Help in the Image App menu for further details on how to operate When you operate the Image App on the smartphone ...

Страница 65: ... registered list Bluetooth connection between the camera and the smartphone will be made For Android devices A Wi Fi connection will be made by selecting Connection Connecting to a Smartphone Bluetooth Connection Android Android 5 0 or higher equipped with Bluetooth 4 0 or higher excluding those that do not support Bluetooth Low Energy iOS iOS 9 3 or higher excluding the iPad 2 Setup Bluetooth Blu...

Страница 66: ... camera device name you want to connect to from the Camera registered list End Bluetooth Connection To terminate the Bluetooth connection turn off the Bluetooth function of the camera Even if you terminate the connection the pairing information for it will not be deleted Cancelling Pairing On the camera 1 Select the menu 2 Select the smartphone you want to delete On your smartphone Select the came...

Страница 67: ...mage App When the connection confirmation screen is displayed on the camera select Yes to connect For first time connection only Connecting to a Smartphone Wi Fi connection Connecting Without Entering a Password Setup Wi Fi Wi Fi Function New Connection Remote Shooting View At the time of purchase Wi Fi Password is set to OFF Before connecting to a Wi Fi network ensure that the device displayed on...

Страница 68: ...layed on the camera 3 Enter the password displayed on the camera into the smartphone For first time connection only 4 Start Image App 1 Set the camera to Recording Mode Press the shutter button halfway to return to recording mode 2 Select the camera s menu items to terminate the Wi Fi connection 3 On the smartphone close Image App Using Password Authentication to Connect Setup Wi Fi Wi Fi Setup Wi...

Страница 69: ...nnection automatically iOS devices Depending on the connection status of the smartphone you may need to change the connected device on the Wi Fi setup screen Follow the on screen message on the smartphone to change the setting Wireless connectivity required Support for Bluetooth Low Energy Indicates that the function can be used with smartphones that support Bluetooth Low Energy Indicates that the...

Страница 70: ...ia Bluetooth Select Remote operation iOS devices If you need to change the connected device on the Wi Fi setup screen follow the on screen message to change the setting 1 Select 2 Record an image The recorded images are saved in the camera Some settings are not available Setup Wi Fi Wi Fi Setup Priority of Remote Device Camera Allows you to perform operations with both the camera and the smartphon...

Страница 71: ...mage 2 Touch the image to enlarge it When you play a motion picture image quality differs from that of the actual recorded motion picture The image quality may deteriorate or the sound may skip during motion picture or picture playback To save the image or upload it on a social media site or other web service 3 Touch and hold and then drag the image An OS version of Android 7 0 or higher or iOS 10...

Страница 72: ... RAW format images Edited images can be saved in a format JPEG TIFF etc that can be displayed on a personal computer For details on how to use the SILKYPIX Developer Studio refer to the Help or the Ichikawa Soft Laboratory s support website This software allows you to edit motion pictures with ease For more information on how to use LoiLoScope read the LoiLoScope manual available for download at t...

Страница 73: ...3 Photo Style P55 Œ Flash Mode Flash Extra Tele Conversion when recording motion pictures Recording format Recording quality P44 Snap Movie Aspect Ratio P53 Picture size P54 Extra Tele Conversion when taking still pictures Image size Panorama Settings Image effect filter adjustment display P C1 1 EXPS EXPS WL 50p 50p SNAP 4SEC L 4 3 EXM 4 3 STD WIDE Image effect filter setting Loop Recording P33 C...

Страница 74: ... AFF AFC MF AFS BKT AFL LOW STAR 3 Name 2 Number of days that have passed since the departure date 3 Age 2 Location 3 Current date and time Travel destination setting 3 Exposure metre Focal distance display Step zoom 4 AF area Spot metering target Centre marker display Self timer Recording level display Recording level Limiter OFF Silent Mode P57 External Microphone AE Lock Metering Mode P57 Progr...

Страница 75: ...cordable pictures r20 Maximum number of pictures that can be taken continuously Available recording time 1 BKT AWB AWBc AWBw 1 1 R 8m30s 6 Touch tab Touch zoom Touch Shutter Touch AF Touch AE Peaking Fn button P27 P46 Colour P29 Defocus control function P29 Brightness P29 Type of defocus Miniature Effect One point colour Position of the light source Image effect filter adjustment Image effect ON O...

Страница 76: ... AWB 0 0 0 Fn 98 ISO AUTO OFF L 4 3 AFS AFS 1 60 F3 5 C1 1 EXPS EXPS ISO AUTO 0 0 WL 3 Single Burst 4K Photo P31 Post Focus P35 Self timer Focus Mode P29 š Ø AF Mode A Quality P54 Aspect Ratio P53 Picture size P54 Wi Fi Bluetooth P62 Fn button setting P27 4 Photo Style P55 V Ð î Ñ White Balance Intelligent Dynamic Range Control Metering Mode P57 98 Number of recordable pictures r20 Maximum number ...

Страница 77: ... low The battery is drained Charge the battery P14 If the problem is not resolved it may be improved by selecting Reset on the Setup menu When I shake the camera I hear a rattling sound When I shake the camera I hear a rattling sound from the attached lens Recording stops before finishing Cannot record Cannot use some functions In high ambient temperatures or if the camera is used for continuous r...

Страница 78: ...not the subject The shutter speed will become slower and the stabiliser function may not work properly when recording in dark places In these cases use a tripod and the self timer when recording This is characteristic of MOS sensors which serve as the camera s pickup sensors This is not a malfunction When using the electronic shutter lowering the shutter speed may reduce the effect of the horizont...

Страница 79: ...tion When using a large capacity card you may not be able to record for a while after turning on the camera Recording motion picture using the SD card requires an SD card of a supported speed class Use a compatible SD card This may occur when taking a picture by reducing the AF speed in order to adjust the focus at high precision This is not a malfunction Open the flash if it is closed The flash d...

Страница 80: ...displayed If you place the camera on a metal table or shelf the radio waves may be adversely affected In such cases you may not be able to establish a connection Move the camera away from the metal surface Wireless access point Confirm that the connected wireless access point can be used Confirm the radio wave conditions of the wireless access point Move the camera closer to the wireless access po...

Страница 81: ...ding the motion picture with Video Divide It may take longer time to transmit when distance to the wireless access point is far Transmit closer to the wireless access point File format of the motion picture that can be sent differs depending on the destination The lens movement and aperture operation emit sound when turning the camera on or off this is not a malfunction This is the sound of apertu...

Страница 82: ... 2 W When playing back with Monitor When the Interchangeable lens H FS12060 is used 2 2 W When playing back with Monitor When the Interchangeable lens H FSA14140 is used Type Type Digital Single Lens Mirrorless camera Recording media SD Memory Card SDHC Memory Card SDXC Memory Card UHS I UHS II UHS Speed Class 3 Lens mount Micro Four Thirds mount Image sensor Image sensor 4 3q Live MOS sensor tota...

Страница 83: ...0k2880 pixels 4K photo 3888k3888 pixels L 2784k2784 pixels M 1968k1968 pixels S Image quality for pictures Fine Standard RAWiFine RAWiStandard RAW Recording format for motion picture Video format AVCHD Progressive AVCHD MP4 Audio format AVCHD Dolby AudioTM 2 ch MP4 AAC 2 ch Image quality for motion pictures Rec Format AVCHD MP4 Refer to P44 of this document for details Refer to P46 of this documen...

Страница 84: ...SO is set 100 to 25600 Image stabiliser Image stabiliser type Compliant with Image sensor shift type 5 axis stabiliser Dual I S 2 Image stabiliser effect 5 0 stops Based on the CIPA standard Yaw Pitch direction focal length f 60 mm 35 mm conversion f 120 mm When using the interchangeable lens H FS12060 White balance White balance mode AWB AWBc AWBw Daylight Cloudy Shade Incandescent lights Flash W...

Страница 85: ...le lens H FS12060 is used Approx 9 lx when i Low light is used the shutter speed is 1 25 of a second When the Interchangeable lens H FSA14140 is used Flash Flash Built in pop up flash GN 9 0 equivalent ISO200 m GN 6 4 equivalent ISO100 m Flash mode AUTO AUTO Red Eye Reduction Forced ON Forced ON Red Eye Reduction Slow Sync Slow Sync Red Eye Reduction Forced OFF Flash synchronisation speed Equal to...

Страница 86: ...ro B Data from the PC can not be written to the camera using the USB connection cable HDMI micro HDMI Type D REMOTE 2 5 mm jack MIC 3 5 mm jack Headphones 3 5 mm jack Splash Resistant Yes Dimensions Mass Dimensions Approx 130 4 mm W k93 5 mm H k77 4 mm D 5 14q W k3 69q H k3 05q D excluding the projecting parts Mass Approx 533 g 1 18 lb with one card and the battery Approx 481 g 1 06 lb camera body...

Страница 87: ...o 80 RH Wi Fi Compliance standard IEEE 802 11b g n standard wireless LAN protocol Frequency range used central frequency 2412 MHz to 2462 MHz 1 to 11 ch Encryption method Wi Fi compliant WPATM WPA2TM Access method Infrastructure mode Bluetooth Compliance standard Bluetooth v4 2 Bluetooth Low Energy BLE Frequency range used central frequency 2402 MHz to 2480 MHz Input 5 0 V 1 8 A Output 8 4 V 0 75 ...

Страница 88: ...In focus distance Wide 0 20 m 0 66 feet to Tele 0 25 m 0 82 feet to from the focus distance reference line Wide 0 30 m 0 98 feet to from the focus distance reference line focal length 14 mm to 21 mm Tele 0 50 m 1 64 feet to from the focus distance reference line focal length 22 mm to 140 mm Maximum image magnification 0 27k 35 mm film camera equivalent 0 54k 0 25k 35 mm film camera equivalent 0 5k...

Страница 89: ...er support on your product please visit our website www panasonic co uk Direct Sales at Panasonic UK Order accessory and consumable items for your product with ease and confidence by phoning our Customer Communications Centre Monday Friday 9 00 am 5 00 pm Excluding public holidays Or go on line through our Internet Accessory ordering application at www pas europe com Most major credit and debit ca...

Страница 90: ...lick the desired language To check the URL and QR code on the camera You will need Adobe Reader to browse or print the Operating Instructions for advanced features PDF format You can download and install a version of Adobe Reader that you can use with your OS from the following website As of April 2019 http www adobe com products acrobat readstep2 html Setup Online Manual URL display Displays the ...

Страница 91: ...r LGPL V2 1 as well as the respective copyright notice thereof Contact Information oss cd request gg jp panasonic com The source code and the copyright notice are also available for free in our website below https panasonic net cns oss index html Micro Four Thirds and Micro Four Thirds Logo marks are trademarks or registered trademarks of Olympus Corporation in Japan the United States the European...

Страница 92: ...work Alliance This product uses DynaFont from DynaComware Corporation DynaFont is a registered trademark of DynaComware Taiwan Inc QR Code is a registered trademark of DENSO WAVE INCORPORATED Other names of systems and products mentioned in these instructions are usually the registered trademarks or trademarks of the manufacturers who developed the system or product concerned This product is licen...

Отзывы: