111
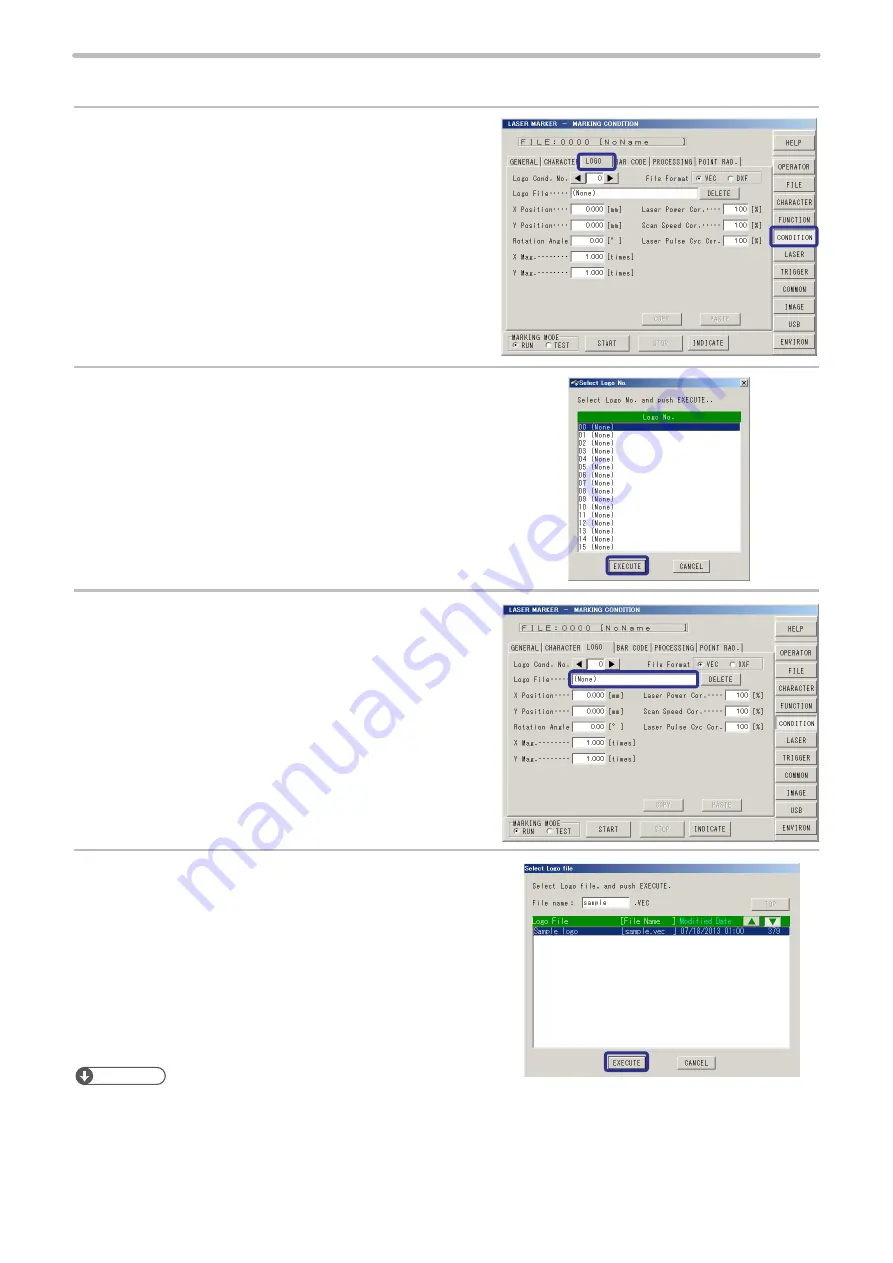
1. Select the logo data.
1.
Press [CONDITION] and press [LOGO].
2.
Select the logo No. 00, and then press [SET].
The logo No. is available to set from 0 to 15.
3.
Press [Logo File].
4.
Select the logo file from the list and press [SET].
Reference
• The logo file created newly is required to register into the laser marker. Refer to “4-15 USB Media” (P.241) and “Logo Data
Conversion Software Operation Manual”.
• As for the following file format data, BMP, DXF, JPEG, and HPGL, and art work made by Adobe
®
Illustrator
®
convert
these data into the appropriate file format data using logo data conversion software or ExportVec, and then register the
data into the laser marker. (DXF files are not required to be converted.) Refer to the “Logo Data Conversion Software
Operation Manual”, “ExportVec Operation Manual” for details.
ME-LP400V-OP-6
Содержание LP-V Series
Страница 11: ...11 MEMO ME LP400V OP 6 ...
Страница 32: ...32 1 Product Overview ME LP400V OP 6 ...
Страница 58: ...2 Installation and Connection ME LP400V OP 6 ...
Страница 77: ...3 Basic Operation Procedure ME LP400V OP 6 ...
Страница 121: ...4 Description of Operation Screen ME LP400V OP 6 ...
Страница 146: ...146 Symbol ME LP400V OP 6 ...
Страница 271: ...271 MEMO ME LP400V OP 6 ...
Страница 272: ...Maintenance ME LP400V OP 6 ...
Страница 291: ...Troubleshooting ME LP400V OP 6 ...
Страница 308: ...Appendix ME LP400V OP 6 ...
Страница 328: ...Index ME LP400V OP 6 ...
Страница 333: ...No 9000 0062 14V ...
Страница 334: ... Panasonic Industrial Devices SUNX Co Ltd 2003 2018 July 2018 9000 0062 14V ...


