background image

43

Getting Started

CAUTION

After setting the disc, do not click the CD/DVD 


drive icon (on Windows Explorer, etc.) until the 
disc is recognized by the computer.
For AutoPlay Disc:


An AutoPlay Disc may start during file access 
depending on the status of the disc.

When playing back motion video from a disc, 
playback may not be smooth in some conditions.

When you turn on the CD/DVD drive power for 


the first time after purchase or reinstallation, 
the CD/DVD drive is recognized as a new 
device. Do not turn off the drive power with the 
drive power/open switch until the recognition 
process is completed (approximately 30 
seconds).

NOTE

Power-saving mode of the CD/DVD drive

If the drive is not accessed for 30 seconds, the drive 
motor will automatically be shut down to reduce the 
power consumption.
When the drive is accessed again, the drive motor is 
turned on. In this case, reading of the disc data will 
take approximately 30 seconds.

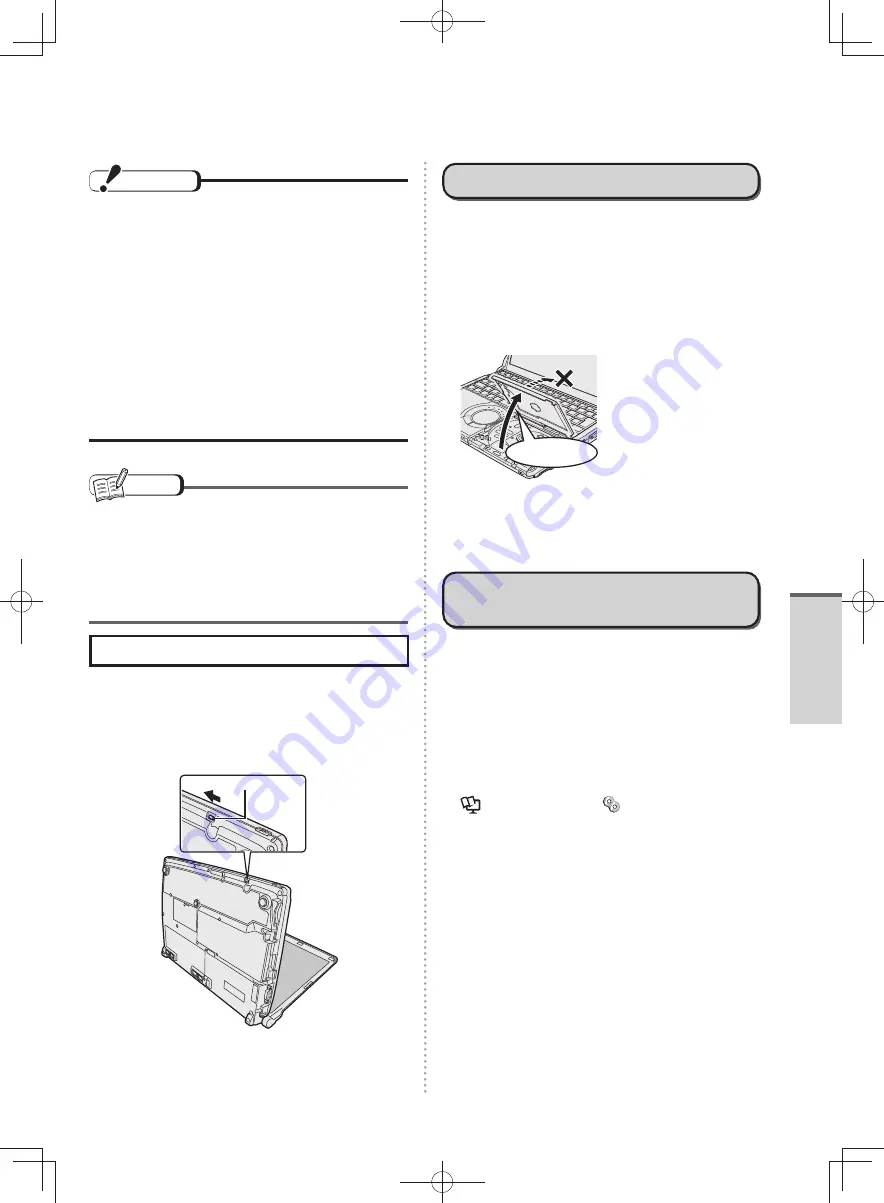
Cannot open the disc cover

To remove a disc when the disc cover cannot be 
opened or when the computer is powered off:
Insert a pointed object (e.g., the bent-out tip of a 
paper clip, or the tip of a ballpoint pen) into the 
emergency hole, and move in the direction of the 
arrow.

Emergency Hole

When opening the disc cover

Be sure to close the display only after confirming 


the disc cover is closed. If the disc cover is not 
closed, the LCD may become damaged.
Never insert a foreign object such as a paper clip 


into the drive.
Doing so may cause malfunction.
The disc cover can be opened up to an angle that 


will automatically open to this maximum open 
position.

Do not attempt to 

open the cover further 

after it stops.

If you accidentally 
touch the disc cover 
causing the disc cover 
to open more than the 
degrees described 
above, press the cover 
forward slowly until the 
stopper returns to its 
original position.

Do not leave the disc cover open and do not 


touch the lens. The lens and disc can become 
dusty in some conditions. It may cause 
malfunction in reading or writing.

About Playback of Media 
Recorded with CPRM

CPRM is rights management technology which 
is used when digital broadcasts with recording 
restrictions are recorded to DVD-RAM, DVD-R or 
DVD-RW with a DVD recorder.
To play back such content, your operating 
environment must be connected to the Internet. 
Once connected to the Internet, the content is 
recognized automatically and is available for 
playback. From the next time, it can be played back 
without connecting to the Internet.


Reference Manua

l “

 (CD/DVD Drive)”

DFQW5600ZA̲BasicManual̲CF-S10.indb   43

DFQW5600ZA̲BasicManual̲CF-S10.indb   43

2011/11/15   14:08:11

2011/11/15   14:08:11

Содержание CF-S10 Series

Страница 1: ...CTIONS and Reference Manual 操作マニュアル etc Use these resources as described below Supplied accessories Setup Windows Options Warranty After Sales Service etc OPERATING INSTRUCTIONS This book Wireless LAN Guide NetSelector2 Hard Disk Handling Installation Manual of Trusted Platform Module TPM Reference to the on screen manuals of the computer How to display page 19 in this book If a Problem Occurs in ...

Страница 2: ...dows 7 64 bit can be selected When reinstalling Windows using the data of the recovery area on the hard disk you can select the OS to be installed either Windows 7 32 bit or Windows 7 64 bit page 81 Easy use Changing the settings is simple Changing the computer settings to suit your objectives In addition to the standard Windows power plans the following five power plans are available Panasonic Po...

Страница 3: ...hen using the computer in a high ambient temperature 15 Backing up and restoring e mail etc 16 When the battery indicator does not light on 16 When using peripheral devices 16 Keep the recovery disc in a safe place 16 About security when using wireless LAN 16 About the power saving settings 17 Sound and Video 17 About Notations 18 How to Use the On screen Manual 19 How to access the Reference Manu...

Страница 4: ...vanced Menu 53 Boot Menu 54 Security Menu 55 Exit Menu 60 Changing Hard Disk Partitions 61 What is Partitions 61 Troubleshooting If a Problem Occurs in the Computer Resolving Problems 62 Contact for repair 63 Problems with Starting Up Shutting Down and Sleep and Hibernation Mode The computer does not power on The battery indicator is not lit 64 If Windows is started up while the SD SDHC SDXC memor...

Страница 5: ... green or blue dots on the screen or there is unevenness in colors and brightness on the screen 71 The screen becomes disordered 72 The images appearing on the screen will be stretched 72 Screen became black for instant 72 Nothing is displayed on the screen 73 Problems with Recovery Disc Product Recovery DVD ROM Product Recovery DVD ROM is not attached 74 You do not know the making method of the R...

Страница 6: ... computer Double click on the desktop 1 Click 2 Click the category 3 Click the title of manual Troubleshooting 困ったときのQ A Refer to Troubleshooting when a problem occurs Double click on the desktop 1 Click 2 Click the category 3 Click the title of Troubleshooting DFQW5600ZA BasicManual CF S10 indb 6 DFQW5600ZA BasicManual CF S10 indb 6 2011 11 15 14 07 08 2011 11 15 14 07 08 ...

Страница 7: ...emble or Modify It Prohibited Electrolyte leakage generation of heat ignition or rupture may result If this product is subjected to a strong impact stop using it immediately Do Not Short the Positive and Negative Contacts Prohibited Generation of heat ignition or rupture may result Do not place the battery pack together with articles such as necklaces or hairpins when carrying or storing Avoid Ext...

Страница 8: ...o use this product while any of the above conditions are present may result in fire or electric shock If a malfunction or trouble occurs immediately turn the power off and unplug the AC plug and then remove the battery pack Then contact your technical support office for repair Do Not Do Anything That May Damage the AC Cord the AC Plug or the AC Adaptor Do not damage or modify the cord place it nea...

Страница 9: ...t inside this product fire or electric shock may result If water spills in the keyboard refer to page 12 If other foreign matter has found its way inside immediately turn the power off and unplug the AC plug and remove the battery pack Then contact your technical support office Keep SD Memory Cards Away from Infants and Small Children Prohibited Accidental swallowing will result in bodily injury I...

Страница 10: ...ith Medical Electronic Devices 2 Do not take into operating rooms intensive care units or CCUs 3 The radio waves from the computer may affect medical electronic devices and cause an accident due to mistaken operation In a Crowded Location such as a Full Train Carriage Turn Off the Power Because Someone with a Cardiac Pacemaker May Be Nearby 2 The radio waves may affect the operation of the pacemak...

Страница 11: ...e LAN connector is connected to a network such as the ones listed below a fire or electric shock may result Networks other than 1000BASE T 100BASE TX or 10BASE T Phone lines IP phone Internet Protocol Telephone Telephone lines internal phone lines on premise switches digital public phones etc Do Not Subject the AC Adaptor To Any Strong Impact Prohibited Using the AC adaptor after a strong impact s...

Страница 12: ...ge 4 Keeping the computer level move the computer to a dry place If the computer is placed back on the wet surface water may seep inside the computer from the bottom 5 Insert the tip of a ball point pen or other object into the emergency hole on the bottom of the computer and move it in the direction of the arrow to open the disc cover The computer should be kept level without tilting while the di...

Страница 13: ... period paid for replacement may be required If the computer becomes warm during usage The computer may become hot due to the operation of the CPU or other parts but this is not a malfunction Using Intel Wireless Display to display 1 the computer image on an external display increases the processing load on the CPU As a result the computer may become warm When the screen is displayed on the extern...

Страница 14: ...are running or access indicator is on Do not power the computer off during operations Properly shut Windows down from the Start menu to avoid problems Do not place the computer close to objects that emit electromagnetic waves magnets electromagnetic bracelets etc The data saved on the hard disk may be erased Use the security function for all important data password Reference Manual Security Refer ...

Страница 15: ...e the dirty area gently Using a detergent other than a neutral kitchen cleanser e g a weak alkali cleanser may adversely affect painted surfaces We recommend cleaning the drive lens with an air puffer used for camera lenses Do not use any spray type of lens cleaning products Lens CAUTION Do not use benzene thinner or rubbing alcohol since it may adversely affect the surface causing discoloration e...

Страница 16: ...arefully read the instruction manuals Reference Manual and the instruction manual of the peripheral devices Keep the recovery disc in a safe place Recovery Disc The recovery disc is required in situations such as when reinstallation cannot be performed from the hard disk If you want to create this disc refer to 6 Creating a Recovery Disc in the supplied Preparation and Setting Guide About security...

Страница 17: ...ur own responsibility If you cannot configure them yourself contact your technical support office About the power saving settings In the default settings this computer is set to power management based on the International ENERGY STAR Program for example by operating the power saving function when the device is not accessed or operated for a certain period of time This reduces the energy consumptio...

Страница 18: ...icated as Windows or Windows 7 In these instructions optical disc drive is indicated as CD DVD drive In these instructions the descriptions vary depending on the connected external display These displays are classified as follows An analog display is an external display that is connected to the external display port An HDMI supporting display is an external display including a television that is c...

Страница 19: ... Start All Programs Panasonic NetSelector2 About NetSelector2 How to access the Hard Disk Handling The Hard Disk Handling will provide you with the helpful information on how to use the hard disk 1 Click Start All Programs Panasonic On Line Manuals Hard Disk Handling How to access the Installation Manual of Trusted Platform Module TPM The Installation Manual of Trusted Platform Module TPM will pro...

Страница 20: ...ge 23 F Wireless Switch WIRELESS Switch the wireless devices to on right side or to off left side Reference Manual Wireless G Display Internal LCD To adjust the LCD brightness dark bright page 25 H Security Lock You can connect a Kensington cable Refer to the instruction manual of the cable The security lock and cable is a theft prevention device Panasonic Corporation will bear no responsibility i...

Страница 21: ...nserting the battery pack properly B Battery Pack Reference Manual Battery Follow the procedures below to insert remove the battery pack C RAM Module Slot Insert the RAM module page 46 D Emergency Hole To remove a disc when the disc cover cannot be opened or when the computer is powered off insert a pointed object e g the bent out tip of a paper clip or the tip of a ballpoint pen into the emergenc...

Страница 22: ...ck Use only a condenser microphone Using an input source other than a condenser microphone may not allow audio to be input or may damage the computer When using a monaural microphone with a 2 terminal plug Click Start Control Panel Hardware and Sound Sound Recording Microphone Properties and then add a check mark for Mono Microphone in Enhancements When recording in stereo using a stereo microphon...

Страница 23: ... with Battery page 70 Caps Lock indicator This indicator lights green when is pressed Subsequent non shifted input is capitalized NumLk indicator Ten key mode This indicator lights green when is pressed Part of the keyboard see figure below will function as a ten key numeric input To disable press once more the indicator will turn off 6 5 4 9 8 7 3 2 1 0 P O I U L K J 0 9 8 7 M 6 5 4 9 8 7 3 2 1 0...

Страница 24: ...rea click the icon to display all icons Icons Names and roles or Speaker icon Set volume etc Network connection icon Use to set LAN wireless LAN connections Reference Manual Internet and Wireless or Battery meter icon The is displayed when connecting the AC adaptor Use to make various power option settings Reference Manual Battery or Windows action center icon Use to make or confirm security setti...

Страница 25: ...ew icon Displayed only when Optimized view has been set up Use to display the Optimized view display expand to a full screen display or configure the settings for Optimized view Reference Manual Using Let snote Intel R My WiFi Technology icon Adjusts the LCD Brightness Making the display brighter shortens the battery operating time While pressing press to adjust The brightness changes each time th...

Страница 26: ...t the computer will start After 3 wrong password attempts have been made or there is no input for one minute the computer will power off If the screen display disappears Because the power saving setting is configured at the time of purchase if the computer is not operated or devices are not accessed for a certain period of time the power saving function operates and the screen display may become d...

Страница 27: ...e charge the battery pack before the next use or use the AC adaptor The battery charge retention times are shown in the table below When you leave the computer or interrupt your work If you use the Sleep or Hibernation function then when you turn on the power next time the software application and files you were using before will be displayed and you can restart the same operations page 38 Press t...

Страница 28: ...ouches the touch pad unintentionally causing the cursor to move adjust the sensitivity using PalmCheck By dragging slide bar to the Maximum position you can prevent the cursor from moving unintentionally By dragging slide bar to the Minimum position you can enable the cursor to move even with a light touch of the palm on the touch pad Touch Sensitivity When operating the touch pad if your finger t...

Страница 29: ...device when external USB pointing device is attached and click OK Handling the Touch Pad By design the touch pad is to be used with a fingertip only Do not place any object on the work surface or press down forcefully with sharp pointed objects e g nails or hard objects that can leave marks e g pencils and ball point pens Try to avoid having any harmful substances such as oil come in contact with ...

Страница 30: ...y combination turns on off audio from the internal speaker and headphone jack Turning off the speaker will also turn off the warning beep ON OFF MUTE Pressing this key combination adjusts the volume of the internal speaker and headphone jack down up Pressing this key combination puts the computer into sleep mode Pressing this key combination enables the restoration of the screen settings such as t...

Страница 31: ...ot set a high safety level just by encrypting data as described in Advanced Be sure to combine this setting with the Basic and Practical security functions If the network administrator at your company has issued instructions about the settings or other issues follow these instructions The information described in this document is not necessarily appropriate for all environments Measures that every...

Страница 32: ...ngs in this computer NOTE While using the Security Setting Utility do not individually set or change the functions that can be set in the Security Setting Utility About creating a Windows password and standard user When the Windows security is set to a high safety level or different security software is used specific conditions such as number of characters and difficulty level may be required for ...

Страница 33: ...s administrator If there are 2 or more files called setup right click the file with Application displayed in Type 3 If User Account Control is displayed click Yes A standard user needs to enter an administrator password Follow the on screen instructions 2 Read the information in the Confirm Before Use screen carefully and then click Yes If you click No you cannot use the Security Setting Utility 3...

Страница 34: ...der to be saved and click Save If an item is saved that requires a supervisor password when setting functions the following screen is displayed If you enter the supervisor password and click Confirm the supervisor password is saved in the profile Password entry is not required when importing the profile If you click Skip security settings such as the password are not saved in the profile Password ...

Страница 35: ...ing on to an administrator s user account before setting in the Security Setting Utility Windows Firewall Automatic updating Standard user creation Logon method When multiple folders encrypted with the Encrypting File System are created only the information for the folder created last is saved The import results are saved in a file called ssulog txt in the Documents folder NOTE You can also import...

Страница 36: ...le click Display 4 Double click Display brightness set 20 to each item and click OK Set to 20 cd m2 or higher by setting to 20 Measured without a computer load Measurement Method b The internal LCD brightness is set to the darkest level and the computer is left alone with the desktop screen displayed Method for setting the brightness to the darkest level 1 Click Start Control Panel Hardware and So...

Страница 37: ...n is prevented so the lifetime of battery pack will be extended In the default settings the battery s Economy Mode ECO is disabled to prioritize the battery s operating time If required switch to the battery s Economy Mode ECO to make more efficient use of the battery When the AC adaptor is frequently connected Economy Mode ECO enabled The battery pack degradation is minimized because charging is ...

Страница 38: ...u can change the time until the computer enters sleep or hibernation You can also change the time until the display turns off Default settings Enters sleep Enters hibernation Display turns off Display darkens If no access for a certain period of time 1 For AC connection 5 min 10 min 20 min 1080 min For battery 2 min 5 min 15 min 1080 min 1 To change the time before entering sleep start from step 1...

Страница 39: ...ION The computer may enter the hibernation mode by thermal control if you use the computer in a high ambient temperature and use an application that uses a lot of CPU power Wait a few minutes at least 5 before turning the computer on again if this occurs Using Setting to sleep Setting to hibernation Fn Fn F10 F7 While pressing press While pressing press Using the shutdown screen Click Start and cl...

Страница 40: ...to Sleep or Hibernate If the display was closed after the computer enters sleep or hibernation If you do not want the computer to resume slide the power switch NOTE If the computer enters sleep while a USB keyboard or mouse is connected touching the USB keyboard keys or mouse will resume the computer For detailed information refer to Reference Manual Using Let snote Do not perform the following op...

Страница 41: ...omputer while Optical Drive Power is set to On in the Setup Utility buzzing or whirring sound While a CD DVD is playing back low rotating sound at a regular intervals This is the sound of the CD DVD drive motor operating and is not a malfunction Operation of the Drive Power Open Switch Immediately after the computer is turned on if the drive power open switch of the CD DVD drive is operated while ...

Страница 42: ...over cannot open if a hand is on the disc cover or the display is closed the drive will not be accessed correctly In this case open and close the disc cover once or restart the computer Do not attempt to open the cover further after it stops 3 Insert Remove a disc When inserting or removing a disc be careful not to touch the lens and other parts of the laser pickup To insert 1 With the title side ...

Страница 43: ...ncy Hole When opening the disc cover Be sure to close the display only after confirming the disc cover is closed If the disc cover is not closed the LCD may become damaged Never insert a foreign object such as a paper clip into the drive Doing so may cause malfunction The disc cover can be opened up to an angle that will automatically open to this maximum open position Do not attempt to open the c...

Страница 44: ... PROSet Wireless WiMAX Connection Utility to disconnect the communication If the communication is not disconnected the communication charges may reach a high level depending on the price plan in your contract Connect to the Internet 1 Slide the wireless switch to the right 2 Click on the notification area click the Wireless Switch Utility icon and then click WiMAX ON If WiMAX ON and WiMAX OFF are ...

Страница 45: ...e details on the screen NOTE If you are not using WiMAX turn off WiMAX or click Disconnect in Intel PROSet Wireless WiMAX Connection Utility to disconnect the communication If the communication is not disconnected when the computer resumes from sleep or hibernation it will connect automatically to WiMAX depending on the usage conditions in some cases it may not connect automatically If the communi...

Страница 46: ...oduct type and the correct installation method RAM modules are extremely sensitive to static electricity There are cases where static electricity generated by the human body has adversely affected such RAM modules When inserting or removing a RAM module do not touch the terminals or internal components insert objects other than the module or allow foreign particles to enter Doing so has been known...

Страница 47: ...minals are no longer visible Gold Terminals If the RAM module is difficult to insert do not force it Check once more to ensure that the module is positioned correctly The slot may be damaged if the following procedure is performed without inserting the module firmly 8 Press the RAM module down until the right and left hooks lock into place Hooks If it is hard to press down the RAM module do not tr...

Страница 48: ...he specifications has been inserted nothing may be displayed on the screen even after the computer is turned on If this happens turn off the computer check that the RAM module is the recommended module and reinstall the module correctly Confirm the total size of memory If the RAM module is recognized correctly the total size of this computer s memory and RAM module memory is displayed on the Infor...

Страница 49: ...r password and press NOTE If you fail to press or at the right moment the Setup Utility will not start up In this case restart Windows Cannot display the Setup Utility screen in simultaneous display Until Windows startup is completed during Setup Utility etc You can not switch the display mode by pressing Even when a password is set if Password On Boot is set to Disabled password entry is not requ...

Страница 50: ...splay Change Advanced Menu Boot Menu Boot Option Security Menu Setup Utility Prompt Security Menu Boot Popup Menu Security Menu Password On Boot Security Menu Password on Reboot Security Menu Password On Resume Security Menu Boot Device on Hibernation Resume Security Menu Set Supervisor Password Security Menu Hard Disk Lock Security Menu User Password Protection Security Menu Set User Password 1 S...

Страница 51: ...s you can choose the desired item by pressing and The color of the selected item will change C You can display the sub menu by pressing on the item shown in reverse display D When the submenu is displayed you can select items by pressing and Key Operations To move among the menus Use these keys when the Information Main Advanced Boot Security or Exit menu is selected To move among the items Use th...

Страница 52: ...te second Numerical values can be adjusted using and or inputted using the keyboard xx xx xx Main Configuration Menu Functions Settings Touch Pad Select whether to use the touch pad Enabled or not Disabled Disabled Enabled Fn Ctrl Key Select whether to switch with functions and vice versa on the internal keyboard This can also be configured in Fn Ctrl function switch utility Do not attempt to repl...

Страница 53: ...vanced Menu Underlined items are the factory presets Menu Functions Settings CPU Configuration Execute Disable Bit Capability Select whether to use the Execute Disable Bit Capability Enabled or not Disabled When Execute Disable Bit Capability is set to Enable it means that this computer supports hardware based Data Execution Prevention DEP It should usually be set to Enabled Factory presets Enable...

Страница 54: ...nabled Legacy USB Support Select whether to use the function that makes the computer recognize USB keyboard USB floppy disk drive and USB CD DVD drive Enabled or not Disabled before starting Windows This is effective only when USB Port is set to Enabled and Boot Mode is set to Normal in the Boot menu Even when Disabled is set the Setup Utility can be operated using the USB keyboard Disabled Enable...

Страница 55: ... confirm the following settings USB Port is Enabled in the Advanced menu Legacy USB is Enabled in the Advanced menu Boot Mode is Normal in the Boot menu When starting up from the internal CD DVD drive confirm the following settings Optical Drive is Enabled in the Advanced menu Optical Drive Power is On in the Main menu Boot Option 1 is Optical Drive in the Boot menu Security Menu Underlined items ...

Страница 56: ...ord Protection Select whether to permit changing the User Password Protected or not No Protection No Protection Protected Set User Password Set User Password when multiple users use this computer etc This function will not work without the Supervisor Password being set Also if the user password is entered when you start up the Setup Utility some of the settings cannot be changed Enter the sub menu...

Страница 57: ... Also when Password On Boot is set to Enabled or Auto 4 password entry is required immediately after you turn on the computer which prevents unauthorized use by a third party Before configuring the setting be sure to refer to Reference Manual Security 4 When Password On Boot is set to Auto and Intel R Anti Theft Technology is being used password entry is not required To check whether or not Intel ...

Страница 58: ... you intended Do not input your password while holding down on etc 5 Enter your password again in Confirm New Password and press 6 Press and then select Yes and press CAUTION Do not forget your password Settings related to security such as the passwords you set yourself cannot be canceled by our Service Center or anyone else at Panasonic Be sure not to forget settings such as passwords If you forg...

Страница 59: ...rity using or To set the supervisor password 1 Select Set Supervisor Password using or and press 2 Enter your password in Create New Password and press 3 Enter your password again in Confirm New Password and press 3 Select Hard Disk Lock using or and press 4 Select Enabled using or and press 5 At the confirmation message press 6 Press and then select Yes and press When starting up the computer if ...

Страница 60: ...ooting If the item is grayed and cannot be selected press to close the Setup Utility and then start up the Setup Utility again Menu Functions Repair Your Computer To perform system recovery tools reinstalling software or erasing hard disk data This is not displayed if the Hard Disk Data Erase Utility has been executed If the item is grayed and cannot be selected press to close the Setup Utility an...

Страница 61: ...S cannot be reinstalled on that drive 6 Right click Unallocated the shrunk space in the step 5 and click New Simple Volume The size is smaller than the entered value 7 Click Next Configure the following settings Specialist knowledge is required to change the settings in 2 and 3 to settings other than those displayed Normally keep the displayed settings and click Next 1 Specify Volume Size Specify ...

Страница 62: ... supplied The computer does not power on Windows does not start up The Windows screen is displayed but cannot be operated Keyboard Touch Pad Internet Wireless LAN etc Screen is too dark Operating time is short This is not a malfunction page 71 Press page 25 Specifications page 90 Changes according to the usage environment page 36 Refer to Troubleshooting page 64 65 Refer to Troubleshooting page 6 ...

Страница 63: ...applications Contact for repair 1 Fill in Repair Order Sheet 2 Check the detailed information related to repair in the Preparation and Setting Guide and then contact the Repair Center Operating hours 10 00 to 18 00 Excluding weekends national holidays year end holidays and Obon holidays E mail rakuten panasonic jp My Let s Customer Desk Please understand that the details above may be changed witho...

Страница 64: ...ifications for the RAM module For details regarding the RAM module refer to Expanding Memory or Specifications in this Operating Instructions Wait until the computer cools down and then turn the power on again When the CPU temperature is high the computer may not start up to prevent overheating of the CPU If the computer does not power on even after cooling down contact your technical support offi...

Страница 65: ...llow the on screen instructions 1 Supervisor Password or User Password set with the Setup Utility When logging on e g resuming the computer audio is distorted Depending on the processing status on Windows sound may be interrupted at Windows startup You can mute the sound at startup 1 Right click the desktop and click Personalize 2 Click Sounds and remove the check mark from Play Windows Startup so...

Страница 66: ...st Name and Full Name Windows startup or operation is slow This problem may be eliminated by adding external memory If you install resident software after purchasing this computer disable the resident software Defragment the disk with the Disk Defragmenter If Windows startup is slow perform the following operations Using Quick Boot Manager reduce the wait time between the time you turn on the comp...

Страница 67: ...e peripheral is disconnected then there may be a problem with the peripheral Consult the peripheral manufacturer If it is no longer possible to shut down Windows after installing software application remove the software application using the following procedure 1 Click Start Control Panel Uninstall a program 2 Remove the software application If it is possible to shut down when the software applica...

Страница 68: ... you log on to Windows 1 Click Start Control Panel If the Windows log on password is set execute steps 7 k 2 Click User Accounts and Family Safety 3 Click Change your Windows password 4 Click Create a password for your account 5 Enter your password and then click Create password 6 Click Start Control Panel 7 Click System and Security 8 Click Change battery settings 9 Click Require a password on wa...

Страница 69: ...ed when you fail to correctly enter the password Follow the message s instructions and set the password again You cannot change the supervisor password and user password by using a password reset disk Do not forget your supervisor password and user password Perform the following to create a password reset disk 1 Click Start Control Panel User Accounts and Family Safety and click User account 2 Cli...

Страница 70: ...the charge is approx 9 or less Connect the AC adaptor You can use the computer when the battery indicator light is orange If you do not have an AC adaptor save your data and power off your computer After replacing the battery pack with a fully charged one turn your computer on again The battery indicator is blinking If blinking red Quickly save your data and power off your computer Remove the batt...

Страница 71: ... 5 under The cursor cannot be controlled properly above Adjust the sensitivity when touching the touch pad page 28 The cursor cannot be moved with a connected mouse Check that the mouse is correctly connected Install the driver for the connected mouse If the mouse driver is installed it may not possible to use the Touch Pad Set Touch Pad to Disabled in the Main menu of the Setup Utility Consult th...

Страница 72: ...play enlarged font sizes in software applications such as Internet Explorer Use the display enlargement function provided by the specific software application To display enlarged desktop icons title bar and cursor or magnify the specific part of the screen Use Optimized View or Loupe Utility Screen became black for instant Screen becomes black for instant in the following cases This is not a malfu...

Страница 73: ...t the display destination has switched completely each time before pressing or again The screen may become darker Press to make the screen brighter page 25 If the power indicator is blinking or is not lit the sleep or hibernation is entered Slide the power switch If an additional RAM module has been inserted or changed RAM module may be inserted correctly Power off your computer check that the RAM...

Страница 74: ...covery Disc for Windows 7 by using the Recovery Disc Creation Utility Refer to Preparation and Setting Guide Create a Recovery Disc You do not know the making method of the Recovery Disc Refer to Preparation and Setting Guide Create a Recovery Disc DFQW5600ZA BasicManual CF S10 indb 74 DFQW5600ZA BasicManual CF S10 indb 74 2011 11 15 14 08 39 2011 11 15 14 08 39 ...

Страница 75: ...nal CD DVD Drive DVD ROM Video Controller Video Sound Sound LAN LAN Wireless LAN Wireless LAN USB 2 0 port USB PC Card Controller PC Card SD Card Controller SD Keyboard Keyboard Touch Pad Touch Pad When the video diagnostic check is running the display may flicker heavily or be distorted When the audio diagnostic check is running sounds such as a loud beep may be generated from the speaker These a...

Страница 76: ...cuted the hardware icon will be displayed in gray 1 Remove all peripherals 2 Connect the AC adaptor During the diagnostic check do not remove the AC adaptor or attach any peripheral devices 3 Turn on the computer If Windows had been started up click Start Shut down and turn on the computer again 4 Press or while Panasonic boot screen is displayed to start up the Setup Utility If the Panasonic boot...

Страница 77: ...roblems discovered The diagnostic check may require a longer period of time if you use the computer in a high ambient temperature NOTE Using the following procedure you can run a diagnostic check on a specified hardware component 1 Click to stop the diagnostic check 2 Click the icon for the hardware that is not to be checked so that the icon is displayed in gray B When running a check on the hard ...

Страница 78: ...blem with the internal RAM module 12 After the diagnostic check is complete click close or press to restart the computer CAUTION The CD DVD drive is noisy when Optical Drive Power is set to On in the Main menu of the Setup Utility xxxx xx When the Icon Becomes Gray and the Corresponding Device Cannot Be Checked Follow the instructions below If the problem persists contact your technical support of...

Страница 79: ... 2 Click Recover system settings or your computer 3 Click Advanced recovery methods 4 Click Use a system image you created earlier to recover your computer A standard user needs to enter an administrator password 5 If you backup your files click Back up now Follow the on screen instructions If you do not backup your files click Skip 6 Click Restart The computer will restart If Enter Password is di...

Страница 80: ...isplayed If Advanced Boot Options is not displayed use the Recovery Disc below If Enter Password is displayed during the following procedure input the Supervisor Password or the User Password 3 Press to select Repair Your Computer and press 4 Click Next Do not specify keyboard layouts other than the one already selected 5 Select the user name registered on Windows 6 Input the password then click O...

Страница 81: ...overy data cannot be backed up to other media Nor can it be backed up to an external hard disk or other devices If the recovery area become corrupted or you cannot reinstall from the hard disk use the Recovery Disc page 85 Dynamic disks a type of disk management system are not supported for hard disk recovery Do not convert to a dynamic disk Reinstallation Procedure Back up data on your hard disk ...

Страница 82: ...d 4 Turn off the computer and connect the AC adaptor 5 Turn on the computer and press or while Panasonic boot screen is displayed to start up the Setup Utility F2 Press Press or Del If the Panasonic boot screen is not displayed turn on the computer while holding down or Hold down or until the Setup Utility screen or password input screen appears When the password is set Enter Password will be disp...

Страница 83: ...titions Select this option when the hard disk has already been divided into several partitions For how to create a new partition refer to Changing Hard Disk Partitions page 61 Before reinstallation The hard disk is divided into multiple partitions for use C drive D drive C drive Partition for the OS 40 GB or more is required D drive HDD recovery partition Recovery partition Installation using the ...

Страница 84: ... bit version was installed The system repair disc is used in cases such as when System Recovery Options cannot be started up from the hard disk If the same Windows version as the Recovery Disc was installed you do not need to create a system repair disc Creating a system repair disc 1 Click Start Control Panel Back up your computer 2 Click Create a system repair disc 3 Set a disc into the CD DVD d...

Страница 85: ...ayed to start up the Setup Utility When the password is set Enter Password will be displayed Enter supervisor password and press You cannot set default settings except the password System Time and System Date with a user password 3 Press At the confirmation message select Yes and press 4 1 Select Main menu using or 2 Select Optical Drive Power using or and press 3 Select On and press 5 Press and t...

Страница 86: ... the on screen instructions According to the screen replace the Recovery Disc Click Erase the whole data on the Hard Disk for security in step 10 to erase hard disk data Confirm the system type of Windows You can confirm the system type of Windows using the following procedure 1 Click Start Computer 2 Click System properties Confirm the System type DFQW5600ZA BasicManual CF S10 indb 86 DFQW5600ZA ...

Страница 87: ...m the hard disk This utility cannot erase data from damaged disk This utility cannot erase data for specific partitions The repair area will not be erased Completely Erasing Data 1 Connect the AC adaptor 2 Turn on the computer and press or while Panasonic boot screen is displayed to start up the Setup Utility If the Panasonic boot screen is not displayed turn on the computer while holding down or ...

Страница 88: ...2 Click Continue again 13 Click YES Erasing the hard disk data starts 14 After erasing is completed click OK The computer is turned off If a problem occurred during the operation an error message will be displayed DFQW5600ZA BasicManual CF S10 indb 88 DFQW5600ZA BasicManual CF S10 indb 88 2011 11 15 14 08 54 2011 11 15 14 08 54 ...

Страница 89: ...he correct date and time If the problem persists the internal clock battery may need to be replaced Contact your technical support office Error Hard disk access is prohibited by Hard Disk Lock Run the Setup Utility and set Hard Disk Lock to Disabled Press F2 to enter setup Write down the error details and press or to start the Setup Utility Change the settings if necessary Reboot and Select proper...

Страница 90: ... 9 4 GB 4 DVD R DL 8 5 GB 4 DVD RAM 9 1 4 GB 2 8 GB 4 7 GB 9 4 GB 4 R 4 7 GB 4 R DL 8 5 GB 4 RW 4 7 GB 4 CD Audio CD ROM XA compatible CD R Photo CD multiple session compatible Video CD CD EXTRA CD RW CD TEXT High Speed RW 4 7 GB 4 High Speed CD RW Ultra Speed CD RW Writing DVD RAM 9 1 4 GB 2 8 GB 4 7 GB 9 4 GB 4 DVD R 1 4 GB 2 8 GB 4 7 GB for General 4 DVD RW Ver 1 1 1 2 1 4 GB 2 8 GB 4 7 GB 9 4 ...

Страница 91: ...Disable Charging Time 23 Approx 4 hours Power off Approx 5 hours Power on Power Consumption Approx 65 W Max 24 Physical Dimensions W D H 25 282 8 mm 209 6 mm 23 4 mm at the front 38 7 mm at the rear excluding protrusion Weight 26 Computer Approx 1 18 kg included the lightweight battery pack Approx 0 255 kg AC adaptor Approx 0 2 kg excluded AC cord Approx 0 06 kg Environment Operation Temperature 5...

Страница 92: ...gsoft 29 Power Plan Power saving To switch the power plan and set power saving Power Plan Extension Utility To use power efficiently Peak Shift Control Utility Writing to CD DVD To write to CD DVD To create DVD video Roxio Creator LJB including MyDVD 30 Sound Movie To play music and video Microsoft Windows Media Player 12 To view DVD video To play video CyberLink PowerDVD 10 31 Peripherals To make...

Страница 93: ...lly depending on the computer s operating status The size of the Video Memory cannot be set by the user The size of the Video memory is allotted depending on the operating system 32 bit 1557 MB Max 4 1 MB 1 000 000 bytes 1 GB 1 000 000 000 bytes Your operating system or some software application will report as fewer GB 5 Data transfer speeds indicate values measured by Panasonic Corporation The da...

Страница 94: ...urs Power on off Varies depending on the usage conditions CPU speed etc It may take a long time to charge a fully discharged battery 24 Approx 0 7 W when the battery pack is fully charged or not being charged and the computer is off However note it is approx 1 W during peak shift control For the battery charge retention times in sleep hibernation refer to Starting Up Shutting Down page 27 Even if ...

Страница 95: ... 5 15 GHz 5 35 GHz 5 47 GHz 5 725 GHz 40 37 These are speeds specified in IEEE802 11a b g n standards Actual speeds may differ 38 The description concerning support for IEEE802 11n is not a guarantee of connecting with other products that support IEEE802 11n 39 The effective range differs depending on surrounding conditions such as the radio wave environment obstructions and the setup environment ...

Страница 96: ...ed trademarks of McAfee Inc of the United States and or other countries Bluetooth is a trademark owned by Bluetooth SIG Inc U S A and licensed to Panasonic Corporation Roxio Creator is trademarks or registered trademarks of Rovi Corporation i Filter is a registered trademark of DigitalArts Corporation WiMAX is a registered trademark of WiMAX Forum HDMI the HDMI Logo and High Definition Multimedia ...

Отзывы: