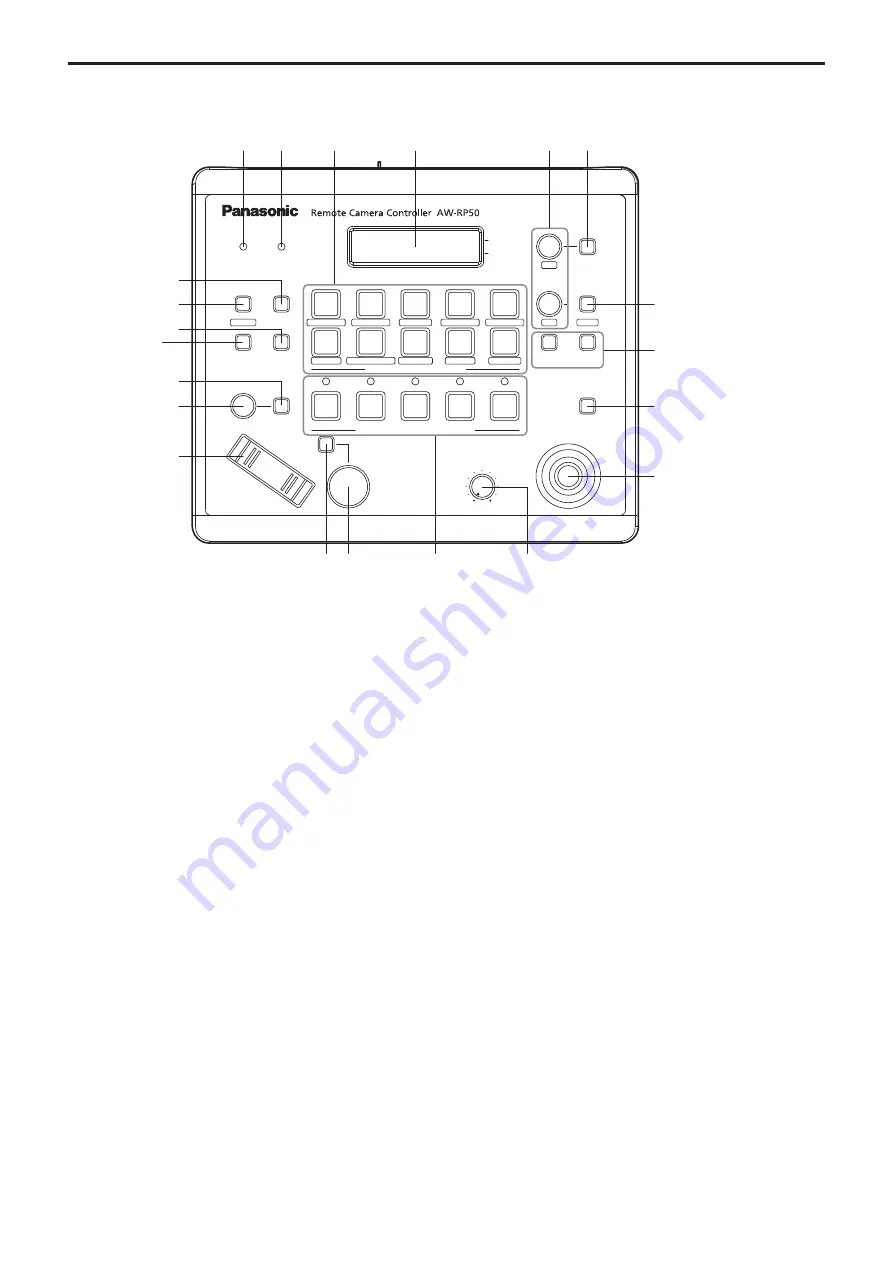
AW-RP50 (not supplied)
For detailed operations, refer to the Operating Instructions of the AW-RP50 — <Operations and Settings>.
z
Control panel
POWER
ALARM
F1
CAMERA
OSD
R/B GAIN
R/B PED
SYSTEM
SETUP
CAMERA
SCENE/MODE
DETAIL
DELETE
STORE
PAGE
MENU
F2
EXIT
USER2
USER1
PT ACTIVE
AUTO
IRIS
AUTO
HI
LOW
PTZ/FOCUS SPEED PAN/TILT
FOCUS/
PUSH
OTAF
TELE
ZOOM
WIDE
CAMERA STATUS / SELECTION
PRESET MEMORY / MENU
GAIN/PED
F2
F1
1
2
3
AWB/ABB
4
SHUTTER
5
1
2
3
4
5
6
7
8
9
10
1
POWER indicator [POWER]
This indicator lights when the POWER switch (
) on the rear panel
is set to ON while power is supplied to the DC IN socket.
2
ALARM indicator [ALARM]
This indicator lights when there is a problem with the power supply
(voltage drop).
It also lights when an alarm (a cooling fan alarm or pan/tilt error) has
been received from a remote camera.
When the alarm indicator has lighted, stop using the unit
immediately, and be absolutely sure to contact your dealer.
Continuing to use the AW-RP50 even after an alarm has occurred
may cause the AW-RP50 to malfunction.
The alarm information can be output to an external device from the
unit’s TALLY/GPI connector (
).
3
LCD panel
The current setting statuses are displayed on this panel.
4
F1 dial, F2 dial [F1, F2]
These dials are turned to change the menu values, and they are
pressed to enter the changes that have been made.
The F1 dial is used to operate the items displayed at the top of the
LCD panel, and the F2 dial is used to operate the items displayed
underneath.
What appears on the on-screen displays of the remote cameras and
how operations are performed differ depending on the camera type.
5
CAMERA OSD button [CAMERA OSD]
When the CAMERA OSD button is held down, its indicator lights, and
the on-screen menu of the selected remote camera is displayed as
the output image of the remote camera.
When the button is held down again while its indicator is lighted, the
menu is cleared, and the indicator goes off.
6
EXIT button [EXIT]
Press this during menu operations to return to the previous
hierarchical level.
7
USER buttons [USER1, USER2]
The functions of some of the setting items on the menus can be
assigned to [USER1] and [USER2] to be recalled later.
p
Assignable functions:
Super Gain, Haze Reduction, Fan, Heater, Defroster, Wiper,
Washer
p
For the [Wiper] function, press PRESET MEMORY/MENU
buttons 1 to 3 (1: Off, 2: Slow, 3: Fast) after pressing the USER
button.
8
MENU button [MENU]
Press this to recall the menus using the PRESET MEMORY/MENU
buttons (
).
When it is pressed again while its indicator is lighted, the menu is
cleared, and the indicator goes off.
Button indicator ON:
The menu operations take effect.
Button indicator OFF:
The menu operations have no effect.
Refer to “Basic operations for the menus”.
9
PAGE button [PAGE]
Press this to specify the preset memory of the remote camera.
When the button is pressed, its indicator lights, and the mode for
selecting the page of the preset memory is established.
In this mode, press one of the PRESET MEMORY/MENU buttons
(
), and specify the page number.
Next, specify the number on the page using one of the PRESET
MEMORY/MENU buttons.
STORE button [STORE]
Press this to register the preset memory data of the currently
selected remote camera.
When it is pressed again while its indicator is lighted, the menu is
cleared, and the indicator goes off.
Button indicator ON:
The preset memory data registration mode is established.
Button indicator OFF:
The preset memory data registration mode is released.
16


