5
UTILIZZO
USE
15
OMCA S.r.l
-
Via Curiel, 6 - 42025 - Cavriago (RE) - ITALY
Phone:
+39 0522 943502 / +39 0522 943503 -
Website
: www.omcasrl.it -
4)
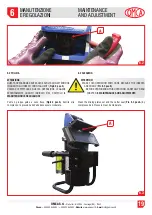
Premere il pulsante di marcia (
Fig.5.1 pos.B
).
5)
Spingere la macchina sul pezzo per eseguire la smussatura.
6)
In base alla dimensione dello smusso e del tipo di materiale è
possibile aumentare la velocità di avanzamento.
7)
Alla fine della lavorazione, fermare la macchina premendo il
pulsante rosso di stop (
Fig.5.1 Pos.A
).
4)
Push the start button (
Pic.5.1 pos.B
).
5)
Push the machine on the workpiece to perform the bevel.
6)
Based on the chamfer dimension and the type of material it is
possible to improve the feed speed.
7)
At the end of the machining, stop the machine by pressing the red
button (
Pic. 5.1 Pos.A
).
5.3
A
ATTENTION:
AT THE END OF THE MACHININg, wHEN THE CUTTER IS NOT IN
CONTACT wITH THE wORKPIECE, IT IS NECESSARY TO HOLD
THE MACHINE TO PREVENT IT FROM FALLINg ON THE gROUND.
ATTENZIONE:
ALLA FINE DELLA LAVORAZIONE, QUANDO LA FRESA NON è PIù A
CONTATTO CON IL PEZZO, OCCORRE SOSTENERE LA MACCHINA,
PER EVITARE CHE POSSA CADERE A TERRA.
5.3 REgOLAZIONE DELLO SMUSSO
Per regolare la dimensione dello smusso
occorre, allentare la leva
di bloccaggio regolazione smusso (
Fig.5.3 pos.B
) e mediante il
volantino (
Fig.5.3 pos.C
) regolare la profondità di smusso desiderato.
Ruotando nel senso della freccia
+
si incrementa l’entità dello
smusso, al contrario ruotando nel senso della freccia
–
si decrementa,
la profondità dello smusso è indicata tramite un’apposita targhetta
(
Fig.5.3 pos.A
). Al termine della regolazione, serrare la leva di
bloccaggio regolazione smusso (
Fig.5.3 pos.B
)
5.3 CHAMFERINg ADJUSTMENT
To adjust the chamfer width
it is necessary to loosen the adjustment
chamfer locking lever (
Pic.5.3 pos.B
) and through the hand-wheel
(
Pic.5.3 pos.C
), adjust the chamfer depth desired. The chamfer
dimension can be increased by rotating in the
+
arrow direction
and decreased by rotating on
–
arrow direction. Bevelling depth is
indicated with a proper label
(
Pic.5.3 pos.A
).
At the end of adjustment, tighten the chamfer adjustment locking lever
(
Pic.5.3 pos.B
)
ATTENTION:
DO NOT TOUCH THE CUTTER DURINg MACHININg FOR ANY REA-
SON (
Pic. 4.1 pos. A
).
ATTENZIONE:
NON TOCCARE PER NESSUN MOTIVO LA FRESA (
Fig.4.1 pos.A
)
DURANTE LA LAVORAZIONE.
B
C


