


PR
OG
SET
UP
1
0
2
3
4
5
6
7
8
9
VOLUME
ANGLE
MUTE
V.MODE
REPEAT
AUDIO
TITLE/PBC SUBTITLE
INTRO
ZOOM
A-B RPT
SLOW
N/P
OSD
BOOK MARK
DVD
SOURCE
CHAP MARK
EDIT
PAUSE/STEP STOP
MENU
CH-
CH+
REC
TIMER
QUALITY
DISC
DVR-140
PROG
PR
OG
SET
UP
SE
TU
P
1
0
2
3
4
5
6
7
8
9
VOLUME
VOLUME
ANGLE
MUTE
V.MODE
V.MODE
REPEAT
REPEAT
AUDIO
AUDIO
TITLE/PBC
TITLE/PBC SUBTITLE
SUBTITLE
INTRO
INTR
O
ZOOM
ZOO
M
A-B RPT
A-B RPT
SLOW
N/P
N/P
OSD
BOOK MARK
BOOK MARK
DVD
SOURCE
SOURCE
CHAP MARK
CHAP MARK
EDIT
EDIT
PAUSE/STEP
PAUSE/STEP STOP
STOP
MENU
MENU
CH-
CH+
REC
REC
TIMER
QUALITY
QUALITY
DISC
STANDBY/ON
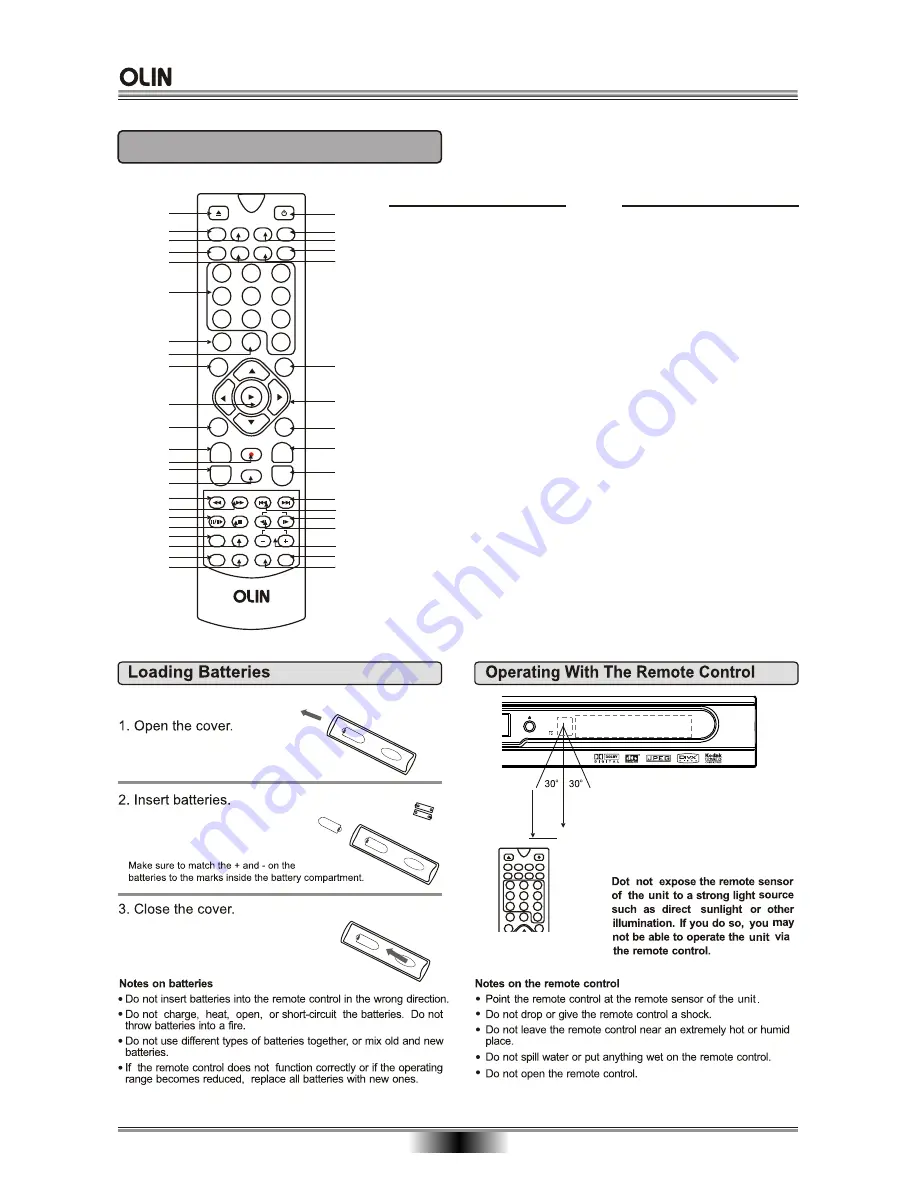
REMOTE CONTROL
REMOTE CONTROL
12
Distance:
About 7m (23 feet) from the
front of the remote sensor.
o
Angle:
About 30 in each direction
of the front of the remote
sensor.
About 7m
Function
Function
1
2
4
6
7
8
9
10
11
12
14
16
18
20
21
22
23
13
15
17
19
3
5
24
25
27
29
30
31
32
33
34
36
38
39
26
28
40
1. OPEN/CLOSE DISC TRAY
2. Video Output Mode
3. TITLE/PBC
4. REPEAT
5. A-B REPEAT
6. DIGITS 0-9 BUTTONS
7. On Screen Display (OSD)
8. NTSC/PAL
9. SETUP
10. PLAY/ENTER
11. ZOOM
12. CHANNEL up
13. RECORD
14. TIMER
15. QUALITY
16. FAST REVERSE
17. FAST FORWARD
18. PAUSE/STEP
19. STOP
20. DVD Title Screen
21. MUTE
22. SOURCE
23. BOOK MARK
24. STANDBY
25. MENU
26. SUBTITLE
27. AUDIO
28. ANGLE
29. INTRO
30. CURSOR
31. PROGRAM
32. CHANNEL down
33. DISC
34. NEXT
35. PREVIOUS
36. SLOW FORWARD
37. SLOW REVERSE
38. /- (Volume Control)
39. CHAPTER MARK
40. EDIT
35
37
Содержание DVR-140
Страница 1: ......


