21
➎
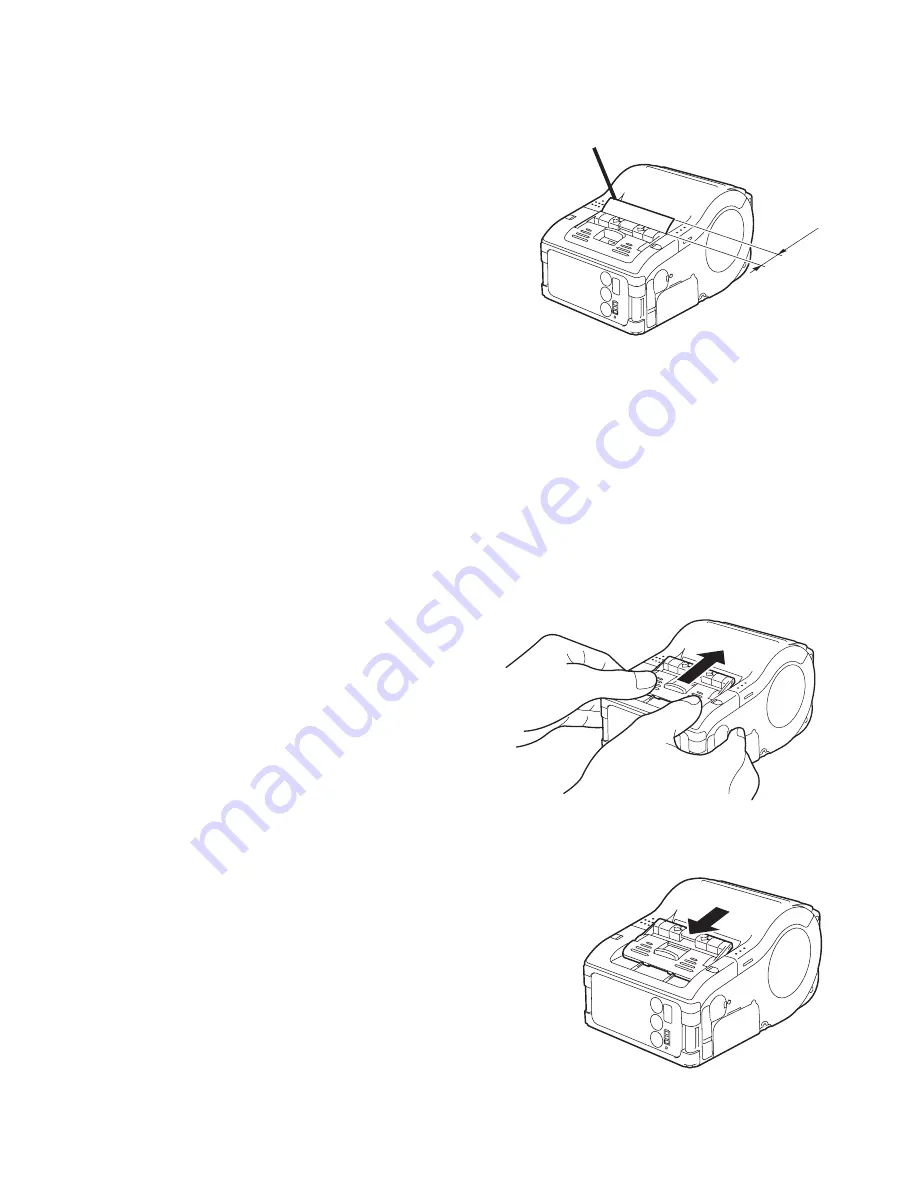
Close the cover
after confirming
that the leading
edge of the label is
outside the printer
(more than 10 mm) .
When using a non-
separate label, press
FEED key to feed a
piece of label and pull
the label upward to cut
it along the perforation .
If the label is jammed,
retry label setting
procedure .
➏
Slide the dispenser unit
until it stops .
This completes the label setting in the Dispense mode .
•
To changing Dispense mode to
continuous mode
Lifting the change lever, slide the
dispenser unit until stops .
Before Starting
4
28
Turning Printer On
5
29
5. Turning Printer On
After the procedure mentioned before has been finished, try
to turn the printer power on and off.
1
Press and hold the
POWER key. When the
STATUS LED lights
green, release the key.
2
Press and hold the
POWER key again.
When he STATUS LED
goes off, release the
key..
POWER
FEED
POWER
FEED
5
Close the cover after
confirming that the
leading edge of the
label is outside the
printer (more than 10
mm).
When using a non-separate
label, press FEED key to
feed a piece of label and pull
the label upward to cut it
along the perforation.
If the label is jammed, retry
label setting procedure.
6
Slide the dispenser unit
until it stops.
This completes the label setting in the Dispense mode.
•
To changing Dispense mode to continuous
mode
Lifting the change lever,
slide the dispenser unit
until stops.
Label leading edge
Before Starting
4
28
Turning Printer On
5
29
5. Turning Printer On
After the procedure mentioned before has been finished, try
to turn the printer power on and off.
1
Press and hold the
POWER key. When the
STATUS LED lights
green, release the key.
2
Press and hold the
POWER key again.
When he STATUS LED
goes off, release the
key..
POWER
FEED
POWER
FEED
5
Close the cover after
confirming that the
leading edge of the
label is outside the
printer (more than 10
mm).
When using a non-separate
label, press FEED key to
feed a piece of label and pull
the label upward to cut it
along the perforation.
If the label is jammed, retry
label setting procedure.
6
Slide the dispenser unit
until it stops.
This completes the label setting in the Dispense mode.
•
To changing Dispense mode to continuous
mode
Lifting the change lever,
slide the dispenser unit
until stops.
Содержание LP441b
Страница 1: ...1 Quick Guide Guide rapide Guía rápida Guia rápido LP440 LP441 ...
Страница 2: ...2 ...
Страница 3: ...3 English 3 Français 39 Español 75 Português 113 ...
Страница 47: ...47 Nom et fonction des commandes ...
Страница 133: ...133 ...
Страница 150: ...150 ...
Страница 151: ...151 ...
Страница 152: ...152 59400002 2010 OKI Data Americas Inc ...


