5/Maintaining the Servo-controlled Humidifier
5-3 5-3
WARNINGS
The heater is hot enough to cause skin burns. Unplug the humidifier and
allow the heater to cool (approximately 30 minutes) before disassembly or
cleaning.
Always disconnect the power before performing service or maintenance
procedures detailed in this manual. Apply power only if you are specifically
instructed to do so as part of the procedure.
Thoroughly air dry the humidifier after cleaning it with flammable agents.
Small amounts of flammable agents, such as ether, alcohol or similar
cleaning solvents left in the humidifier can cause a fire.
Cleaning Schedule
Disinfect the humidifier weekly or after each patient. This is the recommended
minimum cleaning frequency; always follow hospital and local regulations for required
frequencies.
Disassembling the Servo-controlled Humidifier for cleaning
If the humidifier has been exposed to body fluids, check your hospital’s infection
control procedures. You may need to wear protective clothing and eye glasses, or to
use special disinfecting agents and cleaning procedures.
WARNING
Disconnect the power cord before disassembling or reassembling the humidifier.
CAUTIONS
w
Electronic devices in the humidifier controller can be damaged by discharges of
static electricity. Normally these devices are adequately protected, but they can be
damaged if the unit is disassembled beyond what is recommended for operation,
cleaning and maintenance.
w
Do not remove the humidity sensor from the hood rear wall; the humidifier will
malfunction if the sensor is not in the correct position.
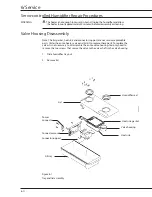
1. Turn the power switch Off and unplug the unit from the power outlet.
2. If the humidifier was running, allow it to cool for at least 30 minutes.
3. Slide the humidifier fill tray out from under the base.
4. Remove the tray lid.
5. Remove the humidifier seals from the holes in the lid.
Содержание Ohio Care Plus
Страница 20: ...2 General Information 2 4 2 4 Notes...
Страница 24: ...4 Using the Servo controlled Humidifier 4 2 4 1 Notes...
Страница 46: ...6 Service 6 18 6 18...
Страница 53: ...8 Schematics 8 1 Figure 8 1 Wiring Diagram Servo controlled Humidifier 8 Schematics CI 18 059...
Страница 54: ...8 Schematics 8 2 Figure 8 2 Power Supply section of the Control Display Board Assembly CI 18 060...
Страница 55: ...8 Schematics 8 3 Figure 8 3 Digital section of the Control Display Board Assembly CI 18 061...
Страница 56: ...8 Schematics 8 4 Figure 8 4 Analog section of the Control Display Board Assembly CI 18 062...
Страница 57: ...8 Schematics 8 5 Figure 8 5 Heater Control section of the Control Display Board Assembly CI 18 063...
Страница 58: ...8 Schematics 8 6 Figure 8 6 Display section of the Control Display Board Assembly CI 18 064...
Страница 67: ......


