background image

Operator Level Parameter Definitions:  

PV - Process Value This is the temperature (or other
process variable) as measured at the sensor.  This will
indicate a value within the range between the low scale
(Lo.SC) and high scale value (hi.SC).  This indication
will read an error code if the temperature (process
variable) goes out of the preset span.  Note items 6 and
7 of the troubleshooting guide on page 25 for the error
code descriptions.

SV - Set Point Value This parameter is the desired set
point of the process.  It can be adjusted within the
range defined by the low scale (Lo.SC) and high scale
value (hi.SC).  The span adjustments can be used to
limit the set point of the controller.

ASP1 - Alarm 1 Set Point Value or Dwell Time This
sets the points at which alarm 1 will energize if A1.SF
(alarm 1 special function) is set for an alarm function.
If A1.SF is selected for the dwell timer function (toon or
toof), then this becomes the timer setting in minutes.
The dwell timer starts counting when the process value
reaches the set point value.  Note page 20 for more
information.

rAMP - Ramp Rate  This controls the heat-up and
cool-down rate of the process.  This setting is in
degrees per minute.

oFSE - Offset Value This parameter is only functional
if the integral time (automatic reset) is set to zero.  The
oFSE then functions the same as manual reset to
correct the process temperature to the set point temper-
ature.  If the process temperature stabilizes below the
set point, then set a positive amount of oFSE.  If the
process temperature stabilizes above the set point, set
a negative amount of oFSE.  Wait for the system to
stabilize and make further adjustments as required.

ASP2 - Alarm 2 Set Point Value  This sets the points
at which alarm 2 will energize if A2.SF (alarm 2 special
function) is set for an alarm function.  If A2.SF is
selected for cooling; the cooling cycle time, proportional
band and deadband are adjusted by parameters CCyC,
C.pb and d-b.  ASP2 will then have no effect.  Note
page 20 for more information.

ShiF - Display Shift A value entered here will be
added or subtracted from the process value.  This offset
can be used as a correction factor if the sensor does
not read the same temperature as the item being
sensed.  Note page 21 for more information.

Pb, Ei and Ed - PID Values Proportional band,
Integral (reset) and Derivative (rate) time constants.
These must be set as close as possible to the process
application requirements.  Note page 17 for more
information.

AhY1, AhY2 - Hysteresis of Alarm 1 and Alarm 2
The values entered here define the deadbands for the
alarms.  The alarms will not change state until the
temperature is outside of the deadband.

hySE - Hysteresis of On-Off Control  This parameter
defines the deadband when on-off control is used and
PID control has been disabled.  For on-off control, set

Pb, Ei and Ed to 0.  The output on a relay control will
not change state until the temperature is outside the
deadband.  Note page 17 for further information.

Addr - Interface Address  For external communica-
tions with a computer.  

Lo.SC, hi.SC - Low/High Scale Range These
parameters are used to define the range (span) of the
control.  These should be set for the requirements and
safety of your process.  Refer to "Initial Operation" on
page 17 for further information.  If inputs other than
thermocouples or RTDs are required, refer to page 22
for reranging directions.

PL.1, PL.2 - Power Limit  These parameters are used
to limit the output percentage of power for heating or
cooling.  If the control has relay or pulsed voltage
outputs, then the percentage of “on” time will be
decreased.  The actual output levels will be decreased
if the control has linear current (4-20mA) or linear
voltage outputs.

inPE - Input Type This parameter is used to program
the control to the type of input sensor used.

uniE - Process Units This parameter is used to set
the display in degrees F, C or blank for engineering
units.

rESo - Display Resolution This parameter is used to
place a decimal point in the process and set point
values.  A two-place decimal point can only be set if the
uniE adjustment is set to engineering units (PU).

Con.A - Control Action of Output 1  This parameter
selects heating (reverse) or cooling (direct) action for
output 1.

A1.Md, A2.Md - Alarm Mode Selection for Alarm 1
and Alarm 2  
This adjustment sets the type of alarm
required: deviation alarm, band alarm or process alarm.
Refer to page 20 for more information.

A1.SF - Alarm 1 Special Function This selects
special functions required for use with alarm 1.  The
special functions include latching alarms, hold
(inhibited) function or dwell timer function.  Refer to
page 20 for more information on alarms.

A2.SF - Alarm 2 Special Function This selects spe-
cial functions for alarm 2.  This includes latching func-
tion, hold (inhibited) function or proportional cooling.

CyC - Proportional Cycle Time of Output 1 This sets
the proportional cycle time for output 1.  This should be
set according to the type of output device used.  For
mechanical relays, cycle times of 15 to 20 seconds are
used.  For solid-state relays, set this adjustment to 1 or
0.  For 4-20mA or other linear outputs set this to 0.

CCyC - Cooling Cycle Time  Only used if A2.SF
(alarm 2 special function) has been set for cooling.  Use
the same settings as the above paragraph.

C.Pb, d-b  Cooling Proportional Band, Cooling
Deadband 
Only used if A2.SF (alarm 2 special
function) has been set for cooling.  Refer to page 22 for
further information on the settings to be used for cooling
output.

Содержание ETR-9200

Страница 1: ...MANUAL NO 25 SOFTWARE VERSION 1 8 and HIGHER Model ETR 9200 AUTOMATIC TUNING SMARTER LOGIC Controller SMARTER SMARTER LOGIC LOGIC LOGIC INSTRUCTION MANUAL ...

Страница 2: ...ed tampering Two large 4 digit displays show process and set point values at a glance Precise 14 slope sensor lineariza tion self diagnostic capability cold junction compensa tion and 3 mode PID calculations are automatically exe cuted by the single chip microprocessor The wide selection of parameters values sensor types set points control modes alarm modes degrees C F and security codes are held ...

Страница 3: ...3 6 F 50 to 1370 C 2 C T Copper Constantan 454 to 752 F 3 6 F 270 to 400 C 2 C E Chromel Constantan 58 to 1382 F 3 6 F 50 to 750 C 2 C B Pt 30 RH Pt 6 RH 32 to 3272 F 5 4 F 0 to 1800 C 3 C R Pt 13 RH Pt 32 to 3182 F 3 6 F 0 to 1750 C 2 C S Pt 10 RH Pt 32 to 3182 F 3 6 F 0 to 1750 C 2 C N Nicrosil Nisil 58 to 2372 F 3 6 F 50 to 1300 C 2 C RTD PT 100 ohms DIN 328 to 752 F 0 72 F 200 to 400 C 0 4 C R...

Страница 4: ...0db Common Mode Rejection 120db Operating Ambient for Rated Accuracy 14 120 F 10 50 C Storage Temperature 4 160 F 20 70 C Humidity 5 90 RH non condensing Insulation 20M ohms min 500VDC Breakdown 2000V AC 50 60Hz 1 minute Shock 200m s2 20g Weight 4 oz 110 grams EMC Emission EN50081 1 EN61326 EN55011 class B EN61000 3 2 EN61000 3 3 EMC Immunity EN50082 2 EN61326 EN61000 4 2 EN61000 4 3 EN61000 4 4 E...

Страница 5: ...ted by fuses or circuit breakers rated at the minimum value possible All units should be installed inside a suitably ground ed metal enclosure to prevent live parts being acces sible to human hands and metal tools All wiring must conform to appropriate standards of good practice national and local codes and regulations Wiring must be suitable for the maximum voltage current and temperature ratings...

Страница 6: ... be the same gauge and material If the RTD is a 3 wire device install the two common wires of the RTD to terminals 13 and 14 If a 2 wire RTD is to be used install a jumper between terminals 13 and 14 See page 22 for instructions to re range the input to volts milli volts or milli amps 1 2 3 4 5 6 7 8 9 10 11 12 13 14 15 16 0 20mA 4 20mA V 0 10V RTD A B B T C PTA TC MV TC COM mA V MV 90 264 VAC 50 ...

Страница 7: ...M 1 Load 3A 240VAC Max for Relay 1A for Triac Alarms 1 2 3A 240VAC Max Hot Fuse Neutral Alarm 2 Alarm 1 Figure 4 4 Example of wiring connections for ETR 9200 1211 Single Relay Output No Alarms Figure 4 5 Example of wiring connections for ETR 9200 1221 Heating Output with dual alarms Typical Wiring Diagrams 12 13 14 A B B 3 Wire RTD Connection 12 13 14 A B B 3 Wire RTD Connection CAUTION SHOCK HAZA...

Страница 8: ...ree Phase Power Fuse Alarms 1 2 3 A 240VAC max Hot Neutral Alarm 2 Alarm 1 Three Pole DP Magnetic Contactor Figure 4 6 Example of wiring connections for ETR 9200 1221 Heating and Cooling with alarm Figure 4 7 Example of wiring connections for ETR 9200 1221 with three phase Delta heater load NOTE The use of motor starters in place of magnetic contactors should be avoided They have very large induct...

Страница 9: ...N L Heater Power Neutral Hot Fuse Heater Fuse Figure 4 8 Example of wiring connections for ETR 9200 1321 with SSR output with dual alarms Red T C 1 2 3 4 5 6 7 8 9 10 11 12 13 14 15 16 OUT 1 Load 3 Amp 240VAC Max Power Input Hot Fuse Neutral ALM 1 ALM 2 Figure 4 9 Ramp and Soak 12 13 14 A B B 3 Wire RTD Connection 12 13 14 A B B 3 Wire RTD Connection ...

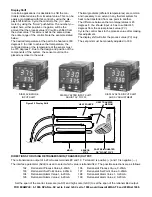
Страница 10: ... addition of a stirrer will help to eliminate thermal lag Since the thermocouple is basically a point measuring device placing more than one thermocouple in parallel will provide an average temperature reading and produce better results in most air heated processes Proper sensor type is also a very important factor in obtaining precise measurements The sensor must have the correct temperature rang...

Страница 11: ...ification Key 2 Verifies the display accuracy for various input types during calibration Press and Disables keypad operation to protect all parameters from being longer than 4 Lock Key tampered with seconds Press and Engineering Selects the Engineering level Scrolls through the Engineering Programs Level Key 1 Resets the control to its normal status Press and Reset Exit Key 2 Unlocks keypad operat...

Страница 12: ...f no entry is made Short Scroll returns to PV SV Short Scroll advances step by step through parameters in forward direction Short Scroll advances step by step through parameters in forward direction Short Scroll advances step by step through parameters in forward direction Short Scroll returns to PV SV See page 14 Short Scroll returns to PV SV Views parameters step by step in reverse order Exits p...

Страница 13: ...1 C 0 19 F 1 11 C 0 40 Minimum value for the selected Input INPT to High Scale HISC Low Scale LOSC to maximum value for the selected Input INPT 0 100 0 100 J Type T C E Type T C S Type T C PT100 JIS 0 1V 1 5V K Type T C B Type T C N Type T C 4 20 mA 0 5V T Type T C R Type T C PT100 DIN 0 20 mA 0 10V degree C degree F process units Engineering Units No decimal point used 2 Digit decimal only for Li...

Страница 14: ...SIS ON OFF ADDRESS LOW LIMIT OF RANGE HIGH LIMIT OF RANGE POWER LIMIT OUTPUT 1 POWER LIMIT OUTPUT 2 INPUT TYPE UNIT TYPE RESOLUTION CONTROL ACTION ALARM MODE 1 ALARM 1 SPECIAL FUNCTION ALARM MODE 2 ALARM 2 SPECIAL FUNCTION PROPORTIONAL CYCLE TIME COOLING CYCLE TIME COOLING PROPORTIONAL BAND DEADBAND CONTROL NO PARAMETER DATE Table 5 4 Parameter Record Sheet OPERATOR LEVEL Long Scroll ...

Страница 15: ...low only selected parameters to be adjustable and all the others to be locked out For example if only the set point is to remain un locked all the other parameters in level 0 can be moved to level 1 Then lock out level 1 and 2 Press the keys to exit the engineering level Manual Mode hand control Used if sensor fails Peak Process Value Stored minimum and maximum values Calibrate A D Converter Indic...

Страница 16: ...r Enters the updated security level of ASP1 Enters the updated security level of RAMP Enters the updated security level of DB Defines the status of the outputs if the sensor fails Select the status for Alarm 1 Alarm 1 ON Alarm 1 OFF Select the status for Alarm 2 Alarm 2 ON Alarm 2 OFF Select the status for Output 2 Output 2 ON Output 2 OFF Select Lock or Free for operator Security Level 0 Locks al...

Страница 17: ... of the deadband hySE Hysteresis of On Off Control This parameter defines the deadband when on off control is used and PID control has been disabled For on off control set Pb Ei and Ed to 0 The output on a relay control will not change state until the temperature is outside the deadband Note page 17 for further information Addr Interface Address For external communica tions with a computer Lo SC h...

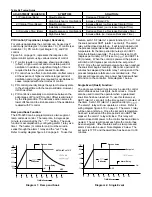
Страница 18: ...on the same process The autotune function starts by depressing the and keys for 4 seconds then release The process value display will flash on and off indicating the control is in the autotune mode No other adjustments can be made to the system while the con trol is autotuning The control will finish autotuning by itself and the correct PID values will be entered into the control s memory Autotuni...

Страница 19: ...you obtain and become familiar with the following reference material Tuning of Indusrial Control Systems by A R Corripio ISBA 1 55617 253 20 Available from ISA Publications and Training Aids Phone 919 549 8411 This method should be performed with a temperature chart recorder Fig 5 2 Steady State Cycling TIME PV Process value PV Tc P Band Pb 1 7 Pc Integral Time ti Tc Derivative Time td 0 125 Tc PV...

Страница 20: ...es When the control is powered the process will climb at 20 degrees per minute to the set point of 475 F Once the set point temperature has been reached the soak timer begins counting After a time period of 30 minutes has elapsed the alarm relay 1 will open and the process temperature falls at an uncontrolled rate This process will repeat every time power has been switched off and on to the contro...

Страница 21: ... an alarm at start up The alarm is enabled only when the Process Value reaches the Set Point SV Latch and Inhibited Alarm A1 SF A2 SF When selected the alarm will stay active until the power is reset The alarm mode is only enabled when the Process Value reached the Set Point Value SV Cooling A2 SF Alarm 2 can be designated as a cooling output if heating and cooling operation is desired Hysteresis ...

Страница 22: ...ated is 330 degrees F In order to achieve that temperature the controlled value or the temperature at the sensor must be 375 degrees F Due to the design and position of the components of the system the sensor could not be placed any closer to the work Thermal gradients different temperatures are common and necessary to an extent in any thermal system for heat to be transferred from one point to an...

Страница 23: ...will increase the span between the heating and cooling set points The range of this adjustment is from 199 199 F 111 111 C Re ranging for Linear Process Inputs Select the type of input you wish to use from the input type list in the operators menu on page 12 This would correspond to the output of the sensor or trans mitter you are using If the front display is to read in engineering units instead ...

Страница 24: ...oom temperature is entered press the key for 4 seconds After the key is released the upper display will strobe indicating that the new value has been loaded into the memory 4 Press the key to view 5 The upper display should read 0 00 Close SW1 The upper display should now read 20 00 If the value is not 20 00 make sure that the current source is accurate After a value of 20 00 is dis played in the ...

Страница 25: ...of the other common causes of failures WARNING Incorrect parameters entered in menu Excessive electrical interference Line wires are improperly connected No voltage between line terminals Incorrect voltage between line terminals Connections to terminals are open missing or loose Thermocouple or RTD is open at tip Thermocouple or RTD lead is broken Shorted thermocouple or RTD leads Short across ter...

Страница 26: ...input mode selected Analog portion A D converter defective Reversed input wiring of sensor No heater power output incorrect output device used Output device defective Open fuse outside of the instru ment Output device shorted or power service shorted CPU or EEPROM non volative memory defective Key switch defective Operation of control incorrect Electromagnetic interference EMI or Radio Frequency I...

Отзывы: