background image


User’s Guide Océ CS9160 printer


88 

AP-40790 – Rev 2.0 -23/08/2011, 


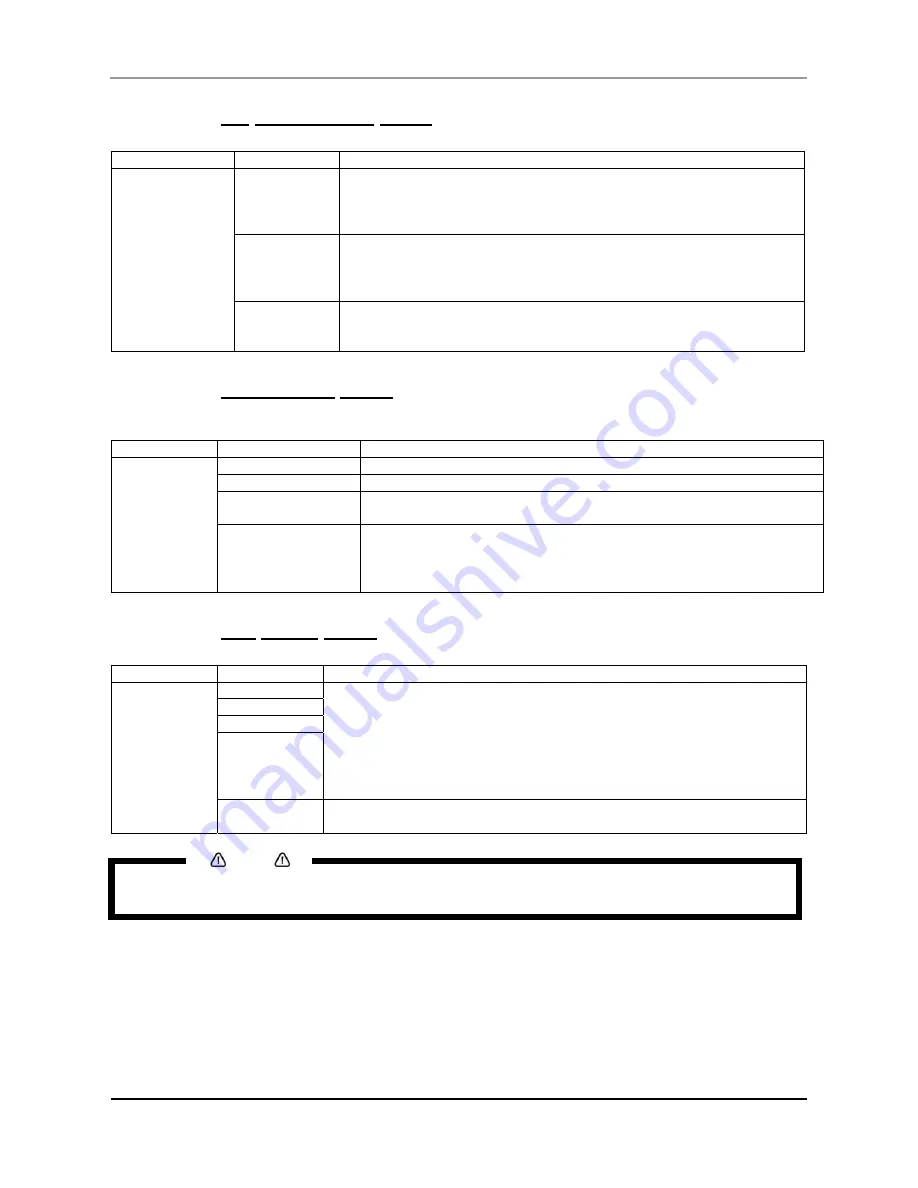
4.7.19 CR Maintenance menu 


Setup Item 

Setting Value 

Description 

CR Maintenance 


Start 


Clean the wiper. 

  [Enter] key:  

The print head moves to the centre. 
The wiper moves forward. 

End 

Cleaning the wiper is complete. 

  [Enter] key:  

Print head returns to the original position. 
The wiper returns to the original position. 

— 

  [Cancel] key: Shift to the previous hierarchy without the wiper 

cleaning operation. 

Refer to: Setup menu


4.7.20 Initialization menu 

The setting value of the printer is returned to default. 
 

Setup Item 

Setting Value 

Description 

Initialization 

ALL 

All settings return to factory default. 

MediaType 

The settings of the MediaType menu are returned to factory default. 

Except MediaType 

The settings other than the MediaType menu are returned to factory 
default. 

— 

  [Enter] key:  

Display "Initialling", and initialize the setting. 

  [Cancel] key: Shift to the previous hierarchy without initialization. 

Refer to: Setup menu


4.7.21 Life Times menu 


Setup Item 

Setting Value 

Description 

Life Times 


Head 

Display the operational life of each part. 

  5 Asterisks (100%) indicate the operational life of a part  

  As the part deteriorates, the number of asterisks decreases one by 

one (20 %). 

  The part must be changed when all of the asterisks have disappeared, 

and "Change" is displayed. 


Pump 

CR Motor 

PF Motor 

— 

  [Cancel] key: Shift to the previous hierarchy. 

Refer to: Setup menu


Notes


Do not keep using a part which has reached its life span. Problems caused by doing so will not 
be covered by the warranty. 


Содержание CS9160

Страница 1: ...Oc CS9160 User s Guide Eco Solvent Low Solvent Ultra Bio Lactite...

Страница 2: ...User s Guide Oc CS9160 printer 2 AP 40790 Rev 2 0 23 08 2011...

Страница 3: ...this document the party to whom it is given assumes its custody and control and agrees to the following The information herein contained is given in confidence and any part thereof shall not be copied...

Страница 4: ...ht this equipment Oc Technologies B V shall not be liable for any damages or troubles resulting from the use of this equipment or this guide IMPORTANT NOTICE For users in Europe This is a Class A prod...

Страница 5: ...rms which the operator needs to know caution items and warning labels stuck on the printer main unit 2 Product overview This chapter explains about the features of the printer along with the names and...

Страница 6: ...User s Guide Oc CS9160 printer 6 AP 40790 Rev 2 0 23 08 2011...

Страница 7: ...er ON OFF 31 3 3 Replacing ink cassettes 33 3 4 Disposal of waste fluids 35 3 5 Transfer and transportation 36 4 Handling the printer 41 4 1 Making the printer ready to print 43 4 2 General info on us...

Страница 8: ...User s Guide Oc CS9160 printer 8 AP 40790 Rev 2 0 23 08 2011...

Страница 9: ...ompliance with following regulations 10 1 2 Warnings cautions and notes 10 1 3 Managing VOCs 11 1 3 1 Instructions for use of an APS 11 1 4 Handling inks cleaning waste of inks cleaning 12 1 5 Warning...

Страница 10: ...collection system for electrical and electronic products Please act according to your local rules and do not dispose of your old products with your normal household waste The correct disposal of your...

Страница 11: ...exhaust ventilation 150 m3 h No 300 m3 Room ventilation 3 times per hour 900 m3 h Use an Air Purification System APS with an active carbon filter Filter 05 1 3 1 Instructions for use of an APS To con...

Страница 12: ...ttes which are not produced by the original manufacturer o printing might become blurred and the end of the ink in the cassette might not be detected correctly o Any problems caused by using an ink ca...

Страница 13: ...re is not connected an electric shock or fire may occur The waste fluid from the printer is a waste oil waste ink of industrial waste Proper waste fluid disposal according to industrial waste disposal...

Страница 14: ...ut the power plugs from the power sockets for safety reasons Make sure to connect an earth wire to the earth connection which meets the following standards o Earth terminal of power socket o Earth wir...

Страница 15: ...ting the printer 1 5 1 Handling the operation procedure labels 1 5 2 Locations and types of warning labels 4 3 2 1 5 6 6 8 9 7 Notes Check whether all the warning labels can be read If the letters or...

Страница 16: ...User s Guide Oc CS9160 printer 16 AP 40790 Rev 2 0 23 08 2011 N Types of warning labels 1 2 3 4...

Страница 17: ...User s Guide Oc CS9160 printer 17 AP 40790 Rev 2 0 23 08 2011 5 6 7 8 9...

Страница 18: ...User s Guide Oc CS9160 printer 18 AP 40790 Rev 2 0 23 08 2011...

Страница 19: ...8 2011 2 PRODUCT OVERVIEW 2 1 Features 20 2 2 Name of the parts and functions 21 2 2 1 Front section 21 2 2 2 Rear section 22 2 2 3 Operation panel 23 2 3 Printer mode 26 2 3 1 Normal mode 26 2 3 2 Se...

Страница 20: ...uce sharp and vivid colours This printer uses 220 ml of large capacity solvent ink cassette with a dedicated IC chip This cassette can control the ink quantity for printing improving productivity Use...

Страница 21: ...osed 4 Stand To install the printer on a levelled floor 5 Media guide Used to feed the media smoothly when the media is set or printed The printer has also an incorporated heater after heater to dry t...

Страница 22: ...ects a network interface cable 8 Waste fluid tank Used to collect waste ink discharged from the printer 9 Waste fluid valve Open and close when discharging the waste fluid from the waste fluid tank Th...

Страница 23: ...up on the operation panel When performing various operations in the operation panel Operating from the operation panel Be sure to read and understand the safety warnings before handling the printer No...

Страница 24: ...are discarded Shifts from Setup menu display to the normal display 4 key This menu changes the set value Origin menu Nozzle Check key Hold this key for two seconds or more to perform a Nozzle Check pr...

Страница 25: ...is set to None 14 Fine S Fine lamp Green Lamp ON The Effect menu is set to Fine or Super Fine Lamp OFF The Effect menu is set to Wave When the Wave lamp is switched OFF the Effect menu is set to None...

Страница 26: ...3 3 Changing the printer mode 1 Changing from Normal mode to Menu mode Action Press the Menu key Result The display is in Menu mode from now on called the Setup Menu display The following message app...

Страница 27: ...ements 29 3 1 4 Installation space 30 3 2 Switching the power ON OFF 31 3 2 1 Switching the power ON 31 3 2 2 Switching the power OFF 32 3 3 Replacing ink cassettes 33 3 4 Disposal of waste fluids 35...

Страница 28: ...ure 20 C to 32 C Humidity 40 to 60 No condensation Guaranteed range of printing accuracy Temperature 22 C to 30 C Humidity 40 to 60 Change rate Temperature within 2 C per hour Humidity within 5 per ho...

Страница 29: ...d 50 m3 Additional local exhaust ventilation 300 m3 h Oc IJC930 Eco Solvent ink Yes optional 50 m3 Additional local exhaust ventilation 150 m3 h No 300 m3 Room ventilation 3 times per hour 900 m3 h Us...

Страница 30: ...8 2011 3 1 4 Installation space Install the printer on a levelled floor which has enough strength to support the weight of the entire machine A 650 mm E 1550 mm B 1000 mm F 3800 mm C 1000 mm G 2700 mm...

Страница 31: ...er indication light lights green The printer starts initializing When the initialization is completed the printer enters the normal status Notes If there is a problem during initial operation the prin...

Страница 32: ...up green the power is ON Press the key once again and switch OFF the power Power OFF is displayed Notes If the head height adjustment lever is raised Change Head Gap Low is displayed Lower the lever N...

Страница 33: ...s such as nozzle loss or air which might come in the ink tubes If Ink End appears it is not possible to print until the new ink cassette has been inserted If there is no new ink cassette for replaceme...

Страница 34: ...ing ink and result in abnormal printing behaviour Notes A used ink cassette must be put in a vinyl bag or a bag used for this kind of waste Disposal of an ink cassette has to be done in compliance wit...

Страница 35: ...e fluid bottle to contain the waste fluid Step 2 Lay a protective material on the floor under the waste fluid tank Step 3 Open the waste fluid valve and transfer the waste fluid to the container Notes...

Страница 36: ...uid Step 3 Remove all the cables such as the power cable Step 4 Verify that the butterfly bolts attaching the stand with the printer are well fixed Step 5 Verify that the printer head is in the rightm...

Страница 37: ...ify that there is no clogging in the printer head Refer to Nozzle check Step 5 Perform a head alignment Refer to Adjust print 3 5 2 Transporting the printer Be sure to read and understand the safety w...

Страница 38: ...l the plastic bar while lifting the carriage Step 11 The plastic bars are installed to both right and left side of the carriage Step 12 Remove the printer from the stand Refer to Installation guide St...

Страница 39: ...inter is loaded with Bio Lactite ink longstore the printer with Bio lactite cleaning In case it is loaded with Low Solvent Ultra ink longstore it with Low Solvent Ultra cleaning liquid Notes To perfor...

Страница 40: ...your type printer the operation panel displays Start Longstore E or Start Head Wash Step 6 Press the ENTER key The longstore procedure starts Step 7 When the longstore procedure is finished power off...

Страница 41: ...test prints 63 4 4 2 Performing a test print 63 4 4 3 Nozzle check 65 4 4 4 Mode Print 65 4 4 5 Setup print 66 4 4 6 Palette print 67 4 5 Adjust print 68 4 6 Menu setup on the operation panel 71 4 6...

Страница 42: ...Ink Status menu 86 4 7 17 Roll Length menu 87 4 7 17 1 Roll media Length menu 87 4 7 18 Head Wash menu 87 4 7 19 CR Maintenance menu 88 4 7 20 Initialization menu 88 4 7 21 Life Times menu 88 4 7 22 I...

Страница 43: ...a General info on usable media 2 Install and load the media Installing roll media Loading roll media 3 Set the media type Setting media type 4 OPTIONAL Adjust the head height Head Height Adjustment 5...

Страница 44: ...resentative If using non compatible media and printer failures or malfunctions occur o The printer will not be covered by the warranty and repair expenses will have to be paid by the customer o For de...

Страница 45: ...n or contraction Media has a printable side and a non printable side Printing on the non print side can cause blurs and blots Always handle media with dry and clean hands to avoid bad print quality Wh...

Страница 46: ...ica option in Europe ROW Please refer to the User Guide of the chosen system to know how to correctly load media Refer to the pricing sheet for more details of these systems If you do not use one of t...

Страница 47: ...ht and left side of the rear Set the distance between the roll media holders wider than the roll media width N Name 1 Roll media holder left 2 Roll media holder Right 3 Roll media 4 Fixing lever Step...

Страница 48: ...lder right and fix the fixing lever N Name 1 Roll media holder right 2 Roll media 3 Fixing lever Step 5 Loosen the fixing levers of the right and left roll media holders move the roll media to the cen...

Страница 49: ...ease refer to the User Guide of the chosen system to know how to correctly load media Refer to the pricing sheet for more details of these systems If you do not use one of the above winding systems Yo...

Страница 50: ...oll media to the media feed slot Notes If the end of the roll media is not wound tightly wind it tightly again and then load it N Name 1 Roll media 2 Media feed slot Step 5 Pull the roll media out abo...

Страница 51: ...l media will fall out from the media feed slot on the rear of the product Confirm that the right edge of the roll media does not go beyond the loading mark If it does it may affect print quality N Nam...

Страница 52: ...er moving the roll media fix it with fixing levers of the right and left roll media holders Notes Press the holders to the printer to fix the roll media holders N Name 1 Roll media holder Left 2 Roll...

Страница 53: ...e ENTER key The media type is set Media Initial is displayed and media initial operation starts Notes The printer starts the media initialization without setting the media type when The Cancel key of...

Страница 54: ...the media is loaded the display shifts to the Media setup menu Notes Refer to the following topics to load media Installing roll media Loading roll media Step 2 Press the Setting value key or Setting...

Страница 55: ...ange the head height during printing If the head height is changed the head alignment will be changed and high print quality will no longer be guaranteed To perform a head alignment refer to Head heig...

Страница 56: ...alue Step 1 Display the Media feed compensation menu Step 2 Press the Menu key Shift to the Setup menu display The operation panel displays Menu 1 Setup Step 3 Press the key The operation panel displa...

Страница 57: ...nting o Start Initial adjustment printing N Name 1 Feed length 2 Media feeding direction o When the initial adjustment printing is complete the printer enters the normal status After the initial adjus...

Страница 58: ...nt to change the feeding length press the key or key and change the set value Press the Enter key o The operation panel displays Printing o Start Confirmation adjustment printing N Name 1 Feed length...

Страница 59: ...on panel displays PF4 Micro Adj Print Step 13 Refer to the illustrations below and check the printing result Step 14 Set up the Micro Adjustment Change Press the key or key to select PF5 Micro Adj Cha...

Страница 60: ...Notes There are two optional winding systems available for the CS9160 o Unwinder Winder 100 Only available as option in Europe ROW o Motorized winding system with tensioning T winder Standard delivere...

Страница 61: ...Step 3 Turn the flanges of the roll media holders and wind roll media Step 4 Loosen the lever of the right roll media holder and remove the media N name 1 Roll media holder right 2 Fixing lever 3 Roll...

Страница 62: ...e left roll media holder N name 1 Roll media holder left 2 Fixing lever 3 Roll media Notes To load another roll media refer to Setting media Store the roll media you do not use according to Notes on s...

Страница 63: ...er Change setup Palette Print To compare output colours with printing colours Check colour mode 4 4 2 Performing a test print Step 1 Verify that the printer has been switched ON and that media more th...

Страница 64: ...select the item you want to print and press the Enter key Submenus Nozzle Check Mode print Setup print All Set List Palette print Result Printing starts for the selected submenu Notes Please refer to...

Страница 65: ...d or missing clean the head Refer to Head cleaning Perform the nozzle check once again after the head has been cleaned Notes For the printing procedure refer to Performing a test print 4 4 4 Mode Prin...

Страница 66: ...AP 40790 Rev 2 0 23 08 2011 4 4 5 Setup print Checks the current settings of the printer Notes User media and print mode lists are printed only when ALL Set List is selected For the printing procedure...

Страница 67: ...6 Palette print Used to compare pen colours used on the computer to the printing colours Notes When Banner 1 or Banner 2 is set in the Print Mode menu PalettePrint is not displayed on the Test Print...

Страница 68: ...he Setup menu display Step 5 Press the key Set1 MediaType is displayed Step 6 Press the or key to select the media type to use Step 7 Press the Enter key 1 PrintMode is displayed Step 8 Press the Ente...

Страница 69: ...ck that the confirmation pattern printing result is as follows When the printing result is You do not need perform Alignment The procedure for the Alignment is now complete When the printing result is...

Страница 70: ...t are most closely aligned 4 is selected in the next printing sample Step 18 Press the or key to set the number that you have selected Step 19 Press the Enter key The set value for BI D normal is regi...

Страница 71: ...Step 2 Press the menu key Step 3 Menu 1 Setup is displayed Step 4 Press the operation panel shifts to the Setup menu display Step 5 Press the key or the key to select a setup item and press the ENTER...

Страница 72: ...7 To save the changed setting press the ENTER key The setting is saved and the next setup item is displayed Notes If you press the CANCEL key key or the key without pressing the ENTER key after changi...

Страница 73: ...med during media initialization Displays the detected media width if media detection is performed during media initialization Set9 Origin Set the start position of the printing data Set10 Prev Stick S...

Страница 74: ...aid by the customer For details contact your OC local representative Setup item Setting Value Description Type 1 to 30 Print mode Set up the print mode according to the used print data or print speed...

Страница 75: ...st 1615 Remark 1 Print modes only selectable via RIP and not visible on the CS9160 panel 2 Large Drop Family VSD1 7 14 21 ng Small Drop Family VSD3 3 5 7 12 5 ng 3 Head speed Slow 320 cps 610 mm s and...

Страница 76: ...o 500 mm Change the length feed length of the media feed direction for the Confirm Print Enter key The setting is determined Printing is displayed and initial adjust print is started After printing th...

Страница 77: ...ous hierarchy Cancel key Cancel the setting and shift to the previous hierarchy User media menu 4 7 1 10 Fixer platen menu Set up this menu to warm up the loaded media and improve the printing quality...

Страница 78: ...y User media menu 4 7 1 12 Standby Heating menu Set up whether each heater is preheated idle heat while in standby mode Setup Item Setting Value Description StandbyHeating 10 min to 60 min to 240 min...

Страница 79: ...ect S Fine Wave Effect None Set 2 Effect Setup items Parameters Description Effect None The Effect function is not used straight line printing Wave A wave pattern will be used to print the file withou...

Страница 80: ...int head Since only one side of the nozzles is used printing speed becomes half of Wave1to 4 Set up this menu when you want to improve the print quality compared with Fine Wave1 to 4 B S Fine Wave Per...

Страница 81: ...uality5 720x720 4 Bi X Graphics1 720x720 4 Uni X Graphics2 720x720 4 Bi X Graphics3 720x720 4 Bi X Banner1 720x540 3 Uni X Banner2 720x540 3 Bi X Banner3 720x720 2 Uni X Banner4 720x720 2 bi X Wave st...

Страница 82: ...4 Side Margin menu Setup Item Setting Value Description Count 5 mm to 25 mm Set the side margin Enter key Save the setting value and shift to the previous hierarchy Cancel key Cancel the setting valu...

Страница 83: ...o Setup menu Media width menu Setup Item Setting Value Description Media width mm Displays the media width that is detected while initializing Cancel key Cancel the setting value and shift to the prev...

Страница 84: ...n 2 Media feeding direction Enter key Display Moving Origin Pos and move the print head to the starting position The operation panel displays the following contents Confirm Position E Enter key or aft...

Страница 85: ...he maximum media width Enter key Save the setting value and shift to the previous hierarchy Cancel key Cancel the setting value and shift to the previous hierarchy Refer to Setup menu 4 7 12 Overwrite...

Страница 86: ...Cleaning OFF The auto cleaning is not performed 1 hours When the selected time is reached the auto cleaning is performed 2 hours 3 hours 4 hours 5 hours 6 hours 9 hours 12 hours 18 hours 24 hours Ent...

Страница 87: ...dia length Notes When replacing the roll media adjust the roll media length again If the roll media length is not set the residual quantity of roll media will not be displayed correctly Enter key Save...

Страница 88: ...he settings of the MediaType menu are returned to factory default Except MediaType The settings other than the MediaType menu are returned to factory default Enter key Display Initialling and initiali...

Страница 89: ...net Mask 000 000 000 000 255 255 255 000 255 255 255 255 Use following keys to change the subnet mask key Increase the value key Decrease the value Enter key Change the value for the next segment Canc...

Страница 90: ...as passed the print head is cleaned automatically Notes During sleep mode even if the set time has passed print head cleaning is not performed under the following circumstances o The front cover is op...

Страница 91: ...raised o The waste fluid tank is full o The ink cassette is empty o The ink cassette is removed o An object other than an appropriate ink cassette is inserted in the cassette slot Activate sleep mode...

Страница 92: ...8 1 Feeding media You can feed roll media at any position you want Follow the procedure below to feed media Step 1 Confirm that the operation panel is Normal Step 2 Check that the media loading lever...

Страница 93: ...inting and deletes the non printed data Receiving Converting Delete the received analyzed data and the remaining incoming data Notes If a large amount of data is saved on the printer the operation pan...

Страница 94: ...el displays Ready to print Step 2 If the roll media cut position is changed refer to Feeding media and advance the roll media to the desired cut position Step 3 Open the front cover Step 4 Place a raz...

Страница 95: ...of the following conditions Receiving Converting Printing Warming up Step 2 Press the Menu key Menu 1 Print Start is displayed Notes When print job is sent with heaters OFF no message warming up will...

Страница 96: ...scription Print Start ENTER key if the heater temperature does not reach the set value during warming up printing starts Temperature Pre Check the current Pre Heater temperature Platen Check the curre...

Страница 97: ...uter case 106 5 1 2 4 Cleaning inside the printer 106 5 1 2 5 Drip cleaning into the cap 108 5 1 3 Monthly maintenance 109 5 1 3 1 Replacing the spitting box sponges 109 5 1 4 Several times a year 110...

Страница 98: ...y Weekly Cleaning the inside of the printer Monthly Monthly Monthly Replace spitting box sponges 2 months Monthly Monthly Clean media guide platen Several times a year Clean timing fences Several time...

Страница 99: ...co Solvent ink order Eco Solvent cleaning o If the printer is currently loaded with Low Solvent Ultra ink order Low Solvent Ultra cleaning o If the printer is currently loaded with Bio Lactite ink ord...

Страница 100: ...ot in progress The display is in the normal state Step 2 Display the CR Maintenance menu on the operation panel Step 3 Press the Menu key Menu 1 Setup is displayed The operation panel shifts to the se...

Страница 101: ...ance cover on the right of the printer N Name 1 Maintenance cover Step 9 Use the cleaning stick moistened with cleaning liquid to remove the ink and dust on the cleaning wiper Cleaning wiper front sid...

Страница 102: ...the right maintenance cover Close the cover firmly until it is locked N Name 1 Maintenance cover Step 11 Press the ENTER key The print head returns to its original position The cleaning wiper returns...

Страница 103: ...es If cleaning exceeds 15 minutes discontinue it by following steps 7 and 8 Perform head cleaning and then start cleaning around the print head again For more information please refer to Head cleaning...

Страница 104: ...oves to the left CR Maintenance END is displayed Step 8 Open the left maintenance cover N Name 1 Maintenance cover Step 9 Confirm using a light such as a penlight that there are no foreign objects suc...

Страница 105: ...ead of the cleaning stick oil on your hands may attach to the cleaning stick causing damage to the print head o Do not immerse the head of the cleaning stick in water to avoid damaging the print head...

Страница 106: ...to wipe off dust and possible dirt from the outer case 5 1 2 4 Cleaning inside the printer Be sure to read and understand the safety warnings before handling the printer Step 1 Open the front cover S...

Страница 107: ...ff paper powder and ink from the platen using a dust free and soft cloth slightly damped with water N Name 1 Platen 2 Media Guide Step 4 Wipe off the dirt of the grid roller s unpainted silver colour...

Страница 108: ...ntly loaded with Low Solvent Ultra or Bio Lactite ink Step 1 Go to the CR maintenance menu and press ENTER The heads move to the centre Step 2 Push the head a little further so you have enough space t...

Страница 109: ...er replacement Notes For types and details of the spitting box sponge contact your local Oc representative Step 1 If the printer is switched ON make sure that Printing or other operations are not in p...

Страница 110: ...veral times a year 5 1 4 1 Clean the timing fence Step 1 Open the front cover Step 2 Clean the timing fence with a dry polyknit wiper N Name 1 Timing fence 5 1 4 2 Clean the Y rail Step 1 Open the fro...

Страница 111: ...er s Guide Oc CS9160 printer 111 AP 40790 Rev 2 0 23 08 2011 5 1 4 3 Clean the P rear sensor surface Step 1 Open the front cover Step 2 Clean the P rear sensor surface with a swab N Name 1 P rear sens...

Страница 112: ...3 Press the key to select the cleaning mode Step 4 Press the Cleaning key for at least 2 seconds Result The operation panel displays Cleaning Step 5 Start the head cleaning Notes Pressing the Cleaning...

Страница 113: ...e necessary to ensure the best printing quality output Part Timing Maintenance station Once a year Wiper Once a year Damper Once a year 5 2 2 Periodical inspection part list Perform periodical inspect...

Страница 114: ...User s Guide Oc CS9160 printer 114 AP 40790 Rev 2 0 23 08 2011...

Страница 115: ...mmed 120 6 3 Malfunctions and failures 122 6 3 1 Problems in installation and introduction 122 6 3 2 Cannot print at all 122 6 3 3 Media related troubleshooting 124 6 3 4 Printing related troubleshoot...

Страница 116: ...tract prepare that or a similar document 6 1 WHEN YOU CANNOT GENERATE GRAPHICS IN THE WAY YOU WANT 6 1 1 Perform Head cleaning If the nozzle check result indicates that the checked points are blurred...

Страница 117: ...ype is displayed Step 6 Press the ENTER key Media Type1 is displayed Step 7 Press the key or the key to select the media type to use Step 8 Press the ENTER key 1 print mode is displayed Notes The sele...

Страница 118: ...After the confirmation pattern is printed Adj 1 Confirm is displayed Step 18 Verify that the confirmation pattern printing result is as follows When the printing result is O You do not need to perform...

Страница 119: ...sample Step 22 Press the or the key to enter the number that you selected in previous step Step 23 Press the ENTER key The set value for BI D Normal is registered The operation panel returns to Norma...

Страница 120: ...warnings before handling the printer Step 1 Switch OFF the power of the printer Refer to Switching the power OFF Step 2 Open the front cover Step 3 Move the print head section from the top of the med...

Страница 121: ...side and cut the torn part with cutting tools such as a razor blade N Name 1 Razor blade 2 Roll media Step 6 Turn the flanges of the roll media holders and wind roll media N Name 1 Flanges 2 Roll med...

Страница 122: ...sette cold or frozen Leave the cassette at room temperature for at least 3hours and perform cleaning several times Head cleaning 2 Is the power switched OFF during ink replenishment Switch the power O...

Страница 123: ...Possible cause remedy Reference 1 Is the type of printer selected correctly at the computer Check that the printer type settings on the computer side and on the printer side are the same connecting t...

Страница 124: ...Are you using folded torn or rolled media Replace the media Cautions on handling media 7 Does the media bend Use the recommended media When using media other than the dedicated one set the Vacuum Fan...

Страница 125: ...occur Notes If non recommended media is used correct media feeding cannot be assured N Possible cause Remedy Reference 1 Are you using the recommended media Use the recommended media 2 Is the media us...

Страница 126: ...correct Set the media correctly Setting roll media 2 Did you set up the origin and print position Cancel or reset the settings of the origin and print position Panel setup menu Printing is blurred N P...

Страница 127: ...Set it to the appropriate temperature Panel setup menu 7 Is the head height set to High Return the head height to Normal Low Head height adjustment Printing lines are not straight N Possible cause Rem...

Страница 128: ...tte Installing ink cassettes 14 Ink Refill Filling the ink Please wait a while Installing ink cassettes 15 Subtank refill Filling the ink into the subtank Please wait a while Installing ink cassettes...

Страница 129: ...waste fluids 9 Life time Head The operational life of the print head has almost expired Contact your local Oc representative 10 Life time Pump The operational life of the pump motor has almost expire...

Страница 130: ...ating after performing the following operations 1 The drive power automatically shuts down 2 All lamps blink and the buzzer rings continuously 3 The error message is displayed Pressing any key on the...

Страница 131: ...User s Guide Oc CS9160 printer 131 AP 40790 Rev 2 0 23 08 2011...

Отзывы: