How to Print and Evaluate a Nozzle Check
The Nozzle Check print fires each nozzle individually in a manner that allows clogged nozzles to
be easily identified by a visual inspection of this special print. The Nozzle Check has been
designed to fit on a piece of media that is 36" (91.5 cm) and is 2.125" (5.4 cm) wide. Since you are
likely to print more than one when you diagnose nozzle problems, make sure your media is wide
enough. To calculate the required offset when you print multiple consecutive nozzle checks, add a
horizontal offset of 2.5" or 60 mm to each consecutive print.
When you print a Nozzle Check print on the RMO, if the media width entered is less than 1067
mm (3.5 ft) the standard nozzle check will not fit across the media. In this case, if the Nozzle Check
icon is selected from the Print Job Control command toolbar, the narrow version (Nozzle Check
Narrow 886.5 x 214.7 (2.9 x 0.70 ft)) is automatically added to the print queue.
Procedure
1.
Place a piece of Océ I/O paper on the printer table (or use the RMO, if available).
2.
Select the Nozzle Check icon at the right end of the Command Toolbar to place the nozzle check
into the Active Print Job list (you can also add a Nozzle Check to the active print list when you
select it from the Special Prints module).
3.
Confirm media thickness.
4.
Activate the table vacuum.
5.
Push the printer Start button to begin the print.
6.
Print an image to make sure there is no banding or other print quality issues.
After you finish
How to Evaluate a Nozzle Check Print
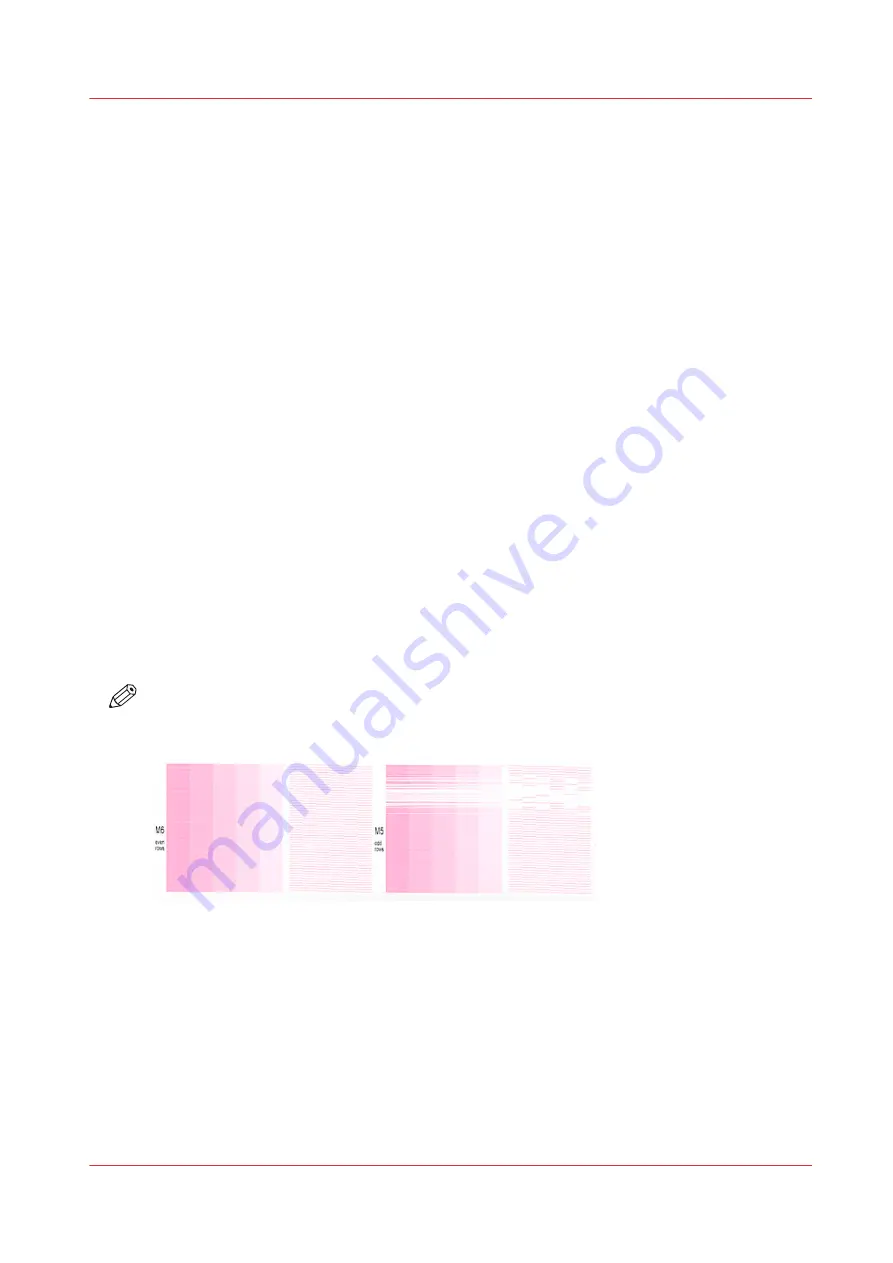
The Magenta section of the Nozzle Check print example shown in the figure below indicates that
multiple nozzles are out.
NOTE
This is an extreme example to illustrate the problem. In most cases you will likely see only two
or three nozzles out.
[134] Nozzle Check Print Magenta Section
How to Correct Nozzle Dropouts
1. If there are only a few nozzle dropouts per printhead try suctioning the affected printheads
again without purging. If many nozzles are out, perform Printhead Maintenance again.
2. Print another nozzle check and repeat step 1.
3. If nozzle dropouts still remain, swab that printhead (see the next section.
When a printhead does not have any dropouts, it will look like the Nozzle Check print of the black
(K) section illustrated below.
How to Print and Evaluate a Nozzle Check
Chapter 11 - Printer Maintenance
183
Содержание Arizona 365 GT
Страница 1: ...Operation guide Oc Arizona 365 GT User Manual...
Страница 6: ...Contents 6...
Страница 7: ...Chapter 1 Introduction...
Страница 11: ...Chapter 2 Product Overview...
Страница 13: ...Chapter 3 Safety Information...
Страница 38: ...Roll Media Safety Awareness 38 Chapter 3 Safety Information...
Страница 39: ...Chapter 4 How to Navigate the User Interface...
Страница 61: ...Chapter 5 How to Operate Your Oc Arizona Printer...
Страница 76: ...How to Handle Media 76 Chapter 5 How to Operate Your Oc Arizona Printer...
Страница 77: ...Chapter 6 How to Operate the Roll Media Option...
Страница 109: ...Chapter 7 How to Use the Static Suppression Upgrade Kit...
Страница 113: ...Chapter 8 How to Work With White Ink...
Страница 164: ...How to Create and Use Quick Sets 164 Chapter 8 How to Work With White Ink...
Страница 165: ...Chapter 9 Ink System Management...
Страница 170: ...Change Ink Bags 170 Chapter 9 Ink System Management...
Страница 171: ...Chapter 10 Error Handling and Troubleshooting...
Страница 174: ...Troubleshooting Overview 174 Chapter 10 Error Handling and Troubleshooting...
Страница 175: ...Chapter 11 Printer Maintenance...
Страница 220: ...How to Remove Uncured Ink on the Capstan 220 Chapter 11 Printer Maintenance...
Страница 221: ...Chapter 12 Regulation Notices...
Страница 226: ...226 Chapter 12 Regulation Notices...
Страница 227: ...Appendix A Application Information...
Страница 233: ......


