68
Zarge einbauen
Eckzarge
Schraubmontage
in Mauerwerk / Beton
Fitting frame
Corner frame
Fixation using screws
into masonry / concrete
Zarge zusammenschrauben, falls sie nicht
verschweißt ist (siehe Seite 45).
Screw the frame together where it is not
welded (see page 45).
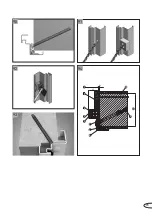
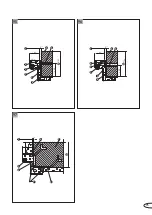
Bild 84,
rechte Seite
Befestigungslaschen (1) mit bei liegenden
gewindefurchenden Schrauben (2) an den
Aufnahmeelementen (3) der Eckzarge
befestigen.
Image 84,
on right-hand side
Fasten fixation brackets (1) with self-
tapping screws provided (2) onto the
base elements (3) of the corner frame.
Die Befestigung am untersten Punkt ist nur
erforderlich, wenn die Zarge ohne Boden-
einstand verwendet wird.
Eckzarge bis fast auf Anschlag in die Öff-
nung schieben und entsprechend Meterriss
ausrichten (nicht zugelassen für T90).
Dübellöcher durch die Befestigungslaschen
bohren (alternativ bei zu wenig Platz Zarge
entnehmen, Dübellöcher anzeichnen und
bohren) und Dübel einsetzen.
Beiliegende Schrauben in Dübel eindrehen.
Zwischen Schraubenkopf und Mauerwerk
muss ein Abstand von 5 mm verbleiben.
Bild 85,
rechte Seite
Bei Toleranzen von 2 mm im Mauerwerk
Klemmbleche 3 mm zwischen Befestigungs-
laschen und Mauerwerk einschieben.
Bild 86,
rechte Seite
(1) Klemmblech
Zarge lose befestigen und mit Klemmble-
chen zwischen Befestigungslaschen und
Schraube fixieren. Schraube mit Maul-
schlüssel zwischen Zarge und Wand an-
ziehen. Bitte achten Sie darauf, dass sich
die Zargenprofile beim Befestigen nicht
verdrehen.
Zarge nochmals auf lot- und waagerechten
Sitz prüfen, Schrauben fest anziehen.
Zarge gemäß Zulassung hinterfüllen (siehe
Seite 104ff.).
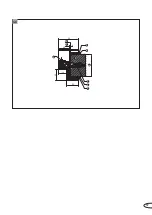
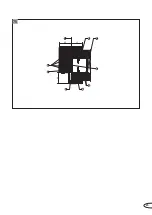
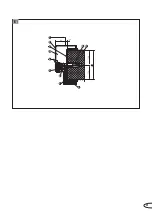
Bild 87,
rechte Seite
(1) Baurichtmaß
(2) Eckzarge
(3) Zargendichtung
(4) Zargenhinterfüllung
(5) Dübel nach bauaufsichtl. Zulassung
(6) Schraube M6 x 12 DIN 7991
(7) Befestigungslasche min. 70 x 3
(8) Maueranker
(9) Mauerwerk / Beton
(10) Wanddicke (s. Tabelle auf Seite 6)
Fortsetzung auf Seite 48
Fixation at the lowest point is necessary
only if the frame is being used without a
floor recess.
Push corner frame into the opening until it
almost clicks into place and line up with
the guide marking (not approved for T90).
Drill wall plug holes through the mounting
plates (or alternatively, where there is not
enough space, remove the frame, mark and
then drill the wall plug holes) and insert
wall plugs.
Twist the bolts provided into the wall plug.
There must be a distance of 5 mm remain-
ing between the bolt head and the masonry
surface.
Image 85,
on right-hand side
Where there is a 2-mm tolerance in the
masonry, push the clamping plates 3 mm
into the space between fixation brackets
and the masonry.
Image 86,
on right-hand side
(1) Clamping plate
Fasten the frame loosely and fix it between
the fixation brackets and the bolt using
clamping plates. Tighten up the bolt
between the frame and the wall using an
open-jawed spanner. Please make sure that
the frame profiles do not rotate while they
are being fastened down.
Check the frame for correct horizontal and
vertical positioning and tighten up the
screws
Backfill the frame in accordance with
approval documentation (see page 104ff.).
Image 87,
on right-hand side
(1) Coordinating size
(2) Corner frame
(3) Frame sealing
(4) Frame backfilling
(5) Wall plug conforming to general
construction approval
(6) Screw M6 x 12 DIN 7991
(7) Fixation bracket min. 70 x 3
(8) Wall anchor
(9) Masonry / concrete
(10) Wall thickness (see table on page 20)
Continued on page 48
Kozijn inbouwen
Hoekkozijn
Schroefmontage
in metselwerk / beton
Schroef het kozijn samen indien het niet is
gelast (zie pagina 45).
Afbeelding 84,
rechterkant
Bevestig de bevestigingsankers (1) aan
de basiselementen (3) van het hoekkozijn
met behulp van de meegeleverde zelf-
tappende schroeven.
Bevestiging op het onderste punt is alleen
nodig indien een kozijn zonder vloeruit-
sparing wordt gebruikt.
Duw het hoekkozijn in de opening tot het
bijna vastklikt en breng het in lijn met de
metermarkering (niet toegestaan voor T90).
Boor pluggaten door de bevestigingsankers
(of verwijder, indien er niet genoeg ruimte
is, het kozijn, teken de pluggaten af en boor
dan de gaten) en doe de pluggen erin.
Draai de meegeleverde schroeven in de
plug. Tussen de schroefkop en het metsel-
werk moet een afstand van 5 mm over-
blijven.
Afbeelding 85,
rechterkant
Duw, indien er een ruimte van 2 mm in het
metselwerk is, de klemplaten 3 mm in de
ruimte tussen de bevestigingsankers en het
metselwerk.
Afbeelding 86,
rechterkant
(1) Klemplaat
Bevestig het kozijn losjes en zet het vast
tussen de bevestigingsankers en de schroef
met behulp van de klemplaten. Draai de
schroef tussen het kozijn en de muur goed
aan met een vlakke sleutel. Let erop, dat de
kozijnprofielen niet draaien tijdens het be-
vestigen.
Controleer het kozijn nogmaals op een cor-
recte horizontale en verticale positionering
en draai de schroeven stevig aan.
Zorg voor de vulling van het kozijn conform
het attest (zie pagina 104ff.).
Afbeelding 87,
rechterkant
(1) Bestelmaat
(2) Hoekkozijn
(3) Kozijnafdichting
(4) Kozijnvulling
(5) Plug conform bouwkundige attest
(6) Schroef M6 x 12 DIN 7991
(7) Bevestigingsanker min. 70 x 3
(8) Muuranker
(9) Metselwerk / beton
(10) Muurdikte (zie tabel op pagina 34)
Vervolg op pagina 48
Содержание NovoPorta Premio E-S-1
Страница 47: ...13 14 15 18 19 20 21 22 1 2 12 16 17 11 47 ...
Страница 49: ...2 1 25 23 24 1 1 2 3 4 5 1 49 ...
Страница 51: ...2 5 mm 30 31 1 29 28 27 26 51 ...
Страница 53: ...1 2 3 1 2 3 1 1 2 2 3 3 33 34 35 36 37 38 32 53 ...
Страница 55: ...41 42 43 44 45 1 1 8 9 4 2 3 7 6 10 5 11 45 5 5 lt 39 40 55 ...
Страница 57: ...84 5 45 34 50 48 3 2 1 4 5 6 5 6 7 8 46 57 ...
Страница 59: ...47 50 52 55 48 51 53 56 49 54 59 ...
Страница 61: ...60 62 65 58 61 63 66 59 64 57 61 ...
Страница 63: ...67 70 73 74 68 71 69 72 63 ...
Страница 65: ...45 39 48 1 6 8 9 5 10 2 3 4 75 65 ...
Страница 67: ...76 77 79 80 81 82 83 78 67 ...
Страница 69: ...1 1 5 5 1 1 1 4 3 2 7 6 8 5 9 10 42 53 1 3 2 1 84 85 86 87 69 ...
Страница 71: ...1 2 3 1 2 3 1 1 2 2 3 3 1 2 3 4 6 9 6 8 5 11 7 10 42 5 5 88 89 71 ...
Страница 73: ...1 9 4 2 3 5 11 10 7 6 8 42 5 5 93 94 90 91 92 73 ...
Страница 75: ...1 2 4 8 3 9 10 7 42 5 5 1 2 4 6 5 7 3 9 10 42 5 5 100 45 1 2 4 6 5 7 3 9 10 42 5 5 100 45 95 96 97 75 ...
Страница 77: ...1 4 7 3 2 5 8 9 6 42 5 5 100 98 77 ...
Страница 79: ...1 9 8 2 7 4 3 6 10 11 5 42 5 5 45 1 7 4 8 2 3 6 5 10 11 9 42 39 max 69 99 100 79 ...
Страница 81: ...1 9 7 6 3 10 8 2 4 5 11 12 42 5 5 1 2 1 2 101 81 ...
Страница 83: ...1 2 4 3 9 8 5 6 7 10 48 82 100 50 102 103 1 83 ...
Страница 85: ...1 10 9 7 4 3 2 6 8 5 11 12 42 5 5 104 85 ...
Страница 87: ...1 2 3 4 5 1 2 3 4 105 1 8 4 9 5 6 3 7 2 10 40 45 1 8 11 9 6 6 2 3 7 4 5 10 40 106 107 87 ...
Страница 89: ...1 7 6 9 5 6 2 4 8 42 x5 30 31 50 40 108 89 ...
Страница 95: ...97 61 1 3 2 6 5 4 7 120 95 ...
Страница 97: ...1 4 3 2 6 9 10 5 7 42 39 max 69 1 4 3 2 9 10 5 7 6 42 39 max 69 121 122 97 ...
Страница 101: ...1 8 6 5 9 4 2 3 7 42 39 max 69 127 101 ...
Страница 103: ...1 11 5 6 7 13 2 9 12 14 4 3 8 42 39 2 5 70 125 1 11 5 14 8 3 2 4 7 10 13 12 42 39 50 2 5 70 125 128 129 103 ...
Страница 105: ...130 131 132 105 ...
Страница 107: ...133 135 134 107 ...
Страница 115: ...4 1 2 3 4 1 2 3 9 7 2 3 8 4 1 149 150 151 152 6 1 5 115 ...
Страница 119: ...53 40 1 Alt 1 3 2 4 1 3 4 2 1 3 2 4 1 3 2 4 100 1 3 4 2 6 7 2 8 1 5 3 4 159 158 160 155 156 157 119 ...
Страница 123: ...1 2 3 4 5 5 167 123 ...
Страница 129: ...129 ...
Страница 130: ...130 ...
Страница 131: ...131 ...

