82
Zarge einbauen
Eck- / Gegenzarge
Schraubmontage
in F60-A-/F90-A-Montagewand
Einbau T30- / MZ- / RC-Türen nach DIN 4102
Teil 4, Tabelle 10.2 und weitere Montage-
wände F60-A / F90-A nach Allg. bauauf-
sichtlichem Prüfzeugnis (siehe Zulassung).
Vergewissern Sie sich, dass das Abschluss-
profil der Wand dreiseitig, d.h. schloss-
und bandseitig sowie oben quer, aus
2 mm-U/A-Profil besteht.
Stirnseitig darf
die Laibung nicht beplankt sein.
Eventuell erforderliche Aussparungen für
Schutzkästen und Bandunterkonstruktio-
nen an der Wandbeplankung vornehmen.
Zarge zusammenschrauben, falls sie nicht
verschweißt ist (siehe Seite 45).
Falls die Zarge mit Gipskarton streifen
hinter füllt werden soll, diese unbedingt
vorab in den Zargenspiegel einlegen (siehe
Seite 109). Dabei Bandlappen an der Zarge
und Schutzkästen unbedingt aussparen!
Gipsplatte im Bereich der Aufnahmeele-
mente anfasen. Eckzarge bis fast auf An-
schlag in die Öffnung schieben und ent-
sprechend Meterriss ausrichten.
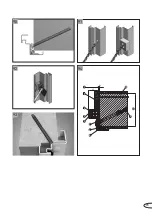
Mit beiliegenden Bohrschrauben 6,3 x 60
Zarge lose am U/A-Profil befestigen.
Zarge nochmals auf lot- und waagerechten
Sitz prüfen, Bohrschrauben fest anziehen.
Nach Montage unteren Montagehilfswinkel
(wenn vorhanden) entfernen.
Zarge gemäß Zulassung hinterfüllen (siehe
Seite 104ff.).
Die Eckzarge ist in der Nut werkseitig vor-
gelocht. Die Gegenzarge mit den mitgelie-
ferten Bohrschrauben 3,9 x 32 an der Eck-
zarge befestigen.
Beim Verschrauben darauf achten, dass
die beiden Zargen anliegend montiert sind.
Die Gegenzarge ist am Zargenspiegel werk-
seitig vorgelocht. Gegenzarge mit den mit-
gelieferten Bohrschrauben 6,3 x 60 an der
Wand befestigen.
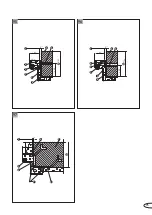
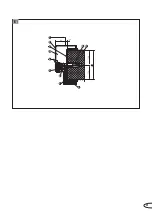
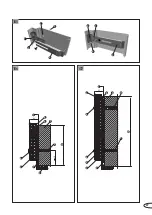
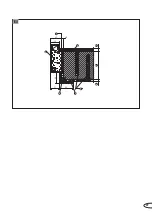
Bild 102,
rechte Seite
(1) Baurichtmaß
(2) Eckzarge
(3) Zargendichtung
(4) Zargenhinterfüllung
(5) U-Profil min. 50 x 40 x 2
(6) Bohrschraube 6,3 x 60 DIN 7504
(7) Bohrschraube 3,9 x 32 DIN 7504
(8) Gegenzarge
(9) GKF (Gipskartonfeuerschutzplatte)
(10) Variabel je nach Wanddicke
Bei Einbau in Einbruchschutz-Montage-
wände sind die Schrauben auf der Gefah-
renseite zusätzlich mit Torx-Einschlag-
sternen zu sichern.
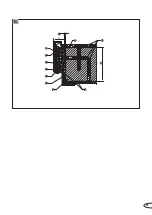
Bild 103,
rechte Seite
(1) Torx-Einschlagstern
Fortsetzung auf Seite 48
Installation T30 / MZ / RC doors conforming
to DIN 4102 Part 4, Table 10.2 and other dry
partition walls F60-A / F90-A according to
general building code test certificates (see
Approval).
Make sure that the butt profile of the wall
is three-sided; that is that it consists of
2-mm U/A profile on both the latch and
hinge side as well as on top.
The frontal
face of the jamb should not be planked.
Make any gaps needed in the wall planking
for protective boxes, and hinge supports.
Screw the frame together where it is not
welded (see page 45).
If you need to backfill the frame with
plasterboard strips, be sure to insert them
into the rear frame piece (see page 109).
Be careful to leave hinge lugs on the frame
and protective boxes open!
Bevel plasterboard edges around the base
elements. Fasten adapters to the base
elements of the corner frame using the
self-tapping screws provided.
Fasten the frame loosely onto the U/A pro-
file using the 6.3 x 60 self-drilling screws
provided.
Check the frame for correct horizontal and
vertical positioning and tighten up the self-
drilling screws.
After installation, remove the installation
aid bracket (if you have used one).
Backfill the frame in accordance with
approval documentation (see page 104ff.).
The groove in the corner frame is factory
pre-perforated. Fasten the counterframe
onto the corner frame using the 3.9 x 32
self-drilling screws provided.
When screwing in, make sure that the two
frames are mounted snugly against each
other.
The counterframe is factory pre-holed on
the rear frame piece. Fasten the counter-
frame onto the wall using the 6.3 x 60 self-
drilling screws provided
Image 102,
on right-hand side
(1) Coordinating size
(2) Corner frame
(3) Frame sealing
(4) Frame backfilling
(5) U-Profile min. 50 x 40 x 2
(6) Self-drilling screw 6.3 x 60 DIN 7504
(7) Self-drilling screw 3.9 x 32 DIN 7504
(8) Counterframe
(9) Fire-resistant plasterboard
(10) Variable, depending on wall thickness
Where installed on anti-break-in walls, the
screws on the hazard side should be addi-
tionally secured by using Torx head screw-
heads.
Image 103,
on right-hand side
(1) Torx star
Continued on page 48
Fitting frame
Corner / counterframe
Fixation using screws
in F60-A / F90-A dry partition wall
Inbouw T30- / MZ- / RC-deuren conform
DIN 4102 Deel 4, tabel 10.2 en overige
montagemuren F60-A / F90-A conform
algemeen keuringsrapport bouwinspectie
(zie attest).
Zorg ervoor, dat het afsluitprofiel van de
muur driezijdig is, d.w.z. dat het bestaat uit
een 2 mm-U/A-profiel aan zowel de kant
van het slot en het scharnier, alsook aan de
bovenkant.
De voorkant van de dagkant mag
niet bekleed zijn.
Breng eventueel benodigde uitsparingen
aan in de muurbekleding voor bescherm-
kastjes en scharnierconstructies.
Schroef het kozijn samen indien het niet is
gelast (zie pagina 45).
Indien het kozijn gevuld moet worden met
gipskartonstroken dienen deze altijd vooraf
aan de achterkant van het kozijn te worden
bevestigd (zie pagina 109). Daarbij moeten
de scharnierlippen aan het kozijn en het
beschermkastje open blijven!
Pak de gipsplaat vast rond de basiselemen-
ten. Duw het hoekkozijn in de opening tot
het bijna vastklikt en breng het in lijn met
de metermarkering.
Bevestig het kozijn losjes aan het U/A-
profiel met behulp van de 6,3 x 60-boor-
schroeven.
Controleer het kozijn nogmaals op een cor-
recte horizontale en verticale positionering
en draai de schroeven stevig aan.
Verwijder na montage de onderste monta-
gehulphaak (indien voorhanden).
Zorg voor de vulling van het kozijn conform
het attest (zie pagina 104ff.).
De gleuf in het hoekkozijn is in de fabriek
al voorgeboord. Schroef hoek- en 2140B-
tegenkozijn aan elkaar vast met de meege-
leverde boorschroeven 3,9 x 32 door deze
boorgaten.
Let er bij het vastschroeven op, dat de
twee kozijnen strak tegen elkaar aan
komen te zitten.
Het tegenkozijn is aan het achterstuk in de
fabriek al voorzien van gaten. Bevestig het
tegenkozijn aan de muur met behulp van
de meegeleverde 6,3 x 60-boorschroeven.
Afbeelding 102,
rechterkant
(1) Bestelmaat
(2) Hoekkozijn
(3) Kozijnafdichting
(4) Kozijnvulling
(5) U-profiel min. 50 x 40 x 2
(6) Boorschroef 6,3 x 60 DIN 7504
(7) Boorschroef 3,9 x 32 DIN 7504
(8) Tegenkozijn
(9) GKF (brandwerend gipskarton)
(10) Variabel, afhankelijk van muurdikte
Bij inbouw in inbraakwerende montage-
muren dienen de schroeven aan de risico-
zijde extra te worden beveiligd met torx-
schroefkoppen.
Afbeelding 103,
rechterkant
(1) Torxschroefkop
Vervolg op pagina 48
Kozijn inbouwen
Hoek- / tegenkozijn
Schroefmontage
in F60-A-/F90-A-metal-stud
Содержание NovoPorta Premio E-S-1
Страница 47: ...13 14 15 18 19 20 21 22 1 2 12 16 17 11 47 ...
Страница 49: ...2 1 25 23 24 1 1 2 3 4 5 1 49 ...
Страница 51: ...2 5 mm 30 31 1 29 28 27 26 51 ...
Страница 53: ...1 2 3 1 2 3 1 1 2 2 3 3 33 34 35 36 37 38 32 53 ...
Страница 55: ...41 42 43 44 45 1 1 8 9 4 2 3 7 6 10 5 11 45 5 5 lt 39 40 55 ...
Страница 57: ...84 5 45 34 50 48 3 2 1 4 5 6 5 6 7 8 46 57 ...
Страница 59: ...47 50 52 55 48 51 53 56 49 54 59 ...
Страница 61: ...60 62 65 58 61 63 66 59 64 57 61 ...
Страница 63: ...67 70 73 74 68 71 69 72 63 ...
Страница 65: ...45 39 48 1 6 8 9 5 10 2 3 4 75 65 ...
Страница 67: ...76 77 79 80 81 82 83 78 67 ...
Страница 69: ...1 1 5 5 1 1 1 4 3 2 7 6 8 5 9 10 42 53 1 3 2 1 84 85 86 87 69 ...
Страница 71: ...1 2 3 1 2 3 1 1 2 2 3 3 1 2 3 4 6 9 6 8 5 11 7 10 42 5 5 88 89 71 ...
Страница 73: ...1 9 4 2 3 5 11 10 7 6 8 42 5 5 93 94 90 91 92 73 ...
Страница 75: ...1 2 4 8 3 9 10 7 42 5 5 1 2 4 6 5 7 3 9 10 42 5 5 100 45 1 2 4 6 5 7 3 9 10 42 5 5 100 45 95 96 97 75 ...
Страница 77: ...1 4 7 3 2 5 8 9 6 42 5 5 100 98 77 ...
Страница 79: ...1 9 8 2 7 4 3 6 10 11 5 42 5 5 45 1 7 4 8 2 3 6 5 10 11 9 42 39 max 69 99 100 79 ...
Страница 81: ...1 9 7 6 3 10 8 2 4 5 11 12 42 5 5 1 2 1 2 101 81 ...
Страница 83: ...1 2 4 3 9 8 5 6 7 10 48 82 100 50 102 103 1 83 ...
Страница 85: ...1 10 9 7 4 3 2 6 8 5 11 12 42 5 5 104 85 ...
Страница 87: ...1 2 3 4 5 1 2 3 4 105 1 8 4 9 5 6 3 7 2 10 40 45 1 8 11 9 6 6 2 3 7 4 5 10 40 106 107 87 ...
Страница 89: ...1 7 6 9 5 6 2 4 8 42 x5 30 31 50 40 108 89 ...
Страница 95: ...97 61 1 3 2 6 5 4 7 120 95 ...
Страница 97: ...1 4 3 2 6 9 10 5 7 42 39 max 69 1 4 3 2 9 10 5 7 6 42 39 max 69 121 122 97 ...
Страница 101: ...1 8 6 5 9 4 2 3 7 42 39 max 69 127 101 ...
Страница 103: ...1 11 5 6 7 13 2 9 12 14 4 3 8 42 39 2 5 70 125 1 11 5 14 8 3 2 4 7 10 13 12 42 39 50 2 5 70 125 128 129 103 ...
Страница 105: ...130 131 132 105 ...
Страница 107: ...133 135 134 107 ...
Страница 115: ...4 1 2 3 4 1 2 3 9 7 2 3 8 4 1 149 150 151 152 6 1 5 115 ...
Страница 119: ...53 40 1 Alt 1 3 2 4 1 3 4 2 1 3 2 4 1 3 2 4 100 1 3 4 2 6 7 2 8 1 5 3 4 159 158 160 155 156 157 119 ...
Страница 123: ...1 2 3 4 5 5 167 123 ...
Страница 129: ...129 ...
Страница 130: ...130 ...
Страница 131: ...131 ...

