66
Zarge einbauen
Umfassungszarge 2140B
T30: Falz-Schraubmontage
in F60-B-/F90-B-Montagewand
Einbau T30- / MZ- / RC-Türen nach DIN 4102
Teil 4, Tabelle 10.3 und weitere Montage-
wände F60-B / F90-B nach Allg. bauauf-
sichtlichem Prüfzeugnis (siehe Zulassung).
Vergewissern Sie sich, dass das Abschluss-
profil der Wand bei T30-Türen dreiseitig,
d.h. schloss- und bandseitig sowie oben
quer, aus passenden Holzständern besteht.
Stirnseitig muss die Laibung einseitig be-
plankt sein.
Eventuell erforderliche Aussparungen für
Schutzkästen und Bandunterkonstruktio-
nen an der Wandbeplankung vornehmen.
Falls die Zarge mit Gipskarton streifen
hinter füllt werden soll, diese unbedingt
vorab in den Zargenspiegel einlegen (siehe
Seite 109). Dabei Bandlappen an der Zarge
und Schutzkästen unbedingt aussparen!
Gipsplatte im Bereich der Aufnahmeele-
mente anfasen. Adapter mit beiliegenden
gewindefurchenden Schrauben an den Auf-
nahmeelementen der Eckzarge befestigen.
Die Befestigung am untersten Punkt ist nur
erforderlich, wenn die Zarge ohne Boden-
einstand verwendet wird.
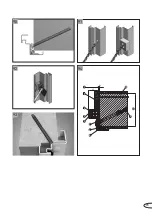
Eckzarge bis fast auf Anschlag in die Öff-
nung schieben und entsprechend Meterriss
ausrichten.
Zarge mit beiliegenden Schrauben an den
vorgegebenen Punkten an der Wand befes-
tigen, ggf. mit Distanzblechen unterlegen.
Zargenlochungen mit Kappen abdecken.
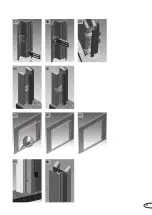
Bild 77,
rechte Seite
Zarge nochmals auf lot- und waagerechten
Sitz prüfen, Schrauben fest anziehen.
Gegenadapter auf Höhe des Adapters aus-
richten und an der Wand befestigen. Für die
beiden oberen Befestigungspunkte sind
keine Gegenadapter erforderlich.
Bild 78,
rechte Seite
Zarge gemäß Zulassung hinterfüllen (siehe
Seite 104ff.).
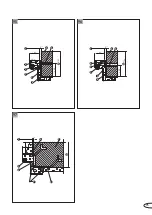
Spezielle 2140B-Gegenzarge leicht schräg
von oben über den untersten Gegenadapter
schieben und dann in die Öffnung stellen.
Bild 79,
rechte Seite
2140B-Gegenzarge an der Eckzarge aus-
richten und über die restlichen Gegenadap-
ter bis auf Anschlag aufschieben.
Bilder 80+81,
rechte Seite
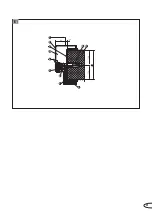
Die Eckzarge ist in der Nut werkseitig vor-
gelocht. Eck- und 2140B-Gegen zarge mit
mitgelieferten Bohrschrauben 3,9 x 32
durch diese Bohrungen verschrauben.
Für Lager-Normtüren mit nicht werkseitig
vorgerichteten Bohrungen in der Dichtungs-
nut müssen die Löcher gem. Vor gabe auf
Seite 127 eingebracht werden.
Beim Verschrauben darauf achten, dass
die beiden Zargen anliegend montiert sind.
Bild 82,
rechte Seite
Fortsetzung auf Seite 48
Installation T30 / MZ / RC doors conforming
to DIN 4102 Part 4, Table 10.3 and other dry
partition walls F60-B/F90-B according to
general building code test certificates (see
Approval).
Make sure that the butt profile of the wall
for T30 doors is three-sided; that is that it
is made of suitable timber beams on both
the latch and hinge side as well as on top.
The frontal face of the wall must be
planked on one side.
Make any gaps needed in the wall planking
for protective boxes, and hinge supports.
If you need to backfill the frame with
plasterboard strips, be sure to insert them
into the rear frame piece (see page 109).
Be careful to leave hinge lugs on the frame
and protective boxes open!
Bevel plasterboard edges around the base
elements. Fasten adapters to the base
elements of the corner frame using the
self-tapping screws provided.
Fixation at the lowest point is necessary
only if the frame is being used without a
floor recess.
Push corner frame into the opening until it
almost clicks into place and line up with
the guide marking.
Fasten frame to the pre-set points on
the wall using the screws provided, using
spacing plates where necessary. Cover
frame holes with borehole plugs.
Image 77,
on right-hand side
Check the frame for correct horizontal and
vertical positioning and tighten up the screws.
Align the counteradapter to the height of
the adapter and fasten it onto the wall. No
counteradapter is required for the two up-
per fixation points.
Image 78,
on right-hand side
Backfill the frame in accordance with
approval documentation (see page 104ff.).
Move special 2140B counterframe slightly
tilted from above into the lowest counter-
adapter and then position inside the open-
ing.
Image 79,
on right-hand side
Adjust the position of the 2140B counter-
frame to the corner frame and move it into
the remaining counteradapters until it
clicks into place.
Images 80+81,
on right-hand side
The groove in the corner frame is factory
pre-perforated. Screw the corner and 2140B
counterframe together with the 3.9 x 32 self-
drilling screws through these holes.
For standard doors without factory pre-
prepared holes in the seal strip groove, the
holes must be made following the instruc-
tions on page 127.
When screwing in, make sure that the two
frames are mounted snugly against each
other.
Image 82,
on right-hand side
Continued on page 48
Fitting frame
Closed frame 2140B
T30: Fixation using rebate screws
in F60-B / F90-B dry partition wall
Inbouw T30- / MZ- / RC-deuren conform
DIN 4102 Deel 4, tabel 10.3 en overige
montagemuren F60-B / F90-B conform
algemeen keuringsrapport bouwinspectie
(zie attest).
Zorg ervoor, dat het afsluitprofiel van de
muur voor T30-deuren driezijdig is, d.w.z.
dat het bestaat uit geschikte houten balken
een vierkante pijp aan zowel de kant van
het slot en het scharnier, alsook aan de
bovenkant.
De voorkant van de dagkant
mag niet bekleed zijn.
Breng eventueel benodigde uitsparingen
aan in de muurbekleding voor bescherm-
kastjes en scharnierconstructies.
Indien het kozijn gevuld moet worden met
gipskartonstroken dienen deze altijd vooraf
aan de achterkant van het kozijn te worden
bevestigd (zie pagina 109). Daarbij moeten
de scharnierlippen aan het kozijn en het
beschermkastje open blijven!
Pak de gipsplaat vast rond de basiselemen-
ten. Bevestig de adapters aan de basisele-
menten van het hoekkozijn met behulp van
de meegeleverde zelftappende schroeven.
Bevestiging op het onderste punt is alleen
nodig indien een kozijn zonder vloeruit-
sparing wordt gebruikt.
Duw het hoekkozijn in de opening totdat het
bijna vastklikt en breng het in lijn met de
metermarkering.
Bevestig het kozijn aan de aangeven punten
op de muur met de meegeleverde schroe-
ven, gebruik indien nodig afstands platen.
Dek de kozijngaten af met kapjes.
Afbeelding 77,
rechterkant
Controleer het kozijn nogmaals op een cor-
recte horizontale en verticale positionering
en draai de boorschroeven stevig aan.
Pas de tegenadapter aan de hoogte van de
adapter aan en bevestig hem aan de muur.
Voor de twee bovenste bevestigingspunten
zijn geen tegenadapters nodig.
Afbeelding 78,
rechterkant
Zorg voor de vulling van het kozijn conform
het attest (zie pagina 104ff.).
Beweeg het speciale 2140B-tegenkozijn
licht schuin gekanteld van boven over de
onderste tegenadapter en plaats het daar-
na binnen in de opening.
Afbeelding 79,
page de droite
Pas het 2140B-tegenkozijn aan op het
hoekkozijn en schuif het over de overige
tegenadapters tot het vastklikt.
Afbeeldingen 80+81,
rechterkant
De gleuf in het hoekkozijn is in de fabriek
al voorgeboord. Schroef hoek- en 2140B-
tegenkozijn aan elkaar vast met de meege-
leverde boorschroeven 3,9 x 32 door deze
boorgaten.
Voor standaarddeuren zonder voorgeboorde
gaten in de afdichtingsgleuf dienen de
gaten te worden geboord volgens de in-
structies op pagina 127.
Let er bij het vastschroeven op, dat de
twee kozijnen strak tegen elkaar aan
komen te zitten.
Afbeelding 82,
rechterkant
Vervolg op pagina 48
Kozijn inbouwen
Muuromvattend kozijn 2140B
T30: Verdekte montage
in F60-B- / F90-B-hout-stud
Содержание NovoPorta Premio E-S-1
Страница 47: ...13 14 15 18 19 20 21 22 1 2 12 16 17 11 47 ...
Страница 49: ...2 1 25 23 24 1 1 2 3 4 5 1 49 ...
Страница 51: ...2 5 mm 30 31 1 29 28 27 26 51 ...
Страница 53: ...1 2 3 1 2 3 1 1 2 2 3 3 33 34 35 36 37 38 32 53 ...
Страница 55: ...41 42 43 44 45 1 1 8 9 4 2 3 7 6 10 5 11 45 5 5 lt 39 40 55 ...
Страница 57: ...84 5 45 34 50 48 3 2 1 4 5 6 5 6 7 8 46 57 ...
Страница 59: ...47 50 52 55 48 51 53 56 49 54 59 ...
Страница 61: ...60 62 65 58 61 63 66 59 64 57 61 ...
Страница 63: ...67 70 73 74 68 71 69 72 63 ...
Страница 65: ...45 39 48 1 6 8 9 5 10 2 3 4 75 65 ...
Страница 67: ...76 77 79 80 81 82 83 78 67 ...
Страница 69: ...1 1 5 5 1 1 1 4 3 2 7 6 8 5 9 10 42 53 1 3 2 1 84 85 86 87 69 ...
Страница 71: ...1 2 3 1 2 3 1 1 2 2 3 3 1 2 3 4 6 9 6 8 5 11 7 10 42 5 5 88 89 71 ...
Страница 73: ...1 9 4 2 3 5 11 10 7 6 8 42 5 5 93 94 90 91 92 73 ...
Страница 75: ...1 2 4 8 3 9 10 7 42 5 5 1 2 4 6 5 7 3 9 10 42 5 5 100 45 1 2 4 6 5 7 3 9 10 42 5 5 100 45 95 96 97 75 ...
Страница 77: ...1 4 7 3 2 5 8 9 6 42 5 5 100 98 77 ...
Страница 79: ...1 9 8 2 7 4 3 6 10 11 5 42 5 5 45 1 7 4 8 2 3 6 5 10 11 9 42 39 max 69 99 100 79 ...
Страница 81: ...1 9 7 6 3 10 8 2 4 5 11 12 42 5 5 1 2 1 2 101 81 ...
Страница 83: ...1 2 4 3 9 8 5 6 7 10 48 82 100 50 102 103 1 83 ...
Страница 85: ...1 10 9 7 4 3 2 6 8 5 11 12 42 5 5 104 85 ...
Страница 87: ...1 2 3 4 5 1 2 3 4 105 1 8 4 9 5 6 3 7 2 10 40 45 1 8 11 9 6 6 2 3 7 4 5 10 40 106 107 87 ...
Страница 89: ...1 7 6 9 5 6 2 4 8 42 x5 30 31 50 40 108 89 ...
Страница 95: ...97 61 1 3 2 6 5 4 7 120 95 ...
Страница 97: ...1 4 3 2 6 9 10 5 7 42 39 max 69 1 4 3 2 9 10 5 7 6 42 39 max 69 121 122 97 ...
Страница 101: ...1 8 6 5 9 4 2 3 7 42 39 max 69 127 101 ...
Страница 103: ...1 11 5 6 7 13 2 9 12 14 4 3 8 42 39 2 5 70 125 1 11 5 14 8 3 2 4 7 10 13 12 42 39 50 2 5 70 125 128 129 103 ...
Страница 105: ...130 131 132 105 ...
Страница 107: ...133 135 134 107 ...
Страница 115: ...4 1 2 3 4 1 2 3 9 7 2 3 8 4 1 149 150 151 152 6 1 5 115 ...
Страница 119: ...53 40 1 Alt 1 3 2 4 1 3 4 2 1 3 2 4 1 3 2 4 100 1 3 4 2 6 7 2 8 1 5 3 4 159 158 160 155 156 157 119 ...
Страница 123: ...1 2 3 4 5 5 167 123 ...
Страница 129: ...129 ...
Страница 130: ...130 ...
Страница 131: ...131 ...

