96
Zarge einbauen
Blockzarge
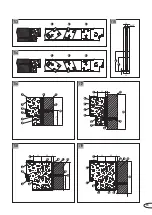
Anschweißmontage
in Mauerwerk / Beton
Zarge zusammenschrauben, falls sie nicht
verschweißt ist (siehe Seite 45).
Befestigungslaschen montieren: Dübel-
löcher durch die Befestigungslaschen
bohren und Dübel einsetzen.
Blockzarge in die Öffnung schieben und
entsprechend Meterriss ausrichten.
Blockzarge auf der Wandfläche an die obe-
ren Befestigungslaschen anschweißen.
Zarge gemäß Zulassung hinterfüllen (siehe
Seite 104ff.).
Restliche Befestigungslaschen und Zarge
miteinander verschweißen.
Die Schweißnähte müssen entschlackt,
kaltverzinkt und grundiert werden.
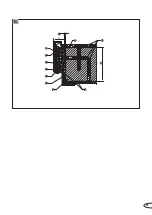
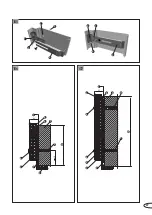
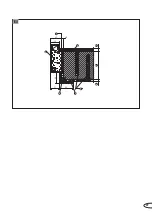
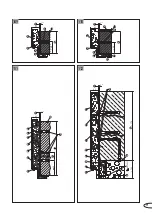
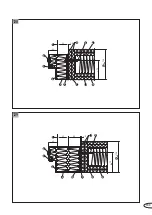
Blockzarge Typ 5 / 6
Bilder 121+122,
rechte Seite
(1) Baurichtmaß
(2) Blockzarge
(3) Zargendichtung
(4) Zargenhinterfüllung
(5) Dübel nach bauaufsichtl. Zulassung
(6) Befestigungslasche
(7) Anschweißdistanzstück
(8) Anschweißdistanz-Blendstück,
dreiseitig umlaufend
(9) Mauerwerk / Beton
(10) Wanddicke (s. Tabelle auf Seite 6)
(11) Bei Wanddicke >_ 240 mm zwei
weitere Schrauben mit Abstand 100
erforderlich
Fortsetzung auf Seite 48
Screw the frame together where it is not
welded (see page 45).
Install the fixation brackets: Drill the wall
plug holes through the fixation brackets
and insert the wall plugs.
Move the block frame into the opening and
line it up using the guide marking.
Weld the block frame against the wall sur-
face via the top fixation brackets.
Backfill the frame in accordance with
approval documentation (see page 104ff.).
Weld the remaining fixation brackets and
the frame together.
Paint must be removed form weld joints
and they must be cold galvanised and
primed.
Block frame Type 5 / 6
Images 121+122,
on right-hand side
(1) Coordinating size
(2) Block frame
(3) Frame sealing
(4) Frame backfilling
(5) Wall plug conforming to general
construction approval
(6) Fixation bracket
(7) Weld separation piece
(8) Welding spacer facing piece,
on three sides
(9) Masonry / concrete
(10) Wall thickness (see table on page 20)
(11) For wall thicknesses >_ 240 mm
two further screws are required
at a spacing of 100
Continued on page 48
Fitting frame
Block frame
Weld fixation
into masonry / concrete
Schroef het kozijn samen indien het niet is
gelast (zie pagina 45).
Monteer de bevestigingsankers: Boor de
pluggaten door de bevestigingsankers en
breng de pluggen in.
Schuif het blokkozijn in de opening en
breng in lijn met de meter markering.
Las het blokkozijn tegen het muuropper-
vlak middels de bovenste bevestigings-
ankers.
Zorg voor de vulling van het kozijn conform
het attest (zie pagina 104ff.).
Las de overige bevestigingsankers en het
kozijn aan elkaar.
De lasnaden moeten worden ontdaan van
verf, koud verzinkt en gegrond.
Blokkozijn type 5 / 6
Afbeeldingen 121+122,
rechterkant
(1) Bestelmaat
(2) Blokkozijn
(3) Kozijnafdichting
(4) Kozijnvulling
(5) Plug conform bouwkundige attest
(6) Bevestigingsanker
(7) Lasafstandsstuk
(8) Lasafstandsstuk, aan drie zijden
(9) Metselwerk / beton
(10) Muurdikte (zie tabel op pagina 34)
(11) Bij muurdikte >_ 240 mm zijn nog
twee schroeven met een afstand
van 100 nodig
Vervolg op pagina 48
Kozijn inbouwen
Blokkozijn
Lasmontage
in metselwerk / beton
Содержание NovoPorta Premio E-S-1
Страница 47: ...13 14 15 18 19 20 21 22 1 2 12 16 17 11 47 ...
Страница 49: ...2 1 25 23 24 1 1 2 3 4 5 1 49 ...
Страница 51: ...2 5 mm 30 31 1 29 28 27 26 51 ...
Страница 53: ...1 2 3 1 2 3 1 1 2 2 3 3 33 34 35 36 37 38 32 53 ...
Страница 55: ...41 42 43 44 45 1 1 8 9 4 2 3 7 6 10 5 11 45 5 5 lt 39 40 55 ...
Страница 57: ...84 5 45 34 50 48 3 2 1 4 5 6 5 6 7 8 46 57 ...
Страница 59: ...47 50 52 55 48 51 53 56 49 54 59 ...
Страница 61: ...60 62 65 58 61 63 66 59 64 57 61 ...
Страница 63: ...67 70 73 74 68 71 69 72 63 ...
Страница 65: ...45 39 48 1 6 8 9 5 10 2 3 4 75 65 ...
Страница 67: ...76 77 79 80 81 82 83 78 67 ...
Страница 69: ...1 1 5 5 1 1 1 4 3 2 7 6 8 5 9 10 42 53 1 3 2 1 84 85 86 87 69 ...
Страница 71: ...1 2 3 1 2 3 1 1 2 2 3 3 1 2 3 4 6 9 6 8 5 11 7 10 42 5 5 88 89 71 ...
Страница 73: ...1 9 4 2 3 5 11 10 7 6 8 42 5 5 93 94 90 91 92 73 ...
Страница 75: ...1 2 4 8 3 9 10 7 42 5 5 1 2 4 6 5 7 3 9 10 42 5 5 100 45 1 2 4 6 5 7 3 9 10 42 5 5 100 45 95 96 97 75 ...
Страница 77: ...1 4 7 3 2 5 8 9 6 42 5 5 100 98 77 ...
Страница 79: ...1 9 8 2 7 4 3 6 10 11 5 42 5 5 45 1 7 4 8 2 3 6 5 10 11 9 42 39 max 69 99 100 79 ...
Страница 81: ...1 9 7 6 3 10 8 2 4 5 11 12 42 5 5 1 2 1 2 101 81 ...
Страница 83: ...1 2 4 3 9 8 5 6 7 10 48 82 100 50 102 103 1 83 ...
Страница 85: ...1 10 9 7 4 3 2 6 8 5 11 12 42 5 5 104 85 ...
Страница 87: ...1 2 3 4 5 1 2 3 4 105 1 8 4 9 5 6 3 7 2 10 40 45 1 8 11 9 6 6 2 3 7 4 5 10 40 106 107 87 ...
Страница 89: ...1 7 6 9 5 6 2 4 8 42 x5 30 31 50 40 108 89 ...
Страница 95: ...97 61 1 3 2 6 5 4 7 120 95 ...
Страница 97: ...1 4 3 2 6 9 10 5 7 42 39 max 69 1 4 3 2 9 10 5 7 6 42 39 max 69 121 122 97 ...
Страница 101: ...1 8 6 5 9 4 2 3 7 42 39 max 69 127 101 ...
Страница 103: ...1 11 5 6 7 13 2 9 12 14 4 3 8 42 39 2 5 70 125 1 11 5 14 8 3 2 4 7 10 13 12 42 39 50 2 5 70 125 128 129 103 ...
Страница 105: ...130 131 132 105 ...
Страница 107: ...133 135 134 107 ...
Страница 115: ...4 1 2 3 4 1 2 3 9 7 2 3 8 4 1 149 150 151 152 6 1 5 115 ...
Страница 119: ...53 40 1 Alt 1 3 2 4 1 3 4 2 1 3 2 4 1 3 2 4 100 1 3 4 2 6 7 2 8 1 5 3 4 159 158 160 155 156 157 119 ...
Страница 123: ...1 2 3 4 5 5 167 123 ...
Страница 129: ...129 ...
Страница 130: ...130 ...
Страница 131: ...131 ...


