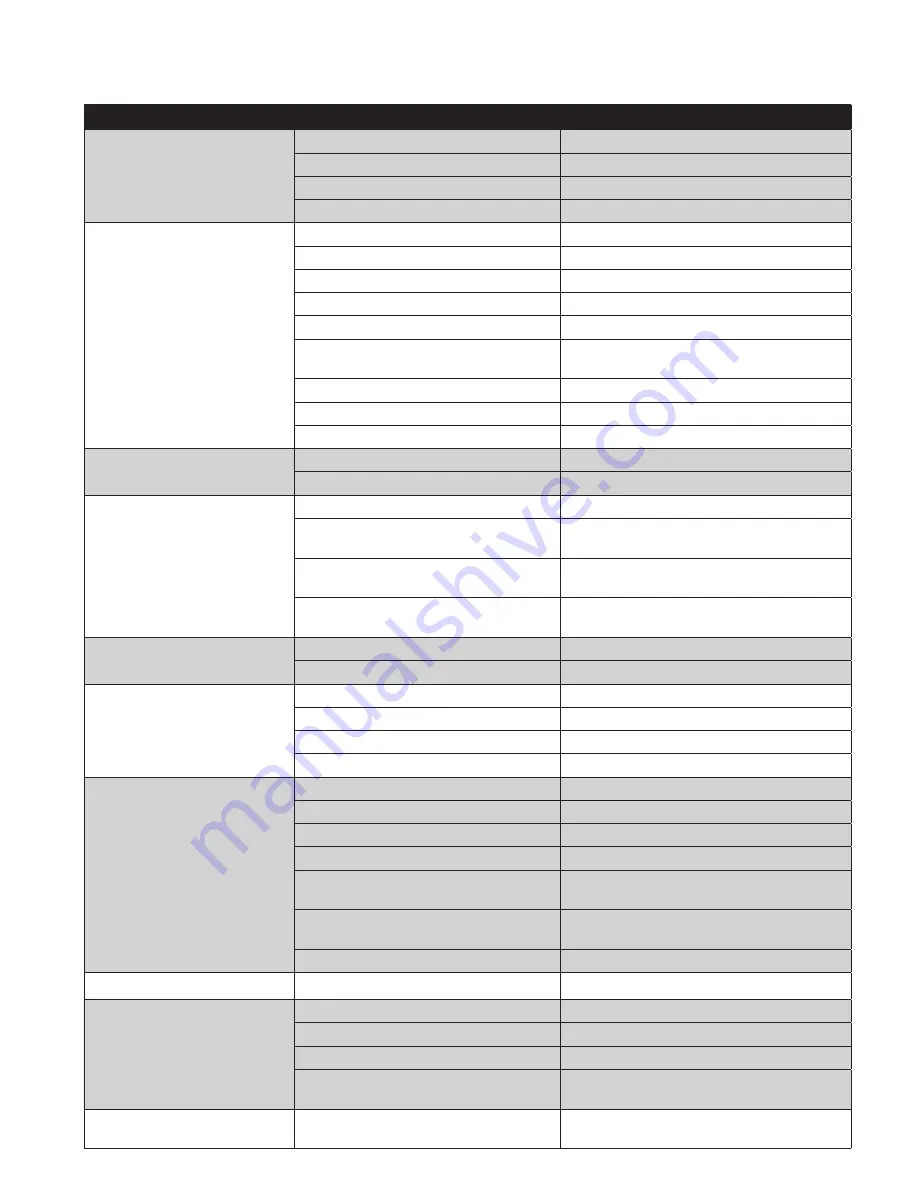
NOVO EconoFlo Series Скачать руководство пользователя страница 32

32

Issue

Possible Cause

Possible Solution

A.

 Unit fails to initiate a regeneration 

cycle.

1. No power supply.

Check electrical service, fuse, etc.

2. Defective circuit board.

Replace faulty parts.

3. Power failure.

Reset time of day.

4. Defective meter.

Replace turbine meter.

B.

 Water is hard.

1. By-pass valve open.

Close by-pass valve.

2. Out of salt or salt level below water level.

Add salt to tank.

3. Plugged injector / screen.

Clean parts.

4. Flow of water blocked to brine tank.

Check brine tank refill rate.

5. Hard water in hot water tank.

Repeat flushing of hot water tank required.

6. Leak between valve and central tube.

Check if central tube is cracked or o-ring is damaged.  

Replace faulty parts.

7. Internal valve leak.

Replace valve seals, spacer, and piston assembly.

8. Reserve capacity setting too low.

Increase reserve capacity.

9. Not enough capacity.

Increase salt dosage.

C.

 Salt use is high.

1. Refill time is too high.

Check refill time setting.

2. Defective flow control.

Replace.

D.

 Low water pressure.

1. Iron or scale build up in line feeding unit.

Clean pipes.

2. Iron build up inside valve or tank.

Clean control and add resin cleaner to clean bed.  Increase 

regeneration frequency.

3. Inlet of control plugged due to foreign 

material.

Remove piston and clean control valve.

4. Deteriorated resin.  (Maybe caused from high 

chlorine or chloramines.)

Re-bed unit.  Consider adding carbon pre-treatment.

E.

 Resin in drain line.

1. Air in water system.

Check well system for proper air eliminator control.

2. Incorrect drain line flow control (DLFC) button.

Check for proper flow rate.

F.

 Too much water in brine tank.

1. Plugged injector or screen.

Clean parts.

2. Valve not regenerating.

Replace circuit board, motor, or control.

3. Foreign material in brine valve.

Clean parts.

4. Unit not drawing brine.

Check for vacuum leak in brine line connections.

G.

 Unit fails to draw brine.

1. Drain line flow control is plugged.

Clean parts.

2. Injector or screen is plugged.

Clean parts.

3. Inlet pressure too low.

Increase pressure to 25 PSI.

4. Internal valve leak.

Replace seals, spacers, and piston assembly.

5. Safety valve closed.

Check for leak in brine line connections. Replace safety float 

assembly.

6. Vacuum leak in brine line.

Check for leak in brine line connections. Tighten all connec-

tions.

7. Drain line has kink in it or is blocked.

Check drain line.

H.

 Valve continuously cycles.

1. Defective position sensor PCB.

Replace faulty parts.

I.

 Flow to drain continuously.

1. Valve settings incorrect.

Check valve settings.

2. Foreign material in control valve.

Clean control.

3. Internal leak.

Replace seals, spacers, and piston assembly.

4. Piston is stuck in position.  Motor may have failed or 

gears have jammed or disengaged.

Check for power to motor.  Check for loose wire.  Check for 

jammed gears or gears disengaged.  Replace faulty parts.

J.

 Valve makes beeping sound.

1. The piston has not advanced to the next cycle 

position properly.

Check for power to motor.  Check for loose wire.  Check for 

jammed gears or gears disengaged.

TROUBLE SHOOTING

Содержание EconoFlo Series

Страница 1: ...nt maintenance procedures for the continued proper operation of your unit These MUST be performed regularly for your warranty to remain valid 2 Read all instructions carefully before operation 3 Avoid...

Страница 2: ...ING BRINE TANK 14 INSTALLATION 15 OPERATION STARTUP INSTRUCTIONS 17 DURING REGENERATION PLUMBING SYSTEM CLEAN UP 19 MAINTENANCE INSTRUCTIONS AND SCHEDULE 20 RES UP FEEDER INSTALLATION INSTRUCTIONS 22...

Страница 3: ...ls of iron manganese sulfur and sediments Damage to pistons seals and or spacers within the control valve are not covered in this warranty due to the harsh environment It is recommended to regularly i...

Страница 4: ...tener can run for days before running out of sodium and when it does the sodium is replenished in only a matter of a few hours When using a softener to remove both hardness and dissolved iron it is im...

Страница 5: ...g The manufacturer reserves the right to make product improvements which may deviate from the specifications and descriptions stated herein without obligation to change previously manufactured product...

Страница 6: ...3 159 7 20 3 x 37 4 21 9 x 21 9 x 72 2 385 0 174 2 BTR 200 Grey 53 0 200 3 23 0 x 40 5 24 6 x 24 6 x 84 700 0 316 7 All brine tanks come with salt grid safety float and brine well VDOW JULG V VWHP VD...

Страница 7: ...ollowing 1 Control Valve 2 Tank 3 Parts Box 4 Owners Manual 5 Drain Hose Clamp Not included in some brands 6 Brine Tank Assembly UNPACKING INSPECTION OF TWIN TANK MODEL 1 Control Valve 2 Tank Distribu...

Страница 8: ...Not Included with some models 5 Brine Tank Assembly 2 Control Valve 3 Media Box Qty depends on Models Distributor Tube Inside the Tank Media Inside the Tank Media Type will depend on what models were...

Страница 9: ...60010006 Bypass Tool 60010026 O Rings Attached 60090010 2 X 3 4 Elbow Adapter 60010630 Transformer 92360 Grease Packet UNPACKING INSPECTION OF CABINET MODEL 1 Cabinet with Valve attached EFC20 EFC30 2...

Страница 10: ...9 SEP 9 Q 2020 A OCT A 10 B NOV B 11 C DEC C 12 D 13 E 14 F 15 G 16 H 17 I 18 J 19 K 20 L 21 M 22 N 23 O 24 P 25 Q 26 R 27 S 28 T 29 U 30 V 31 Valve Serial CheckValveType andValve Serial The right St...

Страница 11: ...ge them Tools Required for Installation NOTE We recommend installation only be completed by a competent installer or plumbing professional to insure this product is installed in accordance with local...

Страница 12: ...alve and Screw theValve inside theTank such that the power cord doesn t get caught between the valve and the tank d Unplug the riser tube carefully position the valve over it and turn the valve into t...

Страница 13: ...valve solder the threaded copper adapters to the copper pipe and then usingTeflon tape screw the assembly into the bypass valve Do not use pipe thread compound as it may attack the material in the val...

Страница 14: ...he brine line already come installed from the factory Leave the other end of the brine line tube inside the brine tank f For installation of brine tank at the installation site pull the other end of t...

Страница 15: ...R FLOW NOTE Check local plumbing codes in regards to requirements for use of Check Valve or back flow prevention or vacuum breaker Connect Softener to the HousePlumbing Any solder joints near the valv...

Страница 16: ...CE THERE ARE RAISED ARROWS ON THE BYPASS ASSEMBLY INDICATING DIRECTION OF WATER FLOW Connect Softener to the HousePlumbing Any solder joints near the valve must be done before connecting any piping to...

Страница 17: ...ow Do not add salt to the brine tank at this time BTR 100 2 5 US Gallons 1 Connect theTransformer to theValve Plug the 12 volt transformer into a 120 VAC 60 Hz outlet Familiarize with Button Configura...

Страница 18: ...7 for Key Pad Configuration Calculating Compensated Hardness forWater where Iron or Manganese is Present From your water analysis Iron x 4 grains of hardness and or Manganese x 8 grains of hardness Th...

Страница 19: ...NG SYSTEM CLEAN UP The following procedures are guidelines only but have proven successful in most instances Under no circumstances should any procedure outlined below be followed if contrary to the a...

Страница 20: ...ILURE TO FOLLOW BASIC MAINTENANCE SCHEDULE WILL RESULT IN THE UNIT FAILING TO OPERATE PROPERLY AND VOID YOUR WARRANTY CAUTION Liquid brine will irritate eyes skin and open wounds gently wash exposed a...

Страница 21: ...alt in tank will both effect the units capacity and result in hardness slippage Should either of these situa tions happen or the unit fails to regenerate for any other reason please first correct the...

Страница 22: ...e Brine Well lid 2 Measure 2 inches from the top of the tank beside the oblong molding 6 Take off the cover of the Res Care bottle Insert the wick making sure it touches the bottom of the bottle Inser...

Страница 23: ...ditioner installation has a 3 valve bypass system first open the valve in the bypass line then close the valves at the conditioner inlet outlet b If the conditioner has an integral bypass valve put it...

Страница 24: ...seal spacer assembly grease it with silicone lubricant and put back in 5 Replace piston assembly followed by timer assembly 6 Replace the piston assembly and reverse following steps in this section Re...

Страница 25: ...ved before Step 2 If there are TB L and TB H meter type options in PCB programming select TB H Ifthevalveprogramminghasno TB L and TB H options changethemeterratiotothe newvalueasperchartbelow For 65...

Страница 26: ...Pull the drain line clip and remove the drain line elbow and washer 2 Clean replace drain line washer REPLACING PCBS Remove PCBs by removing the screws shown in the picture Drain Line Elbow REPLACE D...

Страница 27: ...istrubutor Valve Media Bed Softener Downflow SingleTank EFC T20 9 x 35 25010028 50010005 10010032 95600 EFC T30 10 x 35 25010043 50010005 95601 EFT40 10 x 47 25010070 50010005 95606 EFT60 12 x 52 2501...

Страница 28: ...0661 Screw ST4 2 12 LargeWafer 1 B17 60010662 Brine Gear 1 B16 60010663 Main Gear 1 B15 60010664 Bnt165 Drive Gear 1 B14 60010677 Idler Gear 1 B13 60010103 Spring Idler 1 B12 60010666 Spring Retainer...

Страница 29: ...ST3 5 13 2 60125 60010027 60032 Piston Assembly Seals and Spacer Kit BrineValve Item s For All Injector Assemblies and Brine Line and Drain LineWashers Part Part Description 60010110 BLFC BUTTON 2 0...

Страница 30: ...4 Bypass Shaft Outlet 1 20 60095614 05030013 O ring 30 2 65 2 19 60010740 05056149B Shaft Seal 2 18 60010069 05056172N Plug Clip Red 2 17 60010740 21709004 Shaft Clip Red 2 16 60010209 05056146M Bypas...

Страница 31: ...020019 TANK ASSY 935 NAT 1 25020020 TANK ASSY 1035 NAT 10 50010020 Distribution Assy 1035 1 9 18280 Top Cone 1 8 60095097 1 BypassValve Assy 1 7 765 ControlValve Grey 1 6 55010031 Softener Low Cover 1...

Страница 32: ...n drain line 1 Air in water system Check well system for proper air eliminator control 2 Incorrect drain line flow control DLFC button Check for proper flow rate F Too much water in brine tank 1 Plugg...

Страница 33: ...be adjusted by a qualified person MASTER PROGRAMMING PROGRAMMING LEVELS There are 3 levels to the valve program Master options and Factory options are typically adjusted at the factory These options l...

Страница 34: ...60 MIN BRINE 60 MIN RINSE 10 MIN RINSE 10 MIN RINSE 10 MIN REFILL 11 1 MIN REFILL 11 1 MIN REFILL 11 1 MIN REG TIME 12 00 AM BACKWASH 10 MIN RINSE 10 MIN SOFTENER MODE FILTER MODE CAUTION Thevaluesint...

Страница 35: ...0 0s 0 0s 0 0s 0 0s 0 0s REFILL 2 0s 2 0s 2 0s 2 0s 2 0s SALT SET 10 12 LBS 12 LBS 12 LBS 12 LBS PRESS UP DOWN FOR 8 SECONDS PRESS UP OR DOWNTO CHANGE PRESS SELECTTO ACCEPT METER DELAYED METER DELAYED...

Страница 36: ...Toll Free 1 877 288 9888 Regina SK Cambridge ON Carmel IN Pottstown PA Phoenix AZ 54816 11 18...

Отзывы: