


Page
10
1. HUMIDIFIER INSTALLATION
A.
LOCATION
(1)
The NORTEC NHRS series humidifier is designed to mount on a suitable wall or
vertical surface. Do not sit the unit on the floor due to clearances required for
plumbing and electrical connections. The clearance dimensions shown in this
manual are for reference only and are the minimum required for maintenance on
the humidifier. Local and national codes should be consulted before final location
and installation of the humidifier. NORTEC cannot accept responsibility for
installation code violations.
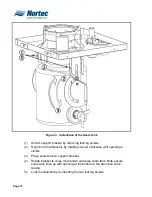
(2)
The location of the humidifier should be below the steam distributor. DO NOT
locate the humidifier any further then absolutely necessary from the steam
distributor location as net output will be reduced as a result of heat loss through
the steam line.
(3)
When possible, mount the NHRS humidifier at a height convenient for servicing.
B.
MOUNTING
(1)
The NHRS series humidifier is wall mounted using keyholes located on the back
of the unit‟s cabinetry. The keyholes are spaced 16 inches apart center to center
as per UL certification standard stud spacing dictates.
(2)
Use #12 x 3 in. screws. 2 screws are needed for a single unit (NHRS 010 to 090
lbs/hour). 3 screws are needed for a double unit (NHRS 135 to 180 lbs/hour).
Insert the screw 16 in. apart. Be sure the screws are level to each other. Proceed
to insert the screws into the studs until there is 1/4 in. of screw exposed. Ensure
the screws are properly anchored to the wall.
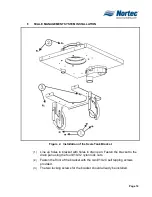
(3)
Raise the unit. Align the keyholes on the back of the unit with the screws. Place
the screws through the keyholes. Make sure the unit is level then tighten the
screws to secure the unit in place.
(4)
Once the unit is securely fixed to the wall, install the “L” shaped brackets into the
same studs the unit is attached to. Place the brackets on top of the unit, inline
with the studs. Using the appropriate sized wood screw fasten the “L” brackets
to the studs securing the unit from any upward motion.
Содержание NH Series
Страница 4: ......
Страница 6: ...Page 1 10 00 INTRODUCTION ...
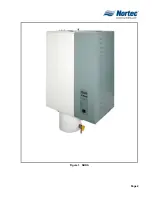
Страница 7: ...Page 2 Figure 1 NHRS ...
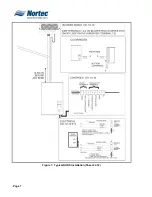
Страница 11: ...Page 6 Figure 6 Typical NHRS Installation Sheet 1 of 2 ...
Страница 12: ...Page 7 Figure 7 Typical NHRS Installation Sheet 2 of 2 ...
Страница 13: ...Page 8 THIS PAGE INTENTIONALLY LEFT BLANK ...
Страница 14: ...Page 9 10 10 INSTALLATION PROCEDURES ...
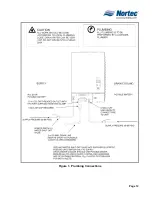
Страница 17: ...Page 12 Figure 1 Plumbing Connections ...
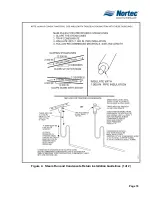
Страница 23: ...Page 18 Figure 4 Steam Run and Condensate Return Installation Guidelines 1 of 2 ...
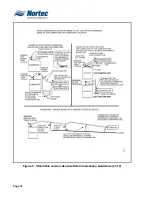
Страница 24: ...Page 19 Figure 5 Steam Run and Condensate Return Installation Guidelines 2 of 2 ...
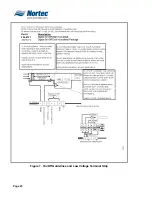
Страница 28: ...Page 23 Figure 7 On Off Guidelines and Low Voltage Terminal Strip 254 8731 ...
Страница 29: ...Page 24 Figure 8 NORTEC Control Guidelines and Wiring Optional ...
Страница 31: ...Page 26 Figure 10 NORTEC Humidity Transducer Guidelines and Wiring Option ...
Страница 41: ...Page 36 Figure 22 Typical SAM e Duct Installation ...
Страница 45: ...Page 40 Figure 25 SAM e Drain Water Cooling ...
Страница 49: ...Page 44 THIS PAGE INTENTIONALLY LEFT BLANK ...
Страница 50: ...Page 45 10 20 OPERATION ...
Страница 60: ...Page 55 Figure 2 Drain Interval Settings ...
Страница 63: ...Page 58 Figure 3 Control Signal Setting ...
Страница 65: ...Page 60 THIS PAGE INTENTIONALLY LEFT BLANK ...
Страница 66: ...Page 10 30 MAINTENANCE PROCEDURES ...
Страница 69: ...Page 6 Figure 1 Minor Maintenance with Scale Management Option ...
Страница 72: ...Page 6 10 40 TROUBLESHOOTING ...
Страница 75: ...Page Figure 1 Wiring Diagram ...
Страница 76: ...Page Figure 2 Wiring Diagram ...
Страница 81: ...Page 7 THIS PAGE INTENTIONALLY LEFT BLANK ...
Страница 82: ...Page 7 10 50 TECHNICAL ...
Страница 83: ...Page 7 Figure 1 Exploded View Plumbing ...
Страница 84: ...Page 7 Table 1 Exploded View Plumbing ...
Страница 85: ...Page Figure 2 Exploded View Electrical ...
Страница 86: ...Page Table 2 Exploded View Electrical ...


