121
Chapter 20
File Menu
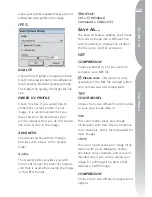
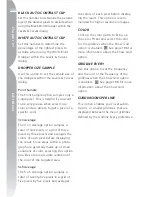
INTENT
The Intent option lets you choose one of
four different rendering intents to apply
to your image. The different rendering
intents control how colors from your
image are made to fit into the colors that
your printer can produce as indicated by
the printer profile.
Please note
: Different printer and
paper combinations, as well as the
different software used to create printer
profiles, benefit from different rendering
intents. Experiment with the different
rendering intents within your workflow
to find the option that works best.
The four options are:
Perceptual
This rendering intent attempts to
maintain the relationships of colors so
that the printed image appears natural
to the human eye. While this intent
maintains the relationships of colors,
the actual color values will be changed.
Saturation
The Saturation rendering intent
attempts to produce highly saturated
colors, but it may not produce accurate
colors in a photograph.
Relative Colorimetric
This rendering intent maps the white
point of the image to the white point
defined by the printer profile and repro-
duces accurately all of the colors that
are within the range of colors reproduc-
ible by your printer. All colors that are
outside of the range that your printer can
produce are shifted to the closest color
possible. This option preserves as many
natural colors as possible and is often the
best choice for printing photographs.
Absolute Colorimetric
This rendering intent is very similar to the
Relative Colorimetric, except that it does
not map the white point of the image to
the white point of the destination profile.
It is recommended that you use Absolute
Colorimetric if you want to proof your
images for a specific print device other
than your printer, since this rendering
intent will attempt to reproduce the
results of the output device, including the
effect of a different paper color.
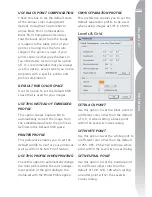
USE BLACK POINT COMPENSATION
Check this box to utilize Black Point
Compensation. This ensures that the
black point from the image is mapped to
the black point of your printer, ensuring
that the full color range of the printer is
used. If your prints contain either gray
shadows or too little detail, try turning
this option off. It is recommended that
you always use this option. The excep-
tion is if you notice any problems with a
specific printer and profile combination.
Once you have set the parameters
for the print, click the Print button.
The images selected to print will be
collected and rendered, if necessary,
and then printed.
Shortcut:
Ctrl + P (Windows)
C P (Mac OS)
Содержание 25338
Страница 1: ... N 5SER S ANUAL ...
Страница 6: ...iv C h ap ter 1 Ta ble o f Co nte nts iv ...
Страница 10: ...4 ...
Страница 13: ...7 ...
Страница 14: ...8 ...
Страница 17: ...11 C h ap ter 3 U Po in t Te ch nol og y Before After ...
Страница 21: ...15 ...
Страница 22: ...16 ...
Страница 33: ...27 ...
Страница 34: ...28 ...
Страница 41: ...35 ...
Страница 42: ...36 ...
Страница 44: ...38 ...
Страница 46: ...40 ...
Страница 48: ...42 ...
Страница 76: ...70 ...
Страница 79: ...73 ...
Страница 80: ...74 ...
Страница 85: ...79 ...
Страница 86: ...80 C h ap ter 1 3 80 ...
Страница 90: ...84 ...
Страница 93: ...87 ...
Страница 94: ...88 ...
Страница 101: ...95 ...
Страница 102: ...96 ...
Страница 104: ...98 ...
Страница 109: ...103 ...
Страница 110: ...104 ...
Страница 114: ...108 ...
Страница 118: ...112 ...
Страница 129: ...123 ...
Страница 130: ...124 ...
Страница 141: ...135 ...
Страница 142: ...136 ...
Страница 166: ...160 ...
Страница 178: ...172 ...
Страница 186: ...180 ...
Страница 199: ...193 ...
Страница 200: ...194 ...
Страница 207: ...201 ...
Страница 208: ...202 ...
Страница 211: ...205 ...
Страница 212: ...206 ...
Страница 215: ...209 ...
Страница 216: ...210 ...
Страница 232: ...226 ...
Страница 237: ...231 ...
Страница 238: ...232 ...
Страница 239: ......

